

How to use loguru log library in Python

1. Overview
The logging library in pythonlogging is a bit like log4j, but the configuration is usually more complicated. Building logs The server is not convenient either. The replacement for the standard library logging is loguru, which is much simpler to use.
The default output format is: time, level, module, line number and log content. loguru No need to manually create logger, it can be used out of the box, which is much easier to use than logging; in addition, the log output has built-in color functions, color and non-color The control is very convenient and more friendly.
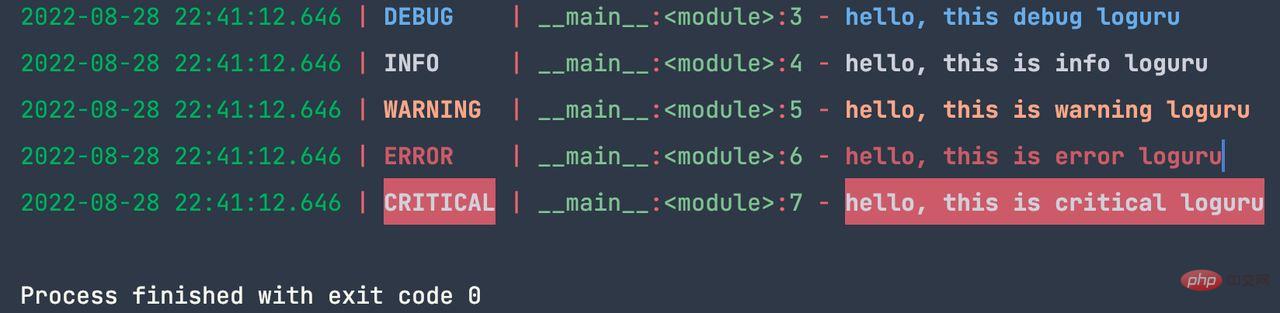
is a non-standard library and needs to be installed in advance. The command is: **pip3 install loguru****. **After installation, the simplest usage example is as follows: <div class="code" style="position:relative; padding:0px; margin:0px;"><pre class='brush:php;toolbar:false;'>from loguru import logger
logger.debug(&#39;hello, this debug loguru&#39;)
logger.info(&#39;hello, this is info loguru&#39;)
logger.warning(&#39;hello, this is warning loguru&#39;)
logger.error(&#39;hello, this is error loguru&#39;)
logger.critical(&#39;hello, this is critical loguru&#39;)</pre><div class="contentsignin">Copy after login</div></div>The above code output:
 The usage of log printing to file is also very simple, the code As follows:
from loguru import logger

logger.add('myloguru.log')

logger.debug('hello, this debug loguru')
logger.info('hello, this is info loguru')
logger.warning('hello, this is warning loguru')
logger.error('hello, this is error loguru')
logger.critical('hello, this is critical loguru')
When the above code is run, it can be printed to the console or to a file.
 2. Common usage
2.1. Display format
loguruThe default format is time, level, name Module and log content, the name module is hard-coded and is the __name__ variable of the current file. It is best not to modify this variable. When the project is more complex, it is very useful to customize the module name, which is easy to define and position and avoid getting bogged down in details. We can manually specify the module name through
. As follows: <div class="code" style="position:relative; padding:0px; margin:0px;"><pre class='brush:php;toolbar:false;'>import sys
from loguru import logger
logger.configure(handlers=[
{
"sink": sys.stderr,
"format": "{time:YYYY-MM-DD HH:mm:ss.SSS} |<lvl>{level:8}</>| {name} : {module}:{line:4} | <cyan>mymodule</> | - <lvl>{message}</>",
"colorize": True
},
])
logger.debug(&#39;this is debug&#39;)
logger.info(&#39;this is info&#39;)
logger.warning(&#39;this is warning&#39;)
logger.error(&#39;this is error&#39;)
logger.critical(&#39;this is critical&#39;)</pre><div class="contentsignin">Copy after login</div></div>
handlers: indicates the log output handle or destination,
"sink": sys.stderrsys.stderrindicates output to the command line terminal., means output to the terminal
"format":means log formatting.
"colorize":<lvl>{level:8}</>means displaying colors according to the log level. 8 means the output width is 8 characters.The output of the above code is:
True**: Indicates the display color.

2.2. Writing to files
Logs generally need to be persisted. In addition to outputting to the command line terminal, they also need to be written to files. The standard log library can configure the logger through the configuration file, and it can also be implemented in the code, but the process is relatively cumbersome. Loguru is relatively simple. Let's see how to implement this function in the code. The log code is as follows:
import sys
from loguru import logger
logger.configure(handlers=[
{
"sink": sys.stderr,
"format": "{time:YYYY-MM-DD HH:mm:ss.SSS} |<lvl>{level:8}</>| {name} : {module}:{line:4} | <cyan>mymodule</> | - <lvl>{message}</>",
"colorize": True
},
{
"sink": 'first.log',
"format": "{time:YYYY-MM-DD HH:mm:ss.SSS} |{level:8}| {name} : {module}:{line:4} | mymodule | - {message}",
"colorize": False
},
])
logger.debug('this is debug')
logger.info('this is info')
logger.warning('this is warning')
logger.error('this is error')
logger.critical('this is critical')logger.configurelogger.configureadds a new
The above only sets the log format throughhandlerand writes it to the log file . Usage is very simple.
, but the module name is not variable. In actual project development, different modules need to specify different module names when writing logs. Therefore, module names need to be parameterized to be more practical. The sample code is as follows: <div class="code" style="position:relative; padding:0px; margin:0px;"><pre class='brush:php;toolbar:false;'>import sys
from loguru import logger
logger.configure(handlers=[
{
"sink": sys.stderr,
"format": "{time:YYYY-MM-DD HH:mm:ss.SSS} |<lvl>{level:8}</>| {name} : {module}:{line:4} | <cyan>{extra[module_name]}</> | - <lvl>{message}</>",
"colorize": True
},
{
"sink": &#39;first.log&#39;,
"format": "{time:YYYY-MM-DD HH:mm:ss.SSS} |{level:8}| {name} : {module}:{line:4} | {extra[module_name]} | - {message}",
"colorize": False
},
])
log = logger.bind(module_name=&#39;my-loguru&#39;)
log.debug("this is hello, module is my-loguru")
log2 = logger.bind(module_name=&#39;my-loguru2&#39;)
log2.info("this is hello, module is my-loguru2")</pre><div class="contentsignin">Copy after login</div></div>
logger.bind(module_name='my-loguru')Parameterization of
loggingmodule_nameis realized through the bind method. bind returns a log object through which log output can be performed, so that log formats for different modules can be implemented.The function of customizing module names in loguru is a little different than the standard logging library. Through the bind method, the functions of standard logcan be easily realized. Moreover, structured logging can be easily implemented through
The output of the above code is as follows:bind and logger.configure.
 2.3.json log
Save it as a structure Converting to json format is very simple, just set the serialize=True parameter. The code is as follows: <div class="code" style="position:relative; padding:0px; margin:0px;"><pre class='brush:php;toolbar:false;'>from loguru import logger
logger.add(&#39;json.log&#39;, serialize=True, encoding=&#39;utf-8&#39;)
logger.debug(&#39;this is debug message&#39;)
logger.info(&#39;this is info message&#39;)
logger.error(&#39;this is error message&#39;)</pre><div class="contentsignin">Copy after login</div></div>The output content is as follows:
 2.4. Log wrapping
Log file support Three settings: loop, preserve, compress. The setup is also relatively simple. Especially the compression formats are very rich in support. Common compression formats are supported, such as: "gz", "bz2", "xz", "lzma", "tar", "tar.gz", "tar.bz2", "tar.xz" , "zip". The sample code is as follows: <div class="code" style="position:relative; padding:0px; margin:0px;"><pre class='brush:php;toolbar:false;'>from loguru import logger
logger.add("file_1.log", rotation="500 MB") # 自动循环过大的文件
logger.add("file_2.log", rotation="12:00") # 每天中午创建新文件
logger.add("file_3.log", rotation="1 week") # 一旦文件太旧进行循环
logger.add("file_X.log", retention="10 days") # 定期清理
logger.add("file_Y.log", compression="zip") # 压缩节省空间</pre><div class="contentsignin">Copy after login</div></div><h4 id="并发安全">2.5.并发安全</h4><p><code>loguru默认是线程安全的,但不是多进程安全的,如果使用了多进程安全,需要添加参数enqueue=True,样例代码如下:
logger.add("somefile.log", enqueue=True)
loguru另外还支持协程,有兴趣可以自行研究。
3.高级用法
3.1.接管标准日志logging
更换日志系统或者设计一套日志系统,比较难的是兼容现有的代码,尤其是第三方库,因为不能因为日志系统的切换,而要去修改这些库的代码,也没有必要。好在loguru可以方便的接管标准的日志系统。
样例代码如下:
import logging
import logging.handlers
import sys
from loguru import logger
handler = logging.handlers.SysLogHandler(address=('localhost', 514))
logger.add(handler)
class LoguruHandler(logging.Handler):
def emit(self, record):
try:
level = logger.level(record.levelname).name
except ValueError:
level = record.levelno
frame, depth = logging.currentframe(), 2
while frame.f_code.co_filename == logging.__file__:
frame = frame.f_back
depth += 1
logger.opt(depth=depth, exception=record.exc_info).log(level, record.getMessage())
logging.basicConfig(handlers=[LoguruHandler()], level=0, format='%(asctime)s %(filename)s %(levelname)s %(message)s',
datefmt='%Y-%M-%D %H:%M:%S')
logger.configure(handlers=[
{
"sink": sys.stderr,
"format": "{time:YYYY-MM-DD HH:mm:ss.SSS} |<lvl>{level:8}</>| {name} : {module}:{line:4} | [ModuleA] | - <lvl>{message}</>",
"colorize": True
},
])
log = logging.getLogger('root')
# 使用标注日志系统输出
log.info('hello wrold, that is from logging')
log.debug('debug hello world, that is from logging')
log.error('error hello world, that is from logging')
log.warning('warning hello world, that is from logging')
# 使用loguru系统输出
logger.info('hello world, that is from loguru')输出为:

3.2.输出日志到网络服务器
如果有需要,不同进程的日志,可以输出到同一个日志服务器上,便于日志的统一管理。我们可以利用自定义或者第三方库进行日志服务器和客户端的设置。下面介绍两种日志服务器的用法。
3.2.1.自定义日志服务器
日志客户端段代码如下:
# client.py
import pickle
import socket
import struct
import time

from loguru import logger

class SocketHandler:

    def __init__(self, host, port):
        self.sock = socket.socket(socket.AF_INET, socket.SOCK_STREAM)
        self.sock.connect((host, port))

    def write(self, message):
        record = message.record
        data = pickle.dumps(record)
        slen = struct.pack(">L", len(data))
        self.sock.send(slen + data)

logger.configure(handlers=[{"sink": SocketHandler('localhost', 9999)}])

while True:
    time.sleep(1)
    logger.info("Sending info message from the client")
    logger.debug("Sending debug message from the client")
logger.error("Sending error message from the client")日志服务器代码如下:
# server.py
import pickle
import socketserver
import struct
from loguru import logger
class LoggingStreamHandler(socketserver.StreamRequestHandler):
def handle(self):
while True:
chunk = self.connection.recv(4)
if len(chunk) < 4:
break
slen = struct.unpack('>L', chunk)[0]
chunk = self.connection.recv(slen)
while len(chunk) < slen:
chunk = chunk + self.connection.recv(slen - len(chunk))
record = pickle.loads(chunk)
level, message = record["level"].no, record["message"]
logger.patch(lambda record: record.update(record)).log(level, message)
server = socketserver.TCPServer(('localhost', 9999), LoggingStreamHandler)
server.serve_forever()运行结果如下:

3.2.2.第三方库日志服务器
日志客户端代码如下:
# client.py
import zmq
from zmq.log.handlers import PUBHandler
from loguru import logger

socket = zmq.Context().socket(zmq.PUB)
socket.connect("tcp://127.0.0.1:12345")
handler = PUBHandler(socket)logger.add(handler)
logger.info("Logging from client")日志服务器代码如下:
# server.py
import sys
import zmq
from loguru import logger

socket = zmq.Context().socket(zmq.SUB)
socket.bind("tcp://127.0.0.1:12345")
socket.subscribe("")
logger.configure(handlers=[{"sink": sys.stderr, "format": "{message}"}])

while True:
    _, message = socket.recv_multipart()
logger.info(message.decode("utf8").strip())3.3.与pytest结合
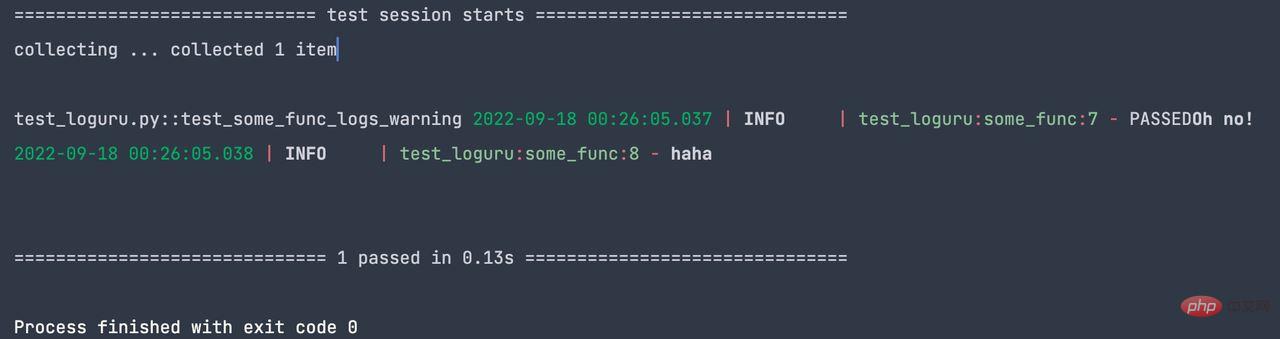
官方帮助中有一个讲解loguru与pytest结合的例子,讲得有点含糊不是很清楚。简单的来说,pytest有个fixture,可以捕捉被测方法中的logging日志打印,从而验证打印是否触发。
下面就详细讲述如何使用loguru与pytest结合的代码,如下:
import pytest
from _pytest.logging import LogCaptureFixture
from loguru import logger

def some_func(i, j):
    logger.info('Oh no!')
    logger.info('haha')
    return i + j

@pytest.fixture
def caplog(caplog: LogCaptureFixture):
    handler_id = logger.add(caplog.handler, format="{message}")
    yield caplog
    logger.remove(handler_id)

def test_some_func_logs_warning(caplog):
    assert some_func(-1, 3) == 2
assert "Oh no!" in caplog.text测试输出如下:
The above is the detailed content of How to use loguru log library in Python. For more information, please follow other related articles on the PHP Chinese website!

Hot AI Tools

Undresser.AI Undress
AI-powered app for creating realistic nude photos

AI Clothes Remover
Online AI tool for removing clothes from photos.

Undress AI Tool
Undress images for free

Clothoff.io
AI clothes remover

AI Hentai Generator
Generate AI Hentai for free.

Hot Article
Hot Tools

Notepad++7.3.1
Easy-to-use and free code editor

SublimeText3 Chinese version
Chinese version, very easy to use

Zend Studio 13.0.1
Powerful PHP integrated development environment

Dreamweaver CS6
Visual web development tools

SublimeText3 Mac version
God-level code editing software (SublimeText3)
Hot Topics
 1377
1377
 52
52

 Do mysql need to pay
Apr 08, 2025 pm 05:36 PM
Do mysql need to pay
Apr 08, 2025 pm 05:36 PM
MySQL has a free community version and a paid enterprise version. The community version can be used and modified for free, but the support is limited and is suitable for applications with low stability requirements and strong technical capabilities. The Enterprise Edition provides comprehensive commercial support for applications that require a stable, reliable, high-performance database and willing to pay for support. Factors considered when choosing a version include application criticality, budgeting, and technical skills. There is no perfect option, only the most suitable option, and you need to choose carefully according to the specific situation.
 HadiDB: A lightweight, horizontally scalable database in Python
Apr 08, 2025 pm 06:12 PM
HadiDB: A lightweight, horizontally scalable database in Python
Apr 08, 2025 pm 06:12 PM
HadiDB: A lightweight, high-level scalable Python database HadiDB (hadidb) is a lightweight database written in Python, with a high level of scalability. Install HadiDB using pip installation: pipinstallhadidb User Management Create user: createuser() method to create a new user. The authentication() method authenticates the user's identity. fromhadidb.operationimportuseruser_obj=user("admin","admin")user_obj.
 Navicat's method to view MongoDB database password
Apr 08, 2025 pm 09:39 PM
Navicat's method to view MongoDB database password
Apr 08, 2025 pm 09:39 PM
It is impossible to view MongoDB password directly through Navicat because it is stored as hash values. How to retrieve lost passwords: 1. Reset passwords; 2. Check configuration files (may contain hash values); 3. Check codes (may hardcode passwords).
 Python: Exploring Its Primary Applications
Apr 10, 2025 am 09:41 AM
Python: Exploring Its Primary Applications
Apr 10, 2025 am 09:41 AM
Python is widely used in the fields of web development, data science, machine learning, automation and scripting. 1) In web development, Django and Flask frameworks simplify the development process. 2) In the fields of data science and machine learning, NumPy, Pandas, Scikit-learn and TensorFlow libraries provide strong support. 3) In terms of automation and scripting, Python is suitable for tasks such as automated testing and system management.
 How to optimize MySQL performance for high-load applications?
Apr 08, 2025 pm 06:03 PM
How to optimize MySQL performance for high-load applications?
Apr 08, 2025 pm 06:03 PM
MySQL database performance optimization guide In resource-intensive applications, MySQL database plays a crucial role and is responsible for managing massive transactions. However, as the scale of application expands, database performance bottlenecks often become a constraint. This article will explore a series of effective MySQL performance optimization strategies to ensure that your application remains efficient and responsive under high loads. We will combine actual cases to explain in-depth key technologies such as indexing, query optimization, database design and caching. 1. Database architecture design and optimized database architecture is the cornerstone of MySQL performance optimization. Here are some core principles: Selecting the right data type and selecting the smallest data type that meets the needs can not only save storage space, but also improve data processing speed.
 The 2-Hour Python Plan: A Realistic Approach
Apr 11, 2025 am 12:04 AM
The 2-Hour Python Plan: A Realistic Approach
Apr 11, 2025 am 12:04 AM
You can learn basic programming concepts and skills of Python within 2 hours. 1. Learn variables and data types, 2. Master control flow (conditional statements and loops), 3. Understand the definition and use of functions, 4. Quickly get started with Python programming through simple examples and code snippets.
 How to use AWS Glue crawler with Amazon Athena
Apr 09, 2025 pm 03:09 PM
How to use AWS Glue crawler with Amazon Athena
Apr 09, 2025 pm 03:09 PM
As a data professional, you need to process large amounts of data from various sources. This can pose challenges to data management and analysis. Fortunately, two AWS services can help: AWS Glue and Amazon Athena.
 Can mysql connect to the sql server
Apr 08, 2025 pm 05:54 PM
Can mysql connect to the sql server
Apr 08, 2025 pm 05:54 PM
No, MySQL cannot connect directly to SQL Server. But you can use the following methods to implement data interaction: Use middleware: Export data from MySQL to intermediate format, and then import it to SQL Server through middleware. Using Database Linker: Business tools provide a more friendly interface and advanced features, essentially still implemented through middleware.
