
If you need to access multiple services to complete the processing of a request, such as when implementing the file upload function, first access the Redis cache, verify whether the user is logged in, and then receive the body in the HTTP message And save it on the disk, and finally write the file path and other information into the MySQL database. What would you do?
First, you can use the blocking API to write synchronization code and just serialize it step by step, but obviously at this time, one thread can only process one request at the same time. We know that the number of threads is limited. The limited number of threads makes it impossible to achieve tens of thousands of concurrent connections. Excessive thread switching also takes away CPU time, thereby reducing the number of requests that can be processed per second.
So in order to achieve high concurrency, you may choose an asynchronous framework, use non-blocking APIs to disrupt business logic into multiple callback functions, and achieve high concurrency through multiplexing. But at this time, the business code is required to pay too much attention to concurrency details and needs to maintain a lot of intermediate states. Once an error occurs in the code logic, it will fall into callback hell.
Therefore, not only will the bug rate be very high, but the development speed of the project will also be slowed down, and there will be risks in launching the product in a timely manner. If you want to take into account development efficiency while ensuring high concurrency, coroutines are the best choice. It can write code in a synchronous manner while maintaining an asynchronous operating mechanism. This not only achieves high concurrency but also shortens the development cycle. It is the future development direction of high-performance services.
Here we must point out that in terms of concurrency, using "coroutine" is not better than "non-blocking callback", and the reason why we choose coroutine is because its programming model is more Simple, similar to synchronization, which allows us to write asynchronous code in a synchronous manner. The "non-blocking callback" method is a test of programming skills. Once an error occurs, it is difficult to locate the problem, and it is easy to fall into callback hell, stack tearing and other dilemmas.
So you will find that the technology to solve high concurrency problems has been changing, from multi-process and multi-threading to asynchronous and coroutine. Facing different scenarios, they are all solving them in different ways. question. Let's take a look at how high-concurrency solutions have evolved, what problems coroutines solve, and how they should be applied.
We know that a host has limited resources, one CPU, one disk, and one network card. How can it serve hundreds of requests at the same time? Multi-process mode was the original solution. The kernel divides the execution time of the CPU into many time slices (timeslices). For example, 1 second can be divided into 100 10-millisecond time slices. Each time slice is then distributed to different processes. Usually, each process requires multiple time slice to complete a request.
In this way, although from a micro perspective, for example, the CPU can only execute one process in these 10 milliseconds, from a macro perspective, 100 time slices are executed in 1 second, so the requests in the process to which each time slice belongs are also obtained. Execution, which realizes concurrent execution of requests.
However, the memory space of each process is independent, so using multiple processes to achieve concurrency has two disadvantages: first, the management cost of the kernel is high, and second, it is impossible to simply synchronize data through memory, which is very difficult. inconvenient. As a result, the multi-threaded mode appeared. The multi-threaded mode solved these two problems by sharing the memory address space.
However, although a shared address space can easily share objects, it also leads to a problem, that is, when any thread makes an error, all threads in the process will crash together. This is why services such as Nginx that emphasize stability insist on using the multi-process mode.
But in fact, whether it is based on multi-process or multi-threading, it is difficult to achieve high concurrency, mainly for the following two reasons.
The following figure takes disk IO as an example to describe the switching method between two threads using the blocking method to read the disk in multi-threads.
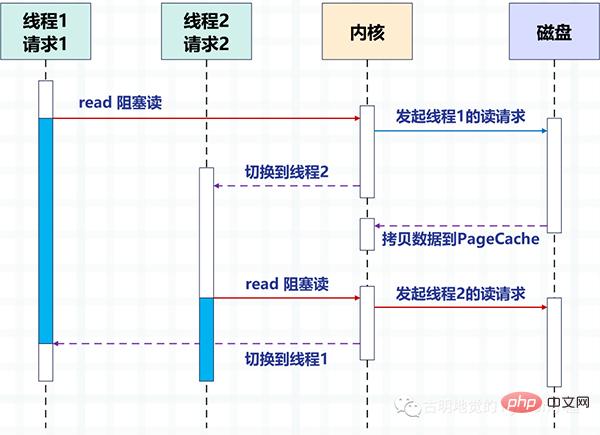
Through multi-threading, one thread processes one request to achieve concurrency. But it is obvious that the number of threads that the operating system can create is limited, because the more threads, the more resources will be occupied, and the cost of switching between threads is also relatively high, because it involves switching between kernel mode and user mode.
Then the question is, how can we achieve high concurrency? The answer is "Just leave the request switching work implemented by the kernel in the above figure to the user-mode code." Asynchronous programming implements request switching through application layer code, reducing switching costs and memory footprint.
Asynchronousization relies on IO multiplexing mechanisms, such as Linux's epoll. At the same time, the blocking method must be changed to a non-blocking method to avoid the huge consumption caused by kernel switching. High-performance services such as Nginx and Redis rely on asynchronousization to achieve millions of levels of concurrency.
The following figure describes how the request is switched after the non-blocking read of asynchronous IO is combined with the asynchronous framework.
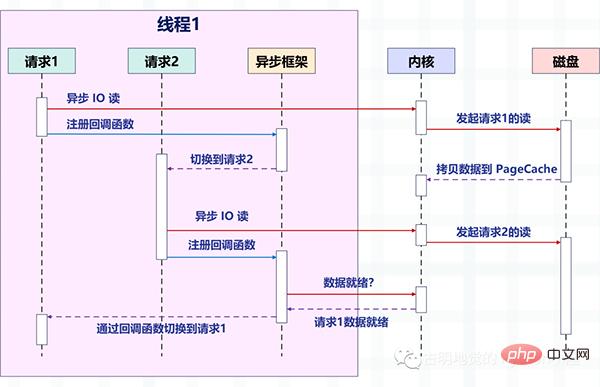
Pay attention to the changes in the picture. Before, one thread processed one request, but now one thread processes multiple requests. This is the "non-blocking callback" we talked about before. Way. It relies on the IO multiplexing provided by the operating system, such as Linux's epoll and BSD's kqueue.
The read and write operations at this time are equivalent to an event, and a corresponding callback function is registered for each event. Then the thread will not block (because the read and write operations are non-blocking at this time), but can Do other things, and then let epoll manage these events uniformly.
Once the event occurs (when it is readable and writable), epoll will notify the thread, and then the thread executes the callback function registered for the event.
For a better understanding, let’s take Redis as an example to introduce non-blocking IO and IO multiplexing.
127.0.0.1:6379> get name
"satori"
First of all, we can use the get command to get the value corresponding to a key. Then the question is, what happened to the Redis server above?
The server must first listen to the client's request (bind/listen), then establish a connection with the client (accept) when it arrives, read the client's request (recv) from the socket, and parse the request (parse), the request type parsed here is get, the key is "name", and then the corresponding value is obtained according to the key, and finally returned to the client, that is, writing data to the socket (send).
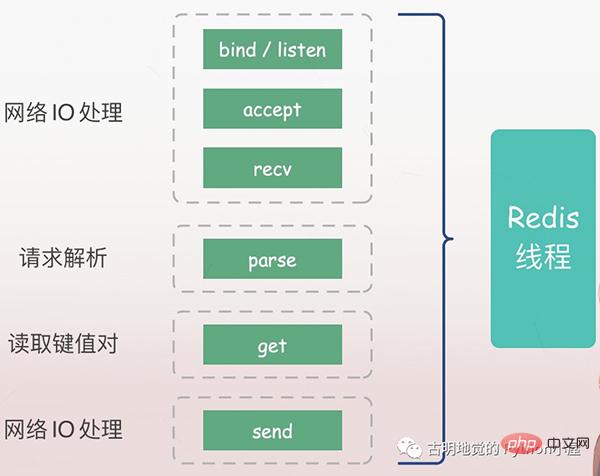
All the above operations are executed in sequence by the Redis main thread, but there are potential blocking points, namely accept and recv.
If it is blocking IO, when Redis detects a connection request from a client but fails to successfully establish a connection, the main thread will always be blocked in the accept function, causing other clients to be unable to establish with Redis. connect. Similarly, when Redis reads data from the client through recv, if the data has not arrived, the Redis main thread will always be blocked in the recv step, so this will cause Redis's efficiency to become low.
But obviously, Redis will not allow this to happen, because the above are all situations that blocking IO will face, and Redis uses non-blocking IO, that is, it will The socket is set to non-blocking mode. First, in the socket model, calling the socket() method will return the active socket; calling the bind() method to bind the IP and port, and then calling the listen() method to convert the active socket into a listening socket; finally, the listening socket The socket calls the accept() method to wait for the arrival of the client connection. When the connection is established with the client, it returns the connected socket, and then uses the connected socket to receive and send data to the client.
But note: We said that in the listen() step, the active socket will be converted into a listening socket, and the type of listening socket at this time is blocking. The blocking type of listening socket When the interface calls the accept() method, if there is no client to connect, it will always be in a blocked state, and the main thread will not be able to do other things at this time. Therefore, you can set it to non-blocking when listening(). When the non-blocking listening socket calls accept(), if no client connection request arrives, the main thread will not wait stupidly. , but will return directly and then do other things.
Similarly, when we create a connected socket, we can also set its type to non-blocking, because a blocked type of connected socket will also be blocked when calling send() / recv() It will be in a blocking state. For example, when the client does not send data, the connected socket will always be blocked in the rev() step. If it is a non-blocking type of connected socket, then when recv() is called but no data is received, there is no need to be in a blocking state, and you can also return directly to do other things.
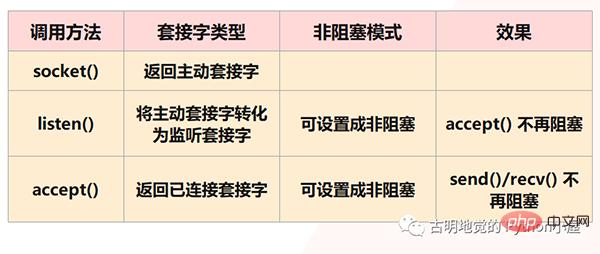
But there are two points to note:
1) Although accept() is no longer blocked, the Redis main thread can do other things when there is no client connection. But if a client comes to connect later, how does Redis know? Therefore, there must be a mechanism that can continue to wait for subsequent connection requests on the listening socket and notify Redis when the request arrives.
2) send() / recv() is no longer blocked. The reading and writing process equivalent to IO is no longer blocked. The reading and writing methods will be completed instantly and return, that is, it will read as much as it can read. We use the strategy of writing as much as we can to perform IO operations, which is obviously more in line with our pursuit of performance. But this will also face a problem, that is, when we perform a read operation, it is possible that only a part of the data has been read, and the remaining data has not been sent by the client. So when will this data be readable? The same is true for writing data. When the buffer is full and our data has not been written yet, when can the remaining data be written? Therefore, there must also be a mechanism that can continue to monitor the connected socket while the Redis main thread is doing other things, and notify Redis when there is data to read and write.
This can ensure that the Redis thread will not wait at the blocking point like in the basic IO model, nor will it be unable to process the actual arriving client connection request and readable and writable data. As mentioned above The mechanism is IO multiplexing.
The I/O multiplexing mechanism refers to a thread processing multiple IO streams, which is the select/poll/epoll we often hear. We won’t talk about the differences between these three. They all do the same thing, but there are differences in performance and implementation principles. select is supported by all systems, while epoll is only supported by Linux.
Simply put, when Redis only runs a single thread, this mechanism allows multiple listening sockets and connected sockets to exist in the kernel at the same time. The kernel will always monitor connection requests or data requests on these sockets. Once a request arrives, it will be handed over to the Redis thread for processing, thus achieving the effect of one Redis thread processing multiple IO streams.
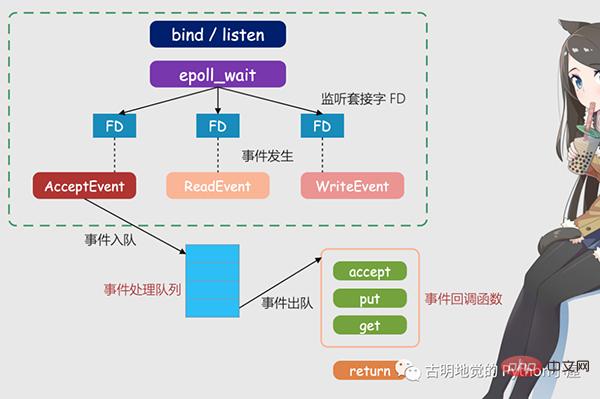
The above picture is the Redis IO model based on multiplexing. The FD in the picture is the socket, which can be a listening socket or a connected socket. Sockets, Redis will use the epoll mechanism to let the kernel help monitor these sockets. At this time, the Redis thread or the main thread will not be blocked on a specific socket, which means that it will not be blocked on a specific client request processing. Therefore, Redis can connect to multiple clients at the same time and process requests, thereby improving concurrency.
But in order to notify the Redis thread when a request arrives, epoll provides an event-based callback mechanism, that is, calling the corresponding processing function for the occurrence of different events.
So how does the callback mechanism work? Taking the above figure as an example, firstly, once epoll detects that a request arrives on FD, it will trigger the corresponding event. These events will be put into a queue, and the Redis main thread will continuously process the event queue. In this way, Redis does not need to keep polling whether there is a request, thus avoiding the waste of resources.
At the same time, when Redis processes events in the event queue, it will call the corresponding processing function, which implements event-based callbacks. Because Redis has been processing the event queue, it can respond to client requests in a timely manner and improve Redis's response performance.
Let’s take the actual connection request and data reading request as an example and explain it again. Connection requests and data read requests correspond to Accept events and Read events respectively. Redis registers accept and get callback functions for these two events respectively. When the Linux kernel monitors a connection request or data read request, it will trigger the Accept event or Read event, then notify the main thread and call back the registered accept function or get function.
Just like a patient going to the hospital to see a doctor, each patient (similar to a request) needs to be triaged, measured, registered, etc. before the doctor can actually diagnose. If all these tasks are done by doctors, their work efficiency will be very low. Therefore, the hospital has set up a triage station. The triage station will always handle these pre-diagnosis tasks (similar to the Linux kernel listening request), and then transfer it to the doctor for actual diagnosis. In this way, even a doctor (equivalent to the main thread of Redis) can Can be very efficient.
这里需要再补充一下:我们上面提到的异步 IO 不是真正意义上的异步 IO,而是基于 IO 多路复用实现的异步化。但 IO 多路复用本质上是同步 IO,只是它可以同时监听多个文件描述符,一旦某个描述符的读写操作就绪,就能够通知应用程序进行相应的读写操作。至于真正意义的异步 IO,操作系统也是支持的,但支持的不太理想,所以现在使用的都是 IO 多用复用,并代指异步 IO。
必须要承认的是,编写这种异步化代码能够带来很高的性能收益,Redis、Nginx 已经证明了这一点。
但是这种编程模式,在实际工作中很容易出错,因为所有阻塞函数,都需要通过非阻塞的系统调用加上回调注册的方式拆分成两个函数。说白了就是我们的逻辑不能够直接执行,必须把它们放在一个单独的函数里面,然后这个函数以回调的方式注册给 IO 多路复用。
这种编程模式违反了软件工程的内聚性原则,函数之间同步数据也更复杂。特别是条件分支众多、涉及大量系统调用时,异步化的改造工作会非常困难,尽管它的性能很高。
下面我们用 Python 编写一段代码,实际体验一下这种编程模式,看看它复杂在哪里。
from urllib.parse import urlparse
import socket
from io import BytesIO
# selectors 里面提供了多种"多路复用器"
# 除了 select、poll、epoll 之外
# 还有 kqueue,这个是针对 BSD 平台的
try:
 from selectors import (
 SelectSelector,
 PollSelector,
 EpollSelector,
 KqueueSelector
 )
except ImportError:
 pass
# 由于种类比较多,所以提供了DefaultSelector
# 会根据当前的系统种类,自动选择一个合适的多路复用器
from selectors import (
 DefaultSelector,
 EVENT_READ,# 读事件
 EVENT_WRITE,# 写事件
)
class RequestHandler:
 """
 向指定的 url 发请求
 获取返回的内容
 """
 selector = DefaultSelector()
 tasks = {"unfinished": 0}
 def __init__(self, url):
 """
 :param url: http://localhost:9999/v1/index
 """
 self.tasks["unfinished"] += 1
 url = urlparse(url)
 # 根据 url 解析出 域名、端口、查询路径
 self.netloc = url.netloc# 域名:端口
 self.path = url.path or "/"# 查询路径
 # 创建 socket
 self.client = socket.socket()
 # 设置成非阻塞
 self.client.setblocking(False)
 # 用于接收数据的缓存
 self.buffer = BytesIO()
 def get_result(self):
 """
 发送请求,进行下载
 :return:
 """
 # 连接到指定的服务器
 # 如果没有 : 说明只有域名没有端口
 # 那么默认访问 80 端口
 if ":" not in self.netloc:
 host, port = self.netloc, 80
 else:
 host, port = self.netloc.split(":")
 # 由于 socket 非阻塞,所以连接可能尚未建立好
 try:
 self.client.connect((host, int(port)))
 except BlockingIOError:
 pass
 # 我们上面是建立连接,连接建立好就该发请求了
 # 但是连接什么时候建立好我们并不知道,只能交给操作系统
 # 所以我们需要通过 register 给 socket 注册一个回调函数
 # 参数一:socket 的文件描述符
 # 参数二:事件
 # 参数三:当事件发生时执行的回调函数
 self.selector.register(self.client.fileno(),
EVENT_WRITE,
self.send)
 # 表示当 self.client 这个 socket 满足可写时
 # 就去执行 self.send
 # 翻译过来就是连接建立好了,就去发请求
 # 可以看到,一个阻塞调用,我们必须拆成两个函数去写
 def send(self, key):
 """
 连接建立好之后,执行的回调函数
 回调需要接收一个参数,这是一个 namedtuple
 内部有如下字段:'fileobj', 'fd', 'events', 'data'
 key.fd 就是 socket 的文件描述符
 key.data 就是给 socket 绑定的回调
 :param key:
 :return:
 """
 payload = (f"GET {self.path} HTTP/1.1rn"
f"Host: {self.netloc}rn"
"Connection: closernrn")
 # 执行此函数,说明事件已经触发
 # 我们要将绑定的回调函数取消
 self.selector.unregister(key.fd)
 # 发送请求
 self.client.send(payload.encode("utf-8"))
 # 请求发送之后就要接收了,但是啥时候能接收呢?
 # 还是要交给操作系统,所以仍然需要注册回调
 self.selector.register(self.client.fileno(),
EVENT_READ,
self.recv)
 # 表示当 self.client 这个 socket 满足可读时
 # 就去执行 self.recv
 # 翻译过来就是数据返回了,就去接收数据
 def recv(self, key):
 """
 数据返回时执行的回调函数
 :param key:
 :return:
 """
 # 接收数据,但是只收了 1024 个字节
 # 如果实际返回的数据超过了 1024 个字节怎么办?
 data = self.client.recv(1024)
 # 很简单,只要数据没收完,那么数据到来时就会可读
 # 那么会再次调用此函数,直到数据接收完为止
 # 注意:此时是非阻塞的,数据有多少就收多少
 # 没有接收的数据,会等到下一次再接收
 # 所以这里不能写 while True
 if data:
 # 如果有数据,那么写入到 buffer 中
 self.buffer.write(data)
 else:
 # 否则说明数据读完了,那么将注册的回调取消
 self.selector.unregister(key.fd)
 # 此时就拿到了所有的数据
 all_data = self.buffer.getvalue()
 # 按照 rnrn 进行分隔得到列表
 # 第一个元素是响应头,第二个元素是响应体
 result = all_data.split(b"rnrn")[1]
 print(f"result: {result.decode('utf-8')}")
 self.client.close()
 self.tasks["unfinished"] -= 1
 @classmethod
 def run_until_complete(cls):
 # 基于 IO 多路复用创建事件循环
 # 驱动内核不断轮询 socket,检测事件是否发生
 # 当事件发生时,调用相应的回调函数
 while cls.tasks["unfinished"]:
 # 轮询,返回事件已经就绪的 socket
 ready = cls.selector.select()
 # 这个 key 就是回调里面的 key
 for key, mask in ready:
 # 拿到回调函数并调用,这一步需要我们手动完成
 callback = key.data
 callback(key)
 # 因此当事件发生时,调用绑定的回调,就是这么实现的
 # 整个过程就是给 socket 绑定一个事件 + 回调
 # 事件循环不停地轮询检测,一旦事件发生就会告知我们
 # 但是调用回调不是内核自动完成的,而是由我们手动完成的
 # "非阻塞 + 回调 + 基于 IO 多路复用的事件循环"
# 所有框架基本都是这个套路一个简单的 url 获取,居然要写这么多代码,而它的好处就是性能高,因为不用把时间浪费在建立连接、等待数据上面。只要有事件发生,就会执行相应的回调,极大地提高了 CPU 利用率。而且这是单线程,也没有线程切换带来的开销。
那么下面测试一下吧。
import time
start = time.perf_counter()
for _ in range(10):
 # 这里面只是注册了回调,但还没有真正执行
 RequestHandler(url="https://localhost:9999/index").get_result()
# 创建事件循环,驱动执行
RequestHandler.run_until_complete()
end = time.perf_counter()
print(f"总耗时: {end - start}")我用 FastAPI 编写了一个服务,为了更好地看到现象,服务里面刻意 sleep 了 1 秒。然后发送十次请求,看看效果如何。
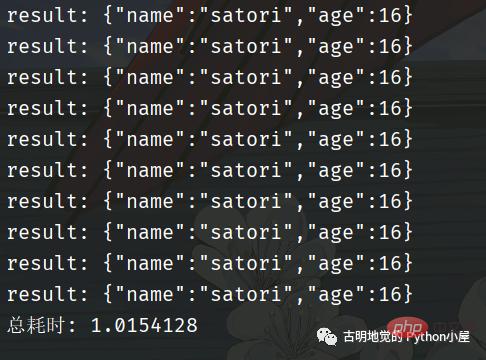
总共耗时 1 秒钟,我们再采用同步的方式进行编写,看看效果如何。
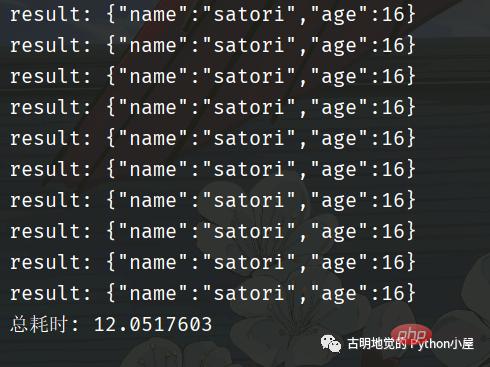
可以看到回调的这种写法性能非常高,但是它和我们传统的同步代码的写法大相径庭。如果是同步代码,那么会先建立连接、然后发送数据、再接收数据,这显然更符合我们人类的思维,逻辑自上而下,非常自然。
但是回调的方式,就让人很不适应,我们在建立完连接之后,不能直接发送数据,必须将发送数据的逻辑放在一个单独的函数(方法)中,然后再将这个函数以回调的方式注册进去。
同理,在发送完数据之后,也不能立刻接收。同样要将接收数据的逻辑放在一个单独的函数中,然后再以回调的方式注册进去。
所以好端端的自上而下的逻辑,因为回调而被分割的四分五裂,这种代码在编写和维护的时候是非常痛苦的。
比如回调可能会层层嵌套,容易陷入回调地狱,如果某一个回调执行出错了怎么办?代码的可读性差导致不好排查,即便排查到了也难处理。
另外,如果多个回调需要共享一个变量该怎么办?因为回调是通过事件循环调用的,在注册回调的时候很难把变量传过去。简单的做法是把该变量设置为全局变量,或者说多个回调都是某个类的成员函数,然后把共享的变量作为一个属性绑定在 self 上面。但当逻辑复杂时,就很容易导致全局变量满天飞的问题。
所以这种模式就使得开发人员在编写业务逻辑的同时,还要关注并发细节。
因此使用回调的方式编写异步化代码,虽然并发量能上去,但是对开发者很不友好;而使用同步的方式编写同步代码,虽然很容易理解,可并发量却又上不去。那么问题来了,有没有一种办法,能够让我们在享受异步化带来的高并发的同时,又能以同步的方式去编写代码呢?也就是我们能不能以同步的方式去编写异步化的代码呢?
答案是可以的,使用「协程」便可以办到。协程在异步化之上包了一层外衣,兼顾了开发效率与运行效率。
协程与异步编程相似的地方在于,它们必须使用非阻塞的系统调用与内核交互,把切换请求的权力牢牢掌握在用户态的代码中。但不同的地方在于,协程把异步化中的两段函数,封装为一个阻塞的协程函数。
这个函数执行时,会使调用它的协程无感知地放弃执行权,由协程框架切换到其他就绪的协程继续执行。当这个函数的结果满足后,协程框架再选择合适的时机,切换回它所在的协程继续执行。我们还是以读取磁盘文件为例,看一张协程的示意图:
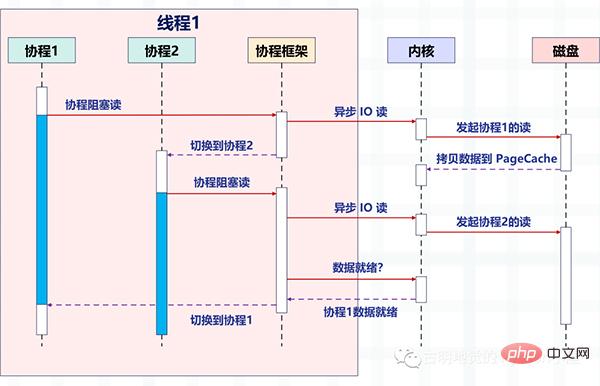
看起来非常棒,所以异步化是通过回调函数来完成请求切换的,业务逻辑与并发实现关联在一起,很容易出错。而协程不需要什么「回调函数」,它允许用户调用「阻塞的」协程方法,用同步编程方式写业务逻辑。
再回到之前的那个 socket 发请求的例子,我们用协程的方式重写一遍,看看它和基于回调的异步化编程有什么区别?
import time
from urllib.parse import urlparse
import asyncio
async def download(url):
 url = urlparse(url)
 # 域名:端口
 netloc = url.netloc
 if ":" not in netloc:
 host, port = netloc, 80
 else:
 host, port = netloc.split(":")
 path = url.path or "/"
 # 创建连接
 reader, writer = await asyncio.open_connection(host, port)
 # 发送数据
 payload = (f"GET {path} HTTP/1.1rn"
f"Host: {netloc}rn"
"Connection: closernrn")
 writer.write(payload.encode("utf-8"))
 await writer.drain()
 # 接收数据
 result = (await reader.read()).split(b"rnrn")[1]
 writer.close()
 print(f"result: {result.decode('utf-8')}")
# 以上就是发送请求相关的逻辑
# 我们看到代码是自上而下的,没有涉及到任何的回调
# 完全就像写同步代码一样
async def main():
 # 发送 10 个请求
 await asyncio.gather(
 *[download("http://localhost:9999/index")
 for _ in range(10)]
 )
start = time.perf_counter()
# 同样需要创建基于 IO 多路复用的事件循环
# 协程会被丢进事件循环中,依靠事件循环驱动执行
loop = asyncio.get_event_loop()
loop.run_until_complete(main())
end = time.perf_counter()
print(f"总耗时: {end - start}")代码逻辑很好理解,和我们平时编写的同步代码没有太大的区别,那么它的效率如何呢?
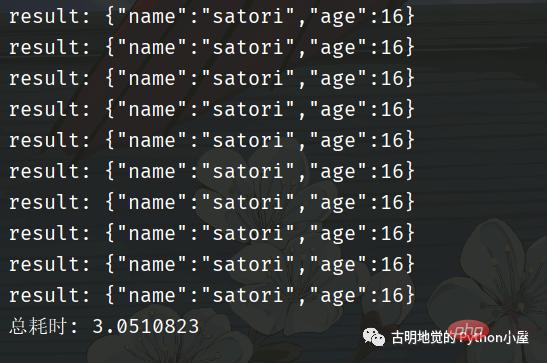
我们看到用了 3 秒钟,比同步的方式快,但是比异步化的方式要慢。因为一开始就说过,协程并不比异步化的方式快,但我们之所以选择它,是因为它的编程模型更简单,能够让我们以同步的方式编写异步的代码。如果是基于回调方式的异步化,虽然性能很高(比如 Redis、Nginx),但对开发者是一个挑战。
回到上面那个协程的例子中,我们一共发了 10 个请求,并在可能阻塞的地方加上了 await。意思就是,在执行某个协程 await 后面的代码时如果阻塞了,那么该协程会主动将执行权交给事件循环,然后事件循环再选择其它的协程执行。并且协程本质上也是个单线程,虽然协程可以有多个,但是背后的线程只有一个。
那么问题来了,协程的切换是如何完成的呢?
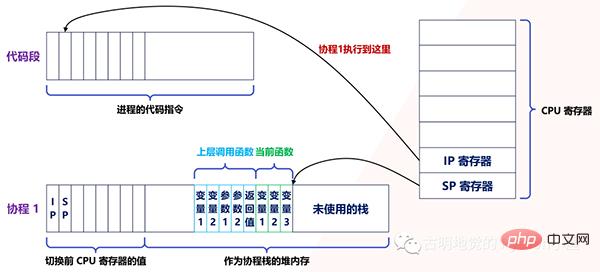
实际上,用户态的代码切换协程,与内核切换线程的原理是一样的。内核通过管理 CPU 的寄存器来切换线程,我们以最重要的栈寄存器和指令寄存器为例,看看协程切换时如何切换程序指令与内存。
每个线程有独立的栈,而栈既保留了变量的值,也保留了函数的调用关系、参数和返回值,CPU 中的栈寄存器 SP 指向了当前线程的栈,而指令寄存器 IP 保存着下一条要执行的指令地址。
因此,从线程 1 切换到线程 2 时,首先要把 SP、IP 寄存器的值为线程 1 保存下来,再从内存中找出线程 2 上一次切换前保存好的寄存器的值,并写入 CPU 的寄存器,这样就完成了线程切换(其他寄存器也需要管理、替换,原理与此相同,不再赘述)。
协程的切换与此相同,只是把内核的工作转移到协程框架来实现而已,下图是协程切换前的状态:
当遇到阻塞时会进行协程切换,从协程 1 切换到协程 2 后的状态如下图所示:
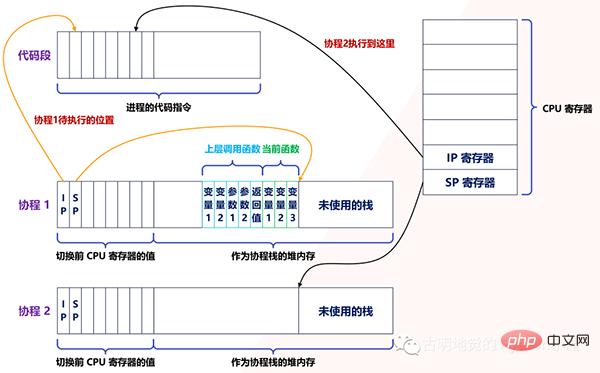
创建协程时,会从进程的堆中分配一段内存作为协程的栈。线程的栈有 8MB,而协程栈的大小通常只有几十 KB。而且,C 库内存池也不会为协程预分配内存,它感知不到协程的存在。这样,更低的内存占用空间为高并发提供了保证,毕竟十万并发请求,就意味着 10 万个协程。
另外栈缩小后,就尽量不要使用递归函数,也不能在栈中申请过多的内存,这是实现高并发必须付出的代价。当然啦,如果能像 Go 一样,协程栈可以自由伸缩的话,就不用担心了。
由此可见,协程就是用户态的线程。然而,为了保证所有切换都在用户态进行,协程必须重新封装所有的阻塞系统调用,否则一旦协程触发了线程切换,会导致这个线程进入休眠状态,进而其上的所有协程都得不到执行。
For example, the ordinary sleep function will make the current thread sleep, and the kernel will wake up the thread. After the coroutine transformation, sleep will only make the current coroutine sleep, and the coroutine framework will wake up the coroutine after a specified time, so in We cannot write time.sleep in Python's coroutine, but should write asyncio.sleep. For another example, mutex locks between threads are implemented using semaphores, and semaphores can also cause threads to sleep. After mutex locks are transformed into coroutines, the framework will also coordinate and synchronize the execution of each coroutine.
So the high performance of coroutines is based on the fact that switching must be completed by user-mode code. This requires that the coroutine ecosystem be complete and cover common components as much as possible.
Let’s take Python as an example. I often see people writing requests.get in async def to send requests. This is wrong. The underlying call to requests.get is a synchronously blocked socket, which will cause the thread to block. Once the thread blocks, it will cause all coroutines to block, which is equivalent to serialization. So there is no point in putting it inside async def, the correct way is to use aiohttp or httpx. Therefore, if you want to use coroutines, you need to re-encapsulate the underlying system calls. If there is no other way, throw them into the thread pool to run.
Another example is the client SDK officially provided by MySQL. It uses blocking sockets for network access, which will cause threads to sleep. You must use non-blocking sockets to transform the SDK into coroutine functions before they can be used in coroutines. .
Of course, not all functions can be transformed with coroutines, such as asynchronous IO reading from disks. Although it is non-blocking, it cannot use PageCache, which reduces system throughput. If you use cached IO to read files, blocking may occur when PageCache is not hit. At this time, if you have higher performance requirements, you need to combine threads with coroutines, throw potentially blocking operations into the thread pool for execution, and work with coroutines through the producer/consumer model.
In fact, in the face of multi-core systems, coroutines and threads also need to work together. Because the carrier of coroutines is threads, and a thread can only use one CPU at a time, by opening more threads and distributing all coroutines among these threads, CPU resources can be fully used. If you have experience using the Go language, you should know this very well.
In addition, in order to let the coroutine get more CPU time, you can also set the priority of the thread. For example, in Linux, set the priority of the thread to -20, and you can get it every time. Longer time slice. In addition, the CPU cache also has an impact on program performance. In order to reduce the proportion of CPU cache failures, threads can also be bound to a CPU to increase the probability of hitting the CPU cache when the coroutine is executed.
Although it has been said here that the coroutine framework is scheduling coroutines, you will find that many coroutine libraries only provide basic methods such as creating, suspending, and resuming execution, and there is no coroutine framework. You need The business code schedules the coroutine by itself. This is because these general coroutine libraries (such as asyncio) are not specifically designed for servers. The establishment of a client network connection in the server can drive the creation of coroutines and terminate with the end of the request.
When the running conditions of the coroutine are not met, the multiplexing framework will suspend it and select another coroutine for execution according to the priority policy. Therefore, when using coroutines to implement high-concurrency services on the server side, you not only choose a coroutine library, but also find a coroutine framework (such as Tornado) that combines IO multiplexing from its ecosystem, which can speed up development.
Broadly speaking, coroutines are a lightweight concurrency model, which is relatively high-level. But in a narrow sense, a coroutine is to call a function that can be paused and switched. For example, what we use async def to define is a coroutine function, which is essentially a function. When calling the coroutine function, we will get a coroutine.
Throw the coroutine into the event loop, and the event loop drives the execution. Once blocked, the execution right is actively handed over to the event loop, and the event loop drives other coroutines to execute. So there is only one thread from beginning to end, and the coroutine is just simulated in the user mode by referring to the structure of the thread.
So when calling a normal function, all internal code logic will be executed until all is completed; while calling a coroutine function, if there is internal blocking, it will switch to other coroutines.
But there is an important prerequisite for being able to switch when a coroutine is blocked, that is, this blocking cannot involve any system calls, such as time.sleep, synchronous sockets, etc. These all require the participation of the kernel, and once the kernel participates, the blocking caused is not just as simple as blocking a certain coroutine (the OS is not aware of the coroutine), but will cause the thread to block. Once a thread blocks, all coroutines above it will block. Since coroutines use threads as carriers, the actual execution must be threads. If each coroutine blocks the thread, then it is not equivalent to a string. Is it done?
So if you want to use coroutines, you must re-encapsulate the blocked system calls. Let’s give a chestnut:
@app.get(r"/index1")
async def index1():
 time.sleep(30)
 return "index1"
@app.get(r"/index2")
async def index2():
 return "index2"
这是一个基于 FastAPI 编写的服务,我们只看视图函数。如果我们先访问 /index1,然后访问 /index2,那么必须等到 30 秒之后,/index2 才会响应。因为这是一个单线程,/index1 里面的 time.sleep 会触发系统调用,使得整个线程都进入阻塞,线程一旦阻塞了,所有的协程就都别想执行了。
如果将上面的例子改一下:
@app.get(r"/index1")
async def index():
 await asyncio.sleep(30)
 return "index1"
@app.get(r"/index2")
async def index():
 return "index2"
访问 /index1 依旧会进行 30 秒的休眠,但此时再访问 /index2 的话则是立刻返回。原因是 asyncio.sleep(30) 重新封装了阻塞的系统调用,此时的休眠是在用户态完成的,没有经过内核。换句话说,此时只会导致协程休眠,不会导致线程休眠,那么当访问 /index2 的时候,对应的协程会立刻执行,然后返回结果。
同理我们在发网络请求的时候,也不能使用 requests.get,因为它会导致线程阻塞。当然,还有一些数据库的驱动,例如 pymysql, psycopg2 等等,这些阻塞的都是线程。为此,在开发协程项目时,我们应该使用 aiohttp, asyncmy, asyncpg 等等。
为什么早期 Python 的协程都没有人用,原因就是协程想要运行,必须基于协程库 asyncio,但问题是 asyncio 只支持发送 TCP 请求(对于协程库而言足够了)。如果你想通过网络连接到某个组件(比如数据库、Redis),只能手动发 TCP 请求,而且这些组件对发送的数据还有格式要求,返回的数据也要手动解析,可以想象这是多么麻烦的事情。
如果想解决这一点,那么必须基于 asyncio 重新封装一个 SDK。所以同步 SDK 和协程 SDK 最大的区别就是,一个是基于同步阻塞的 socket,一个是基于 asyncio。比如 redis 和 aioredis,连接的都是 Redis,只是在 TCP 层面发送数据的方式不同,至于其它方面则是类似的。
而早期,还没有出现这些协程 SDK,自己封装的话又是一个庞大的工程,所以 Python 的协程用起来就很艰难,因为达不到期望的效果。不像 Go 在语言层面上就支持协程,一个 go 关键字就搞定了。而且 Python 里面一处异步、处处异步,如果某处的阻塞切换不了,那么协程也就没有意义了。
但现在 Python 已经进化到 3.10 了,协程相关的生态也越来越完善,感谢这些开源的作者们。发送网络请求、连接数据库、编写 web 服务等等,都有协程化的 SDK 和框架,现在完全可以开发以协程为主导的项目了。
本次我们从高并发的应用场景入手,分析了协程出现的背景和实现原理,以及它的应用范围。你会发现,协程融合了多线程与异步化编程的优点,既保证了开发效率,也提升了运行效率。有限的硬件资源下,多线程通过微观上时间片的切换,实现了同时服务上百个用户的能力。多线程的开发成本虽然低,但内存消耗大,切换次数过多,无法实现高并发。
异步编程方式通过非阻塞系统调用和多路复用,把原本属于内核的请求切换能力,放在用户态的代码中执行。这样,不仅减少了每个请求的内存消耗,也降低了切换请求的成本,最终实现了高并发。然而,异步编程违反了代码的内聚性,还需要业务代码关注并发细节,开发成本很高。
协程参考内核通过 CPU 寄存器切换线程的方法,在用户态代码中实现了协程的切换,既降低了切换请求的成本,也使得协程中的业务代码不用关注自己何时被挂起,何时被执行。相比异步编程中要维护一堆数据结构表示中间状态,协程直接用代码表示状态,大大提升了开发效率。但是在协程中调用的所有 API,都需要做非阻塞的协程化改造。优秀的协程生态下,常用服务都有对应的协程 SDK,方便业务代码使用。开发高并发服务时,与 IO 多路复用结合的协程框架可以与这些 SDK 配合,自动挂起、切换协程,进一步提升开发效率。
最后,协程并不是完全与线程无关。因为线程可以帮助协程充分使用多核 CPU 的计算力(Python 除外),而且遇到无法协程化、会导致内核切换的阻塞函数,或者计算太密集从而长时间占用 CPU 的任务,还是要放在独立的线程中,以防止它影响别的协程执行。
So when using coroutines, it is best to use a thread pool. If some blocking must go through the kernel and cannot be coroutineized, then throw it into the thread pool and complete the switching at the thread level. . Although starting multiple threads will occupy resources, and thread switching will bring overhead, in order to switch through the blocking of the kernel, this is unavoidable, and we can only place our hope on threads; of course, for tasks that are too CPU-intensive, You can also consider throwing it into the thread pool. Some people may be curious, if you can use multiple cores, then it is reasonable to throw it into the thread pool, but Python's multi-threading cannot use multiple cores, why do you do this? The reason is simple. If there is only a single thread, such an overly CPU-intensive task will occupy CPU resources for a long time, causing other tasks to not be executed. When multi-threading is turned on, although there is still only one core, because the GIL will cause thread switching, there will be no situation like "the king of Chu has a slim waist, and the harem is starving to death". The CPU can get evenly distributed, allowing all tasks to be executed.
The above is the detailed content of Full of useful information! A comprehensive introduction to how Python's coroutines are implemented! If you understand it, you are awesome!. For more information, please follow other related articles on the PHP Chinese website!


