Can't turn on Memory Integrity in Windows Security Center
Memory integrity is a primary core feature of Windows Security Center. Therefore, if you are unable to turn on this feature, or if it is completely grayed out on your system, your system may be exposed to ongoing threats. In different situations, there may be different reasons behind this issue. If you encounter this problem, don't discount or ignore it, just like you would any other Windows error message.
Initial Solution –
1. The first and most preliminary solution you can try is to restart your computer. If this doesn't resolve the issue, move on to the main solution.
2. Are you using other antivirus tools? Third-party antivirus packages have their own features (including memory protection schemes). So, in this case, you should disable your antivirus software and check it.
Fix 1 – Find out the culprit and remove it
You can find out which one is the culprit and remove it using CMD terminal.
Step 1 –You must open an elevated Command Prompt page. So, use the Win key and the S key together to open the search box.
Step 2 –Just, start typing the word “Command”.
Step 3 –You will notice the “Command Prompt symbol” in the search results. There, right-click on it and click "Run as administrator".
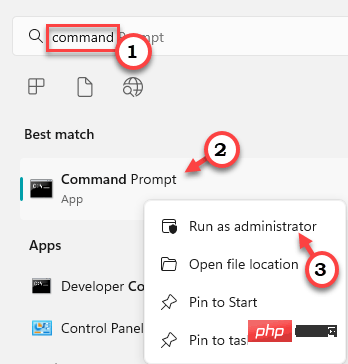
Step 4 – You can get the computer by copy-pasting this code and pressing Enter A list of all installed drivers.
dism /online /get-drivers /format:table

You will know the complete list of installed drivers.
Now, look for "Published Name" from the driver description to determine which is the problematic driver. The name reads like this - "oem11.inf". You may not be able to tell which driver this is. However, it will be useful to remove that particular driver from the system.

Step 5 –Modify and execute this specific code to remove the driver from the system.
[Make sure to remove only the problematic driver. Otherwise, you might have trouble removing a good, working driver.
pnputil /delete-driver /uninstall /force
[Replace "<已发布名称>" with the published name you noticed in the chart.
Example – For example, assuming you encounter this problem while using “oem71.inf”, the command would be –
pnputil /delete-driver oem71.inf /uninstall /force

Exit the terminal after running the driver uninstaller code. Then, restart the system.
Windows will delete the driver even if the driver is using the device at the time. Therefore, the driver's effect will disappear the next time you reboot.
If you want to get the driver back, download the latest version (from the device manufacturer's website) and reinstall it.
Fix 2 – Use Autorun to Detect Drivers
There is a program called Autorun, from Microsoft, that you can use to detect a faulty driver and uninstall it from your computer .
Step 1 –You can download Autorun Portable directly from here.
The best part is you don’t have to install anything.
Step 2 –After downloading the tool, run “Autorun”.
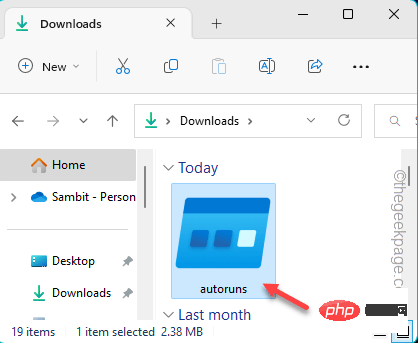
Step 3 –Wait until Windows loads and runs automatically. Now, go to the "Driver" tab.
Here you will notice that all drivers appear in a list format.
Step 4 –Find out which driver is incompatible with the list. Simply right-click the driver and click "Remove" to remove the driver from your computer.
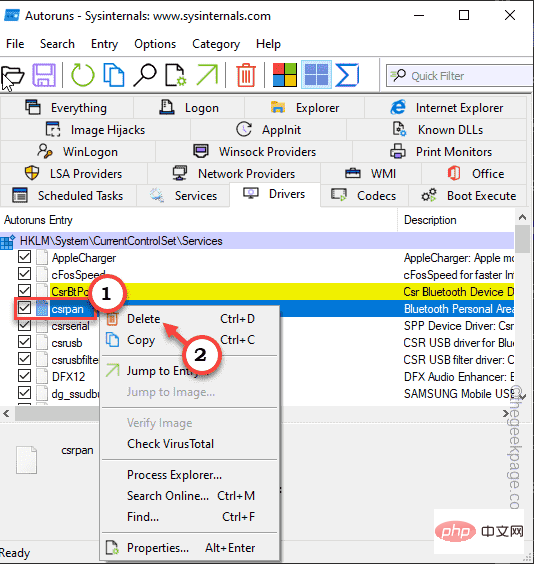
This way you can remove the driver very easily.
Please remember to restart your computer.
Fix 3 – Enable Hypervisor Enforcement of Code Integrity Keys
You can try a registry hack that enables/disables the Memory Integrity feature.
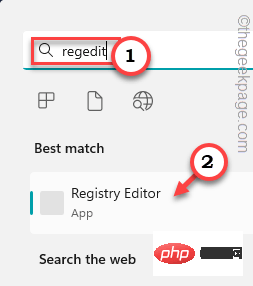
Step 1 –Write “Registry Editor” in the search bar.
步骤 2 –然后,点击“注册表编辑器”将其打开。
第 3 步 –现在,按照左侧窗格到达这个地方 -
HKEY_LOCAL_MACHINE\SYSTEM\CurrentControlSet\Control\DeviceGuard\Scenarios\HypervisorEnforcedCodeIntegrity
第 4 步 –查看右侧窗格,您将找到一个名为“已启用”的 DWORD 值。
步骤 5 –然后,双击它以将其打开。
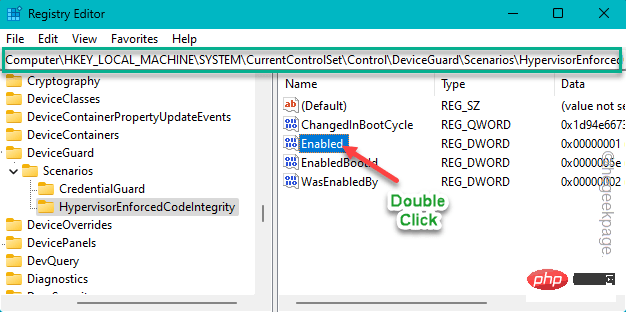
步骤 6 –现在,有两个条件。
0 表示关闭
1 表示开
步骤 7 –因此,将值设置为“1”以启用内存完整性功能。
步骤 8 –然后,单击“确定”。
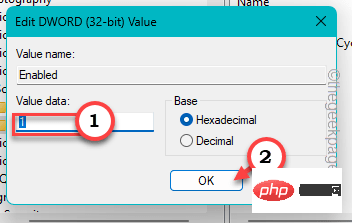
设置值后,退出注册表编辑器。然后,重新启动系统。
系统重新启动后,内存完整性将打开。
修复4 –启用安全启动,TPM,虚拟化支持
需要启用安全启动、TPM、虚拟化支持和 UEFI 模式,以便可以打开内存完整性。
步骤1 –重新启动系统。
当您的计算机启动时,仔细观察,您会注意到与多种功能相关的某些键。例如,某个键打开 BIOS,另一个键将您带到启动选项页面。
步骤 2 –因此,按住与 BIOS 关联的键。在某些计算机中,您可能必须同时使用 Fn 和相关键才能打开 BIOS 屏幕。

第 3 步 –现在,一旦您进入 BIOS 设置,请找到这些项目 –
Secure BootTPMHardware Virtualization Support
第 4 步 –逐个启用所有这些项目。
步骤 5 –保存更改。
让计算机重新启动。
修复5 –关闭基于虚拟化的安全策略
如果你使用的是 Windows 11 专业版或企业版,则可以禁用基于虚拟化的安全策略,然后打开内存完整性功能。
步骤1 –单击“搜索”图标并键入“组策略”。
步骤2 –然后,点击“编辑组策略”将其打开。
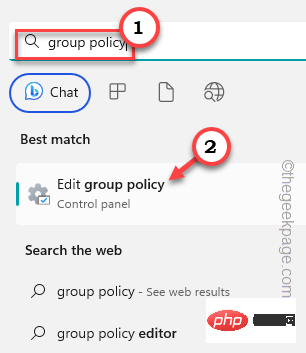
第 3 步 – 在此处展开左侧部分 –
Computer Configuration > Administrative Templates > System > Deice Guard
步骤4 –然后,双击“启用基于虚拟化的安全性”策略进行编辑。
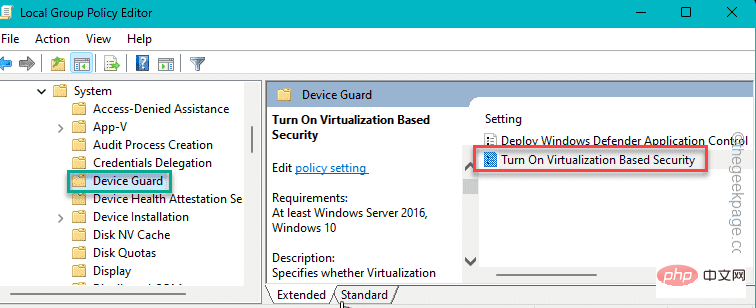
步骤 5 – 将此策略设置为“禁用”模式。
步骤6 –现在您可以保存这些更改。因此,单击“应用”和“确定”。
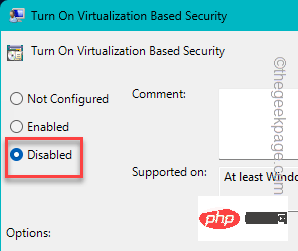
退出本地组策略编辑器。
执行此操作后重新启动计算机一次。
The above is the detailed content of Can't turn on Memory Integrity in Windows Security Center. For more information, please follow other related articles on the PHP Chinese website!

Hot AI Tools

Undresser.AI Undress
AI-powered app for creating realistic nude photos

AI Clothes Remover
Online AI tool for removing clothes from photos.

Undress AI Tool
Undress images for free

Clothoff.io
AI clothes remover

AI Hentai Generator
Generate AI Hentai for free.

Hot Article

Hot Tools

Notepad++7.3.1
Easy-to-use and free code editor

SublimeText3 Chinese version
Chinese version, very easy to use

Zend Studio 13.0.1
Powerful PHP integrated development environment

Dreamweaver CS6
Visual web development tools

SublimeText3 Mac version
God-level code editing software (SublimeText3)

Hot Topics
 1359
1359
 52
52
 How to jump from Word plug-in to browser for login authorization?
Apr 01, 2025 pm 08:27 PM
How to achieve login authorization from within the application to outside the application? In some applications, we often encounter the need to jump from one application to another...
 How to implement cross-application jump for Word plug-in login authorization?
Apr 01, 2025 pm 11:27 PM
How to implement cross-application jump for Word plug-in login authorization? When using certain Word plugins, we often encounter this scenario: click on the login in the plugin...
 Binance binance computer version entrance Binance binance computer version PC official website login entrance
Mar 31, 2025 pm 04:36 PM
This article provides a complete guide to login and registration on Binance PC version. First, we explained in detail the steps for logging in Binance PC version: search for "Binance Official Website" in the browser, click the login button, enter the email and password (enable 2FA to enter the verification code) to log in. Secondly, the article explains the registration process: click the "Register" button, fill in the email address, set a strong password, and verify the email address to complete the registration. Finally, the article also emphasizes account security, reminding users to pay attention to the official domain name, network environment, and regularly updating passwords to ensure account security and better use of various functions provided by Binance PC version, such as viewing market conditions, conducting transactions and managing assets.
 How to convert XML to PDF on your phone?
Apr 02, 2025 pm 10:18 PM
It is not easy to convert XML to PDF directly on your phone, but it can be achieved with the help of cloud services. It is recommended to use a lightweight mobile app to upload XML files and receive generated PDFs, and convert them with cloud APIs. Cloud APIs use serverless computing services, and choosing the right platform is crucial. Complexity, error handling, security, and optimization strategies need to be considered when handling XML parsing and PDF generation. The entire process requires the front-end app and the back-end API to work together, and it requires some understanding of a variety of technologies.
 How to implement hot reload in Debian
Apr 02, 2025 am 07:54 AM
Experience the convenience of Flutter hot reloading on the Debian system, just follow the steps below: Install FlutterSDK: First, you need to install FlutterSDK on the Debian system. Visit Flutter official website to download the latest stable version of SDK and decompress to the specified directory (for example, ~/flutter). After that, add Flutter's bin directory to the system PATH environment variable. Edit the ~/.bashrc or ~/.profile file, add the following code: exportPATH="$PATH:~/flutter/bin" Save the file and execute source~/.bas
 xml online formatting
Apr 02, 2025 pm 10:06 PM
XML Online Format Tools automatically organizes messy XML code into easy-to-read and maintain formats. By parsing the syntax tree of XML and applying formatting rules, these tools optimize the structure of the code, enhancing its maintainability and teamwork efficiency.
 How to design a lottery algorithm to ensure profitability?
Apr 02, 2025 am 06:48 AM
How to design a lottery algorithm to ensure profitability? When designing a lottery product, how to automatically set the winning probability of each prize based on the value of the prize to confirm...
 Jiutian Computing Power Platform Task: Will the computing task continue to run after the local computer is shut down?
Apr 01, 2025 pm 11:57 PM
Discussion on the task status after the local computer of Jiutian Computing Power Platform is closed. Many users will encounter a question when using Jiutian Computing Power Platform for artificial intelligence training...


