3 Ways to Enable TLS 1.2 on All Windows Versions in 2022
Transport Layer Security (TLS 1.2), also known as Transport Layer Security, is an encryption protocol designed to keep user data secure when it is transmitted over a network. The TLS 1.2 protocol is similar to SSL (Secure Sockets Layer).
Transport Layer Security (TLS 1.2) is used primarily by client-server applications to share data and information across networks without security holes or information leakage.
It provides confidentiality, authenticity, and integrity through the use of certificates between computer applications that share information.
How to check if TLS 1.2 is enabled?
Transport layer security was introduced as an Internet Engineering Task Force in 1999 and has continued to evolve since then, with the introduction of TLS 1.2 in 2008.
Transport layer security has two layers of operations: TLS handshake protocol and TLS records. TLS operations are at the application layer.
TLS 1.2 is more than just an upgrade; it’s an important step to ensure secure data sharing. Older versions of transport layer security have become vulnerable, and security holes can be easily avoided using TLS 1.2.
Make sure to update the TLS version to TLS 1.2. and TLS 1.2. Enable on your system to protect your data.
TSL 1.2 and 1.3 are enabled by default on Windows 11. You can also read this article to learn more about how the protocol works.
The quickest way to check if TLS 1.2 is enabled on your computer is to search for the registry key to see if it exists. HKEY_LOCAL_MACHINE\SYSTEM\CurrentControlSet\Control\SecurityProviders\SCHANNEL\Protocols\TLS 1.2\Client\Enabled and its corresponding value 1.
What is the command to check TLS version in Windows?
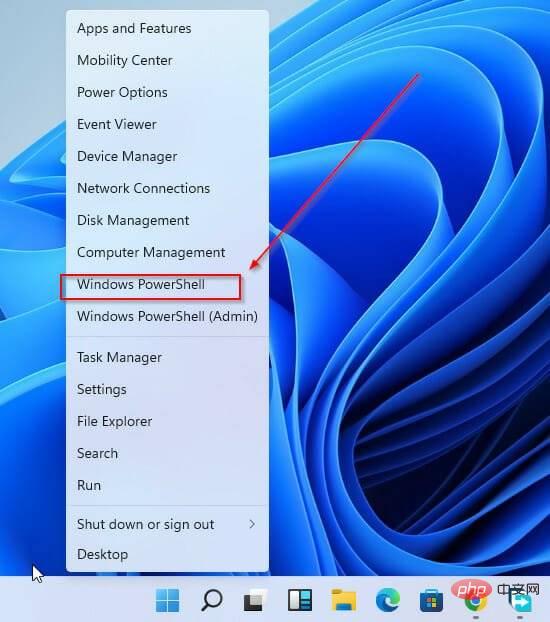
- Press Windows X.
- SelectWindows Powershell.

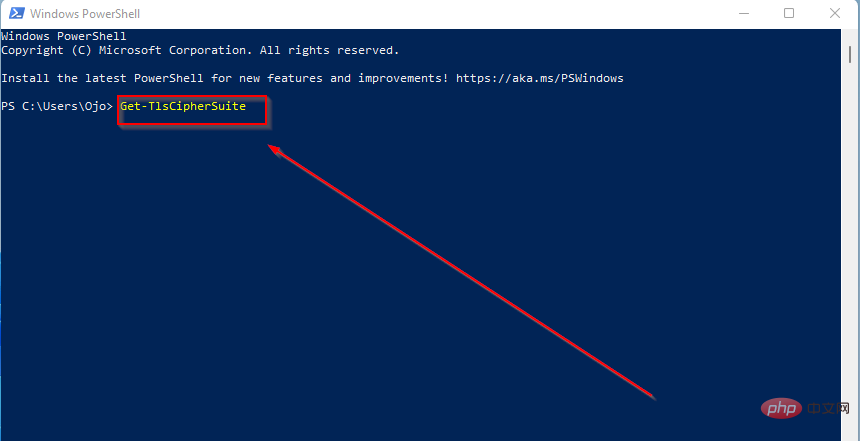
- Enter the following command:
Get-TlsCipherSuite.
- Press Enter. Yes
You can check the version of TLS 1.2 using the following command in Windows: openssl s_client -connect www.google.com:443 -tls1_2. If you get the certificate chain and handshake you will be able to tell if the version is supported. Otherwise, you will receive a handshake error message.
How do you check which TSL protocol is being used?
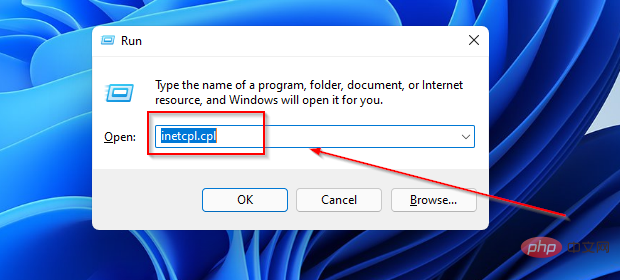
- Press Windows R.

- Press Enter.
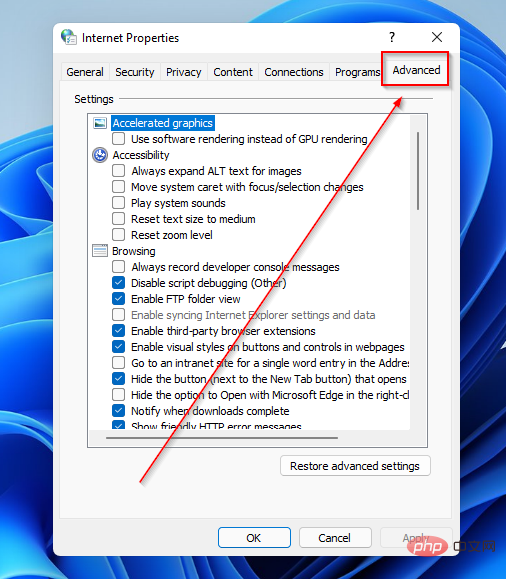
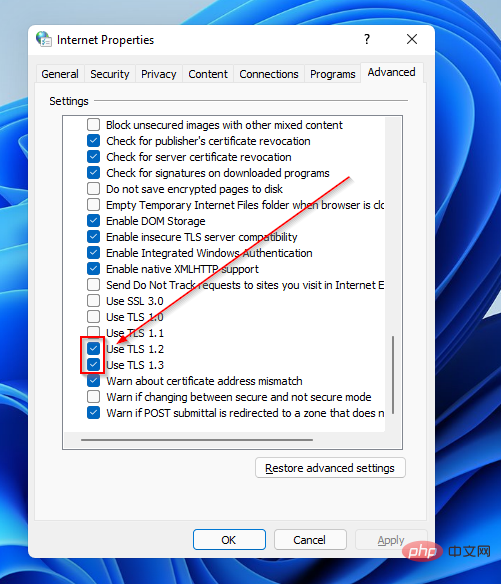
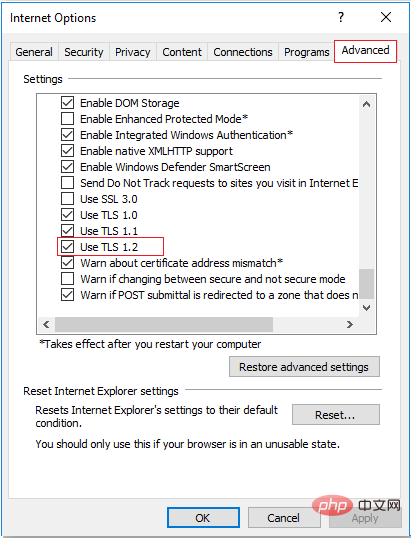
- In the Internet Properties window, click the Advanced tab.

- Scroll to the bottom of the page and check which TLS protocol was viewed.

There are different TLS protocols, the latest is 1.3. You can see which ones are currently in use by noting which checkboxes are selected.
How to enable TLS 1.2 on Windows?
➡ How to enable TLS 1.2 on Windows 11?
- ClickWindows R.

- Press Enter.
- In the Internet Properties window, click the Advanced tab.

- Scroll down and check the TSL protocol in use
 ##Select
 - Apply. Close the browser window and restart your Google Chrome browser.
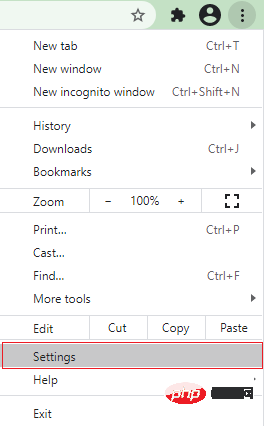
- Open Google Chrome.
- Press
- ALT F. Select
- settings.
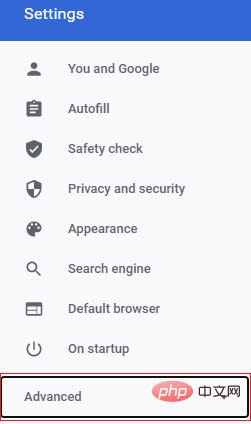
 Click
Click - Advanced.
 Scroll down and select
 - System. Click
- to open your computer’s proxy settings. Click
- Internet Options and select Advanced. Scroll down and click
- Security and check the Use TLS 1.2 box.
 Click
Click - OK. Close the browser window and restart the browser.
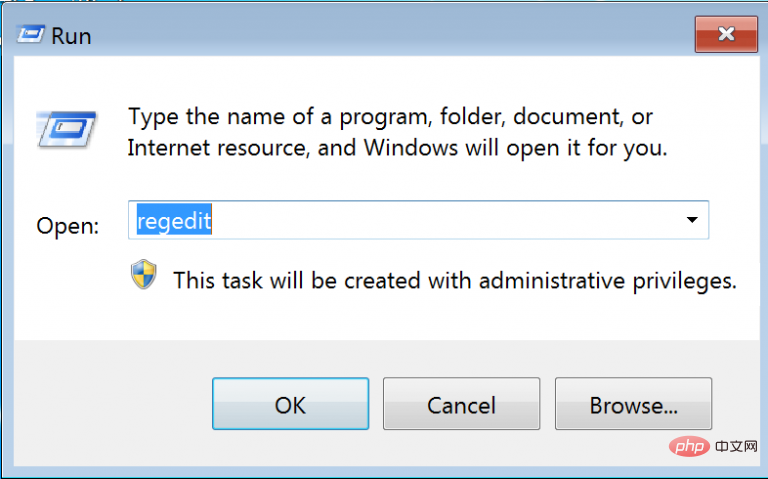
- Go to the status bar and click the Windows button. Click Run.
- Type
- Regedit in the run page.
 Click OK to access the Registry Editor.
 - Clicking the
- OK button will give you access to Windows Options For Windows 7, enter this registry key:
-
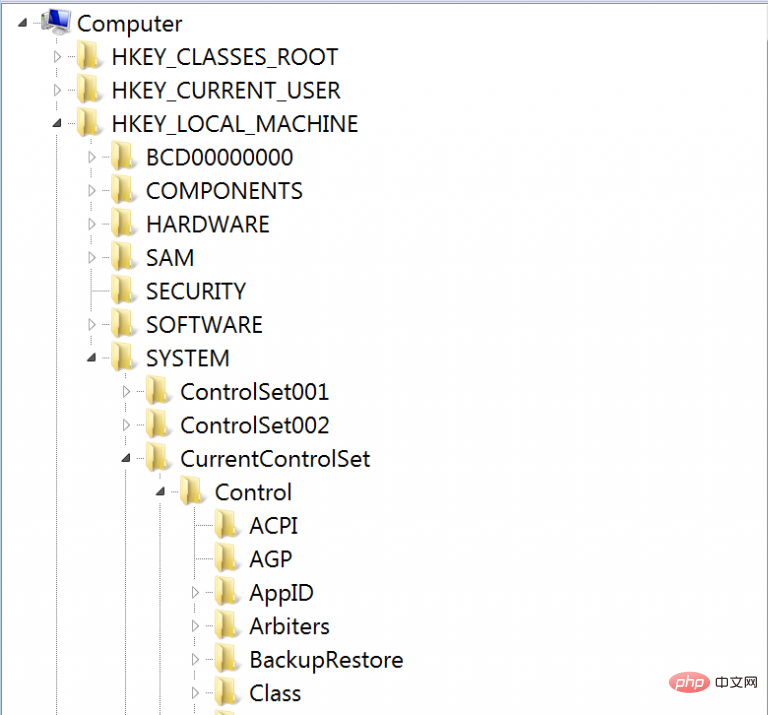
HKEY_LOCAL_MACHINE\SYSTEM\CurrentControlSet \Control\SecurityProviders\SCHANNEL\Protocols
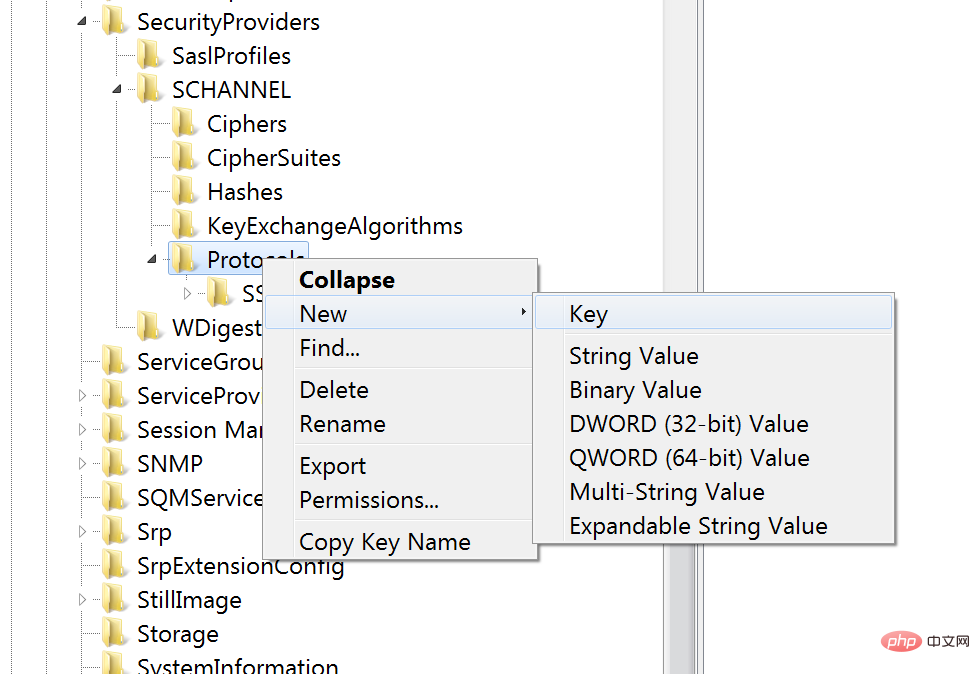
. Click the "Protocols" folder, click "
 - New" and select from the drop-down menu Select "Key".
 After completing step 5, a new folder named
 - New Key #1 will be created. Rename the folder to TLS 1.2.
- Right-click the TLS 1.2 tab and click
- New. Select a key from the drop-down menu.
- When Step 7 is completed, a new folder named New Key #1 will be created.
- Rename the folder to Client.
-
 Right-click the client key, click
 - New, and select a DWORD (32-bit) value from the drop-down list. Click on the DWORD (32-bit) value and a new file named
- "New Value #1". Change the name to Disabled by default.

- After completing all steps, restart the system to activate the changes.
➡ How to enable TLS 1.2 on Windows Server 2019?
- Press the Windows R button to access Regedit.
- Press Enter.
- Navigation
Computer\HKEY_LOCAL_MACHINE\SYSTEM\CurrentControlSet\Control\SecurityProviders\SCHANNEL\ - Right-click the right pane and clickNew.
- Select key.
- Name the new key TLS 1.2 and click on it.
- Click New.
- Create a new key named Client.
- Right-click the client key and click New.
- Select a DWORD (32-bit) value .
- Name the new file DWORD DisabledByDefault.
- Double-click it to open its properties
- Make sure the base is hexadecimal and the value is zero.
- Create another new DWORD file and name it Enabled.
- Double-click it to make sure the base is hexadecimal and the value is one.
- Repeat the same steps for the server key using the exact words: DWORDS and Values.
- Close the registry.
- Restart the system.
➡ How to enable TLS 1.2 on Windows Server 2016?
- First, open the Windows Start menu.
- Type Regedit in the search bar to open it.
- Make sure to back up your current registry before making any changes.
- In the registry, go to
Computer\HKEY_LOCAL_MACHINE\SYSTEM\CurrentControlSet\Control\SecurityProviders\SCHANNEL\Protocols
- Right click on the empty space in the right pane and click New.
- Select key.
- Name the new key TLS 1.2
- Right-click on the empty right pane again and create two new keys named Client and # New key for ##Server. Select the Client key, click
- New, then select a DWORD (32-bit) value. Click on the DWORD and rename it to
- DisabledByDefault. Right click on it, change the base to hexadecimal and set the value to zero.
- Create another
- DWORD and name it enabled. Change the base to
- hex and set the value to one.
- Repeat the same steps for the server key and create DWORDS with the same values. Close the registry and restart your server.
- Start the
- regedit.exe program. Enter path:
- HKEY_LOCAL_MACHINE\SOFTWARE\Microsoft\.NETFramework\v2.0.50727.
- SystemDefaultTlsVersions. Set the DWORD value to
- -. Create another entry named
- SchUseStrongCrypto and set the DWORD value to one. Go to path:
- HKEY_LOCAL_MACHINE\SOFTWARE\Microsoft\.NETFramework\v4.0.30319
.Create an entry and name it - SystemDefaultTlsVersions. Set the DWORD value to
- -. Make the same changes to the 64-bit operating system location:
- HKEY_LOCAL_MACHINE\SOFTWARE\Wow6432Node\Microsoft\.NETFramework\v2.0.50727
.Please create a new entry, And name it - SystemDefaultTlsVersions. Set the DWORD value to
- -. Create another entry and name it
- SchUseStrongCrypto and set the DWORD value to one. Go to
- HKEY_LOCAL_MACHINE\SOFTWARE\Wow6432Node\Microsoft\.NETFramework\v4.0.30319
.Perform the same modifications as in the earlier position.
- Search for
- servers from the top menu bar. From the list of options, select the server of your choice.
- Go to
- Server Management and select Settings and Packages. Click the
- Advanced tab and scroll down to the Nginx box.
- TLS VersionsA list of selected versions will be displayed. Click Edit to make changes. Select the desired protocol as per the requirement and click
- Save changes.
As mentioned previously, TSL 1.3 is automatically enabled on modern Preview builds of Windows. As far as Internet security deployment protocols go, TSL 1.3 is the standard. Its security protocols are formulated in a way to facilitate endpoint-to-endpoint data transfer. That is, it provides an additional layer of security for client-server communication.
The new protocol resolves most of the flaws of the previous version, making the encryption algorithm obsolete. As a result, the handshake protocol (client authentication) is greatly encrypted and enhanced.
In addition, TSL 1.3 has significant privacy improvements. This means that the network's visibility into your user details and information is severely limited.
The above is the detailed content of 3 Ways to Enable TLS 1.2 on All Windows Versions in 2022. For more information, please follow other related articles on the PHP Chinese website!

Hot AI Tools

Undresser.AI Undress
AI-powered app for creating realistic nude photos

AI Clothes Remover
Online AI tool for removing clothes from photos.

Undress AI Tool
Undress images for free

Clothoff.io
AI clothes remover

AI Hentai Generator
Generate AI Hentai for free.

Hot Article

Hot Tools

Notepad++7.3.1
Easy-to-use and free code editor

SublimeText3 Chinese version
Chinese version, very easy to use

Zend Studio 13.0.1
Powerful PHP integrated development environment

Dreamweaver CS6
Visual web development tools

SublimeText3 Mac version
God-level code editing software (SublimeText3)

Hot Topics
 Fix fatal error when creating TLS client credentials
Apr 21, 2023 pm 12:07 PM
With the launch of Windows 11 operating system, users rarely face problems while launching programs on their computers. However, for programs linked to servers, users often encounter fatal errors when creating TLS client credentials on their systems. Error messages are often not easy to interpret, especially when they are cryptic. But what's even more frustrating is when the error doesn't indicate what the problem is. This tutorial is designed to help you fix fatal errors that occur while creating TLS client credentials without losing your files, documents, and other data. What are TLS client credentials? Transport Layer Security (TLS) is a protocol designed to provide over the Internet through end-to-end encryption, integrity proof, and authentication
 Remove a printer on Windows 11: 6 methods and 7 fix instructions
Apr 17, 2023 am 09:37 AM
Removing a Printer on Windows 11 Completely removing a printer requires two things - removing the printer itself, and then removing the driver. There are several ways you can perform these operations on Windows 11. They are: Method 1: From Settings Perhaps the most common method, a printer can be easily removed from the Windows Settings application. Here's how to do it: Press Win+I to open Settings. Then click Bluetooth & Devices in the left pane. On the right, click Printers & Scanners. Click the printer you want to uninstall. Select Delete. When prompted, click Yes. Method 2: Use Device Manager to Remove Printer Drivers Device Manager lets you manage and remove Windows
 How to solve the problem of location services being grayed out in Windows 10/11?
Apr 26, 2023 pm 03:49 PM
Location services are an important feature for some applications on Windows, depending on the location of your system. So if you see the Location Services option grayed out on your system, you can't even toggle it manually. Usually, some system glitch causes this issue and you can easily fix it by following these simple solutions. Fix 1 – Adjust the registry You can adjust the registry to fix this greyed out location services issue. 1. Press the Win key and type "Registry". 2. Then, click "Registry Editor" to open the Registry Editor on your system. 3. You will delete a specific registry subdirectory. Usually, it won't affect your system at all. However, it is recommended that you perform a system backup. one. After opening the Registry Editor, click
 Fix: WD My Cloud doesn't show up on the network in Windows 11
Oct 02, 2023 pm 11:21 PM
If WDMyCloud is not showing up on the network in Windows 11, this can be a big problem, especially if you store backups or other important files in it. This can be a big problem for users who frequently need to access network storage, so in today's guide, we'll show you how to fix this problem permanently. Why doesn't WDMyCloud show up on Windows 11 network? Your MyCloud device, network adapter, or internet connection is not configured correctly. The SMB function is not installed on the computer. A temporary glitch in Winsock can sometimes cause this problem. What should I do if my cloud doesn't show up on the network? Before we start fixing the problem, you can perform some preliminary checks:
 How to disable core parking on Windows 10
May 16, 2023 pm 01:07 PM
If you are a Windows user and want to disable the core parking functionality in your system, this article will guide you through the process. What is core parking? The core parking function is a power saving mechanism. It puts some of your processors into a sleep mode that doesn't perform any tasks and consumes very little or no power. This helps reduce energy consumption and therefore heat in the system. These cores are unparked when needed. Few users need to disable this feature, especially gamers. Disabling this feature will improve your system performance. Disable Windows Core Parking using Windows Registry Editor Step 1: Use Windows + R keys simultaneously to open the run prompt. Step 2: At the run prompt
 Fix: Time sync fails on Windows 11
May 03, 2023 pm 08:46 PM
If your PC is not set with the correct date and time, then you will face multiple system-related issues. It is worth noting that multitasking on your PC will be hindered if the time is not synchronized or the time is set incorrectly. For example, if you download or save a file on your PC, the file information will contain adulterated information due to incorrect time. Since it's the system clock your PC uses to timestamp files, it's important to keep the time and date correct. Software or updates also rely on Internet-based authorization times, and if the time set on your PC is incorrect, then your PC may refuse these updates or install software. Normally, Windows 11 uses NTP (i.e. Network Time Protocol) to
 How to add jump list items on Windows 10 and 11
May 11, 2023 pm 04:31 PM
Jump list on Windows provides easy access to recent files. If you want to add jump list items on Windows, this tutorial will help you get started. Jump Lists on Windows 10 and Windows 11 allow easy access to recently used files, folders, and websites. However, you may want to display more than the 10 most recent items that Windows displays by default. You can make Windows display more items in your jump list by adjusting the registry. For example, you can set it to display about 15-20 items, which will display well on most monitors. This tutorial will show you how to use Windows 10 and Windows 10
 10 Ways to Fix Corrupted Registry Keys in Windows 11: A Step-by-Step Guide
May 15, 2023 pm 04:10 PM
Click to enter: ChatGPT tool plug-in navigation. Ordinary Windows users may never have to access the Windows registry, but various applications and Windows services do. If the registry keys go bad, you will experience various issues such as higher CPU usage, random system crashes, extended startup and shutdown times, and sub-par global performance. Needless to say, the registry must remain functioning properly. What is the Windows Registry? The Windows Registry is a system-wide repository of files and settings that stores important information about Windows, user preferences, applications, hardware, and many other important parts that make up your personal computer. This data is stored in "


