How to disable any key on your keyboard in Windows 11 or 10
May 02, 2023 pm 12:43 PMThere are many situations where you want to disable a certain key on your keyboard on your Windows 10/11 PC. For example, the key might be stuck and unusable, you simply no longer need the key, or you simply can't get rid of the key. Therefore, you end up hitting the wrong key every time, which can be frustrating.
Keeping pressing the wrong key while working on your PC will eventually waste a lot of your productive time, so it is better to disable the problem key to be able to continue working as usual without having to press the wrong key every time .
Today, in this post, we will show you how to disable problem keys on your keyboard on Windows 10/11 PC.
Download and use Microsoft PowerToys
Since the launch of Windows 10, Microsoft has introduced a system utility package called Microsoft Power Toys. This utility is known to help users with different aspects while working on Windows, one of which is the keyboard manager. Let’s see how to access Keyboard Manager through the PowerToys app:
Step 1: Click on the link below to download PowerToys:
Download Microsoft PowerToys
Step 2: Click on the link below Scroll down until you see the Powertoys installation exe file.
Step 3: Click on the .exe fileDownloadand install Power Toys
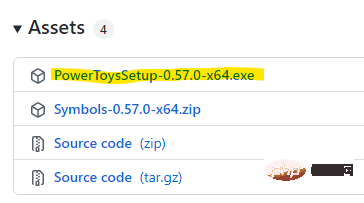
Step 5: After downloading the .exe file, Click to open the file.
Step 6: You will now see the PowerToys Settings window.
Click Next to continue.
Step 7: Now, follow the on-screen instructions to complete the installation.
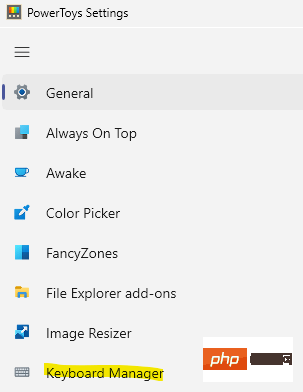
Step 8: After installation, open the PowerToys utility and it will open the window named - PowerToys Settings.
Here, click on the Keyboard Manager option on the left.
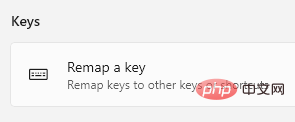
Step 9: Next, go to the right and under the Keys section, click Remap a key.
Step 10: Now, in the Remap keys window, click on the “ ” symbol under Key.
Step 11: You can type the key name (letters/symbols/numbers) in the Type field or select it from the drop-down list.
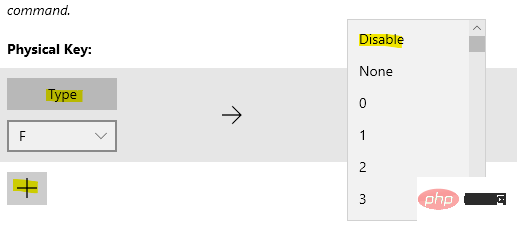
Next, under Map to field, type or select Disabled from the drop-down list.
When finished, press OK to save changes.
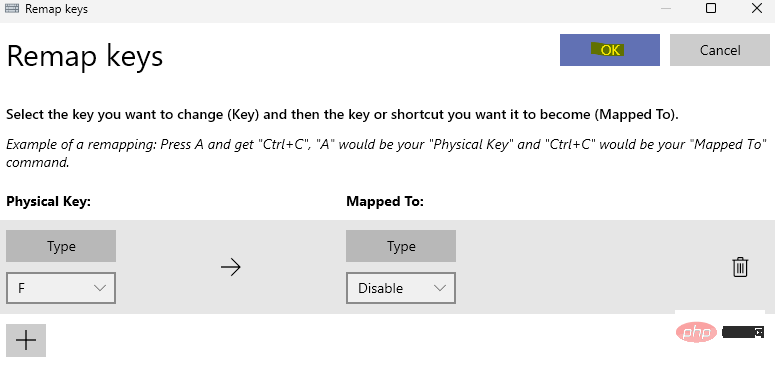
Exit the PowerToys settings window and the problem key should now be disabled.
*Note - In a similar manner, you can also disable shortcut keys. Just follow step 8 and select Remap Shortcuts from the right side and follow steps 10 and 11 to disable the desired shortcut keys.
To restore the key in the future, repeat steps 8 to 10 and click the bin icon to remove the key remapping.
Download and use the KeyTweak app
If you are looking for a free tool that allows you to disable specific keys on your keyboard, then KeyTweak is the first choice of many people. Once downloaded, you can select the problem key from the tool and disable it. Let’s see how;
Step 1:Open a browser and run a Google search for KeyTweak.
Step 2: In the results, click on any trusted website to download the KeyTweak app.
For example, I clicked on the first result.
Step 3: Click the "Download" button to continue downloading.
Step 4: After downloading, navigate to the Downloads folder and click on the installation file to start the installation.
Step 5: In the window that opens, click "I agree" to agree to the terms and conditions and continue.
Now, follow the on-screen instructions to complete the installation.
Step 6: Now, go to "Getting Started" and type keytweak in the Windows search bar.
Under the Best Match field, click the KeyTweak application to open the program.
Step 7: Now, in the KeyTweak application, the keys are numbered, so place your cursor over each key to find the one you want to disable button.
For example, I want to disable the Q key here, so I clicked on the number on my keyboard - 17 .
Step 8: When you select a number, it will display the key you selected under Keyboard Controls at the bottom.
Here you can see the selected key and the letter or symbol it is mapped to.
Now, press the Disable Keys button and the selected key is disabled.
You can now continue to use your PC keyboard with the problem key disabled, so even if you accidentally hit it while typing, it won't type anything.
*Note – If you would like to re-enable the key at any time in the future, simply open the KeyTweak app and click Restore Default below Value button to restore the key.
Download and Use AutoHotkey
AutoHotkey is another free and open source utility that allows you to automate tasks that need to be performed frequently, for example, one of which is remapping or disabling keys. However, it allows you to automate only certain keys like numbers, symbols or universal keys (CapsLock, Enter, Tab, etc.) or cursor control keys (Delete, PgUp, PgDn, Insert, etc.), letters, etc.
You can view the list of eligible keys that can be disabled on the official page here.
Now, follow the following process to disable the problem key using the AutoHotkey utility:
Step 1: Click on the link below to visit the AutoHotkey official page to download the utility Program:
Download Auto Hotkeys
Step 2:Now, in my case, I want to disable the Shift key on my keyboard. So I checked the AutoHotkey list for the key and then proceeded to disable the key by following this process:
To disable a key, open Notepad (or any text document) and type the key name, followed by: :return.
For example, in my case, I typed:
Left Shift::Back
Step 3:Now, go to "File" tab and select "Save As".
Step 4: In the Save As window, name the file as per your convenience followed by .ahk as the file extension.
Click Save to save changes.
Step 5: Now, go to the location where you saved the AutoHotkey file.
Double click on it to run the file, once run it will disable the problem key.
You can now continue using your keyboard without worrying about using the wrong keys.
*NOTE –If you want to restore the key later, just go to the system tray on the taskbar, right-click the H key and select the pause hotkey.
The above is the detailed content of How to disable any key on your keyboard in Windows 11 or 10. For more information, please follow other related articles on the PHP Chinese website!

Hot Article

Hot tools Tags

Hot Article

Hot Article Tags

Notepad++7.3.1
Easy-to-use and free code editor

SublimeText3 Chinese version
Chinese version, very easy to use

Zend Studio 13.0.1
Powerful PHP integrated development environment

Dreamweaver CS6
Visual web development tools

SublimeText3 Mac version
God-level code editing software (SublimeText3)

Hot Topics
 How to run a JAR file on Windows 11 or 10
May 12, 2023 pm 06:34 PM
How to run a JAR file on Windows 11 or 10
 How to disable driver signature enforcement in Windows 11
May 20, 2023 pm 02:17 PM
How to disable driver signature enforcement in Windows 11
 4 Ways to Enable or Disable Microsoft Store on Windows 11 or 10
May 14, 2023 am 10:46 AM
4 Ways to Enable or Disable Microsoft Store on Windows 11 or 10
 How to fix Windows 11 activation error 0xc004c060
May 17, 2023 pm 08:47 PM
How to fix Windows 11 activation error 0xc004c060
 How to fix runtime error 339 on Windows 11/10
May 13, 2023 pm 11:22 PM
How to fix runtime error 339 on Windows 11/10
 0x80010105: How to fix this Windows update error
May 17, 2023 pm 05:44 PM
0x80010105: How to fix this Windows update error
 Not migrating device settings on Windows 11? This is the fix
May 13, 2023 pm 02:10 PM
Not migrating device settings on Windows 11? This is the fix
 5 Ways to Disable Delivery Optimization Service in Windows
May 17, 2023 am 09:31 AM
5 Ways to Disable Delivery Optimization Service in Windows


