

Python's powerful signal library: blinker


1. Signal
Hello everyone, I am my old cousin~
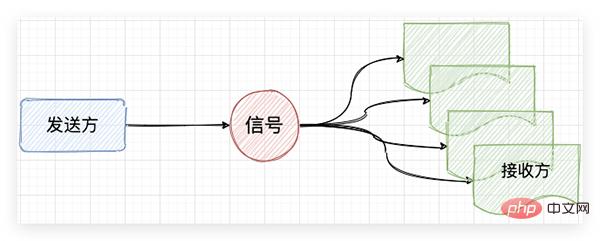
A signal is a way of notification or communication. Signals are divided into sending party and receiver. The sender sends a signal, and the process of the receiver receiving the signal will jump into the signal processing function. After execution, it will jump back to the original position to continue execution.
Common signals in Linux, inputting Ctrl C through the keyboard is to send a signal to the system to tell the system to exit the current process.
The characteristic of a signal is that the sender notifies the subscriber of what happened. Using signals is divided into 3 steps: defining signals, monitoring signals, and sending signals.
#The communication module that provides the signal concept in Python is blinker.
Blinker is a powerful signal library based on Python, which supports both simple point-to-point communication and point-to-multipoint multicast. Flask's signaling mechanism is based on it. Although the kernel of Blinker is small, it is very powerful. It supports the following features:
- Supports registration of global named signals
- Supports anonymous signals
- Supports custom naming Signal
- Supports persistent connections and short-lived connections with the receiver
- Implements automatic disconnection with the receiver through weak references
- Supports sending any size Data
- Supports collecting the return value of the signal receiver
- Thread safety
2. Blinker uses the
installation method:
pip install blinker
2.1 Named signal
from blinker import signal
# 定义一个信号
s = signal('king')
def animal(args):
print('我是小钻风,大王回来了,我要去巡山')
# 信号注册一个接收者
s.connect(animal)
if "__main__" == __name__:
# 发送信号
s.send()

2.2 Anonymous signal
blinker also supports anonymous signals, that is, there is no need to specify a specific signal value. Each anonymous signal created is independent of each other.
from blinker import Signal
s = Signal()
def animal(sender):
print('我是小钻风,大王回来了,我要去巡山')
s.connect(animal)
if "__main__" == __name__:
s.send()
2.3 Multicast signal
Multicast signal is a characteristic that can better reflect the advantages of signals. Multiple receivers are registered to the signal, and the sender only needs to send once to deliver information to multiple receivers.
from blinker import signal
s = signal('king')
def animal_one(args):
print(f'我是小钻风,今天的口号是: {args}')
def animal_two(args):
print(f'我是大钻风,今天的口号是: {args}')
s.connect(animal_one)
s.connect(animal_two)
if "__main__" == __name__:
s.send('大王叫我来巡山,抓个和尚做晚餐!')

2.4 The receiver subscribes to the topic
The receiver supports subscribing to the specified topic, and only when the specified topic sends a message, it is sent to the receiver. This method distinguishes different topics well.
from blinker import signal
s = signal('king')
def animal(args):
print(f'我是小钻风,{args} 是我大哥')
s.connect(animal, sender='大象')
if "__main__" == __name__:
for i in ['狮子', '大象', '大鹏']:
s.send(i)

2.5 Decorator Usage
In addition to function registration, there is a simpler signal registration method, that is, decorator.
from blinker import signal
s = signal('king')
@s.connect
def animal_one(args):
print(f'我是小钻风,今天的口号是: {args}')
@s.connect
def animal_two(args):
print(f'我是大钻风,今天的口号是: {args}')
if "__main__" == __name__:
s.send('大王叫我来巡山,抓个和尚做晚餐!')
2.6 Decorators that can subscribe to topics
Connect's registration method has a drawback when using decorators, which is that it cannot subscribe to topics, so there is a more advanced connect_via method that supports subscribing to topics.
from blinker import signal
s = signal('king')
@s.connect_via('大象')
def animal(args):
print(f'我是小钻风,{args} 是我大哥')
if "__main__" == __name__:
for i in ['狮子', '大象', '大鹏']:
s.send(i)
2.7 Check whether there is a receiver for the signal
If it takes a long time for a sender to prepare before sending a message, in order to avoid the waste of performance caused by no receiver, you can first Check whether there is a receiver for a certain signal, and only send it when it is confirmed that there is a receiver, so as to be accurate.
from blinker import signal
s = signal('king')
q = signal('queue')
def animal(sender):
print('我是小钻风,大王回来了,我要去巡山')
s.connect(animal)
if "__main__" == __name__:
res = s.receivers
print(res)
if res:
s.send()
res = q.receivers
print(res)
if res:
q.send()
else:
print("孩儿们都出去巡山了")
{4511880240: <weakref at 0x10d02ae80; to 'function' at 0x10cedd430 (animal)>}
我是小钻风,大王回来了,我要去巡山
{}
孩儿们都出去巡山了
2.8 Check whether the subscriber is subscribed to a certain signal
You can also check whether the subscriber is subscribed to a certain signal
from blinker import signal
s = signal('king')
q = signal('queue')
def animal(sender):
print('我是小钻风,大王回来了,我要去巡山')
s.connect(animal)
if "__main__" == __name__:
res = s.has_receivers_for(animal)
print(res)
res = q.has_receivers_for(animal)
print(res)
True
False
3. Flask signal based on blinker
Flask integrates blinker as a solution for decoupled applications. In Flask, the usage scenarios of signals are as follows: before the request arrives and after the request ends. At the same time, Flask also supports custom signals.
3.1 Simple Flask demo
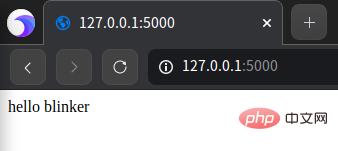
from flask import Flask
app = Flask(__name__)
@app.route('/',methods=['GET','POST'],endpoint='index')
def index():
return 'hello blinker'
if __name__ == '__main__':
app.run()
When accessing 127.0.0.1:5000, return hello blinker to the browser.
3.2 Custom signals
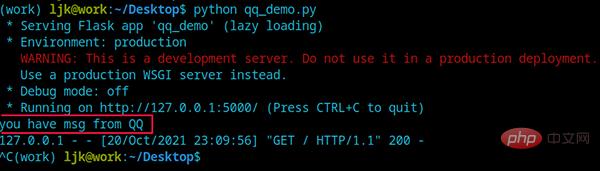
Because Flask integrates signals, they are imported from Flask when using signals in Flask.
from flask import Flask
from flask.signals import _signals
app = Flask(__name__)
s = _signals.singal('msg')
def QQ(args):
print('you have msg from QQ')
s.connect(QQ)
@app.route('/',methods=['GET','POST'],endpoint='index')
def index():
s.send()
return 'hello blinker'
if __name__ == '__main__':
app.run()
3.3 Flask’s own signals
In addition to customizing signals, you can also use built-in signals in Flask. There are many kinds of signals that come with Flask, as follows:
请求
request_started = _signals.signal('request-started')# 请求到来前执行
request_finished = _signals.signal('request-finished')# 请求结束后执行
模板渲染
before_render_template = _signals.signal('before-render-template')# 模板渲染前执行
template_rendered = _signals.signal('template-rendered')# 模板渲染后执行
请求执行
got_request_exception = _signals.signal('got-request-exception')# 请求执行出现异常时执行
request_tearing_down = _signals.signal('request-tearing-down')# 请求执行完毕后自动执行(无论成功与否)
appcontext_tearing_down = _signals.signal('appcontext-tearing-down') # 请求上下文执行完毕后自动执行(无论成功与否)
请求上下文中
appcontext_pushed = _signals.signal('appcontext-pushed')# 请求上下文push时执行
appcontext_popped = _signals.signal('appcontext-popped')# 请求上下文pop时执行
message_flashed = _signals.signal('message-flashed')# 调用flask在其中添加数据时,自动触发
The following takes before the request arrives as an example to see how to use signals in Flask
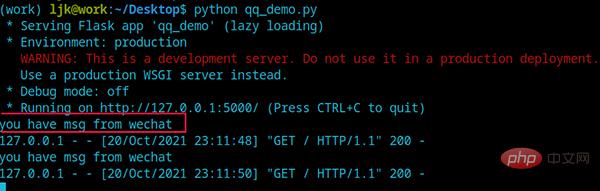
from flask import Flask
from flask.signals import _signals, request_started
import time
app = Flask(__name__)
def wechat(args):
print('you have msg from wechat')
# 从flask中引入已经定好的信号,注册一个函数
request_started.connect(wechat)
@app.route('/',methods=['GET','POST'],endpoint='index')
def index():
return 'hello blinker'
if __name__ == '__main__':
app.run()
When a request arrives, Flask will go through request_started Notifying the recipient is the function wechat. At this time, the wechat function is executed first and then returns the result to the browser.
But this method of use is not very authentic, because signals do not support asynchronous methods, so usually the receivers of signals in production environments are frameworks configured for asynchronous execution, such as the famous asynchronous framework celery in Python.
4. Summary
Advantages of signals:
- Decoupled applications: Decompose serially running coupled applications into multi-level execution
- Publish Subscribers: Reduce the use of callers, notify multiple subscribers with one call
Disadvantages of signals:
- Does not support asynchronous
- Supports subscriptions The theme's capacity is limited
Every like, view, message, and retweet of yours is very important to me, thank you for your support.
Okay, see you next time. I love cats, technology, and Sisi’s old cousin even more⁽⁽ଘ( ˙꒳˙ )ଓ⁾⁾
The above is the detailed content of Python's powerful signal library: blinker. For more information, please follow other related articles on the PHP Chinese website!

Hot AI Tools

Undresser.AI Undress
AI-powered app for creating realistic nude photos

AI Clothes Remover
Online AI tool for removing clothes from photos.

Undress AI Tool
Undress images for free

Clothoff.io
AI clothes remover

AI Hentai Generator
Generate AI Hentai for free.

Hot Article
Hot Tools

Notepad++7.3.1
Easy-to-use and free code editor

SublimeText3 Chinese version
Chinese version, very easy to use

Zend Studio 13.0.1
Powerful PHP integrated development environment

Dreamweaver CS6
Visual web development tools

SublimeText3 Mac version
God-level code editing software (SublimeText3)
Hot Topics
 1384
1384
 52
52

 PHP and Python: Code Examples and Comparison
Apr 15, 2025 am 12:07 AM
PHP and Python: Code Examples and Comparison
Apr 15, 2025 am 12:07 AM
PHP and Python have their own advantages and disadvantages, and the choice depends on project needs and personal preferences. 1.PHP is suitable for rapid development and maintenance of large-scale web applications. 2. Python dominates the field of data science and machine learning.
 Python vs. JavaScript: Community, Libraries, and Resources
Apr 15, 2025 am 12:16 AM
Python vs. JavaScript: Community, Libraries, and Resources
Apr 15, 2025 am 12:16 AM
Python and JavaScript have their own advantages and disadvantages in terms of community, libraries and resources. 1) The Python community is friendly and suitable for beginners, but the front-end development resources are not as rich as JavaScript. 2) Python is powerful in data science and machine learning libraries, while JavaScript is better in front-end development libraries and frameworks. 3) Both have rich learning resources, but Python is suitable for starting with official documents, while JavaScript is better with MDNWebDocs. The choice should be based on project needs and personal interests.
 How is the GPU support for PyTorch on CentOS
Apr 14, 2025 pm 06:48 PM
How is the GPU support for PyTorch on CentOS
Apr 14, 2025 pm 06:48 PM
Enable PyTorch GPU acceleration on CentOS system requires the installation of CUDA, cuDNN and GPU versions of PyTorch. The following steps will guide you through the process: CUDA and cuDNN installation determine CUDA version compatibility: Use the nvidia-smi command to view the CUDA version supported by your NVIDIA graphics card. For example, your MX450 graphics card may support CUDA11.1 or higher. Download and install CUDAToolkit: Visit the official website of NVIDIACUDAToolkit and download and install the corresponding version according to the highest CUDA version supported by your graphics card. Install cuDNN library:
 Detailed explanation of docker principle
Apr 14, 2025 pm 11:57 PM
Detailed explanation of docker principle
Apr 14, 2025 pm 11:57 PM
Docker uses Linux kernel features to provide an efficient and isolated application running environment. Its working principle is as follows: 1. The mirror is used as a read-only template, which contains everything you need to run the application; 2. The Union File System (UnionFS) stacks multiple file systems, only storing the differences, saving space and speeding up; 3. The daemon manages the mirrors and containers, and the client uses them for interaction; 4. Namespaces and cgroups implement container isolation and resource limitations; 5. Multiple network modes support container interconnection. Only by understanding these core concepts can you better utilize Docker.
 MiniOpen Centos compatibility
Apr 14, 2025 pm 05:45 PM
MiniOpen Centos compatibility
Apr 14, 2025 pm 05:45 PM
MinIO Object Storage: High-performance deployment under CentOS system MinIO is a high-performance, distributed object storage system developed based on the Go language, compatible with AmazonS3. It supports a variety of client languages, including Java, Python, JavaScript, and Go. This article will briefly introduce the installation and compatibility of MinIO on CentOS systems. CentOS version compatibility MinIO has been verified on multiple CentOS versions, including but not limited to: CentOS7.9: Provides a complete installation guide covering cluster configuration, environment preparation, configuration file settings, disk partitioning, and MinI
 How to operate distributed training of PyTorch on CentOS
Apr 14, 2025 pm 06:36 PM
How to operate distributed training of PyTorch on CentOS
Apr 14, 2025 pm 06:36 PM
PyTorch distributed training on CentOS system requires the following steps: PyTorch installation: The premise is that Python and pip are installed in CentOS system. Depending on your CUDA version, get the appropriate installation command from the PyTorch official website. For CPU-only training, you can use the following command: pipinstalltorchtorchvisiontorchaudio If you need GPU support, make sure that the corresponding version of CUDA and cuDNN are installed and use the corresponding PyTorch version for installation. Distributed environment configuration: Distributed training usually requires multiple machines or single-machine multiple GPUs. Place
 How to choose the PyTorch version on CentOS
Apr 14, 2025 pm 06:51 PM
How to choose the PyTorch version on CentOS
Apr 14, 2025 pm 06:51 PM
When installing PyTorch on CentOS system, you need to carefully select the appropriate version and consider the following key factors: 1. System environment compatibility: Operating system: It is recommended to use CentOS7 or higher. CUDA and cuDNN:PyTorch version and CUDA version are closely related. For example, PyTorch1.9.0 requires CUDA11.1, while PyTorch2.0.1 requires CUDA11.3. The cuDNN version must also match the CUDA version. Before selecting the PyTorch version, be sure to confirm that compatible CUDA and cuDNN versions have been installed. Python version: PyTorch official branch
 How to update PyTorch to the latest version on CentOS
Apr 14, 2025 pm 06:15 PM
How to update PyTorch to the latest version on CentOS
Apr 14, 2025 pm 06:15 PM
Updating PyTorch to the latest version on CentOS can follow the following steps: Method 1: Updating pip with pip: First make sure your pip is the latest version, because older versions of pip may not be able to properly install the latest version of PyTorch. pipinstall--upgradepip uninstalls old version of PyTorch (if installed): pipuninstalltorchtorchvisiontorchaudio installation latest
