How to enable Windows Installer logging in Windows 11/10
Windows Installer, also known as Microsoft Installer, is a component included in the Windows operating system and is used to deploy applications (software installation, removal and maintenance) on Windows PCs ). In order to identify issues related to Windows Setup, you can use the logging service provided in Windows. You must have noticed that sometimes the installation of some applications fails because the Windows installer is unable to perform the process.
If you have problems installing applications on your Windows PC, you can view the logs maintained by Windows Installer. First, you need to enable these logs if you want to reference them when you encounter software installation problems. After you enable Windows Installer logging, you need to attempt to install the program so that Windows Installer can record the installation progress in a log file. These log files can help troubleshoot package installation issues.
Windows Installer logging can be enabled by adding keys and values to the registry. You can try the installation after adding and enabling the registry key. Windows Installer will now track the installation progress and add it to the Temp folder. The name of the log file can be any random name, but the first letter of the name will have "Msi" and a .log extension at the end of the file. These log files will contain any error codes generated by Windows Installer when logging is enabled.
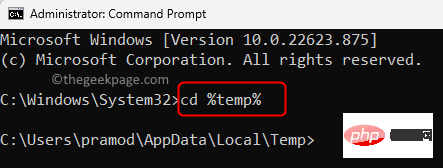
To open the Temp folder, open Command Prompt and type the following command
cd %temp%
After typing the above command, you will see the command The prompt changes to the location of the Temp folder.
In this article, we have discussed two methods using which you can enable Windows Installer logging on Windows 11/10 PC.
Method 1 – Enable Windows Installer Logging via Registry Editor
Since you are making modifications to the registry, it is always recommended that you take a registry backup or create a restore before proceeding point so that you can restore the system to its original state if any issues arise after the changes.
step 1. Press Windows R to open the "Run" box.
Step 2. Type Registry Editor and press Enter to open Registry Editor.
When User Account Control prompts for permissions, click "Yes".
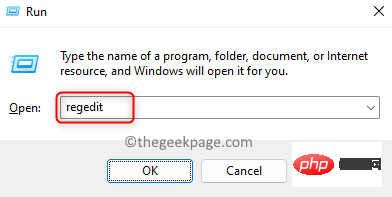
Step 3. Copy and paste the path given below into the navigation bar or use the folders in the left pane to navigate.
HKEY_LOCAL_MACHINE\Software\Policies\Microsoft\Windows\Installer
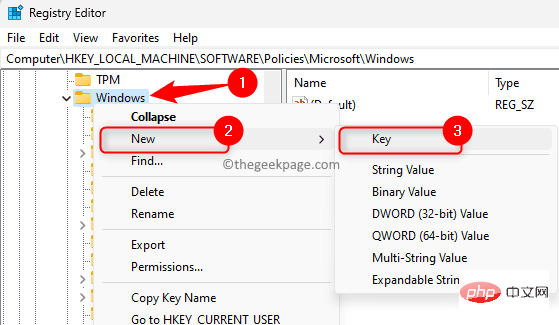
Step 4. If you cannot find the Installer folder, right-click the Windows folder in the left pane and select New –>Key.
Name this new folder Installer.
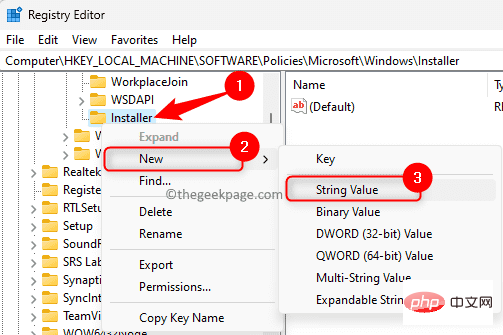
Step 5. Now, right click on the Installer folder and select the option New –>String Value.
Name this string log record.
Step 6. In the right pane, double-click the Logging entry to open its Edit window.
Step 7. In the "Edit String" window, set the "Value Data" field to voicewarmupx.
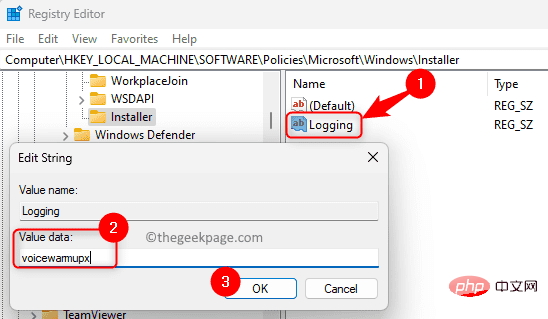
#The value data field can contain letters in any order. Each letter here is used to enable a different logging mode. The alphabetical functions for MSI version 1.1 are as follows:
- v: Verbose output
- o: Insufficient disk space message
- i: Status message
- c: Initial UI parameters
- e: All error messages
- w: Non-fatal warnings
- a : Start operation
- r : Operation-specific record
- m : Out of memory or Fatal exit message
- u: User request
- p: Terminal attribute
- : Append to Existing file
- ! : Flush each line to the log
- x: Additional debugging information. The "x" flag is only available on Windows Server 2003 and later, MSI Redistributable version 3.0 and later MSI Redistributable.
- "*": Wildcard: record all information except v and x options. To include v and x options, specify "/l*vx".
Step 8. Click OK and close the Registry Editor.
Step 9. Restart your PC after enabling Windows Setup logging.
Try to install the program so that log files can be created.
Note:
After you complete the troubleshooting process for a specific application installation, you need to disable Windows Installer logging. Leaving it enabled may affect system performance and disk space. In order to disable it, you need to delete the Logging entry in the registry. Otherwise, a new log file will be created every time the application is installed or removed.
Method 2 – Enable Windows Installer logging using Group Policy
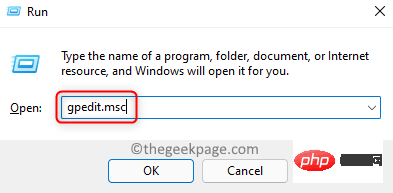
Step 1. Use the Windows and R key combination to open the Run box.
Step 2. Type gpedit.msc and press Enter to open Local Group Policy Editor.
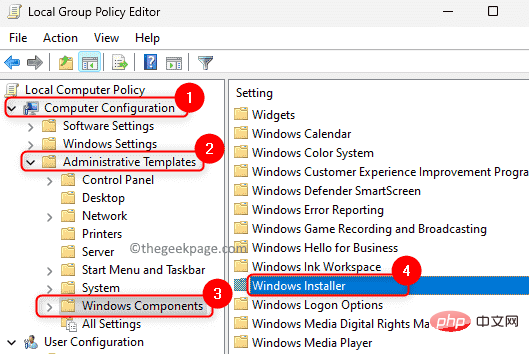
Step 3. Using the folders in the left panel, navigate in the folder order mentioned below.
Computer Configuration –> Administrative Templates –> Windows Components –> Windows Installer
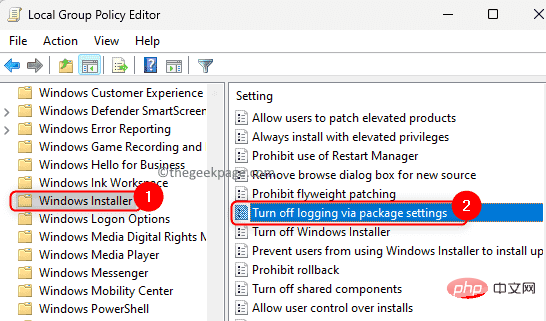
Step 4. Find the settings associated with Logging in the right pane.
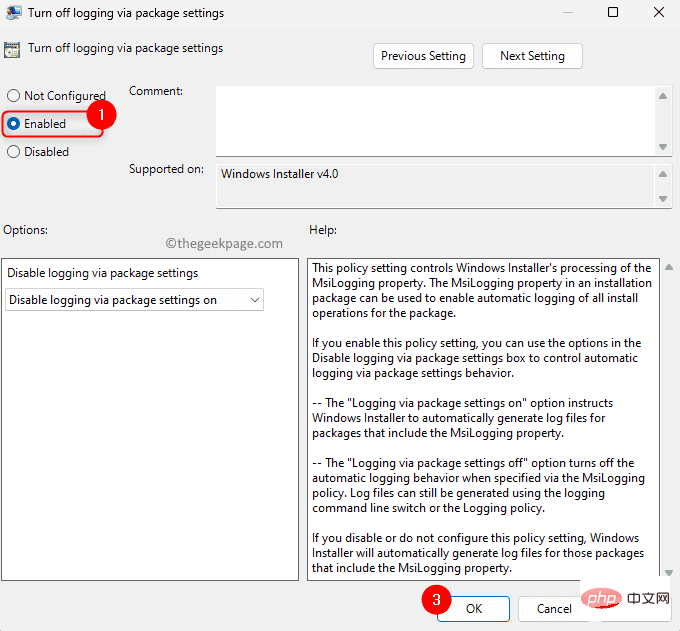
Double-click "Turn off logging through package settings" to change its properties.
Step 5. Select the Enabled option.
In Options, select the logging options to use from the two options in the drop-down list.
The log files will appear in the Temp folder.
Step 6. Click "Apply" and then "OK" to save the changes.
Step 7.Restart the computer and check the log files when trying to deploy the application.
The above is the detailed content of How to enable Windows Installer logging in Windows 11/10. For more information, please follow other related articles on the PHP Chinese website!

Hot AI Tools

Undresser.AI Undress
AI-powered app for creating realistic nude photos

AI Clothes Remover
Online AI tool for removing clothes from photos.

Undress AI Tool
Undress images for free

Clothoff.io
AI clothes remover

Video Face Swap
Swap faces in any video effortlessly with our completely free AI face swap tool!

Hot Article

Hot Tools

Notepad++7.3.1
Easy-to-use and free code editor

SublimeText3 Chinese version
Chinese version, very easy to use

Zend Studio 13.0.1
Powerful PHP integrated development environment

Dreamweaver CS6
Visual web development tools

SublimeText3 Mac version
God-level code editing software (SublimeText3)

Hot Topics
 1386
1386
 52
52
 Unable to remove Xbox wireless controller, removal failure fix
Apr 14, 2023 am 10:40 AM
The Xbox app allows its users to play exciting games on their PC in case the console is not there. Users can connect their Xbox controller directly to the PC and start playing on their Windows PC. Sometimes the Xbox Wireless Controller cannot be removed from a user's Windows 11/Windows 10 laptop. There are a number of issues, the most prominent of which is users encountering "removal failed" issues when trying to remove gadgets. If you get a "Removal failed" error when removing your Xbox Wireless Controller, restart your computer. The most straightforward solution to common problems is to restart your Windows device. If you are restarting your computer
 0xC004d302: How to fix this activation error
Apr 14, 2023 pm 02:49 PM
Some of our readers have recently reported that they received one of the Windows activation errors, such as the 0xC004D302 error code on their Windows PC, due to which certain features stopped working. This error occurs on computers running non-core versions of Microsoft Windows. It can be triggered when the trusted data store is reactivated. You can solve this problem by following this article. What causes the 0xc004d302 error in this article? Here are some potential reasons behind the 0xC004d302 Windows Activation Error Code: Fake or Incorrect Product Key – One of the most common reasons why you receive the 0xC004d302 error code is when you enter
 No location tab in properties: how to enable it
Apr 13, 2023 pm 11:16 PM
Folder properties provide users with details such as creation date, folder name, size, etc. However, sometimes you may come across the Location tab in the properties of a Windows folder. So, we'll walk you through the steps to troubleshoot and re-enable it. Alternatively, you can check out our detailed guide on fixing folder access denied issue on Windows 11. Why can't I find the Location tab in the folder properties? There are several factors that can cause the Location tab to be missing in folder properties on Windows 11. Most notably: Folders don’t support moving – some folders support moving to another location, while others don’t. By default, moving from one location to another is supported
 Remove a printer on Windows 11: 6 methods and 7 fix instructions
Apr 17, 2023 am 09:37 AM
Removing a Printer on Windows 11 Completely removing a printer requires two things - removing the printer itself, and then removing the driver. There are several ways you can perform these operations on Windows 11. They are: Method 1: From Settings Perhaps the most common method, a printer can be easily removed from the Windows Settings application. Here's how to do it: Press Win+I to open Settings. Then click Bluetooth & Devices in the left pane. On the right, click Printers & Scanners. Click the printer you want to uninstall. Select Delete. When prompted, click Yes. Method 2: Use Device Manager to Remove Printer Drivers Device Manager lets you manage and remove Windows
 How to solve the problem of location services being grayed out in Windows 10/11?
Apr 26, 2023 pm 03:49 PM
Location services are an important feature for some applications on Windows, depending on the location of your system. So if you see the Location Services option grayed out on your system, you can't even toggle it manually. Usually, some system glitch causes this issue and you can easily fix it by following these simple solutions. Fix 1 – Adjust the registry You can adjust the registry to fix this greyed out location services issue. 1. Press the Win key and type "Registry". 2. Then, click "Registry Editor" to open the Registry Editor on your system. 3. You will delete a specific registry subdirectory. Usually, it won't affect your system at all. However, it is recommended that you perform a system backup. one. After opening the Registry Editor, click
 How to disable core parking on Windows 10
May 16, 2023 pm 01:07 PM
If you are a Windows user and want to disable the core parking functionality in your system, this article will guide you through the process. What is core parking? The core parking function is a power saving mechanism. It puts some of your processors into a sleep mode that doesn't perform any tasks and consumes very little or no power. This helps reduce energy consumption and therefore heat in the system. These cores are unparked when needed. Few users need to disable this feature, especially gamers. Disabling this feature will improve your system performance. Disable Windows Core Parking using Windows Registry Editor Step 1: Use Windows + R keys simultaneously to open the run prompt. Step 2: At the run prompt
 Fix: WD My Cloud doesn't show up on the network in Windows 11
Oct 02, 2023 pm 11:21 PM
If WDMyCloud is not showing up on the network in Windows 11, this can be a big problem, especially if you store backups or other important files in it. This can be a big problem for users who frequently need to access network storage, so in today's guide, we'll show you how to fix this problem permanently. Why doesn't WDMyCloud show up on Windows 11 network? Your MyCloud device, network adapter, or internet connection is not configured correctly. The SMB function is not installed on the computer. A temporary glitch in Winsock can sometimes cause this problem. What should I do if my cloud doesn't show up on the network? Before we start fixing the problem, you can perform some preliminary checks:
 How to add jump list items on Windows 10 and 11
May 11, 2023 pm 04:31 PM
Jump list on Windows provides easy access to recent files. If you want to add jump list items on Windows, this tutorial will help you get started. Jump Lists on Windows 10 and Windows 11 allow easy access to recently used files, folders, and websites. However, you may want to display more than the 10 most recent items that Windows displays by default. You can make Windows display more items in your jump list by adjusting the registry. For example, you can set it to display about 15-20 items, which will display well on most monitors. This tutorial will show you how to use Windows 10 and Windows 10


