

2 Super Easy Ways to Change the Default Gateway on Windows 11

Windows 11 has been out for a while, and Microsoft has introduced many changes since its launch. Many settings have now been moved from Control Panel to the Settings app, which can make it difficult to find general settings. If you wish to change the default gateway IP address on Windows 11, you can start here.
How to change the default gateway on Windows 11
You can change the default gateway in Windows 11 using the Settings app or using CMD. Follow any of the following sections to help you through the process, depending on your current needs and requirements. let's start.
Method 1: Using Settings
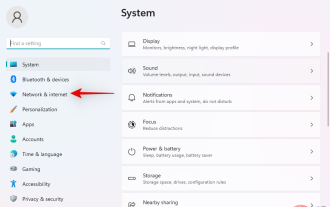
Press the Windows i keyboard to open the "Settings" app. Click on Network and Internet.
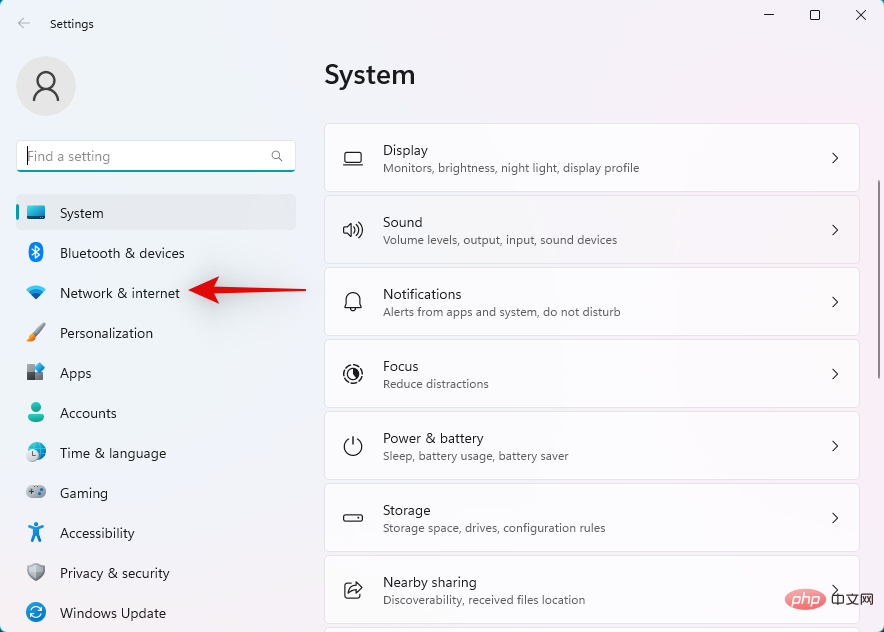
Click and select your current network type, Wi-Fi or Ethernet. We will choose Wi-Fi for this tutorial.
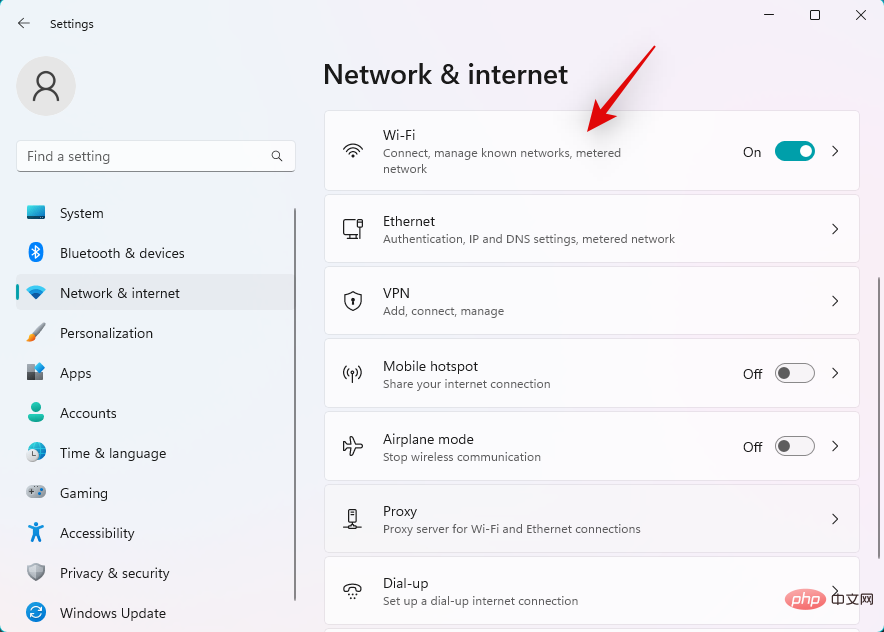
Click Hardware Properties.
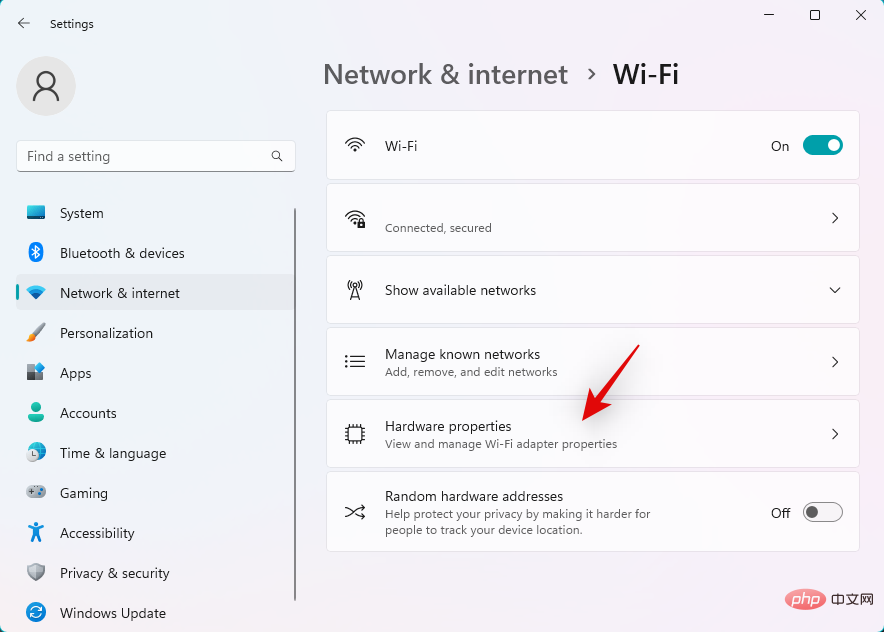
Now click Edit next to IP assignment.
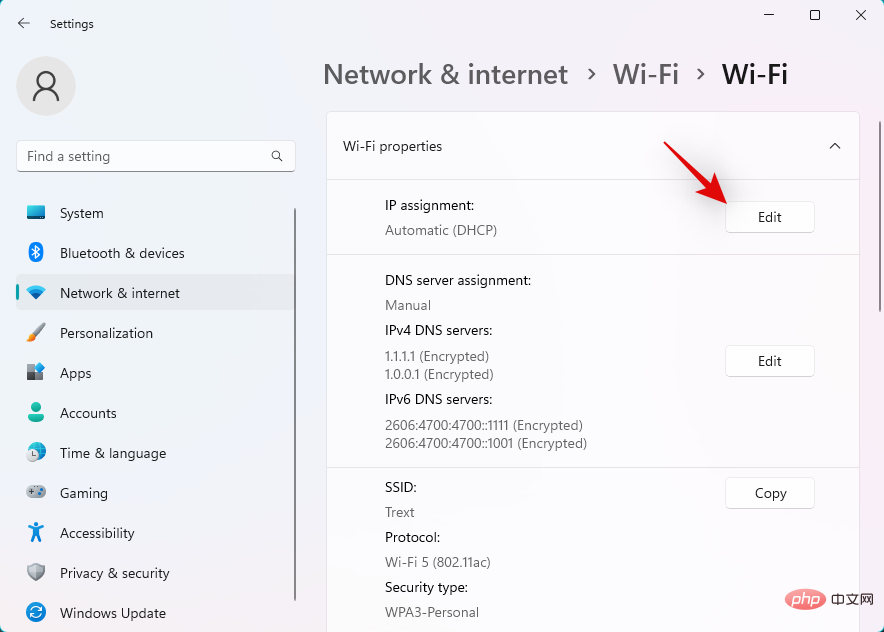
Click the drop-down menu at the top and select Manual.
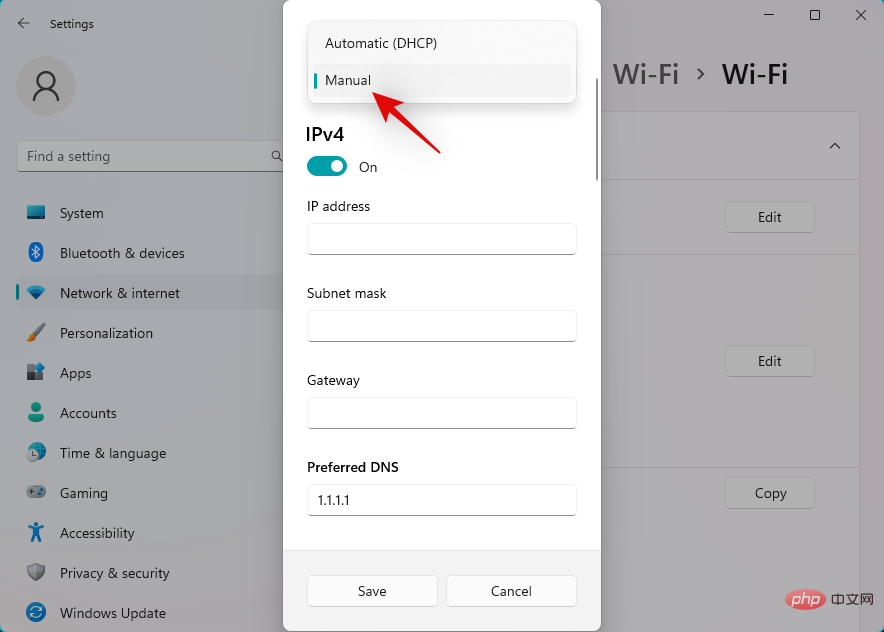
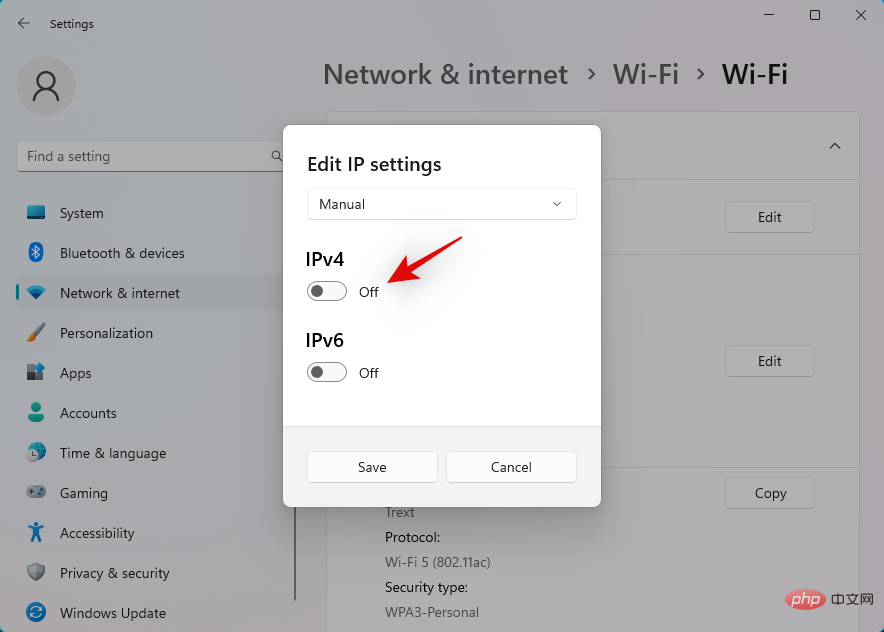
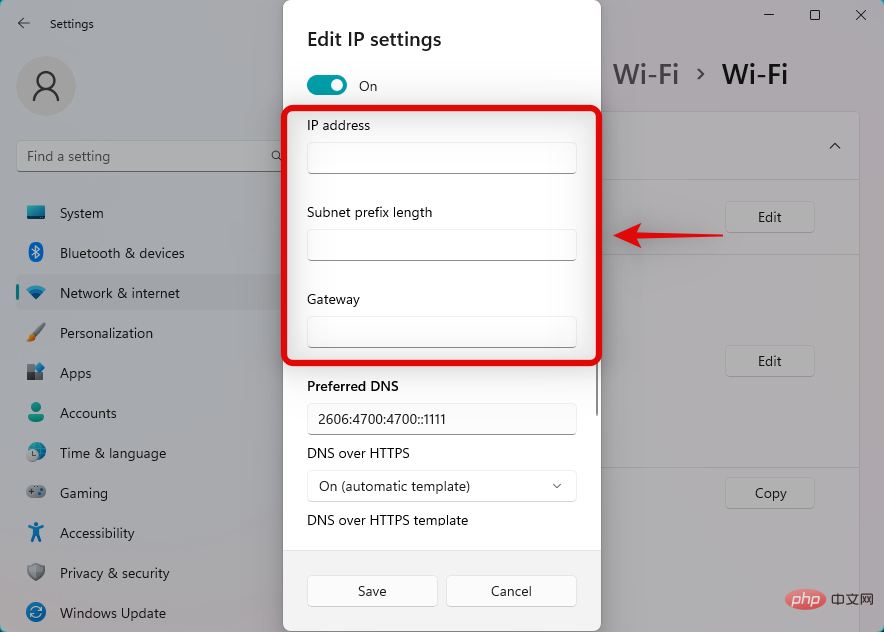
Turn on the IPv4 switch.
Enter the following details as per your preference.
- IP Address
- Subnet Mask
- Gateway

You can also set up custom DNS according to your preferences. If needed, scroll down and set the default IPv6 gateway similarly.
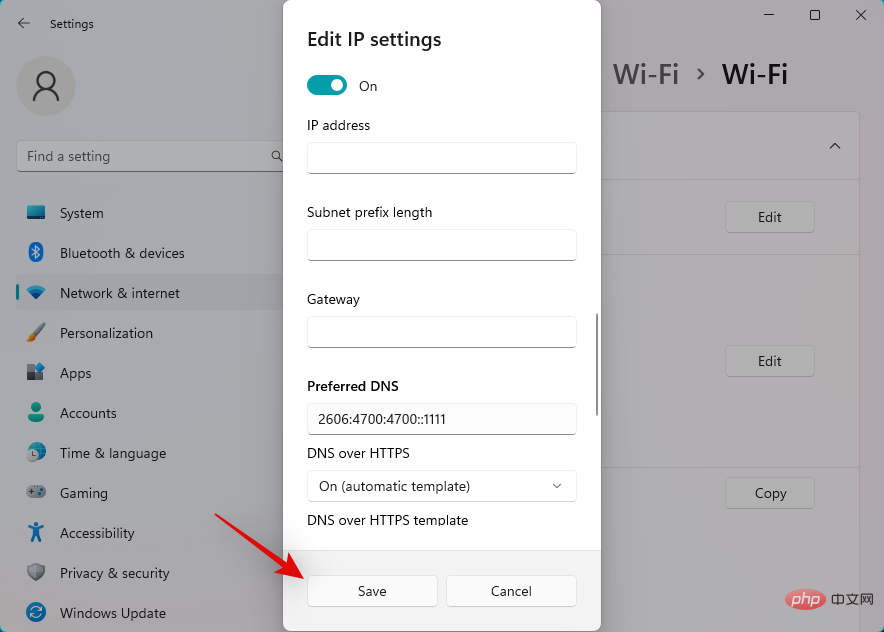
When finished, click Save.
That's it! You will now configure the default gateway on Windows 11.
Method 2: Using Command Prompt (CMD)
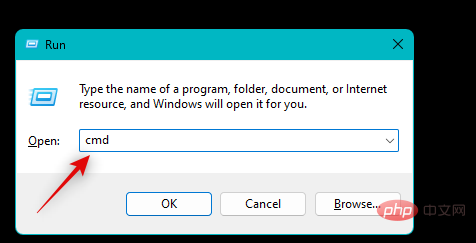
Press Windows R to start Run.

Type the following and press Ctrl Shift Enter.
cmd
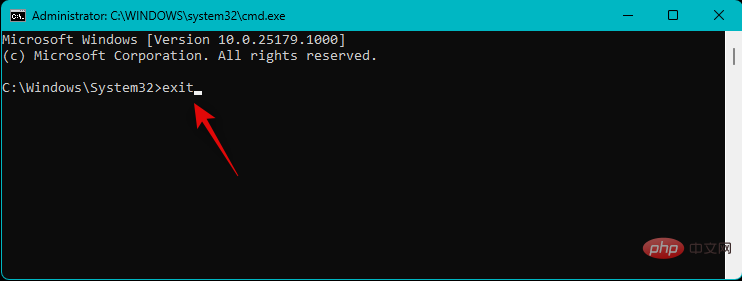
Type the following command and press Enter. Replace IP, MASK, and DEFAULTGATEWAY with your preferred values.
netsh int ip set address "Local Area Connection" address=IP<strong> mask=</strong>MASK<strong> gateway=</strong>DEFAULTGATEWAY<strong></strong>

exit
The above is the detailed content of 2 Super Easy Ways to Change the Default Gateway on Windows 11. For more information, please follow other related articles on the PHP Chinese website!

Hot AI Tools

Undresser.AI Undress
AI-powered app for creating realistic nude photos

AI Clothes Remover
Online AI tool for removing clothes from photos.

Undress AI Tool
Undress images for free

Clothoff.io
AI clothes remover

AI Hentai Generator
Generate AI Hentai for free.

Hot Article
Hot Tools

Notepad++7.3.1
Easy-to-use and free code editor

SublimeText3 Chinese version
Chinese version, very easy to use

Zend Studio 13.0.1
Powerful PHP integrated development environment

Dreamweaver CS6
Visual web development tools

SublimeText3 Mac version
God-level code editing software (SublimeText3)
Hot Topics
 1378
1378
 52
52

 How to check the default gateway on your mobile phone (Easily understand and set the default gateway of your mobile phone)
May 06, 2024 pm 06:28 PM
How to check the default gateway on your mobile phone (Easily understand and set the default gateway of your mobile phone)
May 06, 2024 pm 06:28 PM
In order to perform network settings and troubleshooting, when using mobile phones to access the Internet, we often need to know the default gateway of the mobile phone. And to help readers understand relevant knowledge and operations, this article will introduce how to check the default gateway on the mobile phone. 1. What is the default gateway? It is responsible for sending data packets from the local network to the target network or device. The default gateway is the channel that connects the local network to the external network. 2. The importance of the default gateway. It determines how data packets enter and leave the mobile phone. The role of the default gateway on the mobile phone is similar to the doorway of a home. 3. Open the phone settings, find "Settings" on the home screen of the phone and click to enter the settings page and application icon. 4. Enter the network settings sliding screen and find it. Click "Network and Internet" on the settings page to enter the option. 5.
 How to solve the problem of default gateway automatically disappearing
Feb 24, 2024 pm 04:18 PM
How to solve the problem of default gateway automatically disappearing
Feb 24, 2024 pm 04:18 PM
How to solve the problem that the default gateway disappears automatically. In modern society, the Internet has become an indispensable part of people's lives. Whether for work or entertainment, we all need stable network connections to complete various tasks. The default gateway is one of the key elements connecting the local network to the external Internet. However, sometimes we may encounter the problem that the default gateway disappears automatically, resulting in the inability to access the Internet. So, how should we solve this problem when the default gateway disappears? First, we should clarify the concept of default gateway. The default gateway is a network route
 How to find the default gateway
Feb 19, 2024 pm 02:39 PM
How to find the default gateway
Feb 19, 2024 pm 02:39 PM
Where to look at Default Gateway Default gateway (DefaultGateway) is a network term used to refer to the exit point of a major network to which a computer or other network device is connected. It plays the role of forwarding network requests to other networks. The default gateway is usually configured by the network administrator or Internet Service Provider (ISP) and is very important to the computer. When we need to connect to the Internet, we need to know the IP address of the default gateway. So, where to find the IP address of the default gateway?
 2 Super Easy Ways to Change the Default Gateway on Windows 11
May 04, 2023 pm 12:16 PM
2 Super Easy Ways to Change the Default Gateway on Windows 11
May 04, 2023 pm 12:16 PM
Windows 11 has been released for a while, and Microsoft has introduced many changes since its release. Many settings have now been moved from Control Panel to the Settings app, which can make it difficult to find general settings. If you wish to change the default gateway IP address on Windows 11, then you can start here. How to change the default gateway on Windows 11 You can change the default gateway in Windows 11 using the Settings app or using CMD. Follow any of the following sections to help you through the process, depending on your current needs and requirements. let's start. Method 1: Using Settings Press the Windows+i keyboard to open the Settings app. Click on Network and Internet
 How to fill in the default gateway of the router in Win11 system
Jun 29, 2023 pm 01:05 PM
How to fill in the default gateway of the router in Win11 system
Jun 29, 2023 pm 01:05 PM
How to fill in the default gateway of the router in Win11 system? The default gateway means that if a host cannot find an available gateway, it will send the data packet to the default designated gateway, and this gateway will process the data packet. So how to fill in the default gateway of the router in Win11 system? Many friends don’t know how to operate in detail. The editor below has compiled the steps to fill in the default gateway of the Win11 system router. If you are interested, follow the editor to take a look below! Steps to fill in the default gateway of the router in Win11 system What is the default gateway of the router? The default gateway of the wireless router is: you can view it after setting the router to dial. Method 1: Computer enters the router 1. Computer IP and DNS settings are automatically
 How to set the default gateway on Win10 computer_Where to set the default gateway on Win10 computer
Mar 22, 2024 pm 04:41 PM
How to set the default gateway on Win10 computer_Where to set the default gateway on Win10 computer
Mar 22, 2024 pm 04:41 PM
How to set the default gateway on Win10 computer? Below I will introduce you to the specific operation method, I hope it will be helpful to you. 1. Click the "Search" button in the lower left corner of the computer, search for "Control Panel" and click "Open". 2. Open Network and Internet in the pop-up window, and then click "Network and Sharing Center". In the upper left corner of the page, click "Change Adapter Settings" 3. Right-click "WLAN" and select "Properties" in the pop-up menu. Double-click to open "I
 How to solve the problem that the default gateway is not available in win10
Dec 27, 2023 pm 06:19 PM
How to solve the problem that the default gateway is not available in win10
Dec 27, 2023 pm 06:19 PM
Friends who use win10 system have more or less encountered the situation where the default gateway is unavailable. This situation can easily lead to frequent network interruptions, but today I have brought you a detailed solution to take a look. What to do if the default gateway in Windows 10 is unavailable: 1. Right-click the lower left corner to start and click "Device Manager". 2. Then scroll down to find "Network Adapter". 3. Expand it, find your network card, right-click and select "Properties". 4. After entering properties, click "Power Management". 5. Cancel the √ in front of "Allow the computer to turn off this device to save power". 6. Right-click the lower left corner again to start and click "Network Connection". 7. Enter settings and click "Change Adapter Options". 8. After entering the network connection, right-click the network card connection and select "Properties"
 Win7 default gateway is not available solution
Jul 11, 2023 pm 06:54 PM
Win7 default gateway is not available solution
Jul 11, 2023 pm 06:54 PM
Many friends who use win7 have found that the windows7 operating system seems to have a problem, that is, the connection to the router is often automatically disconnected. According to the diagnosis, the default gateway is unavailable. How to solve this problem? Let’s take a look below. Solution for win7 default gateway not available: 1. First click Start in the lower left corner, then go to Control Panel, then open "Internet and Internet Core" and click "Network Status and Tasks". 2. Then click on Change Adapter Selection. 3. In the future, you can right-click the broadband connection and select Properties. 4. Then select "Internet Protocol Version 6" and click Properties. 5. In the end, Jiuke chose fully automatic