

How to print only specific parts of an Excel document

In many cases, you may have a huge Excel file, but a specific part of that Excel file may be important to you. In this case, printing the entire Excel document is a waste of time, resources, and effort. Additionally, if you print all the data, the recipient may be confused about the actual data to focus on. Obviously, if you had some way to print only a specific part of an Excel document on a single page, that would simplify your life to a great extent. Also, if you had the option to print multiple sections of Excel on multiple pages, I'm sure that would be an idea that would be warmly welcomed as well.
In this article, we will explain how to easily print one or more parts of Excel in single or multiple pages according to your requirements, but obviously not the entire document. So let’s dive into this article, shall we?
Example Scenario
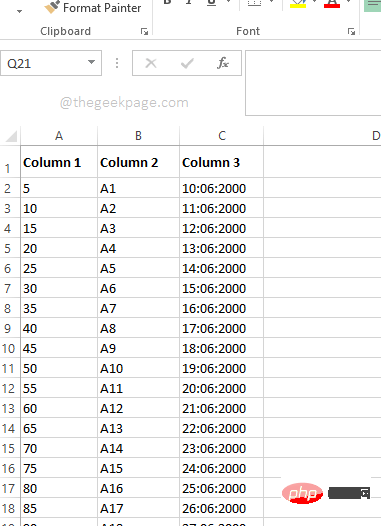
We have an Excel document with data that spans more than one page.
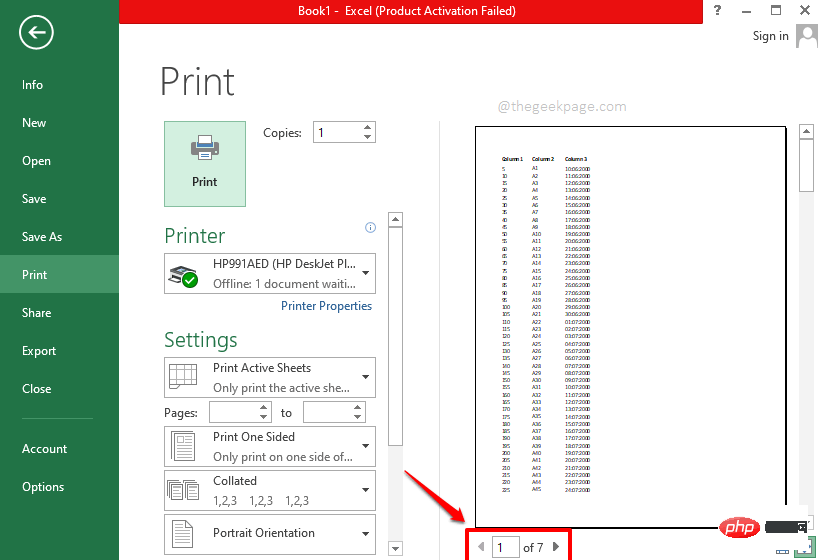
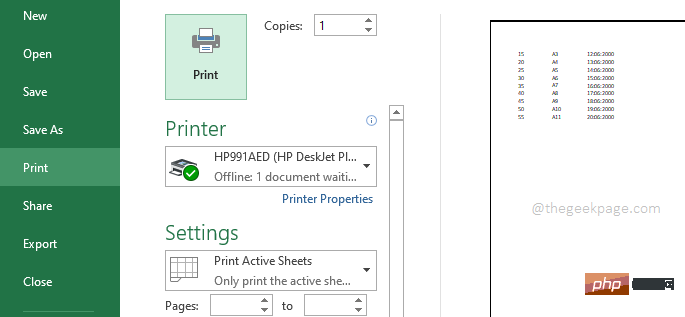
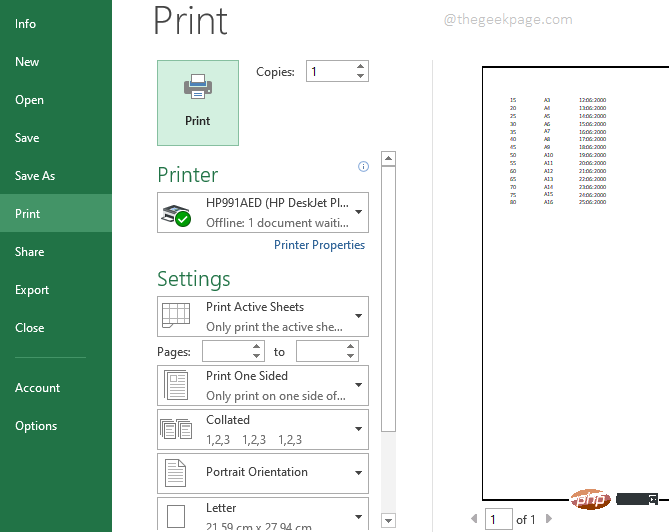
Now, if you press the CTRL P keys simultaneously, the Print settings page will open and it will offer you to print Preview informs you that all 7 pages of the document will be printed, and you only need a portion of the data to print. Let’s see how we can easily solve this problem.
Part 1: How to Set the Print Area and Print Only Specific Parts of the Document
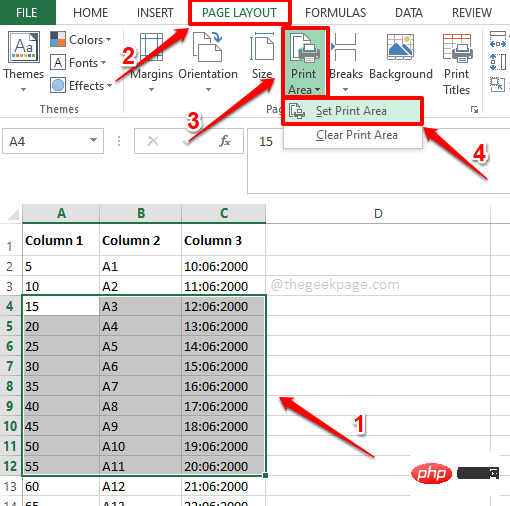
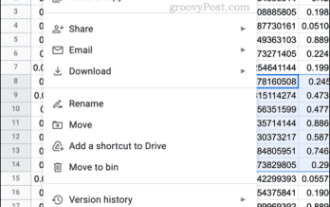
Step 1: FirstSelect The data part to be printed.
After selecting the data, click the PAGE LAYOUT tab at the top.
Now, click on the drop-down menu named Print Area. From the available options, click the option that says Set the print area.
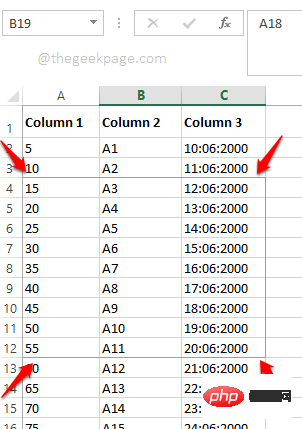
Step 2: If you look at Excel, you can see that the data you selected is now contained within a small box. This is the print area.
Step 3: Now, if you press the CTRL P keys simultaneously, in the print preview, you can see Only the data within the preset printing area will be printed. That’s all.
Section 2: How to extend the print area and print on the same page
Assuming you set the print area and everything is perfect. Suddenly you realize you have to add more data. The best part is that the new data is next to the original data. So you want the new data to be printed on the same page as the old data. We can accomplish this with 2 different solutions.
2.1: Expand the print area using Name Manager
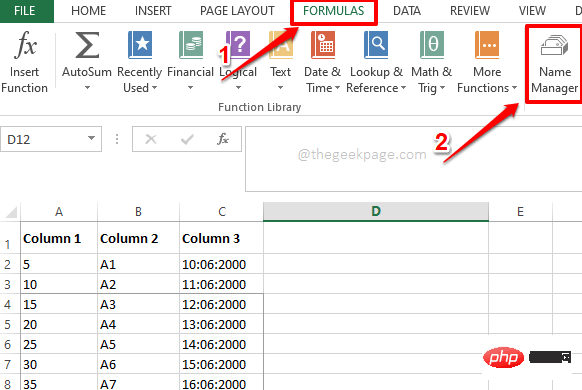
Step 1: Click the Formulas tab in the tab ribbon. Now click on the Name Manager button in the section named Function Library.
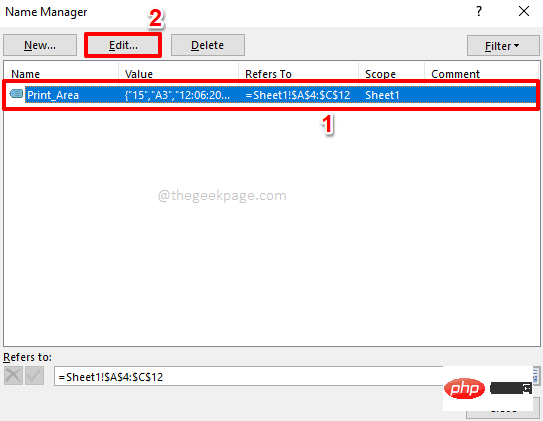
Step 2: In the Name Manager window you will be able to view the print area created in Section 1. Click Print_Area and then click the Edit button at the top.
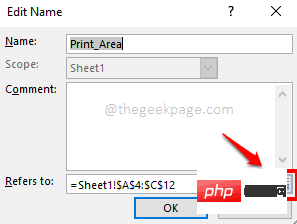
Step 3: Now click on CellCellSelect on the Reference field " icon.
Step 4: You will be able to view the original print area in this step. This is the print area you want to extend.
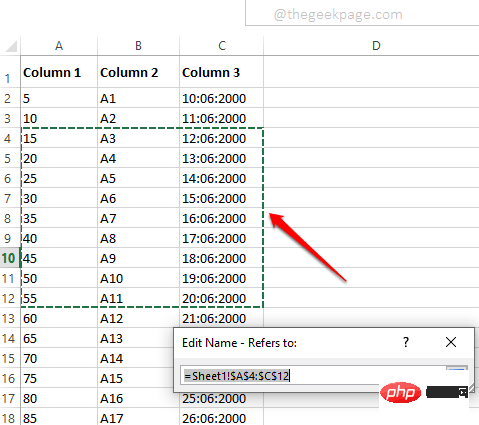
Step 5: You can drag and select the new area you want to merge with the old print area. But remember to keep the old print area within the selected line range as well.
After adding the new print area to the original print area, click the cell selection icon again.
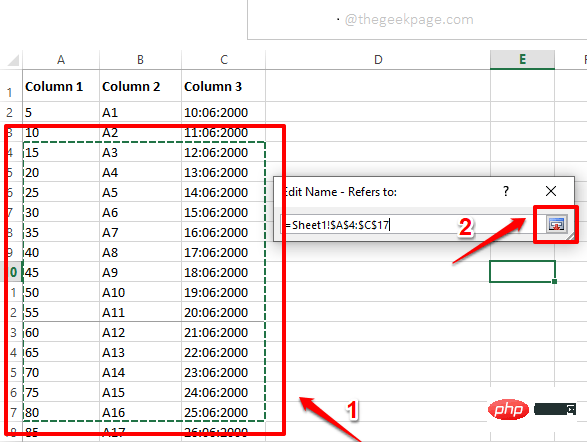
Step 6: You will now be returned to the "Edit Name" window. Click the OK button to continue.

Step 7: Now, if you press the CTRL P keys simultaneously to open the print settings page, you will be able to see your print The range has been modified and the new line range has been successfully added to your print preview and is ready to print.
2.2: Extend the print area using page layout settings
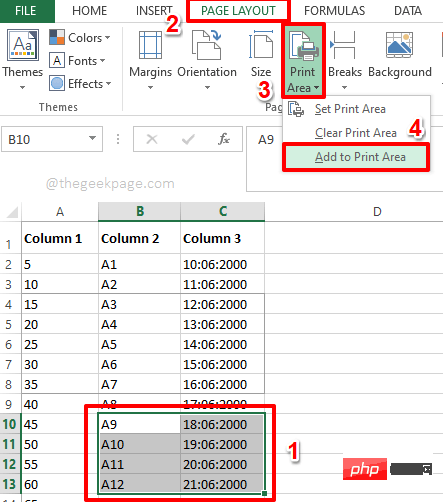
Simply select the new area to be added to the original print area. After selecting the new area, click the Page Layout tab in the top ribbon. Now click on the Print Area drop-down menu and click on the Add to Print Area option.
That’s all. You can now view a print preview by pressing theCTRL P keys simultaneously. The new area will be successfully added to the print preview.
Note: Please make sure that the new printing area is adjacent to the original printing area. Also, make sure the data has the same dimensions as the original print area. That is, for example, the number of columns in both print areas should be the same. If these conditions are not met, the new print area will not be considered an extension of the old print area, and the 2 print areas will be printed on 2 different pages.
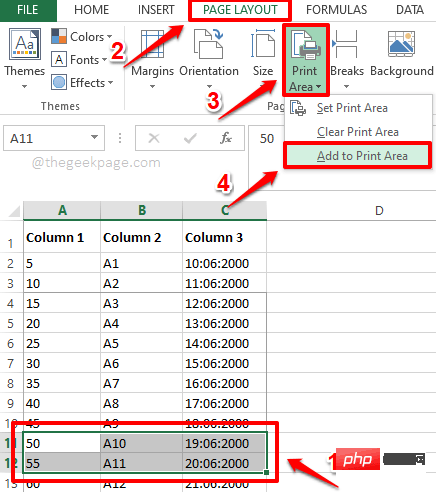
Step 1: First, select your new data set. This data can be located anywhere in the document, with any number of columns.
After selecting the data, click thePAGE LAYOUT tab at the top.
Click the drop-down menu named "Print Area" and then click the "Add to Print Area" option.
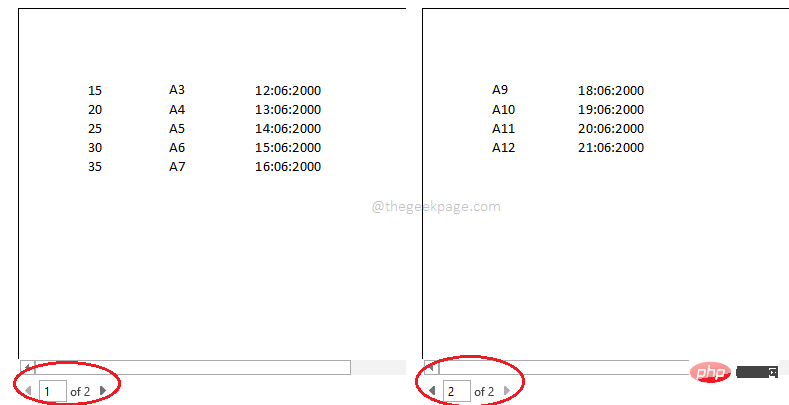
Step 2: That’s it. If you press the CTRL P keys simultaneously, you can see that the 2 print areas are now on 2 different pages and they are ready to print.
PAGE LAYOUT tab at the top as usual. Click the Print Area drop-down menu and click the Clear Print Area option.
That’s all. All your print areas are now cleared and you are now free to print the entire document without the print area causing any trouble. enjoy!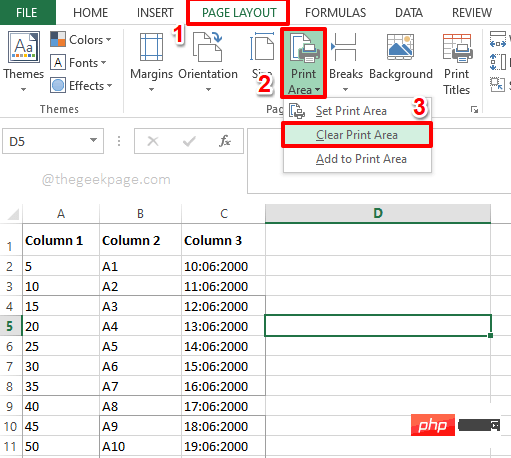
The above is the detailed content of How to print only specific parts of an Excel document. For more information, please follow other related articles on the PHP Chinese website!

Hot AI Tools

Undresser.AI Undress
AI-powered app for creating realistic nude photos

AI Clothes Remover
Online AI tool for removing clothes from photos.

Undress AI Tool
Undress images for free

Clothoff.io
AI clothes remover

Video Face Swap
Swap faces in any video effortlessly with our completely free AI face swap tool!
Hot Article
Hot Tools

Notepad++7.3.1
Easy-to-use and free code editor

SublimeText3 Chinese version
Chinese version, very easy to use

Zend Studio 13.0.1
Powerful PHP integrated development environment

Dreamweaver CS6
Visual web development tools

SublimeText3 Mac version
God-level code editing software (SublimeText3)
Hot Topics


 Fix: ERR_ADDRESS_UNREACHABLE error in Google Chrome
May 15, 2023 pm 06:22 PM
Fix: ERR_ADDRESS_UNREACHABLE error in Google Chrome
May 15, 2023 pm 06:22 PM
Several Windows users have complained that when they try to access some websites on Google Chrome browser on their systems, they are unable to access the web pages. It also displays a message on the browser saying "The site cannot be reached" with error code ERR_ADDRESS_UNREACHABLE. There could be many potential reasons behind this issue, it could be due to website server issues, proxy server settings, unstable internet connection, etc. If you encounter similar problems, don't panic. After deeply analyzing the problem in this article, we got a bunch of solutions. Before proceeding, try the following workarounds: Try checking if the user is trying to access the site from other devices and there are no issues, then this
 Can't use MSI Afterburner in Windows 11? Try the following fixes.
May 09, 2023 am 09:16 AM
Can't use MSI Afterburner in Windows 11? Try the following fixes.
May 09, 2023 am 09:16 AM
MSIAfterburner is an overclocking tool suitable for most graphics cards. Apart from that, you can also use it to monitor the performance of your system. But some users reported that MSIAfterburner is not working in Windows 11. This may be due to several reasons, which we discuss in the following sections. However, when this happens, it prevents you from changing the performance or monitoring it while playing the game. As expected, this poses a significant challenge to gamers. That’s why we’ve dedicated this tutorial to help you understand the issue and walk you through the most effective fixes for MSIAfterburned not working in Windows 11 issue.
 How to set the print area in Google Sheets?
May 08, 2023 pm 01:28 PM
How to set the print area in Google Sheets?
May 08, 2023 pm 01:28 PM
How to Set GoogleSheets Print Area in Print Preview Google Sheets allows you to print spreadsheets with three different print areas. You can choose to print the entire spreadsheet, including each individual worksheet you create. Alternatively, you can choose to print a single worksheet. Finally, you can only print a portion of the cells you select. This is the smallest print area you can create since you could theoretically select individual cells for printing. The easiest way to set it up is to use the built-in Google Sheets print preview menu. You can view this content using Google Sheets in a web browser on your PC, Mac, or Chromebook. To set up Google
 Fix: VAN 1067 error when running Valorant on Windows 11
May 22, 2023 pm 02:41 PM
Fix: VAN 1067 error when running Valorant on Windows 11
May 22, 2023 pm 02:41 PM
The operating system looks much better than its predecessor and has gamer-oriented features like AutoHDR and DirectStorage, but Valorant players have had some trouble launching the game. This is not the first issue faced by gamers earlier, Valorant not opening on Windows 11 is another issue plaguing them but we have covered the ways to fix it. Now it seems that Valorant players who switched to Windows 11 are facing issues due to Secure Boot and TPM2.0 services, which causes the game menu to only show an exit option while running. Many users are getting the VAN1067 error, but it shouldn't be a cause for alarm
 5 Tips to Fix Stdole32.tlb Excel Error in Windows 11
May 09, 2023 pm 01:37 PM
5 Tips to Fix Stdole32.tlb Excel Error in Windows 11
May 09, 2023 pm 01:37 PM
When you start Microsoft Word or Microsoft Excel, Windows very tediously tries to set up Office 365. At the end of the process, you may receive a Stdole32.tlbExcel error. Since there are many bugs in the Microsoft Office suite, launching any of its products can sometimes be a nightmare. Microsoft Office is a software that is used regularly. Microsoft Office has been available to consumers since 1990. Starting from Office 1.0 version and developing to Office 365, this
 DirectX function GetDeviceRemovedReason fails with error
May 17, 2023 pm 03:38 PM
DirectX function GetDeviceRemovedReason fails with error
May 17, 2023 pm 03:38 PM
Almost every high-end game we play relies on DirectX to run efficiently. However, some users reported encountering the DirectX function GetDeviceRemovedReasonfailedwith followed by the error reason. The above reasons are not self-evident to the average user and require some level of research to determine the root cause and the most effective solution. To make things easier, we've dedicated this tutorial to this problem. In the following sections, we will help you identify the potential causes and walk you through the troubleshooting steps to eliminate the DirectX function GetDeviceRemovedReasonfailedwitherror. what causes
 How to change font color on iPhone
May 13, 2023 pm 01:01 PM
How to change font color on iPhone
May 13, 2023 pm 01:01 PM
Color helps how we process things visually, so using a variety of colors in documents, emails, lock screens, and other elements looks better. As with font styles, choosing different font colors can be a good way to avoid text on your phone looking monotonous. How to Change Font Color in Pages App You can change the text color of a document on your iPhone, or you can do it by opening the Pages app on iOS. Within Pages, click the document you want to open. If the document is open in screen view, click the Edit button in the upper right corner. The selected document will now enter editing mode. To change the font color of text in this document, click the desired text to highlight it. Highlight
 3 Ways to Fix System Idle Process High CPU in Windows 11
Apr 28, 2023 pm 07:49 PM
3 Ways to Fix System Idle Process High CPU in Windows 11
Apr 28, 2023 pm 07:49 PM
The system idle process helps make your computer more efficient and responsive by freeing up resources used by other programs and processes. However, you may have noticed that sometimes, your computer's CPU usage is high for system idle processes. System Idle Process High CPU may consume a lot of system resources instead of helping your system run at its peak. This can be a problem for gamers with limited hardware. This problem also occurs when your PC is running for a long time or when you are using multiple programs at the same time and the CPU usage suddenly rises to 100%. Fortunately, you can easily fix high CPU issues in Windows 11. Why is my CPU usage so low in Windows 11