

How to take a screenshot on MacBook Pro

Before you take a screenshot, though, there are two crucial things.
The most important warning is that you must remember that you are not photographing the screen, you are photographing what your Mac is displaying. So if your monitor goes monochrome for some reason and you take a screenshot, the photo will have perfect colors.
You also cannot take screenshots of Blu-ray or DVD players due to copyright issues. The same goes for streaming services like Netflix - you can take a photo, but where the movie is will be blank
Beyond that, you can grab anything on your Mac's screen and Choose between finishing quickly or doing some customization.
How to take a screenshot on MacBook Pro, shortcut
- Hold the Command key
- Hold the Shift key
- Click the Number 3 key
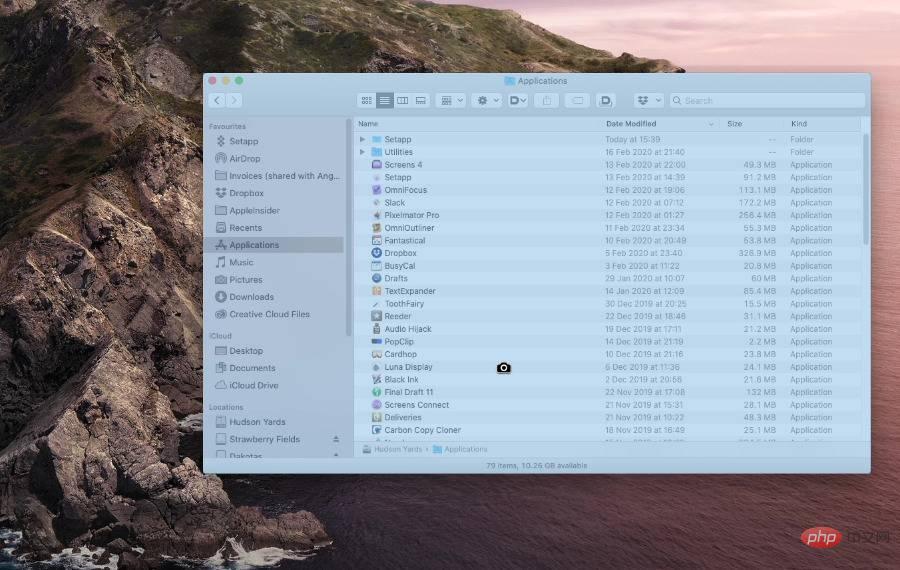
A screenshot of the entire MacBook Pro screen will be briefly displayed on the lower right side of the monitor and then saved to the desktop.
 By default, each screenshot will first appear as a thumbnail in the lower right corner of the screen.
 In the vast majority of cases, this is probably what you want. In the odd situation where you just want to grab a specific part of the screen, you can open that screenshot in an image editor and delete what you don't need.
This image editor can also be your Mac’s built-in editor. You can edit the image while the screenshot briefly appears in the lower right corner, or any time you select it and hit the Spacebar.
Click the marker icon and you'll get a reasonable set of editing tools, including a markup tool and a cropping tool.
How to take a screenshot of a portion of your MacBook Pro screen
However, you can decide ahead of time to take a screenshot of only a specific window or part of the screen.
- Hold the Command key
- Hold the Shift key
- ClickNumber 4 Key
Please note the difference here, you are using the number 4 key. When you do this, your Mac's cursor will change into a crosshair that you can drag to the area you want to grab.
The shot takes place when you release your mouse or trackpad.
 You can only select one window.
 How to take a screenshot of a single window on MacBook Pro screen
- Hold the Command key
- Hold the Shift key
- ClickNumber 4key
- Move the cursor to the window
- ClickSpace bar
- Get ready Once you're done click
How to take a screenshot of a single window on your MacBook Pro screen on a timer
In the example, the capture only happens when you click, While in all other examples it happens immediately. To give yourself a few seconds to arrange a window or select a menu, you can use a timer.
Having seen the use of the number 3 and 4 keys, you probably won't be surprised to learn that this one involves the 5.
- Hold the Command key
- Hold the Shift key
- ClickNumber 5 Key
This time, all that happens is that you see a control bar on the screen. It actually contains buttons that launch everything you've done so far with keystrokes, such as grabbing the entire screen or part of it.
However, it also has an option control.
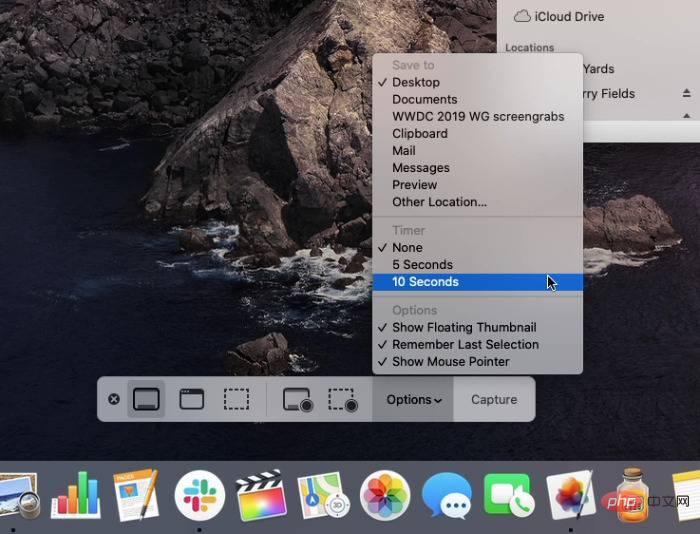 You can set the time delay for taking screenshots.
 Click it and you can choose to shoot immediately, within 5 seconds or within 10 seconds.
You can also choose where to save the screenshot, whether to display it on the screen, etc. The same control strip even includes the option to take a video of the screen instead of a still image.
However, for speed and convenience, Command, Shift and the numbers 3, 4 or 5 's keystrokes cannot be defeated.
The above is the detailed content of How to take a screenshot on MacBook Pro. For more information, please follow other related articles on the PHP Chinese website!

Hot AI Tools

Undresser.AI Undress
AI-powered app for creating realistic nude photos

AI Clothes Remover
Online AI tool for removing clothes from photos.

Undress AI Tool
Undress images for free

Clothoff.io
AI clothes remover

Video Face Swap
Swap faces in any video effortlessly with our completely free AI face swap tool!

Hot Article
Hot Tools

Notepad++7.3.1
Easy-to-use and free code editor

SublimeText3 Chinese version
Chinese version, very easy to use

Zend Studio 13.0.1
Powerful PHP integrated development environment

Dreamweaver CS6
Visual web development tools

SublimeText3 Mac version
God-level code editing software (SublimeText3)
Hot Topics
 1387
1387
 52
52

 How to Fix 'Encryption Credentials Expired” When Printing on Apple Mac
Feb 05, 2024 pm 06:42 PM
How to Fix 'Encryption Credentials Expired” When Printing on Apple Mac
Feb 05, 2024 pm 06:42 PM
Have you ever encountered the "Printer encryption credentials have expired" error message on your Apple Mac computer when trying to print a document? Don't worry! In this tutorial, I will share how to fix expired printer encryption credentials on Apple computers. Let’s get started without further ado. Have you ever encountered the "Printer encryption credentials have expired" error message on your Mac when trying to print a document? Don't worry! In this tutorial, I will share how to fix expired printer encryption credentials on Mac. Let’s get started without further ado. What does it mean if printer encryption credentials expired on Mac? How to Fix Expired Printer Encryption Credentials on Mac Additional Tips and Precautions What Does Expired Printer Encryption Credentials on Mac Mean? Printer encryption credentials on Mac
 How to set the screen of an Apple computer to always be on, and how to make the Mac never sleep
Feb 05, 2024 pm 05:33 PM
How to set the screen of an Apple computer to always be on, and how to make the Mac never sleep
Feb 05, 2024 pm 05:33 PM
Want to stop your Apple Macbook from going to sleep? These are all your options. Apple designed macOS for maximum energy efficiency. Therefore, by default, Apple Mac computers will try to save power as much as possible to extend battery life. Therefore, when you stop using your Mac temporarily, it automatically goes to sleep to save energy. You probably don't want your Mac to go to sleep when you're working on an important task. This guide will show you how to prevent your Mac from going to sleep and keep it awake. How to turn off sleep mode on your Mac macOS lets you control how and when your Mac goes to sleep. However, with the arrival of system settings in macOS Ventura, you may be saving energy
 How to check the battery level of a connected Bluetooth device on your Mac
Feb 05, 2024 pm 01:45 PM
How to check the battery level of a connected Bluetooth device on your Mac
Feb 05, 2024 pm 01:45 PM
Bluetooth accessories such as mice and keyboards are very convenient for your Apple Mac computer. However, these devices have a limited battery life, so checking their battery life regularly ensures you're not caught off guard by sudden disconnections. Who wouldn’t want to check the battery level of a Bluetooth accessory with just a few clicks? Fortunately, your Mac offers several easy ways to check the battery level of Bluetooth devices connected to your Apple Mac computer. Let’s explore these simple options. 1. Check from the Menu Bar on Mac In a Mac, the menu bar is one of the easiest areas to view. Just swipe your cursor to display the menu bar. And, you can make the menu bar always visible in full-screen mode. If you don't see the Bluetooth icon in the menu bar, you need to manually
 How to adjust sleep time on your Mac (set up hibernation)
Feb 05, 2024 pm 02:10 PM
How to adjust sleep time on your Mac (set up hibernation)
Feb 05, 2024 pm 02:10 PM
Do you find that when you don't use your Mac for more than a minute, you constantly need to wake it up? Or do you have the opposite problem, where you leave your Mac alone for a few hours, only to find that when you return it's still awake with the screen on? On your Mac, you can control exactly how long you spend inactive before your display and other components go to sleep. Here's how to adjust your Mac's sleep time. How to set sleep time on Mac In Mac system settings, you can choose how long the display waits before going to sleep. You can choose anywhere from one minute to three hours, or you can choose to have the display never sleep unless you manually put it to sleep. The steps are slightly different depending on which version of macOS you are running.
 Will my work be interrupted if my Mac goes into Sleep Mode while copying a large number of files?
May 08, 2023 pm 08:58 PM
Will my work be interrupted if my Mac goes into Sleep Mode while copying a large number of files?
May 08, 2023 pm 08:58 PM
For example, copying several GB of data to an external hard drive may take several hours. Then the Mac will not be doing any work during the process, and the screen will automatically turn off. Sometimes we even forget that the file copy has not been completed, but the MacBook "Screen" command has been turned off. Mac enters SleepMode, but will file transfers be interrupted? Entering SleepMode will not interrupt file transfer. If the user's MacBook or Mac is always connected to the power supply, and the Mac enters SleepMode, will file transfer be interrupted? You copy hundreds of GB of files from your MacBook to an external hard drive, and close the MacBook screen during the process, causing the Mac to enter SleepMode, but the file
 2 Ways to Lock Photos on Mac
Mar 22, 2024 am 09:06 AM
2 Ways to Lock Photos on Mac
Mar 22, 2024 am 09:06 AM
When you store photos on your Mac, you sometimes include some private photos. To ensure their privacy, you may consider locking them. This prevents others from viewing the photos without permission. This article will explain how to lock photos on Mac to ensure that only you can access them when you need them. How to Lock Photos on Mac [2 Methods] You can lock photos on Mac in two ways – using the Photos app or the Disk Utility app. Method 1: Use the Photos app You can use the Photos app to lock your photos if they are stored in the app. If your photos are stored elsewhere, you'll need to lock them by moving them to the Photos app. Step 1: Add the picture
 How to move files and folders on Mac computer? 4 ways to explain!
Feb 05, 2024 pm 06:48 PM
How to move files and folders on Mac computer? 4 ways to explain!
Feb 05, 2024 pm 06:48 PM
If you want to organize the files and folders on your Apple Mac computer, you may consider moving some content. By moving items, you can create a more organized file structure to work more efficiently or find what you need faster. We'll show you how to move files and folders on macOS using drag and drop, shortcuts or right-click menus, Terminal, and more so you can use the method that makes more sense or that you're most comfortable with. Method 1: Use Drag and Drop on Mac The easiest way to move files and folders on Apple Mac computers is through drag and drop. Whether you're rearranging icons, widgets, and shortcuts on your desktop, or moving items to other locations on macOS, this method is very convenient and easy to use. 1.Open in two
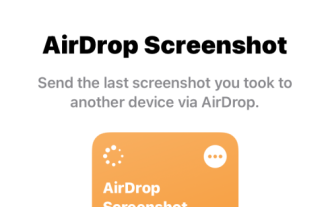 How to Share Last Screenshot on iPhone via AirDrop
Feb 23, 2024 am 08:16 AM
How to Share Last Screenshot on iPhone via AirDrop
Feb 23, 2024 am 08:16 AM
To simplify repetitive tasks, Apple has launched Shortcuts apps that can help you automate common daily operations, such as automatically turning off the Internet connection when you leave your phone, or automatically playing your favorite music list when you get in the car. One task you might want to make easier is sharing the last screenshot you just took without opening the Photos app. This article will introduce how to use the Airdrop function to quickly send iPhone’s latest screenshots to others or other Apple devices. How to quickly share your last screenshot on iPhone Before sharing content, make sure the target device (such as another iPhone, iPad, or Mac) has AirDrop enabled for this to happen