How to adjust the speed of your computer fan in Windows 11?
You may have had to shut down your system at least once due to overheating, or it may have shut down on its own. We've all been there. But what if you could manually control your fans in Windows 11 for optimal results?
Most people would be excited by the idea of manually controlling fan speed, but it's not that straightforward. You have to find the right app that is both compatible and offers the option to not only view but also control the speed.
In the following sections, we will list the various methods for obtaining the correct tools from OEM or third-party sources, as well as fan control in Windows 11 through the BIOS.
What should I know about fan control in Windows 11?
While the built-in settings should do a good job of controlling system temperature, you may sometimes need to manually control the fans in Windows 11.
When doing this, you can set it to the desired value for best results. For example, you can change the speed to high during resource-intensive operations, while if you're just browsing the web, you should be fine keeping it at a lower speed.
Also, when the fan is running at full speed, it makes more noise and causes discomfort than near mid-range. You must also consider this factor when using the manual fan control method in Windows 11.
How to control the computer fan speed?
1. Use the software released by the OEM to control the fan speed
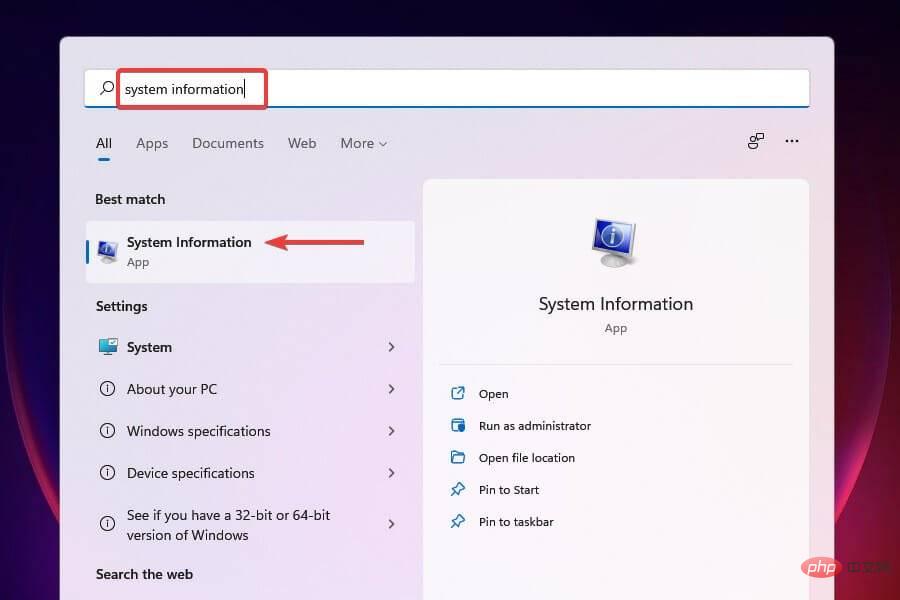
- Press Windows S to start the search menu.
- Enter system information in the text field at the top and click on the relevant search results that appear.

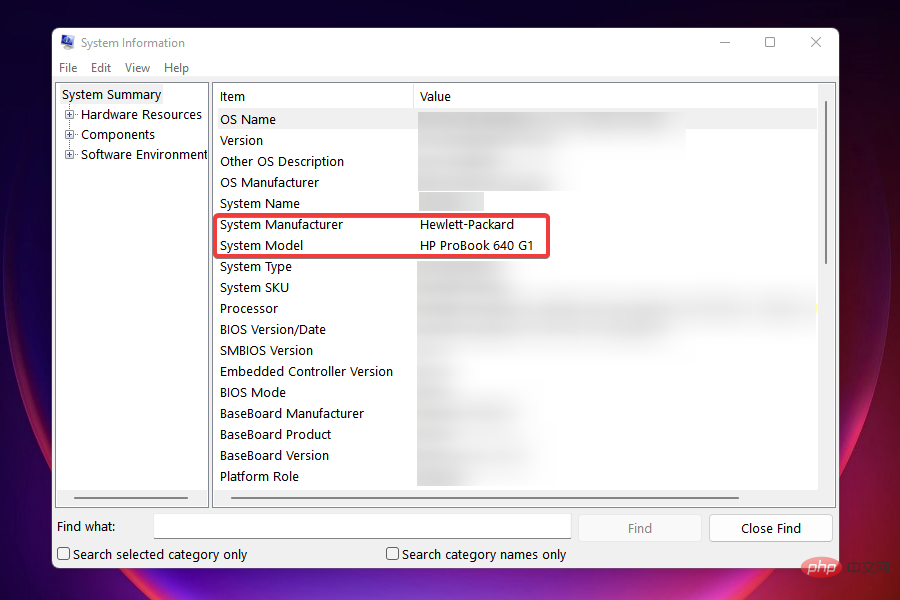
- Locate the System Manufacturer and system model number in the System Summary tab.

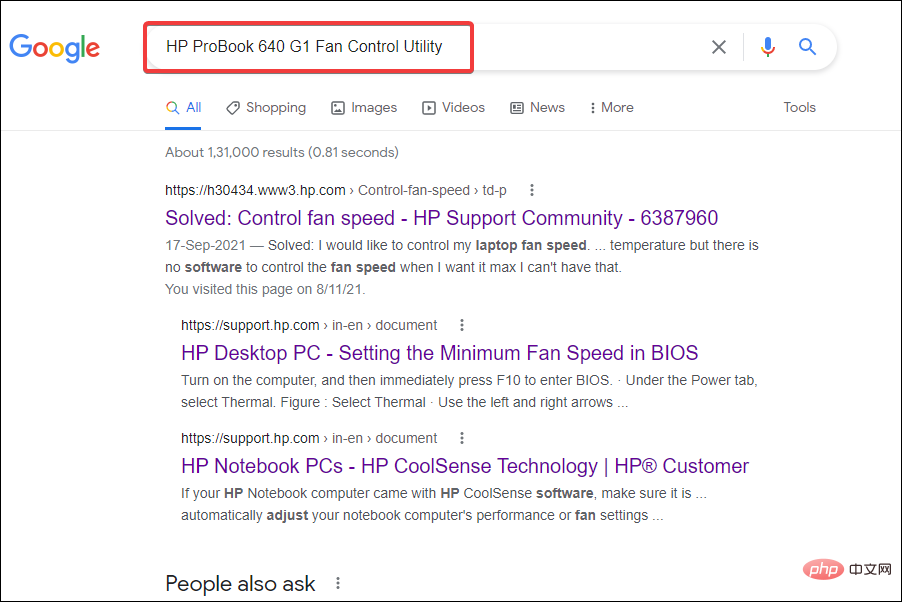
- Next, go to Google or any other valid search engine and search for fan in Windows 11 using manufacturer’s name and model number followed by fan control utility as a keyword controlling software.

- Next, open the OEM’s website, find the relevant utility and download it.
- Navigate to the folder where the downloaded file is stored and double-click it to launch the installer.
- Follow the on-screen instructions to complete the installation process.
After installing the software, you can immediately start controlling your computer fan and setting it to run at your desired speed.
2. Control fan speed on Windows 11 in BIOS
You can easily control fan speed on your PC through BIOS. Controlling PC fans from the BIOS is time-consuming and complex. You must be careful when making changes, as slight mistakes can have fatal effects on your computer.
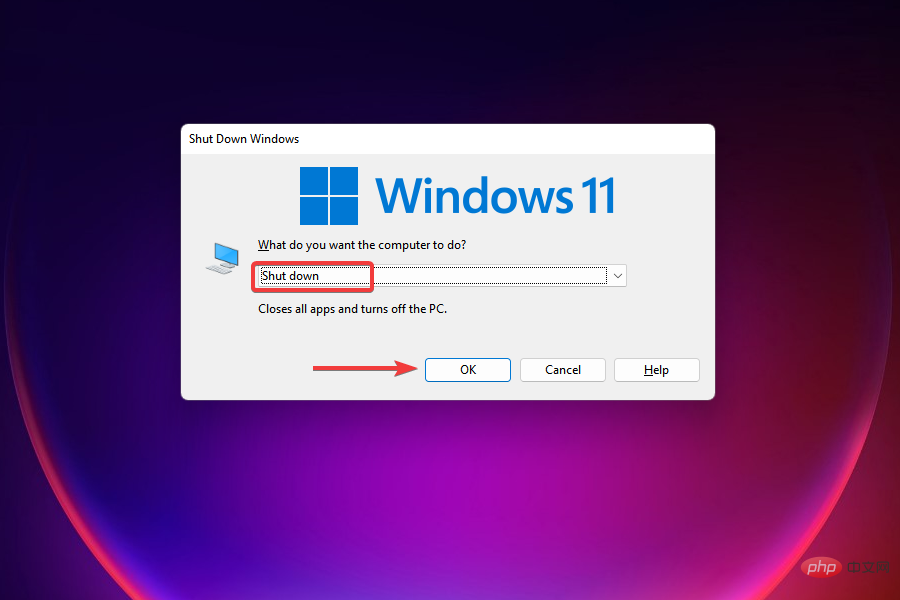
1. Navigate to the desktop and press Start Close Windows box. Alt F4
2. Select Close from the drop-down menu and click OK at the bottom of .
#3. Next, press the button to turn on the computer. Power
4. Once the screen lights up, press the or key (depending on the computer settings) to enter BIOS. Esc F12
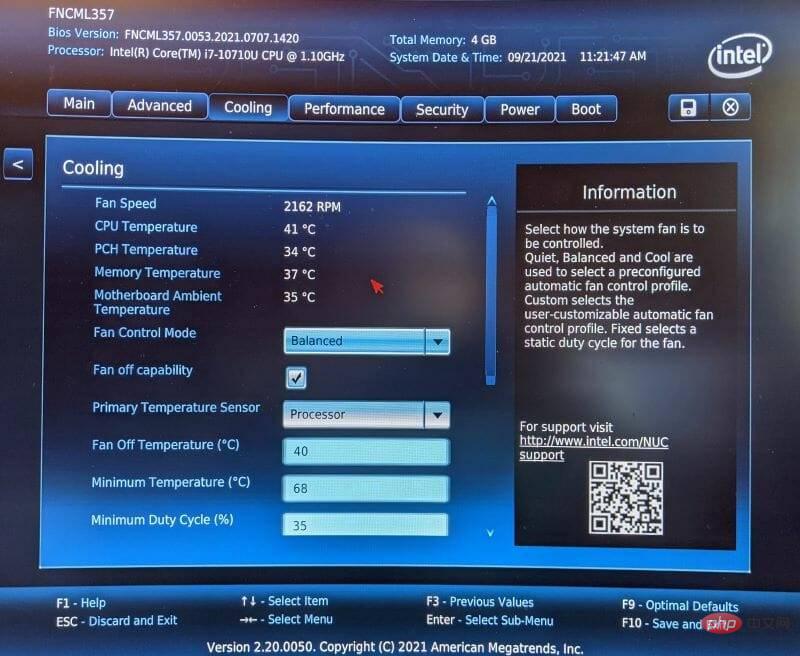
5. Browse through the different options (Advanced, Overclocking, or similar) and find settings related to your computer fan.
6. Once you have found the relevant options, you can now control your computer fan and run it at the desired speed for best results.
Note: Do not change any other settings unless you know the results.
3. Download a third-party utility to control fan speed on Windows 11
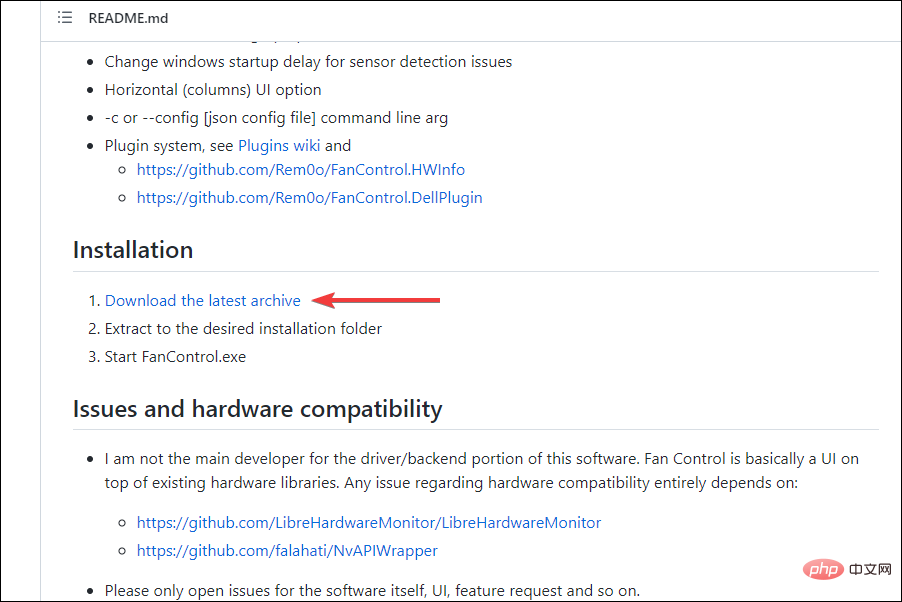
- Go to Fan Control’s GitHub page, scroll down, and click under InstallationDownload the latest archive.

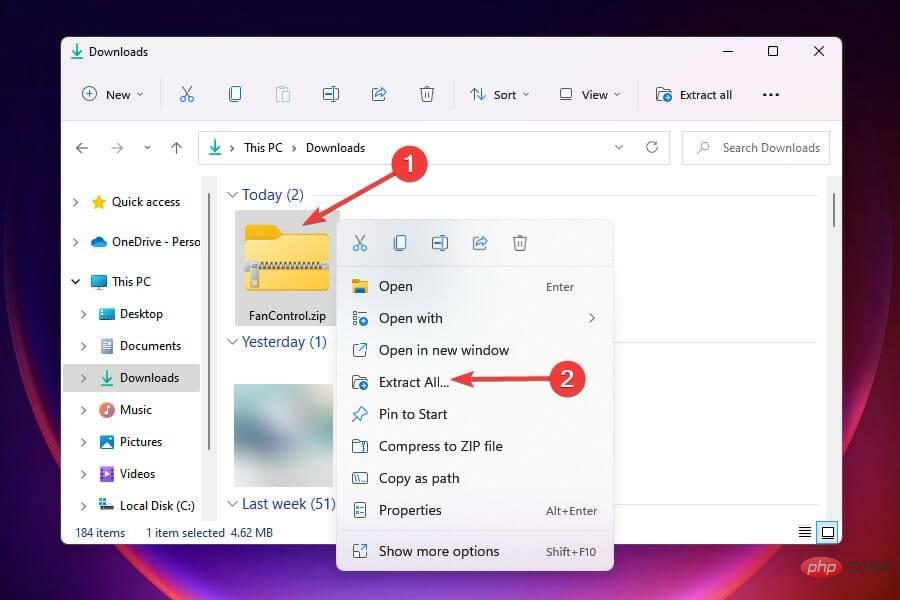
- Navigate to the folder where the downloaded file (.zip format) is stored, right-click on it and select Extract All from the context menu.

- Select the destination where the file will be stored and click Extract in the window that appears.
- Open the folder where the extracted files are stored and double-click the FanControl.exe file to launch the application.

- Choose the appropriate response if the warning pops up and click Yes on the UAC (User Account Control) prompt that appears.
- Now let the Fan Control application scan the system and choose the relevant response when prompted.
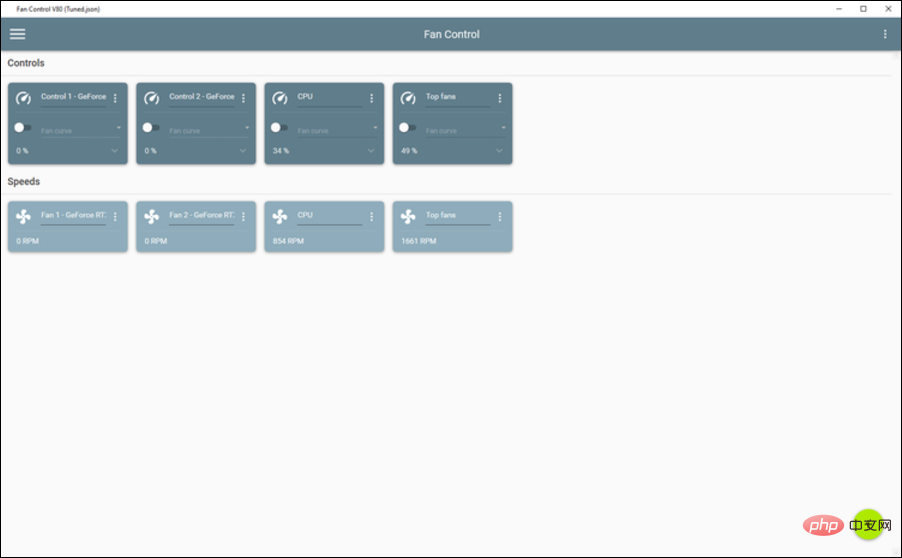
- Once the scan is complete, it will list all fans connected to the system under Controls and the speed at which they subsequently run under Speeds.

- You can now make relevant changes to the fan speed and set it to the desired value.
Fan Control is one of the best open source third-party utilities on the market and is free to use. It provides a simple interface that allows users to quickly change settings and control fans in Windows 11.
Why can't I control the fan in Windows?
Some users may not be able to control fans in Windows 11 or even previous iterations. This is mainly due to BIOS settings. Third-party utilities will be useless if these don't allow for modification of fan speed.
Besides this, the utility may not be compatible with the hardware, in which case you will not be able to make any modifications.
Can I turn off my computer fan to reduce noise in Windows 11?
Never turn off your computer fan or set its speed too low as it will not cool the system.
Whenever you run a bunch of applications or have major processes in the background, your computer may get hot and needs to reduce overheating. This is where computer fans come in.
If the temperature inside the system reaches close to 95°C, the likelihood of damage to precision components is high. Therefore, it is recommended that you let your computer choose the best fan speed or set it to normal levels while following the manual method.
What should I do if the fan keeps running in Windows 11?
When the temperature inside the system is about to drop to the optimal level, the fan starts running. If your computer's fan is constantly running, it's an indication of ongoing overheating.
If you are running high-end applications or performing multiple tasks at once, try eliminating these. When the problem persists, dust buildup is to blame.
If there is heavy dust accumulation in the vents, the hot air inside cannot escape, causing the temperature to rise, prompting the computer fan to start working. And, since the fan is unable to reduce the temperature to optimal levels, it continues to run.
That’s all there is to know about PC fan control in Windows 11. Before you take control and start modifying fan speeds, do thorough research to understand the settings you need.
You can also check out the best fans on the market in case you are having trouble with the one you currently have installed.
The above is the detailed content of How to adjust the speed of your computer fan in Windows 11?. For more information, please follow other related articles on the PHP Chinese website!

Hot AI Tools

Undresser.AI Undress
AI-powered app for creating realistic nude photos

AI Clothes Remover
Online AI tool for removing clothes from photos.

Undress AI Tool
Undress images for free

Clothoff.io
AI clothes remover

AI Hentai Generator
Generate AI Hentai for free.

Hot Article

Hot Tools

Notepad++7.3.1
Easy-to-use and free code editor

SublimeText3 Chinese version
Chinese version, very easy to use

Zend Studio 13.0.1
Powerful PHP integrated development environment

Dreamweaver CS6
Visual web development tools

SublimeText3 Mac version
God-level code editing software (SublimeText3)

Hot Topics
 1378
1378
 52
52
 How to convert XML to PDF on your phone?
Apr 02, 2025 pm 10:18 PM
It is not easy to convert XML to PDF directly on your phone, but it can be achieved with the help of cloud services. It is recommended to use a lightweight mobile app to upload XML files and receive generated PDFs, and convert them with cloud APIs. Cloud APIs use serverless computing services, and choosing the right platform is crucial. Complexity, error handling, security, and optimization strategies need to be considered when handling XML parsing and PDF generation. The entire process requires the front-end app and the back-end API to work together, and it requires some understanding of a variety of technologies.
 What is the reason why PS keeps showing loading?
Apr 06, 2025 pm 06:39 PM
PS "Loading" problems are caused by resource access or processing problems: hard disk reading speed is slow or bad: Use CrystalDiskInfo to check the hard disk health and replace the problematic hard disk. Insufficient memory: Upgrade memory to meet PS's needs for high-resolution images and complex layer processing. Graphics card drivers are outdated or corrupted: Update the drivers to optimize communication between the PS and the graphics card. File paths are too long or file names have special characters: use short paths and avoid special characters. PS's own problem: Reinstall or repair the PS installer.
 How to jump from Word plug-in to browser for login authorization?
Apr 01, 2025 pm 08:27 PM
How to achieve login authorization from within the application to outside the application? In some applications, we often encounter the need to jump from one application to another...
 xml online formatting
Apr 02, 2025 pm 10:06 PM
XML Online Format Tools automatically organizes messy XML code into easy-to-read and maintain formats. By parsing the syntax tree of XML and applying formatting rules, these tools optimize the structure of the code, enhancing its maintainability and teamwork efficiency.
 Does H5 page production require continuous maintenance?
Apr 05, 2025 pm 11:27 PM
The H5 page needs to be maintained continuously, because of factors such as code vulnerabilities, browser compatibility, performance optimization, security updates and user experience improvements. Effective maintenance methods include establishing a complete testing system, using version control tools, regularly monitoring page performance, collecting user feedback and formulating maintenance plans.
 How to convert XML to PDF on Android phone?
Apr 02, 2025 pm 09:51 PM
Converting XML to PDF directly on Android phones cannot be achieved through the built-in features. You need to save the country through the following steps: convert XML data to formats recognized by the PDF generator (such as text or HTML); convert HTML to PDF using HTML generation libraries such as Flying Saucer.
 How to speed up the loading speed of PS?
Apr 06, 2025 pm 06:27 PM
Solving the problem of slow Photoshop startup requires a multi-pronged approach, including: upgrading hardware (memory, solid-state drive, CPU); uninstalling outdated or incompatible plug-ins; cleaning up system garbage and excessive background programs regularly; closing irrelevant programs with caution; avoiding opening a large number of files during startup.
 The XML file is too large, can I convert PDFs on my phone?
Apr 02, 2025 pm 09:54 PM
It is difficult to directly convert super large XML to PDF on mobile phones. It is recommended to adopt a partition strategy: cloud conversion: upload to the cloud platform and processed by the server. It is efficient and stable but requires network and possible payment; segmented processing: Use programming tools to split large XML into small files and convert them one by one, requiring programming capabilities; find conversion tools that specialize in processing large files, pay attention to checking user reviews to avoid choosing software that is prone to crash.


