How to resolve write proxy settings access denied error on Windows 11?
Many Windows 11 users have reported seeing the error message "Error writing proxy settings - Access is denied" during system startup or when trying to execute commands through the command prompt. Typically, this error occurs when trying to run any command or after upgrading to Windows OS, some improperly installed 3rd party applications may interfere with the command prompt.
Are you troubled by this Error writing proxy settings message on your Windows 11 computer? Then you've arrived at the right place. In this article, we have curated some possible solutions that can help you resolve this issue on your computer.
Fix 1 – Change the default Terminal app for Windows
Have you changed from the default Terminal app on your Windows 11 PC to some third-party Terminal app? This change in the terminal application could then cause the specific error mentioned above. Therefore, you need to check the Terminal application for any changes and then switch back to the Windows default Terminal application.
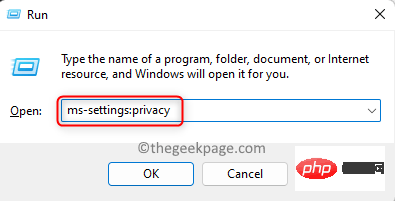
1. Just hold down the Windows and R key combination to open the Run box.
Type ms-settings:privacy and press Enter to open Privacy ## in the Windows Settings application #和安全.
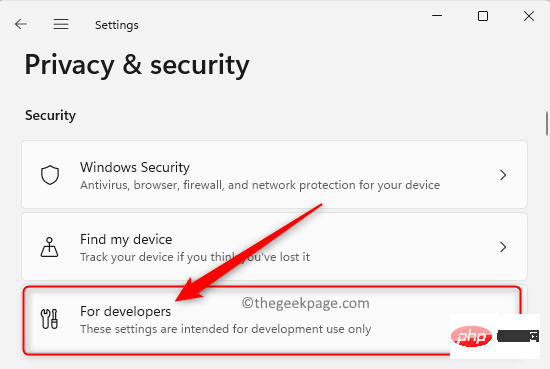
Security section, click on the tile labeled for Developer.
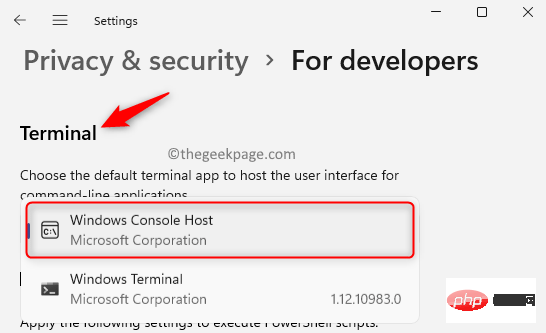
Developer page, scroll down and find the Terminal section.
3. Once you reach theTerminal section, check to see if Windows Console Host is used as the default terminal application.
If you are using some third-party terminal application, click the drop-down menu to see the options from which you can choose the default terminal application for your Windows operating system. From the options, selectWindows Console Host or Windows Terminal.
Restart the computer. Use the default terminal application while executing any command to check if the error has been fixed.
Fix 2 – Perform a Clean BootStarting the system in Clean Boot mode helps identify errors caused by third-party applications installed on the PC. If you don't see the error after a clean boot, then there are some conflicting third-party applications that are causing the error. 1. Click theWindows button (blue square icon) on the taskbar.
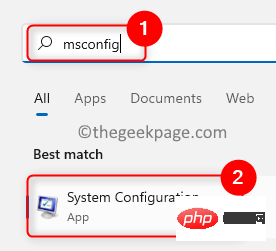
In the Windows search box, typemsconfig to find system configuration.
Click on thesystem configuration shown in the search results.
System ConfigurationAfter the window opens, select the Service tab.
At the bottom of this dialog box, make surethe box next to Hide all Microsoft services is checked.
Then, click theDisable all button in the lower right corner.
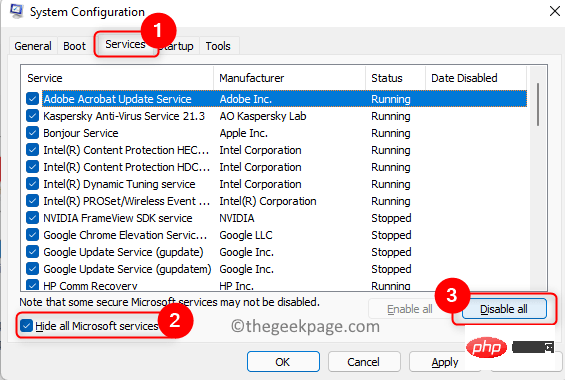
Launch tab.
Here, click on the linkto open the Task Manager.

Startup tab in Task Manager. You need to disable the application from here.
To do this,select the program in the list and click the Disable button.
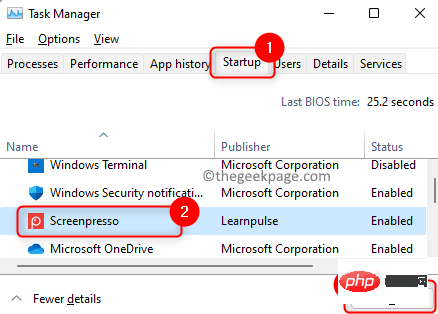
System Configuration window, click Apply, and then click OK to confirm the changes.
When prompted to perform a restart, click theRestart button.
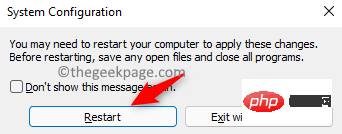
If you don't see an error message, you need to find the program that caused this error. You need to review all recently installed applications and try to uninstall them from your PC. On a trial and error basis, you can try removing 3rd party apps one at a time.
Fix 3 – Reset IP Configuration
1. Click the Windows key on your keyboard.
Type command prompt in the Windows search bar.
Right-click Command Prompt in the search results and select Run as administrator.
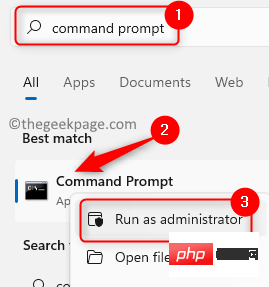
#2. In a terminal window, type the following commands and execute them one after another to release the IP address, refresh DNS, and update the IP address.
ipconfig /发布ipconfig /flushdnsipconfig /更新
3. After executing the above command, restart the computer.
Check if the error has been fixed.
Fix 4 – Clean Startup Programs
Sometimes, newly installed programs can be configured and added to the list of startup programs on the computer, which in turn can cause this error.
You need to open Task Manager and view Startup Programs to find the application causing this issue. You can then disable the program from running on the next startup.
1. Press the Ctrl Shift Esc keys at the same time to open the Task Manager.
After the Task Manager window opens, select the Start option card.
2.Select the application and click the Disable button at the bottom.
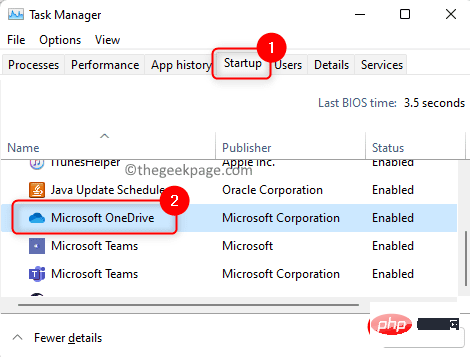
#Disable all startup applications in the list as described above.
3. Close Task Manager and restart the computer.
Check if the error has been resolved.
If the error persists, it can be said that a 3rd party application is causing this error.
4. To find the application causing this error, open Task Manager again.
Enable one application at a time. To do this, select the application and click the Enable button.
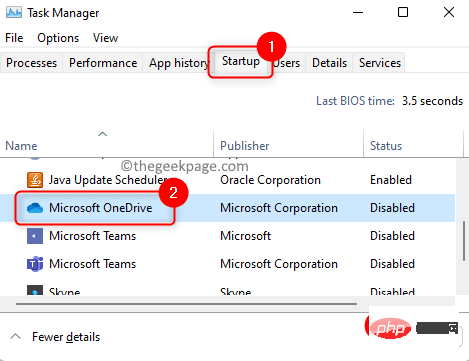
Check if you still see the error.
Fix 5 – Access Windows Terminal as Administrator
If you see this “Error writing proxy settings” when executing a command using Windows Terminal, you need to use Windows with administrative rights terminal.
1. Use the Windows and R key combination to open the Run dialog box.
Enter wt in the text box.
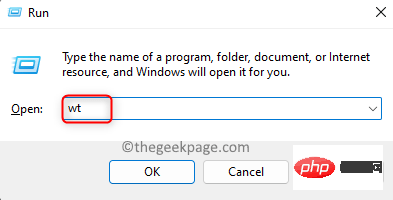
Hold down the Ctrl Shift Enter key at the same time.
2. When User Account Control prompts, click Yesto grant permission to run the program.
Now, try executing the command you tried earlier and check if the error still exists.
Fix 6 – Roll back to a previous version of Windows 11
1. Press the Windows R key to open the Run box.
Type ms-settings:recovery and press Enter to open recovery settings.
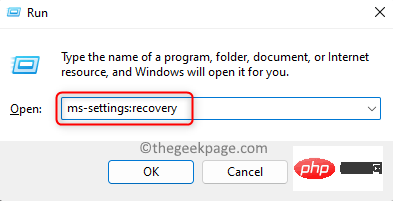
#2. On the Recovery page, scroll down and find the Recovery Options section.
Here, click the Back button.
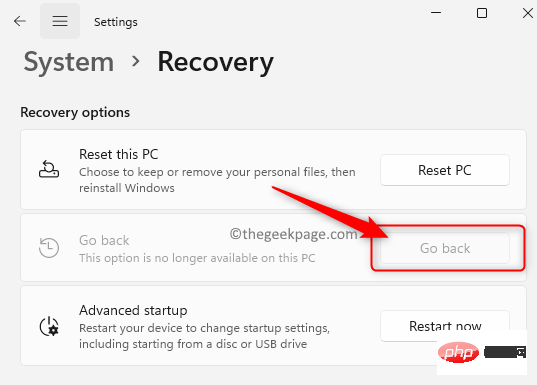
Follow the on-screen instructions to complete rolling Windows back to a previous version.
NOTE: If the "Back" button is gray, it means you are not allowed to roll back to any previous Windows 11 version.
Encountering errors during system startup can prevent you from completing tasks on your PC. We hope this article has provided enough information on fixing "Error writing proxy settings - Access Denied" on Windows 11 PC.
The above is the detailed content of How to resolve write proxy settings access denied error on Windows 11?. For more information, please follow other related articles on the PHP Chinese website!

Hot AI Tools

Undresser.AI Undress
AI-powered app for creating realistic nude photos

AI Clothes Remover
Online AI tool for removing clothes from photos.

Undress AI Tool
Undress images for free

Clothoff.io
AI clothes remover

Video Face Swap
Swap faces in any video effortlessly with our completely free AI face swap tool!

Hot Article

Hot Tools

Notepad++7.3.1
Easy-to-use and free code editor

SublimeText3 Chinese version
Chinese version, very easy to use

Zend Studio 13.0.1
Powerful PHP integrated development environment

Dreamweaver CS6
Visual web development tools

SublimeText3 Mac version
God-level code editing software (SublimeText3)

Hot Topics
 1387
1387
 52
52
 What does Discord Do Not Disturb mean and how to use it?
Jun 03, 2023 pm 01:02 PM
If you have Discord Do Not Disturb enabled, you will not see any notifications on your app. This includes servers, group chats, and direct messages. Discord is a chat application that allows users to communicate through text, pictures, and video calls in games. It is designed to be a communication channel for gamers to chat and coordinate with each other in real time. DND settings allow you to disable all incoming messages you don't want to see. This is useful if you don't want to be disturbed by any messages while you are working. Additionally, you can also try the best Discord bots that can help you manage your guild while you are away. If you're wondering what Discord Do Not Disturb means and how to use it, this tutorial should help. D
 How to disable driver signature enforcement in Windows 11
May 20, 2023 pm 02:17 PM
Microsoft has built several security features into Windows to ensure your PC remains secure. One of them is driver signature enforcement in Windows 11. When this feature is enabled, it ensures that only drivers digitally signed by Microsoft can be installed on the system. This helps most of the users to a great extent as it protects them. But there is a downside to enabling driver signature enforcement. Suppose you find a driver that works for your device, but it is not signed by Microsoft, although it is completely safe. But you won't be able to install it. Therefore, you must know how to disable driver signing in Windows 11
 Error code 22: How to fix graphics device driver Try updating graphics driver or clearing CMOS
May 19, 2023 pm 01:43 PM
What does graphics device error code 22 mean and what causes it? When you encounter error code 22, you will always see the error message This device is disabled. (Code 22). You can view more details about this graphics device driver error code 22 by going to the Device Status area in the device properties. We also discussed Error code 11 in Windows 43. You can also check out our guide on how to fix graphics device error code 31 on your PC. Device is actually disabled: The device in question may throw you this error code 22 and is actually disabled. There are driver issues: Incompatible or corrupted driver files can also cause multiple issues with the device program. Drivers are not the most
 How to fix Windows 11 activation error 0xc004c060
May 17, 2023 pm 08:47 PM
Why am I encountering Windows 11 activation error 0xc004c060? First make sure you are using genuine Windows and that the license key is valid. Also, check if it was obtained from an official source and if the key is suitable for the installed OS version. If there is an issue with any of these, you may encounter Windows 11 activation error 0xc004c060. So be sure to verify these and if you find everything is in order, move on to the next section. If you obtained the key through unreliable means or believe that the installed copy is a pirated version, you will need to purchase a valid key from Microsoft. In addition to this, misconfigured settings, missing
 0x80010105: How to fix this Windows update error
May 17, 2023 pm 05:44 PM
Microsoft regularly releases Windows updates to improve functionality or increase the security of the operating system. You can ignore some of these updates, but it's important to always install security updates. While installing these updates, you may encounter error code; 0x80010105. An unstable connection usually causes most update errors, and once the connection is reestablished you're good to go. However, some require more technical troubleshooting, such as the 0x80010105 error, which is what we will see in this article. What causes WindowsUpdate error 0x80010105? This error may occur if your computer has not been updated in a while. Some users may have permanently disabled W for their reasons
 How to disable display scaling for high DPI settings in Windows 11 or 10
May 22, 2023 pm 10:11 PM
The default display scaling feature on Windows 10 or later is a core component of the Windows operating system. But sometimes, this feature of certain apps can cause compatibility issues, unreadable text, blurry logos, and ultimately, app crashes. This can be a huge headache if you're dealing with 2160p or higher resolutions. There are many ways to disable the default display scaling feature on high DPI settings. We've selected the best ones and detailed step-by-step instructions for each process. How to Disable Display Scaling on High DPI Settings There is a way, all you have to do is disable high DPI scaling for a single application, and there is a way to do it for the entire Window
 5 Ways to Disable Delivery Optimization Service in Windows
May 17, 2023 am 09:31 AM
There are many reasons why you might want to disable the Delivery Optimization service on your Windows computer. However, our readers complained about not knowing the correct steps to follow. This guide discusses how to disable the Delivery Optimization service in a few steps. To learn more about services, you may want to check out our How to open services.msc guide for more information. What does Delivery Optimization Service do? Delivery Optimization Service is an HTTP downloader with cloud hosting solution. It allows Windows devices to download Windows updates, upgrades, applications and other large package files from alternative sources. Additionally, it helps reduce bandwidth consumption by allowing multiple devices in a deployment to download these packages. In addition, Windo
 NET HELPMSG 3774: How to fix this error in 5 steps
May 17, 2023 pm 09:27 PM
Many of our readers have encountered error code NETHELPMSG3774 when trying to create a new user account through the command prompt. The error states that the user was successfully created but could not be added to the USERS local group. Why do I receive the NETHELPMSG3774 error code? If you receive error code NETHELPMSG3774 when trying to create a user account on your Windows PC, it may be due to one or more of the following reasons. Incomplete Windows Installation – If Windows was not installed correctly, or the installation process was interrupted, the NETHELPMSG3774 error may occur during user account creation. Corrupted user profile – if


