

There are two situations to distinguish. If you apply the framework, you have no referenceWSGIStandard, then before writing the application framework, you must define a set of your own servers. Of course, this article does not adopt this approach. Professional things should be done by professional people. We will write a framework that complies with the WSGI standard, so we only need to introduce a server that complies with WSGI.
So what are the wsgi servers? ? Here are two simple examples
uwsgi: This server is written in c and is an application container with a wide range of application scenarios. In addition to supporting WSGI, it also supports other protocols, such as HTTP, WebSocket, etc. Not only that, it also provides multiple operating modes such as multi-process, multi-thread, coroutine, asynchronous IO, etc., and also provides many advanced functions, such as memory sharing, scheduled tasks, rapid hot deployment, etc.
waitress: The server is written using python. It is a very lightweight, very reliable, and supports multi-threadingWSGI Server, can be used to run Python Web applications.
The web framework of our article uses uswgi.
The information on uwsgi has been briefly introduced above. This paragraph will briefly introduce the installation and simple configuration of uwsgi.
Install uwsgi, in python, just use pip to install it directly, for example:
pip3 install uwsgi
##uwsgi supports multiple formats, which can be directly on the command line, for example:
uwsgi --http :8080 --wsgi-file myapp.py --callable app
uwsgi --ini myapp.ini
myapp.ini is as follows:
[uwsgi]
http = :8080
wsgi-file = myapp.py
callable = app
uwsgi also supports multiple formats, such as: xml, yaml, json, etc.
url, for example:
uwsgi --ini http://127.0.0.1:8080/myapp.ini
uwsgi process Users and user groups
uid=pdudo
gid=pdudoGroups
uwsgi process uses the pdudo user, and the group is specified using pdudoGroups
project to specify the project name, such as project=pdudoProject
base to specify the process home directory, such as base=/home/pdudo/
to True, and then set the number of process. It is recommended that the number of processes does not exceed the number of cpu cores, for example: <div class="code" style="position:relative; padding:0px; margin:0px;"><pre class='brush:php;toolbar:false;'>master=True
process=16</pre><div class="contentsignin">Copy after login</div></div>Set external
AddressIf you want to communicate externally, there are many configurations, such as
, etc., but the most commonly used one is http , we can point directly to a socket address, for example: <div class="code" style="position:relative; padding:0px; margin:0px;"><pre class='brush:php;toolbar:false;'>http=0.0.0.0:8000</pre><div class="contentsignin">Copy after login</div></div>uwsgi startup and shutdown
Directly use
uwsgi to start the configuration, such as: <div class="code" style="position:relative; padding:0px; margin:0px;"><pre class='brush:php;toolbar:false;'> uwsgi</pre><div class="contentsignin">Copy after login</div></div> If you do not want to set the configuration file, you can directly start it from the command line, such as:
uwsgi --http :8080
If you want to use the configuration file To start, you can use the load configuration option, for example:
Read the configuration from
ini to start the server <div class="code" style="position:relative; padding:0px; margin:0px;"><pre class='brush:php;toolbar:false;'>uwsgi -ini app.ini</pre><div class="contentsignin">Copy after login</div></div> Read from
Get the configuration to start the server <div class="code" style="position:relative; padding:0px; margin:0px;"><pre class='brush:php;toolbar:false;'>uwsgi --json app.json</pre><div class="contentsignin">Copy after login</div></div>In
, you can shut down the server by sending a signal to the process. The corresponding signal is: SIGINT.
kill -2 uwsgiPID
to start a simple demo, first we write an application that conforms to the WSGI standard. For example, our demo is:<div class="code" style="position:relative; padding:0px; margin:0px;"><pre class='brush:php;toolbar:false;'>def application(environ, start_response):
status = "200 OK"
headers = [("Content-type","text/html"),("Server","pdudo_web_sites")]
start_response(status,headers)
return [b&#39;Hello, pdudos.&#39;]</pre><div class="contentsignin">Copy after login</div></div>In the above code, we define a function
, the formal parameters are environ and start_response, the former is a dictionary, the latter is a function, in application, the request needs to be defined Status and phrases, and response headers. Then call the start_response function, which needs to pass in the status and response header. Finally, a message body will be returned. If you don’t understand this, you can take a look at the
standard. We save the above code as
, and then use uwsgi to start the project: <div class="code" style="position:relative; padding:0px; margin:0px;"><pre class='brush:php;toolbar:false;'>uwsgi --http :8080 --wsgi-file main.py</pre><div class="contentsignin">Copy after login</div></div>The above code, the command used To start
, specify the http port as 8080. The listening network card is not specified. The default is all network cards, starting from swgi-file will specify the wsgi application we wrote ourselves. After startup, we use
to get the following information:
本篇文章,很大部分都在描述uwgi,这是因为我们将选用其为web服务器,所以很大的篇章都在描述它,现在,我们已经会基本的操作了,我们应该来写一个简单的web框架了。
我们写的web框架如下:
webRoute = {}
def application(environ, start_response):
    path = environ['PATH_INFO']
    if webRoute[path]:
        func = webRoute[path]
        code , body = func(environ)
        status = "%d OK" % (code)
        headers = [("Content-type","text/html"),("Server","pdudo_web_sites")]
        start_response(status,headers)
        return [body.encode()]
def Routes(path,func):
    print("add routes: %s %s" %(path,func))
webRoute[path] = func哎,短短17行,我们基本的框架就写完了,厉害吧,我们将次代码保存到本地,命名为myWeb.py ,目的是和逻辑代码分开。上述代码,我们定义了一个webRoute字典来存储路由信息,我们想要存储key为请求的url,值为可被调用的函数。
我们为此专门写了一个Routes函数,该函数将传入2个值,第一个是请求的url,第二个是可被调用的函数。
在application中,会首先获取请求的路径,而后再根据webRoute的值,进行匹配,若匹配到了,则执行该函数,该函数必须2个值,第一个是状态码,第二个是响应报文主体。 我们将根据返回的信息,组合成状态码以及响应头,通过调用start_response函数,将2个参数携带上,最后return一个报文主体。
接下里,我们就可以写我们的逻辑代码了,我们编写如下:
import myWeb
app = myWeb.application
def index(*args):
    return (200,"hello world")
def d345(*args):
    return (400,"dasda")
myWeb.Routes("/index",index)
myWeb.Routes("/123",d345)我们将上述代码保存到本地,命名为main.py。
上述代码,我们先引用了刚刚保存到本地的myWeb文件,定义一个变量app用于引用myWeb.application函数。接着,我们便定义了2个函数,分别是index和d345,2个函数的共同之处是返回了一个元组,元组前者是int类型,将用于状态码,后则是str类型,将用于返回响应报文主体。
最后,我们通过myWeb.Routes将2个函数于路由串联起来,分别对应为:
/index: index函数。
/123: d456函数
我们应用框架就写完了,我们需要使用uwsgi来启动一下我们写的框架:
uwsgi --http :8080 --wsgi-file main.py --callable app
这里新增了一个配置项,callable该参数的意思是,指定应用起始函数,默认是application,如果不是这个名称,则需要额外指定,我们定义的是app,所以需要将其指定为app。
启动后,我们可以观察一下,我们之前在框架Routes函数中,我们打印了路由和函数的信息,我们可以看下uwsgi输出的信息,是有有我们定义的函数。
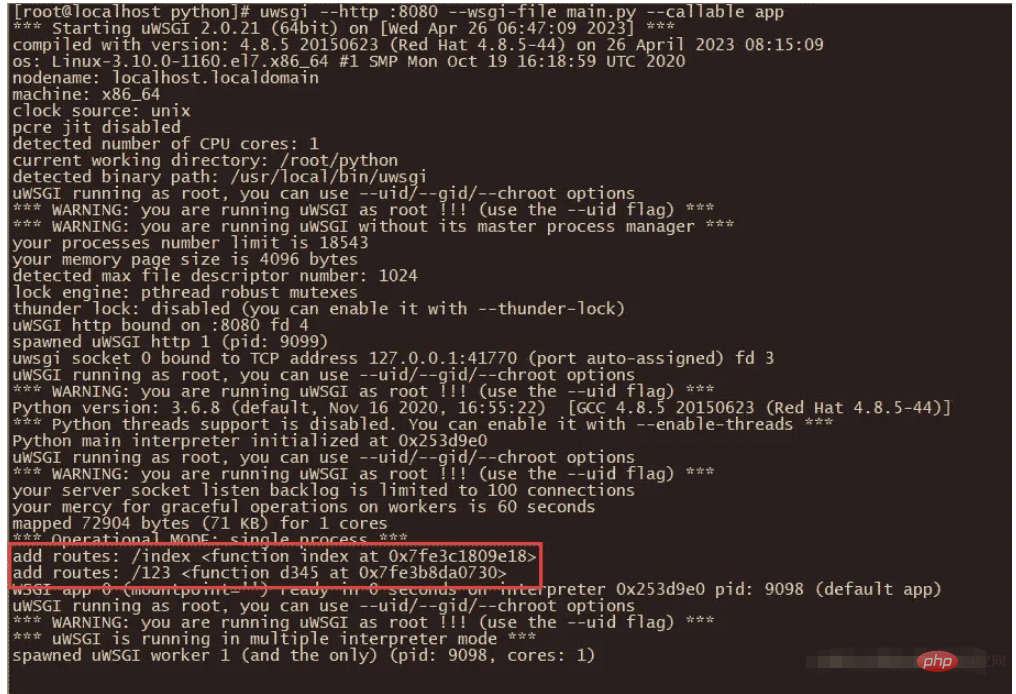
发现没问题后,我们使用curl再来请求一下路由,验证是否有问题:
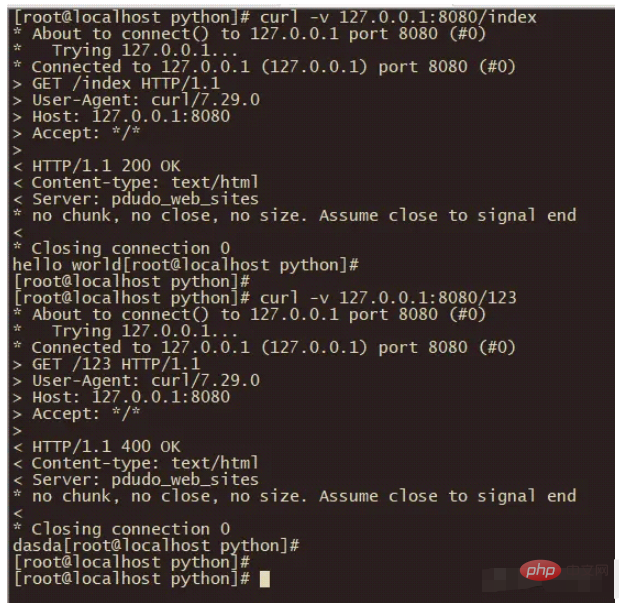
如上结果,结果正确输出。
The above is the detailed content of How to implement a simple web application framework using Python?. For more information, please follow other related articles on the PHP Chinese website!


![[Web front-end] Node.js quick start](https://img.php.cn/upload/course/000/000/067/662b5d34ba7c0227.png)


