For the development environment, we will use Visual Studio Community Edition.
If it is not installed on your computer yet, you can download it from here. and install desktop development using C.

Now that we have Visual Studio for desktop development in C, we can start our project.
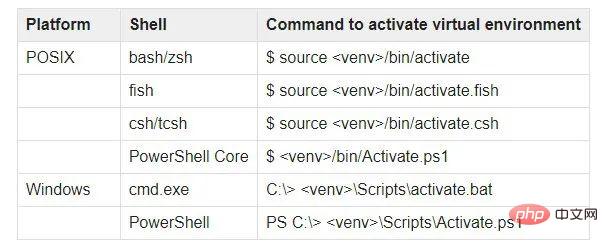
Use Visual Studio to open a new directory and create a new python environment. We will use venv. Open your integrated terminal and write python -m venv venv. Then activate the environment by typing venv/bin/Activate.ps1. This is for PowerShell.
If you are using any other terminal you can find the full list here

Now that we have finished creating the virtual environment, let’s start extracting Our dependencies. For this we will need opencv and face_recognition. Use pip within your terminal.
pip install opencv-python face_recognition
Face Recognition is a library that uses the state-of-the-art dlib library. We're ready to write some code and recognize some faces.
Create a new python file, we will call the file missingPerson.py, assuming we will use our application to match missing persons. Import our dependencies and write our first few lines.
import cv2
import numpy as np
import face_recognition
import os

from face_recognition.api import face_distance
Assuming all of our photos are stored in our server storage, we need to first pull the images of all the people into our application and read those images.
path = 'MissingPersons'
images = []
missingPersons = []
missingPersonsList = os.listdir(path)

for missingPerson in missingPersonsList :
    curImg = cv2.imread(f'{path}/{missingPerson}')
    images.append(curImg)
    missingPersons.append(os.path.splitext(missingPerson)[0])
print(missingPersons)In this section we will use opencv to read all images of missing persons and append them to our missingPerson list.
After we read all the missing face images from storage, we need to find the face encoding so that we can use the CNN face detector to create a 2D array of face bounding boxes in the image.
def findEncodings(images):
    encodeList = []
    for img in images:
        img = cv2.cvtColor(img, cv2.COLOR_BGR2RGB)
        encode = face_recognition.face_encodings(img)[0]
        encodeList.append(encode)
    print(encodeList)
    return encodeList

encodeListKnown = findEncodings(images)
print('Encoding Complete')We store the two-dimensional array into a list of known face codes. This will take several minutes.
Now that we have the facial codes for all the missing people, all we have to do now is match them to our reporter image. face_recognition is very convenient to use.
def findMissingPerson(encodeListKnown, reportedPerson='found1.jpg'):
    person = face_recognition.load_image_file(f'ReportedPersons/{reportedPerson}]')
    person = cv2.cvtColor(person,cv2.COLOR_BGR2RGB)

    try:
        encodePerson = face_recognition.face_encodings(person)[0]

        comparedFace = face_recognition.compare_faces(encodeListKnown,encodePerson)
        faceDis = face_recognition.face_distance(encodeListKnown,encodePerson)
        matchIndex = np.argmin(faceDis)
        if comparedFace[matchIndex]:
            name = missingPersons[matchIndex].upper()
            print(name)
            return name
        else:
          print('Not Found')
          return False

    except IndexError as e:
        print(e)
return eFirst we need to load the image file of the reporter and encode their face. All that remains is to compare the reported face encodings with what we already know about face encodings. Then a simple logic matches their index and returns if the person is found in our missingPersons list.
This kind of facial recognition is not only used to find missing people. It detects and recognizes faces and can operate as needed.
The above is the detailed content of Methods and steps for implementing face recognition using Python. For more information, please follow other related articles on the PHP Chinese website!


