
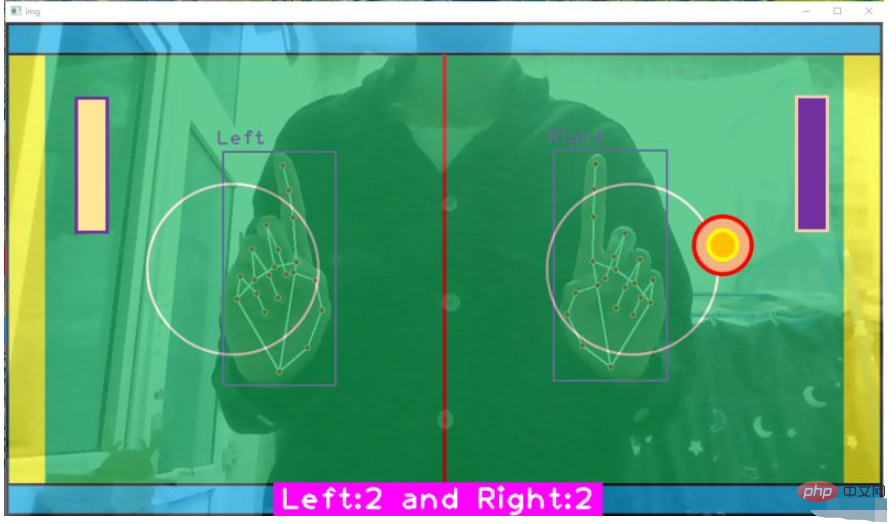
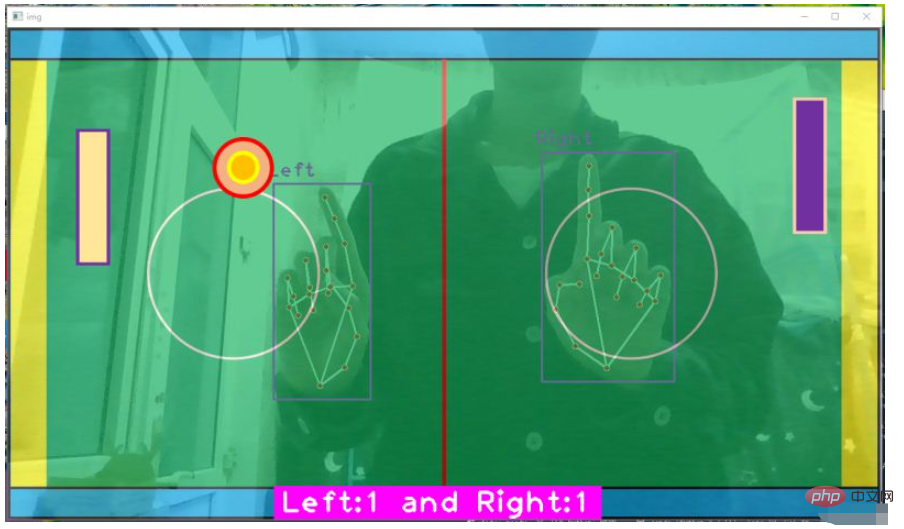
The rules are as follows: the left hand controls the white racket; the right hand controls the purple racket; the racket can only move up and down; the red circle is the ice ball; the ball collides with the blue borders on the upper and lower sides, and the The racket will bounce; if the ball enters the yellow area, the game is over; the pink counting board below records how many times the left and right sides hit the ball.
pip install opencv_python==4.2.0.34  # 安装opencv
pip install mediapipe  # 安装mediapipe
# pip install mediapipe --user  #有user报错的话试试这个
pip install cvzone  # 安装cvzone

# 导入工具包
import cv2
import cvzone
from cvzone.HandTrackingModule import HandDetector  # 导入手部检测模块
The coordinates of the 21 hand key points are as follows:
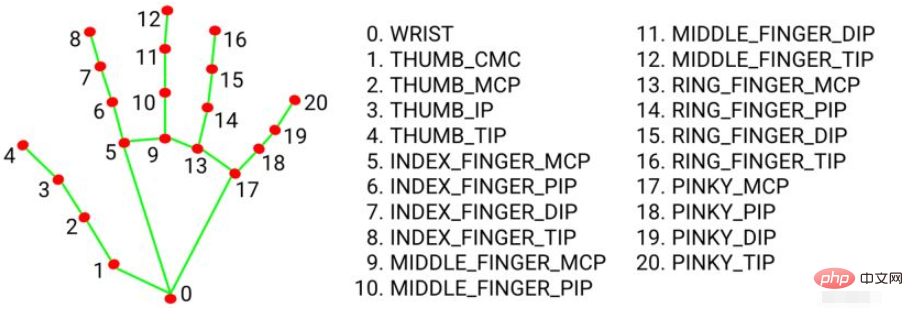
Before you start, prepare pictures of the table, the ball, and the racket. I drew the picture using PPT, and the pictures of the ball and racket must be saved in .png format. Place it in the same folder for easy reading.

(1) cvzone.HandTrackingModule. HandDetector()Hand key point detection method
Parameters:
mode: The default is False, and the input image is treated as a video stream. It will try to detect the hand in the first input image and further locate the coordinates of the hand after successful detection. In subsequent images, once all maxHands hands are detected and the coordinates of the corresponding hands are located, it tracks those coordinates without calling another detection until it loses tracking of any one hand. This reduces latency and is ideal for processing video frames. If set to True, hand detection is run on each input image, for processing a batch of static, potentially irrelevant images.
maxHands: The maximum number of hands to detect, the default is 2
detectionCon: The minimum confidence value of the hand detection model (between 0-1), if it exceeds the threshold, the detection is successful. The default is 0.5
minTrackingCon: The minimum confidence value of the coordinate tracking model (between 0-1), which is used to consider the hand coordinates as successful tracking. If unsuccessful, hand detection will be automatically called on the next input image. . Setting it to a higher value improves the robustness of the solution, but at the cost of higher latency. If mode is True, this parameter is ignored and hand detection will be run on every image. The default is 0.5
Its parameters and return value are similar to the official function mediapipe.solutions.hands.Hands()
MULTI_HAND_LANDMARKS: A collection of detected/tracked hands, where each hand is Represented as a list of 21 hand landmarks, each consisting of x, y, z.
MULTI_HANDEDNESS: A collection of whether the hand being detected/tracked is left or right. Each hand consists of label and score. label is a string with a 'Left' or 'Right' value. score is the estimated probability of predicting the left or right hand.
(2)cvzone.HandTrackingModule.HandDetector.findHands() Find the hand key points and draw
Parameters:
img: Need to detect key points The frame image of the point, the format is BGR
draw: Whether it is necessary to draw key points and recognition frames on the original image
flipType: Whether the image needs to be flipped, when the video image is not a mirror image of ourselves , just set it to True
Return value:
hands: Detected hand information, a list consisting of 0 or 1 or 2 dictionaries. If two hands are detected it is a list consisting of two dictionaries. The dictionary contains: 21 key point coordinates (x, y, z), the upper left coordinate of the detection frame and its width and height, the coordinates of the center point of the detection frame, and which hand is detected.
img: Return the image after drawing the key points and connections
(3)cv2.addWeighted()Image fusion
Mix the two images The images are fused together according to a certain proportion, and the size and number of channels of the two images need to be the same
The two images are fused together according to a certain proportion: cv2.addWeighted(image 1, weight 1, image 2, weight 2, brightness bias Setting)
is equivalent to y = a x1 b x2 c, where a and b represent the weight, and c represents how much the brightness is brightened
First cv2. The parameter cv2.IMREAD_UNCHANGED in imread() refers to opening the image in its original format, including the Alpha channel. That is, open the image without changing it. If the image is in color, then it will be read in color. If the image is grayscale, then it will be read in grayscale. The shape of the read image is as follows:

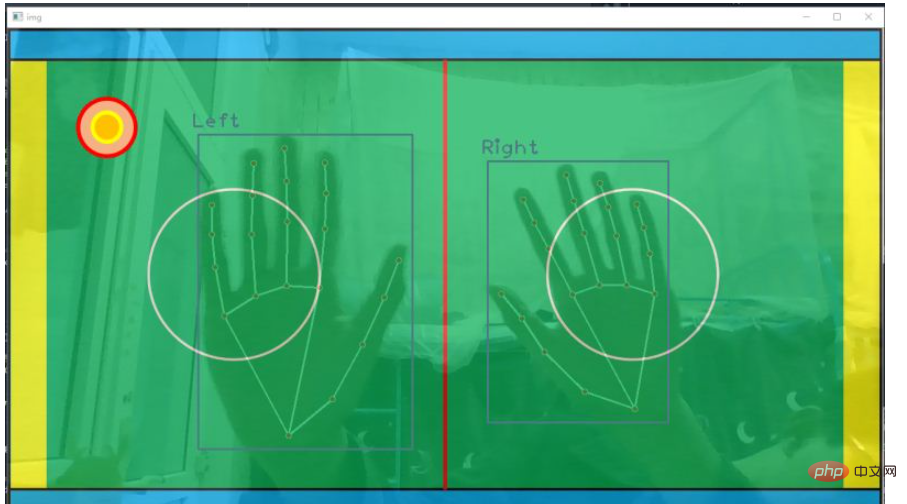
This part of the code is mainly responsible for hand key point detection and fusion of background images and video frame images
import cv2
import cvzone
from cvzone.HandTrackingModule import HandDetector  # 导入手部检测模块

#(1)捕获摄像头
cap = cv2.VideoCapture(0)  # 0代表电脑自带的摄像头
cap.set(3, 1280)  # 读入的图像的宽
cap.set(4, 720)   # 读入的图像的高


#(2)文件配置
# 导入所有需要对图片文件
imgDesk = cv2.imread('games/desk.jpg')  # 球桌的图片
imgBall = cv2.imread('games/ball.png', cv2.IMREAD_UNCHANGED)  # 球的图片
imgBlock1 = cv2.imread('games/block1', cv2.IMREAD_UNCHANGED)  # 球拍的图片
imgBlock2 = cv2.imread('games/block2', cv2.IMREAD_UNCHANGED)  # 球拍的图片
# 调整球桌图片的size
imgDesk = cv2.resize(imgDesk, dsize=(1280,720))


#(3)参数设置
# 接收手部关键点识别的方法,最小手部检测模块置信度0.8,最多检测2只手
detector = HandDetector(detectionCon=0.8, maxHands=2)


#(4)处理帧图像
while True:

    # 返回是否读取成功,以及读取后的帧图像
    success, img = cap.read()  # 每次执行读取一帧

    # 图片翻转呈镜像关系,1代表左右翻转,0代表上下翻转
    img = cv2.flip(img, flipCode=1)

    # 手部关键点检测,返回每个只手的信息和绘制后的图像
    hands, img = detector.findHands(img, flipType=False)  # 上面翻转过了这里就不用翻转了

    # 将球桌图片和视频帧图像融合在一起, 两张图的shape要相同
    # 给出每张图片的融合权重, 亮度偏置为0,这样就变成了半透明的显示形式
    img = cv2.addWeighted(img, 0.3, imgDesk, 0.7, 0)


    #(5)添加桌球的图片,将imgBall放在球桌img的指定坐标位置
    img = cvzone.overlayPNG(img, imgBall, (100,100))

    # 图像展示
    cv2.imshow('img', img)
    # 每帧滞留1ms后消失
    k = cv2.waitKey(1)
    # ESC键退出程序
    if k & 0XFF==27:
        break

# 释放视频资源
cap.release()
cv2.destroyAllWindows()The effect diagram is as follows:
(1) Control the racket
hand['bbox'] 中包含了手部检测框的左上角坐标和检测框的宽高,使用手掌中心点的 y 坐标来控制球拍的上下移动。由于两个球拍的shape是相同的,因此只要获取一个球拍的高度 h2 即可。使用掌心中点 y 坐标控制球拍中点的 y1 坐标,公式为:y1 = (y + h) // 2 - h2 // 2
接着使用 cvzone.overlayPNG() 就可以将球拍图片覆盖在原图片的指定区域,其中坐标参数是指覆盖区域的左上角坐标。固定横坐标,只上下移动。
(2)球移动
首先要规定球的移动速度 speedx, speedy = 10, 10 代表球每一帧沿x轴正方向移动10个像素,沿y轴正方向移动10个像素,那么球的初始合速度方向是沿图片的正右下角移动
如果球碰撞到了球桌的上下边框,就反弹。speedy = -speedy。代表x方向每帧移动的步长不变,y方向每帧移动的方向反转,即入射角等于出射角。
在上述代码中补充
import cv2
import cvzone
import numpy as np
from cvzone.HandTrackingModule import HandDetector # 导入手部检测模块
#(1)捕获摄像头
cap = cv2.VideoCapture(0) # 0代表电脑自带的摄像头
cap.set(3, 1280) # 读入的图像的宽
cap.set(4, 720) # 读入的图像的高
#(2)文件配置
# 导入所有需要对图片文件
imgDesk = cv2.imread('games/desk.jpg') # 球桌的图片
imgBall = cv2.imread('games/ball.png', cv2.IMREAD_UNCHANGED) # 球的图片
imgBlock1 = cv2.imread('games/block1.png', cv2.IMREAD_UNCHANGED) # 球拍的图片
imgBlock2 = cv2.imread('games/block2.png', cv2.IMREAD_UNCHANGED) # 球拍的图片
# 调整球桌图片的size
imgDesk = cv2.resize(imgDesk, dsize=(1280,720))
# 调整球拍的size
imgBlock1 = cv2.resize(imgBlock1, dsize=(50,200))
imgBlock2 = cv2.resize(imgBlock2, dsize=(50,200))
#(3)参数设置
# 接收手部关键点识别的方法,最小手部检测模块置信度0.8,最多检测2只手
detector = HandDetector(detectionCon=0.8, maxHands=2)
# 球的默认位置
ballpos = [100, 100]
# 球的移动速度,每帧15个像素
speedx, speedy = 10, 10
#(4)处理帧图像
while True:
# 返回是否读取成功,以及读取后的帧图像
success, img = cap.read() # 每次执行读取一帧
# 图片翻转呈镜像关系,1代表左右翻转,0代表上下翻转
img = cv2.flip(img, flipCode=1)
# 手部关键点检测,返回每个只手的信息和绘制后的图像
hands, img = detector.findHands(img, flipType=False) # 上面翻转过了这里就不用翻转了
# 将球桌图片和视频帧图像融合在一起, 两张图的shape要相同
# 给出每张图片的融合权重, 亮度偏置为0,这样就变成了半透明的显示形式
img = cv2.addWeighted(img, 0.4, imgDesk, 0.6, 0)
#(5)处理手部关键点,如果检测到手了就进行下一步
if hands:
# 遍历每检测的2只手,获取每一只手的坐标
for hand in hands:
# 获取手部检测框的左上坐标xy,宽高wh
x, y, w, h = hand['bbox']
# 获取球拍的宽高
h2, w1 = imgBlock1.shape[0:2]
# 球拍的中心y坐标,随着掌心移动
y1 = (y + h) // 2 - h2 // 2
# 如果检测到了左手
if hand['type'] == 'Left':
# 左侧的球拍x轴固定,y坐标随左手掌间中点移动
img = cvzone.overlayPNG(img, imgBlock1, (55,y1))
# 如果检测到了右手
if hand['type'] == 'Right':
# 右侧的球拍x轴固定,y坐标随右手掌间中点移动
img = cvzone.overlayPNG(img, imgBlock2, (1280-55,y1))
#(6)改变球的位置
# 如果球的y坐标在超出了桌面的上或下边框范围,调整移动方向
if ballpos[1] >= 600 or ballpos[1] <= 50:
# y方向的速度调整为反方向,那么x方向和y方向的合速度方向调整了
speedy = -speedy
ballpos[0] = ballpos[0] + speedx # 调整球的x坐标
ballpos[1] = ballpos[1] + speedy # 调整球的y坐标
#(5)添加桌球的图片,将imgBall放在球桌img的指定坐标位置
img = cvzone.overlayPNG(img, imgBall, ballpos)
# 图像展示
cv2.imshow('img', img)
# 每帧滞留1ms后消失
k = cv2.waitKey(1)
# ESC键退出程序
if k & 0XFF==27:
break
# 释放视频资源
cap.release()
cv2.destroyAllWindows()效果图如下:
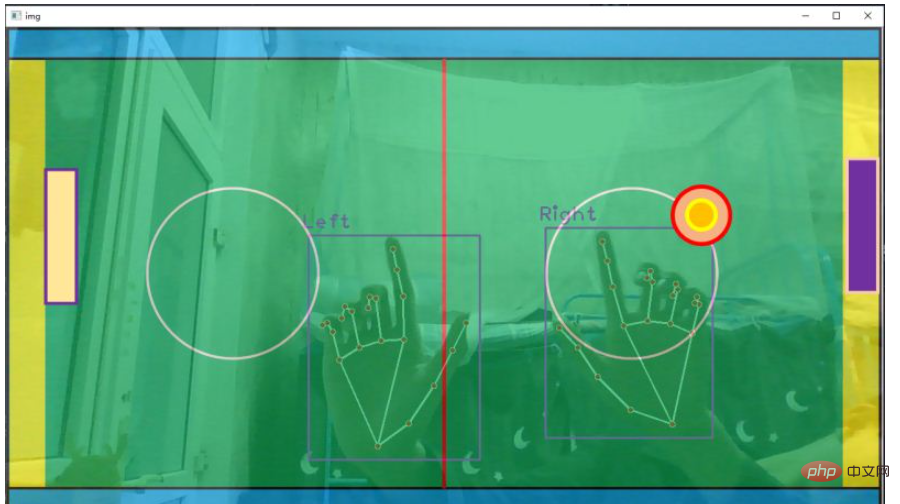
这一部分主要完成三项工作,第一是球拍击打到球,球需要反弹;第二是如果球进入黄色区域,游戏结束;第三是左右侧击球得分计数器。
(1)球拍击球
看到代码中的第(5)步,ballpos 代表球的左上角坐标(x,y),100 < ballpos[0] < 100+w1 代表球到了球拍横坐标区域范围内部了,y1 < ballpos[1] < y1+h2 代表球的y坐标在球拍y坐标内部,这时表明击球成功,speedx = -speedx 只改变沿x轴的速度方向,不改变沿y轴的速度方向。
(2)球进黄区,游戏结束
if ballpos[0] < 50 or ballpos[0] > 1150,如果球图片的左上坐标的 x 坐标,在黄区边缘,整个程序退出。当然也可以做一个游戏结束界面,我之前的博文里也有介绍,我偷个懒不写了。
(3)计数器
首先定义个变量初始化记录左右侧的击球次数 score = [0, 0],如果有一侧的球拍击中球,那么对应该侧计数加一。
上面代码是掌心控制球拍,这里改成食指指尖控制球拍中点移动。
import cv2
import cvzone
from cvzone.HandTrackingModule import HandDetector # 导入手部检测模块
#(1)捕获摄像头
cap = cv2.VideoCapture(0) # 0代表电脑自带的摄像头
cap.set(3, 1280) # 读入的图像的宽
cap.set(4, 720) # 读入的图像的高
#(2)文件配置
# 导入所有需要对图片文件
imgDesk = cv2.imread('games/desk.jpg') # 球桌的图片
imgBall = cv2.imread('games/ball.png', cv2.IMREAD_UNCHANGED) # 球的图片
imgBlock1 = cv2.imread('games/block1.png', cv2.IMREAD_UNCHANGED) # 球拍的图片
imgBlock2 = cv2.imread('games/block2.png', cv2.IMREAD_UNCHANGED) # 球拍的图片
# 调整球桌图片的size
imgDesk = cv2.resize(imgDesk, dsize=(1280,720))
# 调整球拍的size
imgBlock1 = cv2.resize(imgBlock1, dsize=(50,200))
imgBlock2 = cv2.resize(imgBlock2, dsize=(50,200))
#(3)参数设置
# 接收手部关键点识别的方法,最小手部检测模块置信度0.8,最多检测2只手
detector = HandDetector(detectionCon=0.8, maxHands=2)
# 球的默认位置
ballpos = [100, 100]
# 球的移动速度,每帧15个像素
speedx, speedy = 10, 10
# 记录是否游戏结束
gameover = False
# 记录左右的击球数
score = [0, 0]
#(4)处理帧图像
while True:
# 返回是否读取成功,以及读取后的帧图像
success, img = cap.read() # 每次执行读取一帧
# 图片翻转呈镜像关系,1代表左右翻转,0代表上下翻转
img = cv2.flip(img, flipCode=1)
# 手部关键点检测,返回每个只手的信息和绘制后的图像
hands, img = detector.findHands(img, flipType=False) # 上面翻转过了这里就不用翻转了
# 将球桌图片和视频帧图像融合在一起, 两张图的shape要相同
# 给出每张图片的融合权重, 亮度偏置为0,这样就变成了半透明的显示形式
img = cv2.addWeighted(img, 0.4, imgDesk, 0.6, 0)
#(5)处理手部关键点,如果检测到手了就进行下一步
if hands:
# 遍历每检测的2只手,获取每一只手的坐标
for hand in hands:
# 获取食指坐标(x,y,z)
x, y, z = hand['lmList'][8]
# 获取球拍的宽高
h2, w1 = imgBlock1.shape[0:2]
# 球拍的中心y坐标,随着掌心移动
y1 = y - h2 // 2
# 如果检测到了左手
if hand['type'] == 'Left':
# 左侧的球拍x轴固定,y坐标随左手掌间中点移动
img = cvzone.overlayPNG(img, imgBlock1, (100,y1))
# 检查球是否被左球拍击中, 球的xy坐标是否在球拍xy坐标附近
if 100 < ballpos[0] < 100+w1 and y1 < ballpos[1] < y1+h2:
# 满足条件代表球拍击中了,改变球的移动方向
speedx = -speedx # x方向设为反方向
# 得分加一
score[0] += 1
# 如果检测到了右手
if hand['type'] == 'Right':
# 右侧的球拍x轴固定,y坐标随右手掌间中点移动
img = cvzone.overlayPNG(img, imgBlock2, (1150,y1))
# 检查球是否被右球拍击中
if 1050 < ballpos[0] < 1050+w1 and y1 < ballpos[1] < y1+h2:
# 满足条件代表球拍击中了,改变球的移动方向
speedx = -speedx # x方向设为反方向
# 得分加一
score[1] += 1
#(6)检查球是否没接到,那么游戏结束
if ballpos[0] < 50 or ballpos[0] > 1150:
gameover = True
# 游戏结束,画面就不动了
if gameover is True:
break
# 游戏没结束就接下去执行
else:
#(7)调整球的坐标
# 如果球的y坐标在超出了桌面的上或下边框范围,调整移动方向
if ballpos[1] >= 600 or ballpos[1] <= 50:
# y方向的速度调整为反方向,那么x方向和y方向的合速度方向调整了
speedy = -speedy
# 每一整都调整xy坐标
ballpos[0] = ballpos[0] + speedx # 调整球的x坐标
ballpos[1] = ballpos[1] + speedy # 调整球的y坐标
#(8)添加桌球的图片,将imgBall放在球桌img的指定坐标位置
img = cvzone.overlayPNG(img, imgBall, ballpos)
#(9)显示记分板
cvzone.putTextRect(img, f'Left:{score[0]} and Right:{score[1]}', (400,710))
#(10)图像展示
cv2.imshow('img', img)
# 每帧滞留1ms后消失
k = cv2.waitKey(1)
# ESC键退出程序
if k & 0XFF==27:
break
# 释放视频资源
cap.release()
cv2.destroyAllWindows()效果图如下:
The above is the detailed content of How to make a table hockey visual game using Python. For more information, please follow other related articles on the PHP Chinese website!


