

HuggingGPT: A magical tool for AI tasks

Introduction
Artificial General Intelligence (AGI) can be thought of as an artificial intelligence system that is capable of understanding, processing, and responding to intellectual tasks like humans. This is a challenging task that requires a deep understanding of how the human brain works so that we can replicate it. However, the emergence of ChatGPT has aroused huge interest from the research community in developing such systems. Microsoft has released such a key AI-powered system called HuggingGPT (Microsoft Jarvis).
Before we dive into what’s new in HuggingGPT and the relevant details on how it works, let’s first understand the issues with ChatGPT and why it has trouble solving complex AI tasks. Large language models like ChatGPT are good at interpreting text data and handling general tasks. However, they often struggle with certain tasks and can react absurdly. You may have encountered fake responses from ChatGPT while solving complex math problems. On the other hand, we have expert-level AI models such as Stable Diffusion and DALL-E, which have a deeper understanding of their respective subject areas but struggle with a wider range of tasks. Unless we establish a connection between LLM and professional AI models, we cannot fully exploit the potential of LLM to solve challenging AI tasks. This is what HuggingGPT does, it combines the advantages of both to create a more effective, accurate, and versatile AI system.
What is HuggingGPT?
According to a recent paper published by Microsoft, HuggingGPT leverages the power of LLM, using it as a controller to connect it with various AI models in the machine learning community (HuggingFace), enabling it to be used External tools to increase productivity. HuggingFace is a website that provides a wealth of tools and resources for developers and researchers. It also has a wide variety of professional and high-precision models. HuggingGPT applies these models to complex AI tasks in different domains and modes, achieving impressive results. It has similar multi-modal capabilities as OPenAI GPT-4 when it comes to text and images. However, it also connects you to the Internet, and you can provide an external web link to ask questions about it.
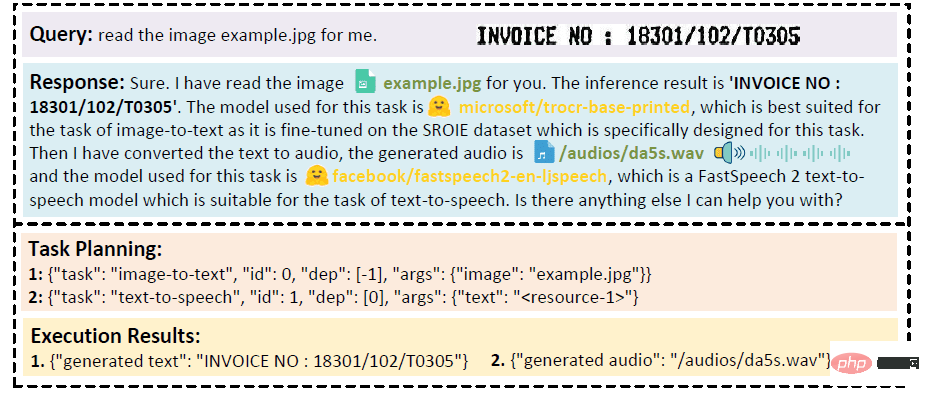
Suppose you want the model to perform an audio reading of text written on an image. HuggingGPT will perform this task serially using the best-fitting model. First, it will export text from the image and use the result for audio generation. The response details can be viewed in the image below. Simply amazing!
Qualitative Analysis of Multimodal Cooperation of Video and Audio Modes
How does HuggingGPT work?
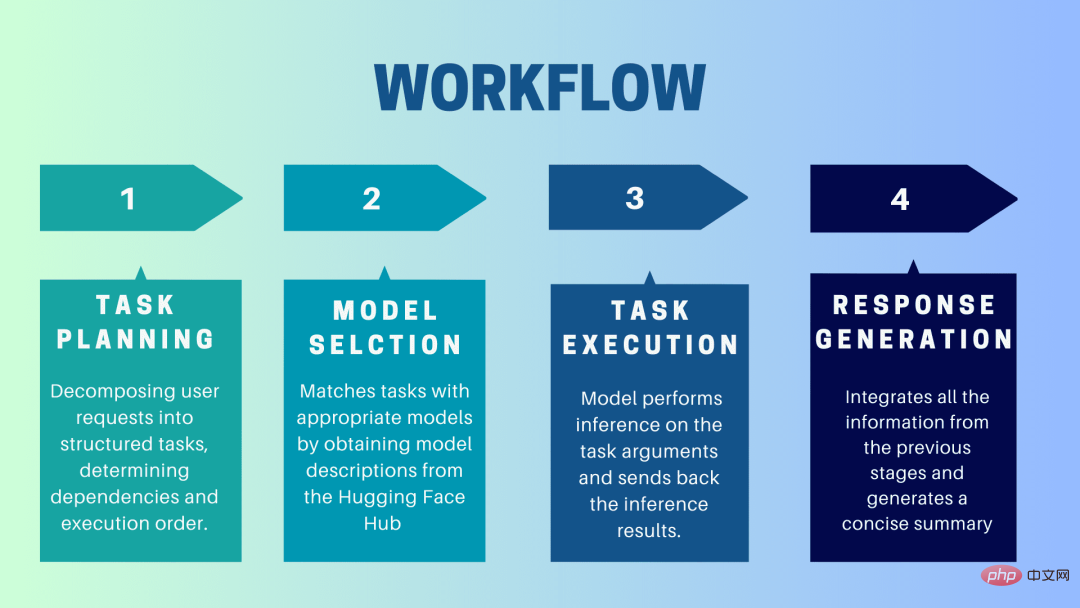
HuggingGPT is a collaborative system that uses LLM as an interface to send user requests to expert models. The complete process from user prompt to model until response is received can be broken down into the following discrete steps:
1. Task planning
At this stage, HuggingGPT uses ChatGPT to understand the user prompt, Then break the query into small actionable tasks. It also identifies the dependencies of these tasks and defines the order in which they are executed. HuggingGPT has four slots for task parsing, namely task type, task ID, task dependency and task parameters. Chats between HuggingGPT and the user are recorded and displayed on the screen showing the resource history.
2. Model selection
Based on the user environment and available models, HuggingGPT uses a contextual task-model allocation mechanism to select the most appropriate model for a specific task. According to this mechanism, model selection is considered as a multiple-choice question, which initially filters out models based on the type of task. Afterwards, the models were ranked based on the number of downloads, as it is considered a reliable measure of model quality. Top-K models are selected based on this ranking. K here is just a constant that reflects the number of models, for example, if it is set to 3, then it will select the 3 models with the most downloads.
3.Task Execution
Here, the task is assigned to a specific model, which performs inference on it and returns the results. To make this process more efficient, HuggingGPT can run different models simultaneously, as long as they don't require the same resources. For example, if given a prompt to generate pictures of cats and dogs, different models can be run in parallel to perform this task. However, sometimes a model may require the same resource, which is why HuggingGPT maintains a
4. Generate response
The last step is to generate a response to the user. First, it integrates all information and reasoning results from previous stages. The information is presented in a structured format. For example, if the prompt is to detect the number of lions in an image, it will draw appropriate bounding boxes with detection probabilities. LLM (ChatGPT) then takes this format and renders it in human-friendly language.
Set up HuggingGPT
HuggingGPT is built on Hugging Face’s state-of-the-art GPT-3.5 architecture, which is a deep neural network model that can generate natural language text. Here are the steps on how to set it up on your local machine:
System Requirements
The default configuration requires Ubuntu 16.04 LTS, at least 24GB of VRAM, at least 12GB (minimum), 16GB (standard), or 80GB (full) RAM, and at least 284GB of disk space. Additionally, 42GB of space is required for damo-vilab/text-to-video-ms-1.7b, 126GB for ControlNet, 66GB for stable-diffusion-v1-5, and 50GB for other resources. For "lite" configuration, only Ubuntu 16.04 LTS is required.
Steps to get started
First, replace the OpenAI Key and Hugging Face Token in the server/configs/config.default.yaml file with your keys. Or, you can put them in the environment variables OPENAI_API_KEY and HUGGINGFACE_ACCESS_TOKEN respectively
Run the following command:
For Server:
- Set up the Python environment and install the required dependencies.
<code># 设置环境cd serverconda create -n jarvis pythnotallow=3.8conda activate jarvisconda install pytorch torchvision torchaudio pytorch-cuda=11.7 -c pytorch -c nvidiapip install -r requirements.txt</code>
- Download the required model.
<code># 下载模型。确保`git-lfs`已经安装。cd modelsbash download.sh # required when `inference_mode` is `local` or `hybrid`.</code>
- Running Server
<code># 运行服务器cd ..python models_server.py --config configs/config.default.yaml # required when `inference_mode` is `local` or `hybrid`python awesome_chat.py --config configs/config.default.yaml --mode server # for text-davinci-003</code>
Now you can access Jarvis's service by sending an HTTP request to the Web API endpoint. Send a request to:
- /hugginggpt endpoint and use the POST method to access the complete service.
- /tasks endpoint, use the POST method to access the intermediate results of phase 1.
- /results endpoint, use the POST method to access the intermediate results of stages 1-3.
These requests should be in JSON format and should include a list of information entered on behalf of the user.
For Web:
- After launching the application awesome_chat.py in server mode, install node js and npm on your computer.
- Navigate to the web directory and install the following dependencies:
<code>cd webnpm installnpm run dev</code>
- Set http://{LAN_IP_of_the_server}:{port}/ to web/src/config/ HUGGINGGPT_BASE_URL for index.ts, in case you are running the web client on another machine.
- If you want to use the video generation function, please compile ffmpeg manually using H.264.
<code># 可选:安装 ffmpeg# 这个命令需要在没有错误的情况下执行。LD_LIBRARY_PATH=/usr/local/lib /usr/local/bin/ffmpeg -i input.mp4 -vcodec libx264 output.mp4</code>
- Double-click the settings icon to switch back to ChatGPT.
For CLI:
Setting up Jarvis using the CLI is very simple. Just run the below mentioned command:
<code>cd serverpython awesome_chat.py --config configs/config.default.yaml --mode cli</code>
For Gradio:
Gradio demo is also hosted on Hugging Face Space. You can experiment after entering OPENAI_API_KEY and HUGGINGFACE_ACCESS_TOKEN.
To run it locally:
- Install the required dependencies, clone the project repository from Hugging Face Space, and navigate to the project directory
- Use the following Command to start the model server and then start the Gradio demo:
<code>python models_server.py --config configs/config.gradio.yamlpython run_gradio_demo.py --config configs/config.gradio.yaml</code>
- Access the demo via http://localhost:7860 in your browser and test it by entering various inputs
- As an option, you can also run the demo as a Docker image by running the following command:
<code>docker run -it -p 7860:7860 --platform=linux/amd64 registry.hf.space/microsoft-hugginggpt:latest python app.py</code>
Note: If you have any questions, please refer to the official Github Repo (https://github. com/microsoft/JARVIS).
Final Thoughts
HuggingGPT also has certain limitations that need to be emphasized here. For example, the efficiency of the system is a major bottleneck, and HuggingGPT requires multiple interactions with LLM at all stages mentioned earlier. These interactions can result in degraded user experience and increased latency. Likewise, the maximum context length is limited by the number of tokens allowed. Another issue is the reliability of the system, as LLM may misinterpret prompts and produce a wrong task sequence, which in turn affects the entire process. Nonetheless, it has great potential for solving complex AI tasks and is a good advancement for AGI. Let’s look forward to the direction this research will take the future of AI!
The above is the detailed content of HuggingGPT: A magical tool for AI tasks. For more information, please follow other related articles on the PHP Chinese website!

Hot AI Tools

Undresser.AI Undress
AI-powered app for creating realistic nude photos

AI Clothes Remover
Online AI tool for removing clothes from photos.

Undress AI Tool
Undress images for free

Clothoff.io
AI clothes remover

Video Face Swap
Swap faces in any video effortlessly with our completely free AI face swap tool!

Hot Article
Hot Tools

Notepad++7.3.1
Easy-to-use and free code editor

SublimeText3 Chinese version
Chinese version, very easy to use

Zend Studio 13.0.1
Powerful PHP integrated development environment

Dreamweaver CS6
Visual web development tools

SublimeText3 Mac version
God-level code editing software (SublimeText3)
Hot Topics
 1386
1386
 52
52

 git software installation
Apr 17, 2025 am 11:57 AM
git software installation
Apr 17, 2025 am 11:57 AM
Installing Git software includes the following steps: Download the installation package and run the installation package to verify the installation configuration Git installation Git Bash (Windows only)
 How to solve the complexity of WordPress installation and update using Composer
Apr 17, 2025 pm 10:54 PM
How to solve the complexity of WordPress installation and update using Composer
Apr 17, 2025 pm 10:54 PM
When managing WordPress websites, you often encounter complex operations such as installation, update, and multi-site conversion. These operations are not only time-consuming, but also prone to errors, causing the website to be paralyzed. Combining the WP-CLI core command with Composer can greatly simplify these tasks, improve efficiency and reliability. This article will introduce how to use Composer to solve these problems and improve the convenience of WordPress management.
 How to solve SQL parsing problem? Use greenlion/php-sql-parser!
Apr 17, 2025 pm 09:15 PM
How to solve SQL parsing problem? Use greenlion/php-sql-parser!
Apr 17, 2025 pm 09:15 PM
When developing a project that requires parsing SQL statements, I encountered a tricky problem: how to efficiently parse MySQL's SQL statements and extract the key information. After trying many methods, I found that the greenlion/php-sql-parser library can perfectly solve my needs.
 How to solve complex BelongsToThrough relationship problem in Laravel? Use Composer!
Apr 17, 2025 pm 09:54 PM
How to solve complex BelongsToThrough relationship problem in Laravel? Use Composer!
Apr 17, 2025 pm 09:54 PM
In Laravel development, dealing with complex model relationships has always been a challenge, especially when it comes to multi-level BelongsToThrough relationships. Recently, I encountered this problem in a project dealing with a multi-level model relationship, where traditional HasManyThrough relationships fail to meet the needs, resulting in data queries becoming complex and inefficient. After some exploration, I found the library staudenmeir/belongs-to-through, which easily installed and solved my troubles through Composer.
 How to solve the complex problem of PHP geodata processing? Use Composer and GeoPHP!
Apr 17, 2025 pm 08:30 PM
How to solve the complex problem of PHP geodata processing? Use Composer and GeoPHP!
Apr 17, 2025 pm 08:30 PM
When developing a Geographic Information System (GIS), I encountered a difficult problem: how to efficiently handle various geographic data formats such as WKT, WKB, GeoJSON, etc. in PHP. I've tried multiple methods, but none of them can effectively solve the conversion and operational issues between these formats. Finally, I found the GeoPHP library, which easily integrates through Composer, and it completely solved my troubles.
 Solve CSS prefix problem using Composer: Practice of padaliyajay/php-autoprefixer library
Apr 17, 2025 pm 11:27 PM
Solve CSS prefix problem using Composer: Practice of padaliyajay/php-autoprefixer library
Apr 17, 2025 pm 11:27 PM
I'm having a tricky problem when developing a front-end project: I need to manually add a browser prefix to the CSS properties to ensure compatibility. This is not only time consuming, but also error-prone. After some exploration, I discovered the padaliyajay/php-autoprefixer library, which easily solved my troubles with Composer.
 git software installation tutorial
Apr 17, 2025 pm 12:06 PM
git software installation tutorial
Apr 17, 2025 pm 12:06 PM
Git Software Installation Guide: Visit the official Git website to download the installer for Windows, MacOS, or Linux. Run the installer and follow the prompts. Configure Git: Set username, email, and select a text editor. For Windows users, configure the Git Bash environment.
 The latest tutorial on how to read the key of git software
Apr 17, 2025 pm 12:12 PM
The latest tutorial on how to read the key of git software
Apr 17, 2025 pm 12:12 PM
This article will explain in detail how to view keys in Git software. It is crucial to master this because Git keys are secure credentials for authentication and secure transfer of code. The article will guide readers step by step how to display and manage their Git keys, including SSH and GPG keys, using different commands and options. By following the steps in this guide, users can easily ensure their Git repository is secure and collaboratively smoothly with others.
