

What's the fix for missing WiFi icon in Windows 11?

Some users have reported that the Wi-Fi option or icon is missing on their Windows 11 PCs. Missing or corrupt network drivers or Windows operating system or hardware issues can be some of the reasons why this issue pops up on Windows 11 PC.
If you are unable to find the WiFi icon in the system tray on your PC, then we have listed some methods that can help you solve this problem and get back the missing Wi-Fi icon. Go ahead and try the fixes mentioned in this article one by one in the order mentioned below. Before trying to fix it, check if there are any buttons/physical switches with a WiFi icon on your laptop. If there are any such switches, press them once to enable the WiFi option.
Fix 1 – Restart Windows Explorer
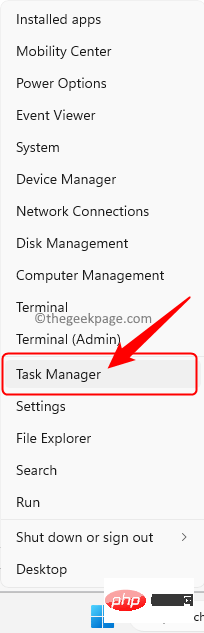
Step 1. Right-click the Windows Start button to open the context menu.
Step 2. Click Task Manager in the menu.
Processes tab, look for "Windows Explorer" in the list of processes running on the computer.
Step 4. SelectWindows Explorer and click Restart Task in the upper right corner of Task Manager.
Step 5. After Explorer restarts, check to see if your missing Wi-Fi icon issue has been fixed.
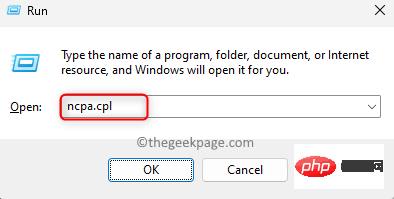
Windows R to open the "Run" dialog box.
Step 2. Typencpa.cpl and press Enter to open the network connection.
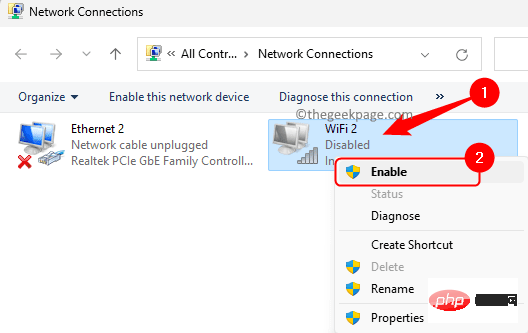
Enable.
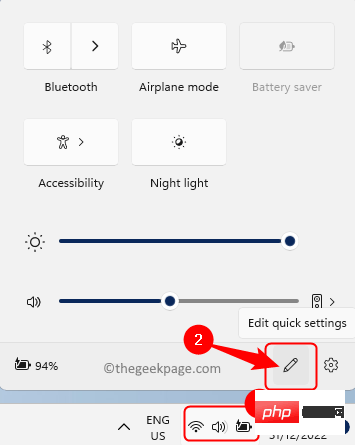
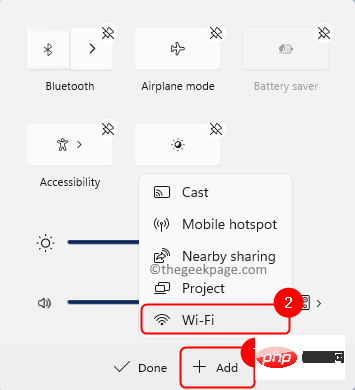
speaker icon in the system tray.
Step 2. You will see a notification or action area. Check if there is a WiFi icon in this area. Step 3. If the WiFi icon doesn't appear here, click theEdit Quick Settings icon at the bottom of this action area.
Add and select Wi-Fi in the options.
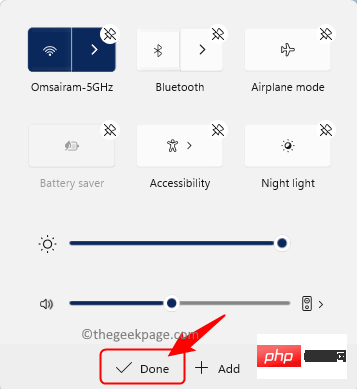
WiFi icon added. The position of this icon can be changed by dragging and dropping it wherever you want it.
Then, clickFinish.
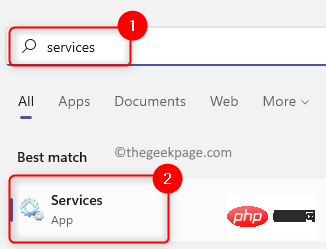
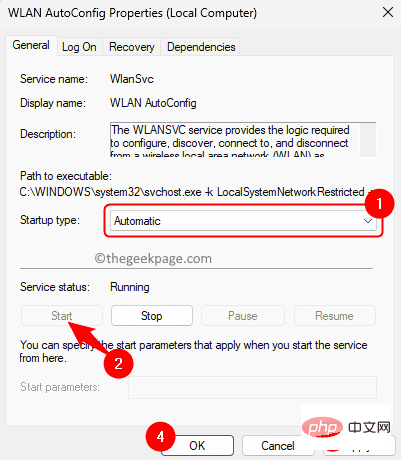
Windows key on your keyboard and type Services in the search box.
Step 2. Select the"Service" application in the search results.
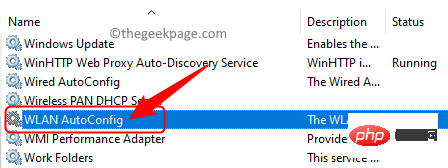
WLAN Auto-Configuration in the list of services.
Double-click it to open theproperties.
"Properties ", make sure "Startup Type" is set to "Automatic".
Step 5. If the service is not running, click the"Start" button to start the service.
Finally, click "Apply" and then "OK" to save the changes.
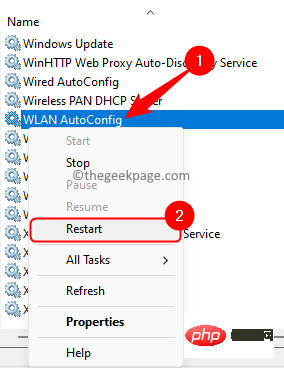
"Services" window, right-click WLAN Auto-Configuration and select "Restart".
Step 7.Restart the computer and check if the problem is resolved.
Fix 5 – Disable and enable network adapter in Device Manager
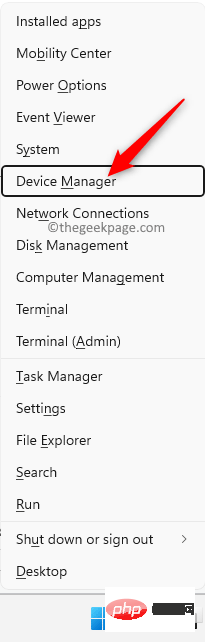
Step 1. Press the Windows X key at the same time to open the Start button context menu.
Step 2. Click Device Manager here.
Step 3. Expand the Network Adapters section by clicking the small arrow next to it.
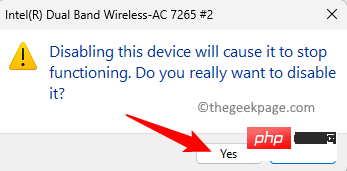
Step 4. Right-click Wireless Network Adapters in the list and select Disable Device.
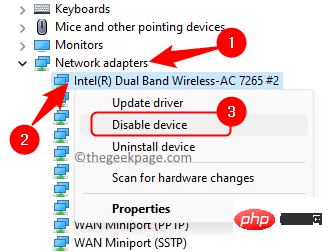
Click "Yes" on the confirmation prompt to disable the device.
Step 5. After disabling the adapter, right-click on it again and select Enable Device.
Step 6. Now, check if the missing WiFi icon has reappeared in the system tray.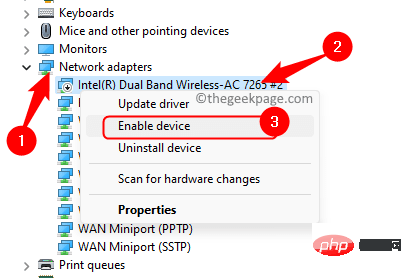
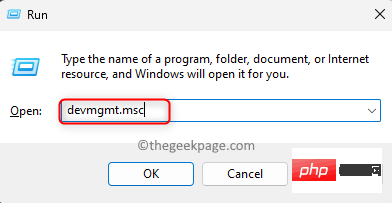
Windows R to open "Run".
Step 2. Typedevmgmt.msc and press the Enter key to open the Device Manager.
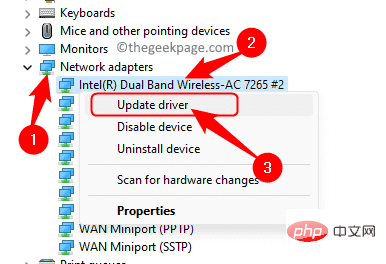
Network Adapters to expand it.
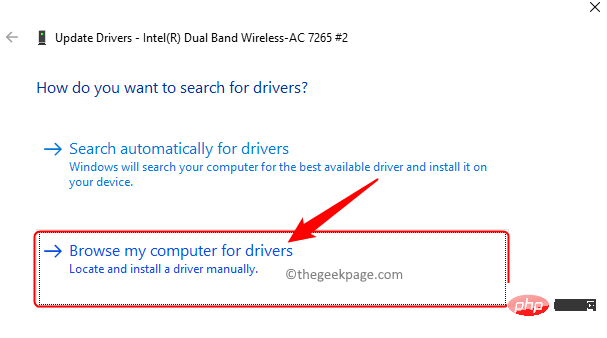
Step 4. Right-click on the problematicWi-Fi device and select Update Driver.
Update Driver" window, click "Browse my computer for driver".
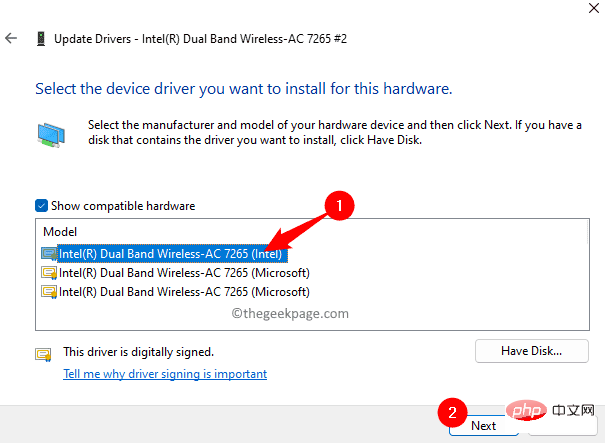
select from a list of available drivers on your computer.

for your WiFi device from the list and click Next.
RestartPC after updating drivers.
Check if you are still having issues. Fix 7 – Reinstall Network DriversStep 1. OpenDevice Manager as described in Steps 1 and 2 in Fix 6 above.
Step 2. Click the arrow next to"Network Adapters" to expand it.
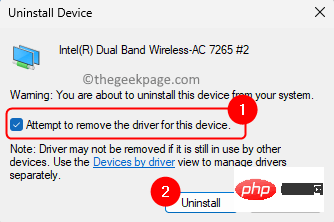
Step 3. Right-click the WiFi network driver and selectUninstallDevice.

Attempt to remove the driver for this device.
Then, click Uninstall.
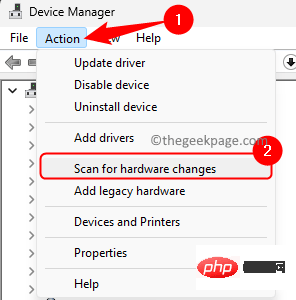
Action menu at the top of Device Manager.
SelectScan for hardware changes.
Restart the system and check if the problem is resolved.
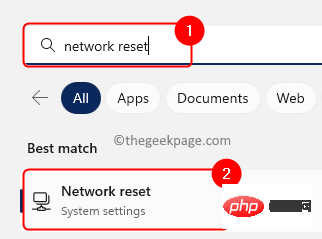
Fix 8 – Perform a Network ResetStep 1. Click theWindows key on your keyboard and type NetworkReset in the search box.
Step 2. ClickNetwork Reset in the search results.
Reset Now" button to remove and reinstall all network adapters.
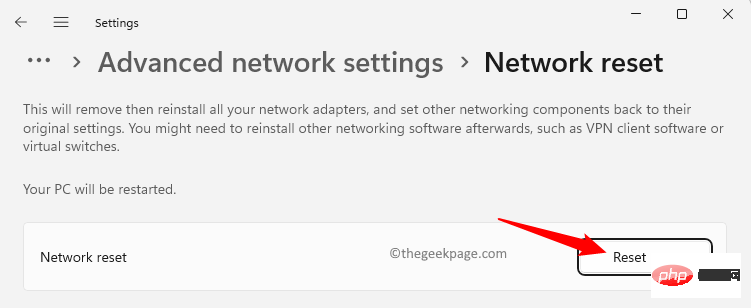
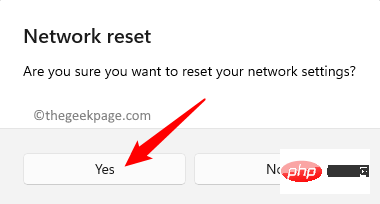
Step 4. Click Yes on the confirmation prompt to continue resetting network settings.
Check whether the problem of missing WiFi icon has been resolved.
Fix 9 – Reset Network Device via Command Prompt
Step 1. Press Windows X and select Terminal (Administrator) in the context menu that opens.
When User Account Control prompts for permissions, click "Yes".

Step 2. Execute the commands given below in the given order.
netsh int ip resetnetsh advfirewall resetnetsh winsock resetipconfig /flushdnsipconfig /releaseipconfig /renew
Step 3. Restart your computer. Check whether the Wifi option is restored after system startup.
Other Fixes
1. Check for Windows Updates
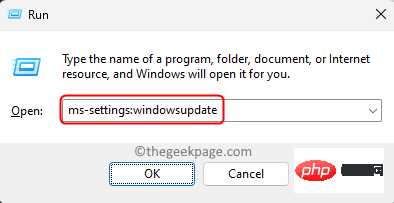
Step 1. Press Windows R to open "Run".
Type ms-settings:windowsupdate and press Enter.
Step 2. Click Check for Updates.

Step 3. Wait for Windows to check for updates. If any updates are found, they will be downloaded and installed.
After updateRestartPC and check if the WiFi icon has been restored.
2. Run the troubleshooter
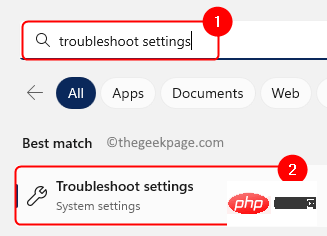
Step 1. Hit the Windows key and type Troubleshooting Settings in the search box.
Step 2. Click Troubleshooting Settings.
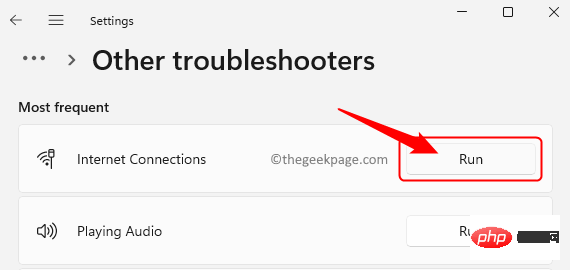
Step 3. Then, select Other troubleshooters.

Step 4. Click the Run button associated with your Internet connection.
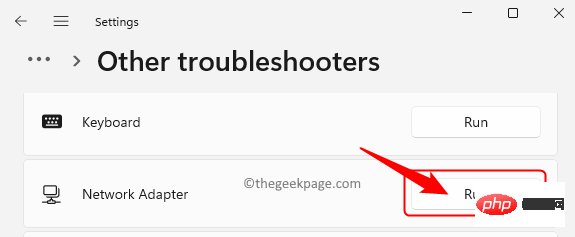
Windows will begin checking for any problems and display them to you along with fixes that can be applied.
Step 5. If the problem persists, run the Network Adapter troubleshooter.
The above is the detailed content of What's the fix for missing WiFi icon in Windows 11?. For more information, please follow other related articles on the PHP Chinese website!

Hot AI Tools

Undresser.AI Undress
AI-powered app for creating realistic nude photos

AI Clothes Remover
Online AI tool for removing clothes from photos.

Undress AI Tool
Undress images for free

Clothoff.io
AI clothes remover

Video Face Swap
Swap faces in any video effortlessly with our completely free AI face swap tool!

Hot Article
Hot Tools

Notepad++7.3.1
Easy-to-use and free code editor

SublimeText3 Chinese version
Chinese version, very easy to use

Zend Studio 13.0.1
Powerful PHP integrated development environment

Dreamweaver CS6
Visual web development tools

SublimeText3 Mac version
God-level code editing software (SublimeText3)
Hot Topics
 1387
1387
 52
52

 What is the reason why PS keeps showing loading?
Apr 06, 2025 pm 06:39 PM
What is the reason why PS keeps showing loading?
Apr 06, 2025 pm 06:39 PM
PS "Loading" problems are caused by resource access or processing problems: hard disk reading speed is slow or bad: Use CrystalDiskInfo to check the hard disk health and replace the problematic hard disk. Insufficient memory: Upgrade memory to meet PS's needs for high-resolution images and complex layer processing. Graphics card drivers are outdated or corrupted: Update the drivers to optimize communication between the PS and the graphics card. File paths are too long or file names have special characters: use short paths and avoid special characters. PS's own problem: Reinstall or repair the PS installer.
 How to solve the problem of loading when PS is always showing that it is loading?
Apr 06, 2025 pm 06:30 PM
How to solve the problem of loading when PS is always showing that it is loading?
Apr 06, 2025 pm 06:30 PM
PS card is "Loading"? Solutions include: checking the computer configuration (memory, hard disk, processor), cleaning hard disk fragmentation, updating the graphics card driver, adjusting PS settings, reinstalling PS, and developing good programming habits.
 How to speed up the loading speed of PS?
Apr 06, 2025 pm 06:27 PM
How to speed up the loading speed of PS?
Apr 06, 2025 pm 06:27 PM
Solving the problem of slow Photoshop startup requires a multi-pronged approach, including: upgrading hardware (memory, solid-state drive, CPU); uninstalling outdated or incompatible plug-ins; cleaning up system garbage and excessive background programs regularly; closing irrelevant programs with caution; avoiding opening a large number of files during startup.
 Does H5 page production require continuous maintenance?
Apr 05, 2025 pm 11:27 PM
Does H5 page production require continuous maintenance?
Apr 05, 2025 pm 11:27 PM
The H5 page needs to be maintained continuously, because of factors such as code vulnerabilities, browser compatibility, performance optimization, security updates and user experience improvements. Effective maintenance methods include establishing a complete testing system, using version control tools, regularly monitoring page performance, collecting user feedback and formulating maintenance plans.
 How to solve the problem of loading when the PS opens the file?
Apr 06, 2025 pm 06:33 PM
How to solve the problem of loading when the PS opens the file?
Apr 06, 2025 pm 06:33 PM
"Loading" stuttering occurs when opening a file on PS. The reasons may include: too large or corrupted file, insufficient memory, slow hard disk speed, graphics card driver problems, PS version or plug-in conflicts. The solutions are: check file size and integrity, increase memory, upgrade hard disk, update graphics card driver, uninstall or disable suspicious plug-ins, and reinstall PS. This problem can be effectively solved by gradually checking and making good use of PS performance settings and developing good file management habits.
 Is slow PS loading related to computer configuration?
Apr 06, 2025 pm 06:24 PM
Is slow PS loading related to computer configuration?
Apr 06, 2025 pm 06:24 PM
The reason for slow PS loading is the combined impact of hardware (CPU, memory, hard disk, graphics card) and software (system, background program). Solutions include: upgrading hardware (especially replacing solid-state drives), optimizing software (cleaning up system garbage, updating drivers, checking PS settings), and processing PS files. Regular computer maintenance can also help improve PS running speed.
 How to use mysql after installation
Apr 08, 2025 am 11:48 AM
How to use mysql after installation
Apr 08, 2025 am 11:48 AM
The article introduces the operation of MySQL database. First, you need to install a MySQL client, such as MySQLWorkbench or command line client. 1. Use the mysql-uroot-p command to connect to the server and log in with the root account password; 2. Use CREATEDATABASE to create a database, and USE select a database; 3. Use CREATETABLE to create a table, define fields and data types; 4. Use INSERTINTO to insert data, query data, update data by UPDATE, and delete data by DELETE. Only by mastering these steps, learning to deal with common problems and optimizing database performance can you use MySQL efficiently.
 Can mysql run on android
Apr 08, 2025 pm 05:03 PM
Can mysql run on android
Apr 08, 2025 pm 05:03 PM
MySQL cannot run directly on Android, but it can be implemented indirectly by using the following methods: using the lightweight database SQLite, which is built on the Android system, does not require a separate server, and has a small resource usage, which is very suitable for mobile device applications. Remotely connect to the MySQL server and connect to the MySQL database on the remote server through the network for data reading and writing, but there are disadvantages such as strong network dependencies, security issues and server costs.