How to use vue-router with Vue3?
Preface
Management routing is an essential feature for most single-page applications. With the new version of Vue Router in Alpha, we can already start seeing how it works in the next version of Vue.
Many of the changes in Vue3 will slightly change the way we access plugins and libraries, including Vue Router.
1. The first step: install vue-router
npm install vue-router@4.0.0-beta.13
2. The second step: main.js
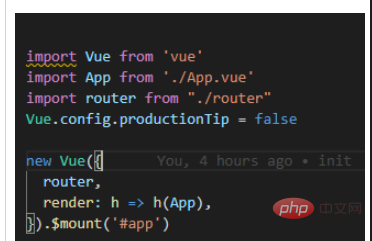
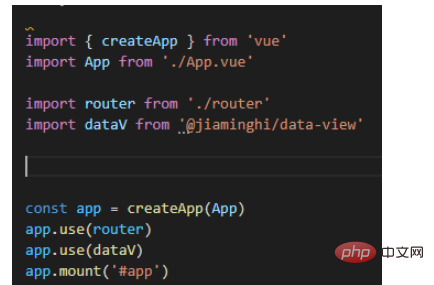
First, let’s compare main.js in vue2 and vue3 Difference: (The first picture is vue2, the second picture is vue3)


It can be clearly seen that we commonly use it in vue2 The Vue object "disappears" in vue3 due to the direct use of the createApp method, but in fact the app created using the createApp method is a Vue object. Vue.use(), which is often used in vue2, can be used in vue3 Replace it with app.use() for normal use; in the main.js file of vue3, use vue-router to directly call the router using the app.use() method.
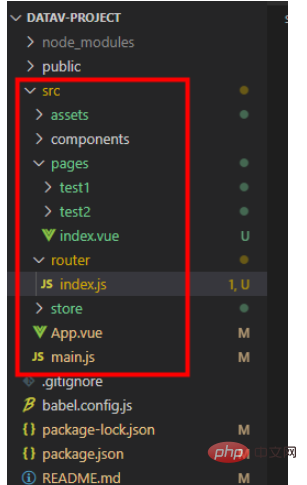
Note: The route name exported by the import routing file is from "corresponding routing file relative path", the project directory is as follows (vue2 and vue3 are the same):

三, routing file
import { createRouter, createWebHashHistory } from "vue-router"

const routes = [
    {
        path: '/',
        component: () => import('@/pages')
    },
    {
        path: '/test1',
        name: "test1",
        component: () => import('@/pages/test1')
    },
    {
        path: '/test2',
        name: "test2",
        component: () => import('@/pages/test2')
    },
]
export const router = createRouter({
  history: createWebHashHistory(),
  routes: routes
})

export default router4. app.vue
<template>
<router-view></router-view>
</template>
<script>
export default {
name: 'App',
components: {
}
}
</script>
<style>
#app {
font-family: Avenir, Helvetica, Arial, sans-serif;
-webkit-font-smoothing: antialiased;
-moz-osx-font-smoothing: grayscale;
text-align: center;
color: #2c3e50;
margin-top: 60px;
}
</style>4. Use (such as jump)
We introduce useRoute and useRouter where we need to use routing (equivalent to $route and $router in vue2)
<script>
import { useRoute, useRouter } from 'vue-router'
export default {
setup () {
const route = useRoute()
const router = useRouter()
return {}
},
}</script>Example: Page jump
<template>
<h2 id="我是test">我是test1</h2>
<button>toTest2</button>
</template>
<script>
import { useRouter } from 'vue-router'
export default {
setup () {
const router = useRouter()
const toTest2= (() => {
router.push("./test2")
})
return {
toTest2
}
},
}
</script>
<style>
</style>The above is the detailed content of How to use vue-router with Vue3?. For more information, please follow other related articles on the PHP Chinese website!

Hot AI Tools

Undresser.AI Undress
AI-powered app for creating realistic nude photos

AI Clothes Remover
Online AI tool for removing clothes from photos.

Undress AI Tool
Undress images for free

Clothoff.io
AI clothes remover

AI Hentai Generator
Generate AI Hentai for free.

Hot Article

Hot Tools

Notepad++7.3.1
Easy-to-use and free code editor

SublimeText3 Chinese version
Chinese version, very easy to use

Zend Studio 13.0.1
Powerful PHP integrated development environment

Dreamweaver CS6
Visual web development tools

SublimeText3 Mac version
God-level code editing software (SublimeText3)

Hot Topics
 1359
1359
 52
52
 vue3+vite: How to solve the error when using require to dynamically import images in src
May 21, 2023 pm 03:16 PM
vue3+vite:src uses require to dynamically import images and error reports and solutions. vue3+vite dynamically imports multiple images. If vue3 is using typescript development, require will introduce image errors. requireisnotdefined cannot be used like vue2 such as imgUrl:require(' .../assets/test.png') is imported because typescript does not support require, so import is used. Here is how to solve it: use awaitimport
 How to refresh partial content of the page in Vue3
May 26, 2023 pm 05:31 PM
To achieve partial refresh of the page, we only need to implement the re-rendering of the local component (dom). In Vue, the easiest way to achieve this effect is to use the v-if directive. In Vue2, in addition to using the v-if instruction to re-render the local dom, we can also create a new blank component. When we need to refresh the local page, jump to this blank component page, and then jump back in the beforeRouteEnter guard in the blank component. original page. As shown in the figure below, how to click the refresh button in Vue3.X to reload the DOM within the red box and display the corresponding loading status. Since the guard in the component in the scriptsetup syntax in Vue3.X only has o
 I encountered the vue-router error 'NavigationDuplicated: Avoided redundant navigation to current location' in my Vue application - how to solve it?
Jun 24, 2023 pm 02:20 PM
The vue-router error "NavigationDuplicated:Avoidedredundantnavigationtocurrentlocation" encountered in the Vue application – how to solve it? Vue.js is becoming more and more popular in front-end application development as a fast and flexible JavaScript framework. VueRouter is a code library of Vue.js used for routing management. However, sometimes
 How to use defineCustomElement to define components in Vue3
May 28, 2023 am 11:29 AM
Using Vue to build custom elements WebComponents is a collective name for a set of web native APIs that allow developers to create reusable custom elements (customelements). The main benefit of custom elements is that they can be used with any framework, even without one. They are ideal when you are targeting end users who may be using a different front-end technology stack, or when you want to decouple the final application from the implementation details of the components it uses. Vue and WebComponents are complementary technologies, and Vue provides excellent support for using and creating custom elements. You can integrate custom elements into existing Vue applications, or use Vue to build
 How to select an avatar and crop it in Vue3
May 29, 2023 am 10:22 AM
The final effect is to install the VueCropper component yarnaddvue-cropper@next. The above installation value is for Vue3. If it is Vue2 or you want to use other methods to reference, please visit its official npm address: official tutorial. It is also very simple to reference and use it in a component. You only need to introduce the corresponding component and its style file. I do not reference it globally here, but only introduce import{userInfoByRequest}from'../js/api' in my component file. import{VueCropper}from'vue-cropper&
 How to use Vue3 and Element Plus to implement automatic import
May 22, 2023 pm 04:58 PM
1 Introduction 1.1 Purpose ElementPlus uses on-demand introduction to greatly reduce the size of the packaged file. 1.2 The final effect is to automatically generate the components.d.ts file and introduce it into the file. The ElementPlus component automatically generates the components.d.ts file and introduce it into the file. ElementPlusAPI2 Preparation Install ElementPlus#Choose a package manager you like#NPM$npminstallelement-plus--save#Yarn$yarnaddelement-plus#pnpm$pnpminstallelement-plus3 Press
 What is the method of encapsulating Axios requests in vue3 and using it in components?
May 21, 2023 am 10:49 AM
1. Create a folder to store the encapsulated js. I created it in src/request/axios.js. 2. The encapsulation code is as follows. Copy the following code directly into request.js to encapsulate get and post requests. What you need to configure yourself is: Change your request address, whether the tokenKey is token, and change it to the local token name you save. You can read the comments in the code, which is easy to understand. /**axios encapsulation*request interception, corresponding interception, and error unified processing*/importaxiosfrom'axios';importQSfrom'qs'
 How to use vue3+ts+axios+pinia to achieve senseless refresh
May 25, 2023 pm 03:37 PM
vue3+ts+axios+pinia realizes senseless refresh 1. First download aiXos and pinianpmipinia in the project--savenpminstallaxios--save2. Encapsulate axios request-----Download js-cookienpmiJS-cookie-s//Introduce aixosimporttype{AxiosRequestConfig ,AxiosResponse}from"axios";importaxiosfrom'axios';import{ElMess


