

How to use the effect of Vue3 responsive core

Normally we will not use effect directly, because effect is a low-level API. When we use Vue3, Vue will call effect for us by default. Effect is translated as effect, which means to make it work. The function that makes it work is the function we pass in, so the function of effect is to make the function we pass in take effect, that is, to execute this function. A simplified diagram of the execution process is as follows:
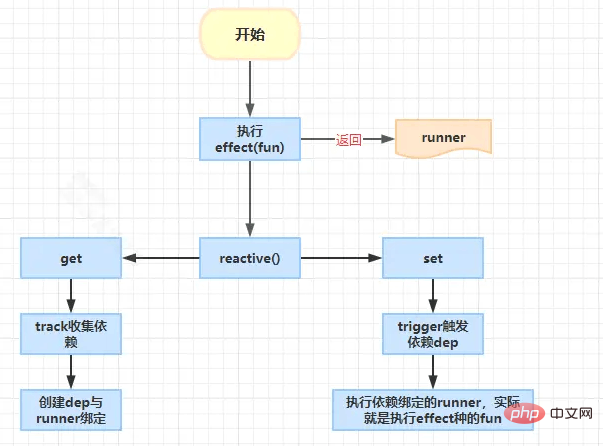
Next, we will first understand the basic usage of effect through examples, and then understand the principle.
1. Effect usage
1. Basic usage
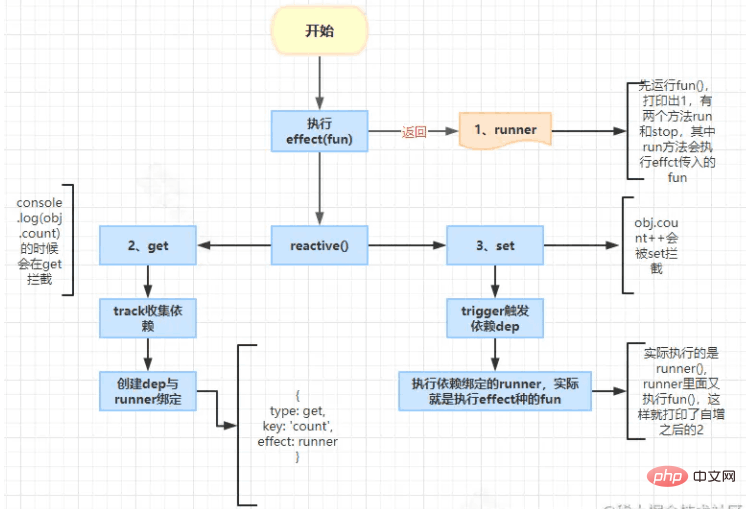
const obj = reactive({count: 1})

const runner = effect(() => {
  console.log(obj.count)
})

obj.count++The result will print 1 first, and then print 2 after obj.count .
The process diagram is as follows:
Run effect(fun)
// 先执行
fun()  // 打印出1

const runner = new ReactiveEffect(fn)

return runner

runner: {
  run() {
    this.fun() //执行fun
  },
  stop() {

  }
}console.log (obj.count)The track dependency collection structure is as follows:

obj.count Trigger dependencies, execute runner.run(), and actually run is
() => {
  console.log(obj.count)
}, so it prints out 2
2. The lazy attribute is true
When this value is true, only after the first manual call to the runner, the dependent data The callback of the effect will be automatically executed when the change is made. It can be understood that the effect is executed for the first time after manually calling the runner.
const obj = reactive({count: 1})

const runner = effect(() => {
  console.log(obj.count)
}, {
  lazy: true
})
runner()
obj.count++will only print out 2
. The reason is that the effect source code has the following Logic:
3. Options include onTrack
let events = []
const onTrack = (e) => {
  events.push(e)
}
const obj = reactive({ foo: 1, bar: 2 })
const runner = effect(
  () => {
    console.log(obj.foo)
  },
  { onTrack }
)
console.log('runner', runner)
obj.foo++
console.log("events", events)Look at the printed results of events:

[
  {
    effect: runner,  // effect 函数的返回值
    target: toRaw(obj),  // 表示的是哪个响应式数据发生了变化
    type: TrackOpTypes.GET,  // 表示此次记录操作的类型。 get 表示获取值
    key: 'foo'
 }
]2. Source code analysis
1. Implementation of effect method
// packages/reactivity/src/effect.ts
export interface ReactiveEffectOptions extends DebuggerOptions {
lazy?: boolean
scheduler?: EffectScheduler
scope?: EffectScope
allowRecurse?: boolean
onStop?: () => void
}
export function effect<T = any>(
fn: () => T, // 副作用函数
options?: ReactiveEffectOptions // 结构如上
): ReactiveEffectRunner {
// 如果 fn 对象上有 effect 属性
if ((fn as ReactiveEffectRunner).effect) {
// 那么就将 fn 替换为 fn.effect.fn
fn = (fn as ReactiveEffectRunner).effect.fn
}
// 创建一个响应式副作用函数
const _effect = new ReactiveEffect(fn)
if (options) {
// 将配置项合并到响应式副作用函数上
extend(_effect, options)
// 如果配置项中有 scope 属性(该属性的作用是指定副作用函数的作用域)
if (options.scope) recordEffectScope(_effect, options.scope)
}
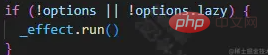
if (!options || !options.lazy) { // options.lazy 不为true
_effect.run() // 执行响应式副作用函数 首次执行fn()
}
// _effect.run作用域绑定到_effect
const runner = _effect.run.bind(_effect) as ReactiveEffectRunner
// 将响应式副作用函数赋值给 runner.effect
runner.effect = _effect
return runner
}Core code:
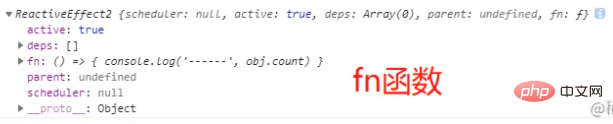
Create a responsive side effect functionconst _effect = new ReactiveEffect( fn), the running results are as follows:
Execute responsive side effect function in non-lazy state_effect.run()
if (!options || !options.lazy) { // options.lazy 不为true
  _effect.run() // 执行响应式副作用函数 首次执行fn()
}_effect.runScope is bound to _effect
// _effect.run作用域绑定到_effect
  const runner = _effect.run.bind(_effect) as ReactiveEffectRunner
Returns the side effect function runner
2, ReactiveEffect function source code
export class ReactiveEffect<T = any> {
  active = true
  deps: Dep[] = [] // 响应式依赖项的集合
  parent: ReactiveEffect | undefined = undefined

  /**
   * Can be attached after creation
   * @internal
   */
  computed?: ComputedRefImpl<T>
  /**
   * @internal
   */
  allowRecurse?: boolean
  /**
   * @internal
   */
  private deferStop?: boolean

  onStop?: () => void
  // dev only
  onTrack?: (event: DebuggerEvent) => void
  // dev only
  onTrigger?: (event: DebuggerEvent) => void

  constructor(
    public fn: () => T,
    public scheduler: EffectScheduler | null = null,
    scope?: EffectScope
  ) {
    // 记录当前 ReactiveEffect 对象的作用域
    recordEffectScope(this, scope)
  }

  run() {
    // 如果当前 ReactiveEffect 对象不处于活动状态,直接返回 fn 的执行结果
    if (!this.active) {
      return this.fn()
    }
    // 寻找当前 ReactiveEffect 对象的最顶层的父级作用域
    let parent: ReactiveEffect | undefined = activeEffect
    let lastShouldTrack = shouldTrack // 是否要跟踪
    while (parent) {
      if (parent === this) {
        return
      }
      parent = parent.parent
    }
    try {
      // 记录父级作用域为当前活动的 ReactiveEffect 对象
      this.parent = activeEffect
      activeEffect = this  // 将当前活动的 ReactiveEffect 对象设置为 “自己”
      shouldTrack = true // 将 shouldTrack 设置为 true (表示是否需要收集依赖)
      // effectTrackDepth 用于标识当前的 effect 调用栈的深度,执行一次 effect 就会将 effectTrackDepth 加 1
      trackOpBit = 1 << ++effectTrackDepth

      if (effectTrackDepth <= maxMarkerBits) {
        // 初始依赖追踪标记
        initDepMarkers(this)
      } else {
        // 清除依赖追踪标记
        cleanupEffect(this)
      }
      // 返回副作用函数执行结果
      return this.fn()
    } finally {
      // 如果 effect调用栈的深度 没有超过阈值
      if (effectTrackDepth <= maxMarkerBits) {
        // 确定最终的依赖追踪标记
        finalizeDepMarkers(this)
      }
      // 执行完毕会将 effectTrackDepth 减 1
      trackOpBit = 1 << --effectTrackDepth
      // 执行完毕,将当前活动的 ReactiveEffect 对象设置为 “父级作用域”
      activeEffect = this.parent
      // 将 shouldTrack 设置为上一个值
      shouldTrack = lastShouldTrack
      // 将父级作用域设置为 undefined
      this.parent = undefined
      // 延时停止,这个标志是在 stop 方法中设置的
      if (this.deferStop) {
        this.stop()
      }
    }
  }

  stop() {
    // stopped while running itself - defer the cleanup
    // 如果当前 活动的 ReactiveEffect 对象是 “自己”
    // 延迟停止,需要执行完当前的副作用函数之后再停止
    if (activeEffect === this) {
      // 在 run 方法中会判断 deferStop 的值,如果为 true,就会执行 stop 方法
      this.deferStop = true
    } else if (this.active) {// 如果当前 ReactiveEffect 对象处于活动状态
      cleanupEffect(this) // 清除所有的依赖追踪标记
      if (this.onStop) {
        this.onStop()
      }
      this.active = false // 将 active 设置为 false
    }
  }
}The function of the run method is to execute the side effect function, and in the process of executing the side effect function, dependencies will be collected;
The function of the stop method is to stop the current ReactiveEffect object, after stopping, will no longer collect dependencies;
activeEffect and this are not equal every time, because activeEffect will change with the depth of the call stack, and this It is fixed;
3. Dependency collection related
1. How to trigger dependency collection
In the side effect function, obj. count will trigger dependency collection
const runner = effect(() => {
  console.log(obj.count)
})The triggered entry is in the get interceptor
function createGetter(isReadonly = false, shallow = false) {
  // 闭包返回 get 拦截器方法
  return function get(target: Target, key: string | symbol, receiver: object) {
    // ...
    if (!isReadonly) {
      track(target, TrackOpTypes.GET, key)
    }
    // ...
}2. Track source code
const targetMap = new WeakMap();
/**
 * 收集依赖
 * @param target target 触发依赖的对象,例子中的obj
 * @param type 操作类型 比如obj.count就是get
 * @param key 指向对象的key, 比如obj.count就是count
 */
export function track(target: object, type: TrackOpTypes, key: unknown) {
  if (shouldTrack && activeEffect) { // 是否应该依赖收集 & 当前的new ReactiveEffect()即指向的就是当前正在执行的副作用函数

    // 如果 targetMap 中没有 target,就会创建一个 Map
    let depsMap = targetMap.get(target)
    if (!depsMap) {
      targetMap.set(target, (depsMap = new Map()))
    }
    let dep = depsMap.get(key)
    if (!dep) {
      depsMap.set(key, (dep = createDep())) // createDep 生成dep = { w:0, n: 0}
    }

    const eventInfo = __DEV__
      ? { effect: activeEffect, target, type, key }
      : undefined

    trackEffects(dep, eventInfo)
  }
}shouldTrack has also been mentioned above. The function is to control whether to collect dependencies;
activeEffect is the ReactiveEffect object we just talked about, which points to the side effect function currently being executed;
The function of the track method is to collect dependencies, and its The implementation is very simple, just record the target and key in targetMap;
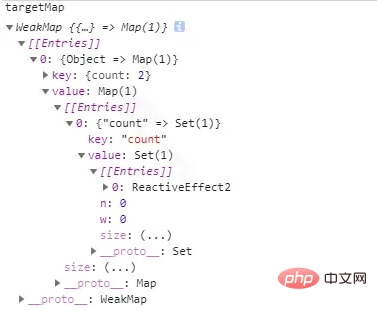
targetMap is a WeakMap, its key is target, its value is a Map, the key of this Map is key, and its value is a Set;
The structural pseudocode of targetMap is as follows:
targetMap = {
  target: {
    key: dep
  },
  // 比如:
  obj: {
    count: {
       w: 0,
       n: 0
    }
  }
}
The above is the original depMap
The dev environment will increase ## to increase responsive debugging #eventInfo
const eventInfo = __DEV__
  ? { effect: activeEffect, target, type, key }
  : undefined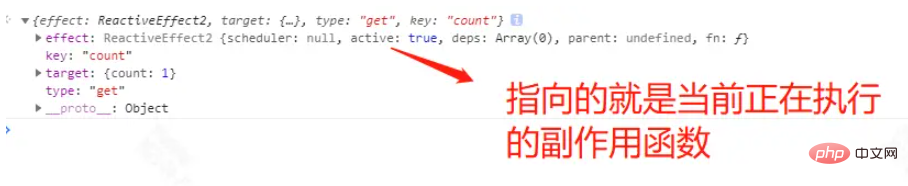
trackEffects(dep, eventInfo)
trackEffects
export function trackEffects(
dep: Dep,
debuggerEventExtraInfo?: DebuggerEventExtraInfo
) {
let shouldTrack = false
if (effectTrackDepth <= maxMarkerBits) {
if (!newTracked(dep)) {
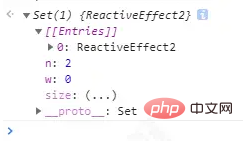
// 执行之前 dep = Set(0) {w: 0, n: 0}
// 执行之后 dep = Set(0) {w: 0, n: 2}
dep.n |= trackOpBit // set newly tracked
shouldTrack = !wasTracked(dep)
}
} else {
// Full cleanup mode.
shouldTrack = !dep.has(activeEffect!)
}
if (shouldTrack) {
// 将activeEffect添加到dep
dep.add(activeEffect!)
activeEffect!.deps.push(dep)
if (__DEV__ && activeEffect!.onTrack) { // onTrack逻辑
activeEffect!.onTrack(
extend(
{
effect: activeEffect!
},
debuggerEventExtraInfo!
)
)
}
}
}Copy after login
export function trackEffects(
dep: Dep,
debuggerEventExtraInfo?: DebuggerEventExtraInfo
) {
let shouldTrack = false
if (effectTrackDepth <= maxMarkerBits) {
if (!newTracked(dep)) {
// 执行之前 dep = Set(0) {w: 0, n: 0}
// 执行之后 dep = Set(0) {w: 0, n: 2}
dep.n |= trackOpBit // set newly tracked
shouldTrack = !wasTracked(dep)
}
} else {
// Full cleanup mode.
shouldTrack = !dep.has(activeEffect!)
}
if (shouldTrack) {
// 将activeEffect添加到dep
dep.add(activeEffect!)
activeEffect!.deps.push(dep)
if (__DEV__ && activeEffect!.onTrack) { // onTrack逻辑
activeEffect!.onTrack(
extend(
{
effect: activeEffect!
},
debuggerEventExtraInfo!
)
)
}
}
}dep.add(activeEffect!) If there is no current ReactiveEffect object in dep, it will be added
obj.count in the example will trigger set interception , trigger dependency update
function createSetter(shallow = false) {
  return function set(
    target: object,
    key: string | symbol,
    value: unknown,
    receiver: object
  ): boolean {
    //...
    const result = Reflect.set(target, key, value, receiver)
    // don't trigger if target is something up in the prototype chain of original
    if (target === toRaw(receiver)) {
      if (!hadKey) {
        trigger(target, TriggerOpTypes.ADD, key, value) // 触发ADD依赖更新
      } else if (hasChanged(value, oldValue)) {
        trigger(target, TriggerOpTypes.SET, key, value, oldValue) //触发SET依赖更新
      }
    }
    //...
}1、trigger依赖更新
// 路径:packages/reactivity/src/effect.ts
export function trigger(
target: object,
type: TriggerOpTypes,
key?: unknown,
newValue?: unknown,
oldValue?: unknown,
oldTarget?: Map<unknown, unknown> | Set<unknown>
) {
const depsMap = targetMap.get(target) // 获取depsMap, targetMap是在track中创建的依赖
if (!depsMap) {
// never been tracked
return
}
let deps: (Dep | undefined)[] = []
if (type === TriggerOpTypes.CLEAR) {
// collection being cleared
// trigger all effects for target
deps = [...depsMap.values()]
} else if (key === 'length' && isArray(target)) {
const newLength = Number(newValue)
depsMap.forEach((dep, key) => {
if (key === 'length' || key >= newLength) {
deps.push(dep)
}
})
} else {
// schedule runs for SET | ADD | DELETE
if (key !== void 0) {
deps.push(depsMap.get(key))
}
// also run for iteration key on ADD | DELETE | Map.SET
switch (type) {
case TriggerOpTypes.ADD:
if (!isArray(target)) {
deps.push(depsMap.get(ITERATE_KEY))
if (isMap(target)) {
deps.push(depsMap.get(MAP_KEY_ITERATE_KEY))
}
} else if (isIntegerKey(key)) {
// new index added to array -> length changes
deps.push(depsMap.get('length'))
}
break
case TriggerOpTypes.DELETE:
if (!isArray(target)) {
deps.push(depsMap.get(ITERATE_KEY))
if (isMap(target)) {
deps.push(depsMap.get(MAP_KEY_ITERATE_KEY))
}
}
break
case TriggerOpTypes.SET:
if (isMap(target)) {
deps.push(depsMap.get(ITERATE_KEY))
}
break
}
}
  const eventInfo = __DEV__
    ? { target, type, key, newValue, oldValue, oldTarget }
    : undefined
  if (deps.length === 1) {
    if (deps[0]) {
      if (__DEV__) {
        triggerEffects(deps[0], eventInfo)
      } else {
        triggerEffects(deps[0])
      }
    }
} else {
const effects: ReactiveEffect[] = []
for (const dep of deps) {
if (dep) {
effects.push(...dep)
}
}
if (__DEV__) {
triggerEffects(createDep(effects), eventInfo)
} else {
triggerEffects(createDep(effects))
}
}
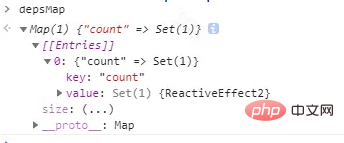
}const depsMap = targetMap.get(target) 获取 targetMap 中的 depsMap targetMap结构如下:
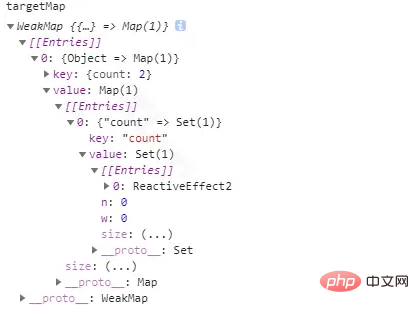
执行以上语句之后的depsMap结构如下:
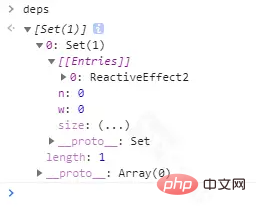
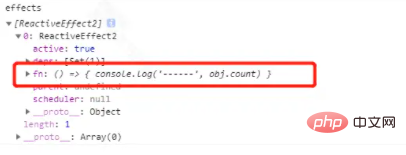
将 depsMap 中 key 对应的 ReactiveEffect 对象添加到 deps 中deps.push(depsMap.get(key))之后的deps结构如下:
triggerEffects(deps[0], eventInfo)
const eventInfo = __DEV__
? { target, type, key, newValue, oldValue, oldTarget }
: undefined
if (deps.length === 1) {
if (deps[0]) {
if (__DEV__) {
triggerEffects(deps[0], eventInfo)
} else {
triggerEffects(deps[0])
}
}
}trigger函数的作用就是触发依赖,当我们修改数据的时候,就会触发依赖,然后执行依赖中的副作用函数。
在这里的实现其实并没有执行,主要是收集一些需要执行的副作用函数,然后在丢给triggerEffects函数去执行,接下来看看triggerEffects函数。
2、triggerEffects(deps[0], eventInfo)
export function triggerEffects(
  dep: Dep | ReactiveEffect[],
  debuggerEventExtraInfo?: DebuggerEventExtraInfo
) {
  // spread into array for stabilization
  const effects = isArray(dep) ? dep : [...dep]
  for (const effect of effects) {
    if (effect.computed) {
      triggerEffect(effect, debuggerEventExtraInfo)
    }
  }
  for (const effect of effects) {
    if (!effect.computed) {
      triggerEffect(effect, debuggerEventExtraInfo)
    }
  }
}主要步骤
const effects = isArray(dep) ? dep : [...dep]获取effects
triggerEffect(effect, debuggerEventExtraInfo)执行effect,接下来看看源码
3、triggerEffect(effect, debuggerEventExtraInfo)
function triggerEffect(
  effect: ReactiveEffect,
  debuggerEventExtraInfo?: DebuggerEventExtraInfo
) {
  if (effect !== activeEffect || effect.allowRecurse) {
     // 如果 effect.onTrigger 存在,就会执行,只有开发模式下才会执行
    if (__DEV__ && effect.onTrigger) {
      effect.onTrigger(extend({ effect }, debuggerEventExtraInfo))
    }
    // 如果 effect 是一个调度器,就会执行 scheduler
    if (effect.scheduler) {
      effect.scheduler()
    } else {
      // 其它情况执行 effect.run()
      effect.run()
    }
  }
}effect.run()就是执行副作用函数
The above is the detailed content of How to use the effect of Vue3 responsive core. For more information, please follow other related articles on the PHP Chinese website!

Hot AI Tools

Undresser.AI Undress
AI-powered app for creating realistic nude photos

AI Clothes Remover
Online AI tool for removing clothes from photos.

Undress AI Tool
Undress images for free

Clothoff.io
AI clothes remover

AI Hentai Generator
Generate AI Hentai for free.

Hot Article
Hot Tools

Notepad++7.3.1
Easy-to-use and free code editor

SublimeText3 Chinese version
Chinese version, very easy to use

Zend Studio 13.0.1
Powerful PHP integrated development environment

Dreamweaver CS6
Visual web development tools

SublimeText3 Mac version
God-level code editing software (SublimeText3)
Hot Topics
 1381
1381
 52
52

 vue3+vite: How to solve the error when using require to dynamically import images in src
May 21, 2023 pm 03:16 PM
vue3+vite: How to solve the error when using require to dynamically import images in src
May 21, 2023 pm 03:16 PM
vue3+vite:src uses require to dynamically import images and error reports and solutions. vue3+vite dynamically imports multiple images. If vue3 is using typescript development, require will introduce image errors. requireisnotdefined cannot be used like vue2 such as imgUrl:require(' .../assets/test.png') is imported because typescript does not support require, so import is used. Here is how to solve it: use awaitimport
 How to use tinymce in vue3 project
May 19, 2023 pm 08:40 PM
How to use tinymce in vue3 project
May 19, 2023 pm 08:40 PM
tinymce is a fully functional rich text editor plug-in, but introducing tinymce into vue is not as smooth as other Vue rich text plug-ins. tinymce itself is not suitable for Vue, and @tinymce/tinymce-vue needs to be introduced, and It is a foreign rich text plug-in and has not passed the Chinese version. You need to download the translation package from its official website (you may need to bypass the firewall). 1. Install related dependencies npminstalltinymce-Snpminstall@tinymce/tinymce-vue-S2. Download the Chinese package 3. Introduce the skin and Chinese package. Create a new tinymce folder in the project public folder and download the
 How to refresh partial content of the page in Vue3
May 26, 2023 pm 05:31 PM
How to refresh partial content of the page in Vue3
May 26, 2023 pm 05:31 PM
To achieve partial refresh of the page, we only need to implement the re-rendering of the local component (dom). In Vue, the easiest way to achieve this effect is to use the v-if directive. In Vue2, in addition to using the v-if instruction to re-render the local dom, we can also create a new blank component. When we need to refresh the local page, jump to this blank component page, and then jump back in the beforeRouteEnter guard in the blank component. original page. As shown in the figure below, how to click the refresh button in Vue3.X to reload the DOM within the red box and display the corresponding loading status. Since the guard in the component in the scriptsetup syntax in Vue3.X only has o
 How Vue3 parses markdown and implements code highlighting
May 20, 2023 pm 04:16 PM
How Vue3 parses markdown and implements code highlighting
May 20, 2023 pm 04:16 PM
Vue implements the blog front-end and needs to implement markdown parsing. If there is code, it needs to implement code highlighting. There are many markdown parsing libraries for Vue, such as markdown-it, vue-markdown-loader, marked, vue-markdown, etc. These libraries are all very similar. Marked is used here, and highlight.js is used as the code highlighting library. The specific implementation steps are as follows: 1. Install dependent libraries. Open the command window under the vue project and enter the following command npminstallmarked-save//marked to convert markdown into htmlnpmins
 How to select an avatar and crop it in Vue3
May 29, 2023 am 10:22 AM
How to select an avatar and crop it in Vue3
May 29, 2023 am 10:22 AM
The final effect is to install the VueCropper component yarnaddvue-cropper@next. The above installation value is for Vue3. If it is Vue2 or you want to use other methods to reference, please visit its official npm address: official tutorial. It is also very simple to reference and use it in a component. You only need to introduce the corresponding component and its style file. I do not reference it globally here, but only introduce import{userInfoByRequest}from'../js/api' in my component file. import{VueCropper}from'vue-cropper&
 How to use vue3+ts+axios+pinia to achieve senseless refresh
May 25, 2023 pm 03:37 PM
How to use vue3+ts+axios+pinia to achieve senseless refresh
May 25, 2023 pm 03:37 PM
vue3+ts+axios+pinia realizes senseless refresh 1. First download aiXos and pinianpmipinia in the project--savenpminstallaxios--save2. Encapsulate axios request-----Download js-cookienpmiJS-cookie-s//Introduce aixosimporttype{AxiosRequestConfig ,AxiosResponse}from"axios";importaxiosfrom'axios';import{ElMess
 How to use Vue3 reusable components
May 20, 2023 pm 07:25 PM
How to use Vue3 reusable components
May 20, 2023 pm 07:25 PM
Preface Whether it is vue or react, when we encounter multiple repeated codes, we will think about how to reuse these codes instead of filling a file with a bunch of redundant codes. In fact, both vue and react can achieve reuse by extracting components, but if you encounter some small code fragments and you don’t want to extract another file, in comparison, react can be used in the same Declare the corresponding widget in the file, or implement it through renderfunction, such as: constDemo:FC=({msg})=>{returndemomsgis{msg}}constApp:FC=()=>{return(
 How to use defineCustomElement to define components in Vue3
May 28, 2023 am 11:29 AM
How to use defineCustomElement to define components in Vue3
May 28, 2023 am 11:29 AM
Using Vue to build custom elements WebComponents is a collective name for a set of web native APIs that allow developers to create reusable custom elements (customelements). The main benefit of custom elements is that they can be used with any framework, even without one. They are ideal when you are targeting end users who may be using a different front-end technology stack, or when you want to decouple the final application from the implementation details of the components it uses. Vue and WebComponents are complementary technologies, and Vue provides excellent support for using and creating custom elements. You can integrate custom elements into existing Vue applications, or use Vue to build
