

How to automatically enter ERP system data in Python

Overall project situation
Software: Pycharm
Environment: Python 3.7. 9 (Considering that customers may have different operating systems, for compatibility reasons)
Technical library: requests, pandas, Pyqt5, etc. (see dependency files for details)
Requirements analysis
Through analysis and communication with customer demand documents, there are roughly the following requirements:
Submit data to 3 interfaces in batches based on "single number ownership"
Need a GUI operation interface
Support different salesmen to log in
In general It is said to be a POST data submission and GUI development.
Project implementation
1.Post submission
This section mainly uses crawler technology. The steps that remain unchanged for thousands of years are to analyze the web page first.
1.1 Login
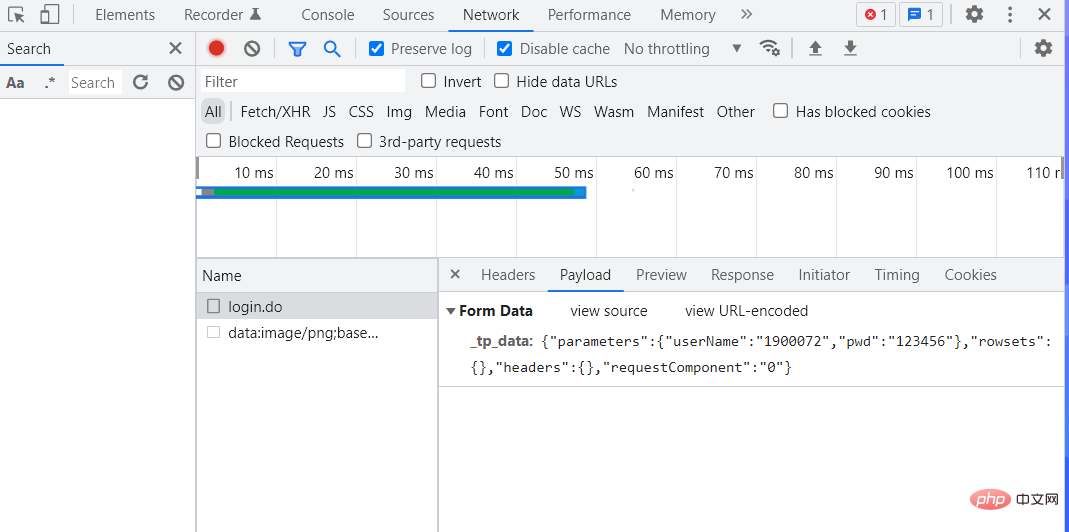
Through packet capture, it is found that the password is plain text, which reduces the difficulty by half. Then use the correct password to analyze the return after successful login. .
    def login(self, username: str, password: str):
        """
        登录
        """
        url = "http://cloud.tiamaes.com:11349/erp/portal.bootstrap/SSOLoginAction/login.do"
        data = {
            "_tp_data": '{"parameters":{"userName":' + username + ',"pwd":' + password + '},"rowsets":{},"headers":{},"requestComponent":"0"}'
        }
        data = parse.urlencode(data).replace("+", "")
        resp = requests.post(url, headers=self.headers, data=data, verify=False)
        self.IDENTIFIER = resp.json()["headers"]["IDENTIFIER"]
        return self.IDENTIFIER
It is found that after successful login, an "IDENTIFIER" parameter will be returned. The value is an encrypted string. This is obvious. Just by looking at the literal meaning, you know that this must be useful, so Write it down first.
1.2 Interface Analysis
Since I am using a test account, the data submitted by this account will be deleted. In order not to inject too much invalid data into others, there will be no actual entry here. , explained with business code.
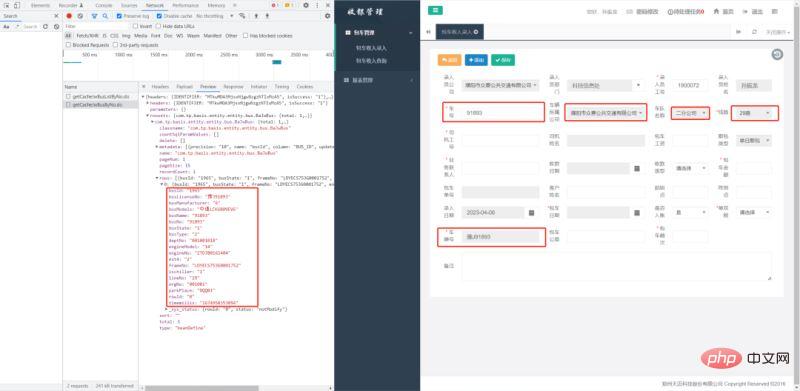
Get vehicle information
Through analysis, it was found that although the customer has given some vehicle information, there is still a lot of missing information that requires oneself Replenish. Through packet capture, we found that after entering the vehicle number, an Ajax request will be initiated, and the other information in the form is the data returned by the Ajax request.
 def get_car_details(self, car_no: str, IDENTIFIER: str):
        """
        获取车辆信息
        """
        # print(self.IDENTIFIER)
        url = "http://cloud.tiamaes.com:11349/money/basis.inter/JwBusAction/getCacheJwBusByNo.do"
        data = {
            '_tp_data': '{"parameters": {"busNo": ' + str(car_no) + ', "dsName": "83"}, "rowsets": {}, "headers": {"IDENTIFIER": ' + IDENTIFIER + '}, "requestComponent": "0"}'
        }
        data = parse.urlencode(data).replace("+", "")
        resp = requests.post(url, headers=self.headers, data=data, verify=False)
        rows = resp.json()["rowsets"]["com.tp.basis.entity.entity.bus.BaJwBus"]["rows"][0]
return rowsGet personnel information
I didn’t find the personnel information in the form through packet capture, and later found it Relevant data was found on a page.

This is a little more troublesome. You need to use regular expressions to match the data.
def get_personal_info(self, IDENTIFIER: str):
"""
获取个人信息
"""
url = "http://cloud.tiamaes.com:11349/money/money.action/CharteredAction/showDetail.do"
data = {
'_tp_data': '{"parameters":{"dsName":"83","method":"add","recId":"-1"},"rowsets":{},"headers":{"IDENTIFIER":' + IDENTIFIER + '},"requestComponent":"1"}'
}
data = parse.urlencode(data).replace("+", "")
resp = requests.post(url, headers=self.headers, data=data, verify=False)
json_data = eval(re.findall(r'<code>.*?"rows":\[(.*?)\]', resp.text)[0])
return json_dataInitiate a request and submit the data
Get the identifier, vehicle information, and personnel information returned by the login, and the rest is to communicate with the customer Combine the given data and initiate a request. It should be noted that the request parameters need to be converted to URL encoding. The request parameters are also the most troublesome part of this crawler. Here we show you the parameters that need to be sent in a request.
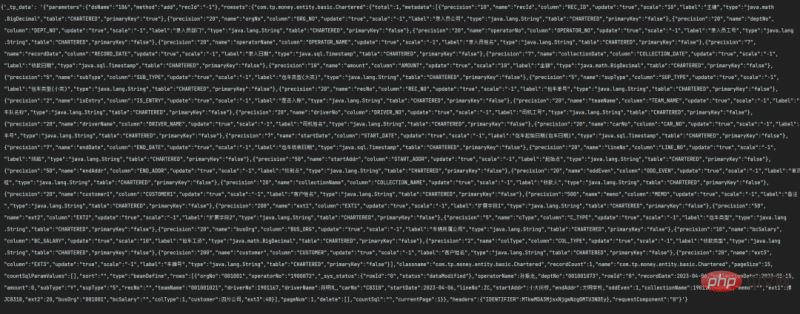
#There are many parameters and the format requirements are relatively strict. In the entire development process, debugging here also takes the longest time. After debugging, the code should be simplified. I am too lazy to change the merge that needs to be merged after debugging, so this section is relatively redundant.
    def submit_data(self, i: dict, IDENTIFIER: str):
        """
        众意数据提交
        """
        personal_info = self.get_personal_info(IDENTIFIER)  # 获取个人信息
        personal_info_data = str(personal_info).replace("'", '"')  # 将personal_info转换为字符串
        url = "http://cloud.tiamaes.com:11349/money/money.action/CharteredAction/saveForm.do"
        print(f'开始处理--{i["单号归属"]}--数据')
        memo = f'工单号{i["工单号"]}、餐费{i["餐费"]}、住宿{i["住宿"]}、过路过桥费{i["过路过桥费"]}、油费{i["油费"]}、备注{i["备注"]}'  # 拼接备注信息
        car_infos = self.get_car_details(str(i["车号"]), IDENTIFIER)  # 获取车辆信息
        pay_type = {
            "现金": "3",
            "转账": "2",
            "欠款": "1"
        }
        single_and_double = {
            "单程": "1",
            "双程": "2"
        }
        colType = pay_type[i["结账方式"]]  # 获取结账方式编码
        oddEven = single_and_double[i["单双程"]]  # 获取单双程编码
        now_date = datetime.datetime.now().date().strftime("%Y-%m-%d")  # 获取当前日期
        .......(此处省略)
        data["_tp_data"] = data["_tp_data"].replace('"dsName":"83"', '"dsName":"82"')
        data = parse.urlencode(data).replace("+", "")  # 将字典转换成url编码
        resp = requests.post(url, headers=self.headers, data=data, verify=False).json()
        order_id = resp["rowsets"]["com.tp.money.entity.basic.Chartered"]["rows"][0]["recNo"]  # 获取订单编号
        i["包车单号"] = order_id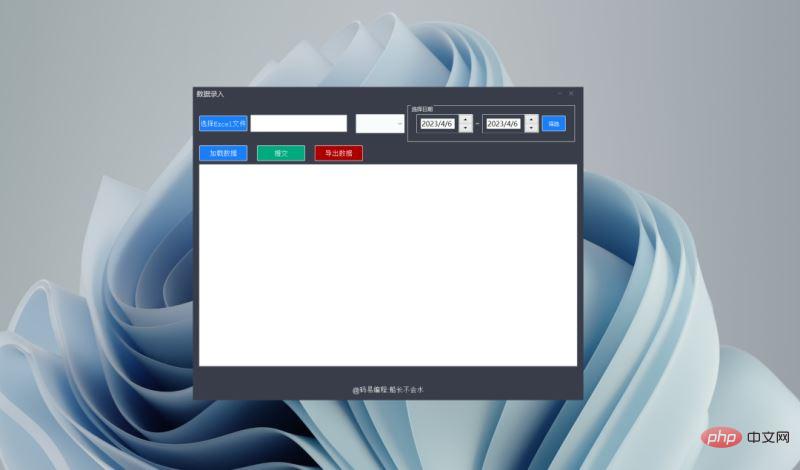
return data2. GUI development
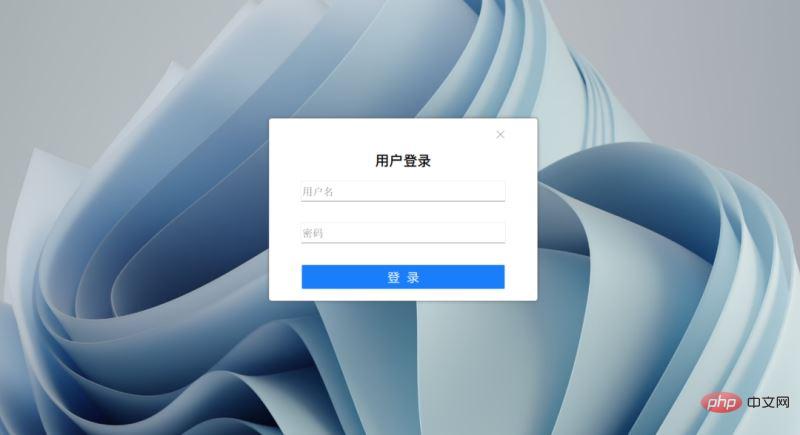
gui development is relatively simple. If you don’t want to beautify it, Pyqt’s native plug-in will do. I borrowed the experience of the previous project here and used only Some knowledge has made a borderless interface and appropriate beautification.
Login
from PyQt5.QtCore import Qt
from PyQt5.QtGui import QColor
from PyQt5.QtWidgets import (QFrame, QMessageBox, QGraphicsDropShadowEffect)
from Ui import login_ui
from Ui.submit_ui_main import MySubmitForm
from submit import TransitSubmit


class MyLogin(login_ui.Ui_LoginForm, QFrame):
    def __init__(self, submit: TransitSubmit):
        super().__init__()
        # self.IDENTIFIER = None
        # self.my_main_window = None
        self.setupUi(self)
        self.submit = submit
        # 设置无边框模式
        self.setWindowFlag(Qt.FramelessWindowHint)  # 将界面设置为无框
        self.setAttribute(Qt.WA_TranslucentBackground)  # 将界面属性设置为半透明
        self.shadow = QGraphicsDropShadowEffect()  # 设定一个阴影,半径为10,颜色为#444444,定位为0,0
        self.shadow.setBlurRadius(10)
        self.shadow.setColor(QColor("#444444"))
        self.shadow.setOffset(0, 0)
        self.frame.setGraphicsEffect(self.shadow)  # 为frame设定阴影效果
        # ------------------------------------------------
        self.show()
        self.pushButton_3.clicked.connect(self.close)  # 关闭按钮
        self.pushButton_login.clicked.connect(self.do_login)  # 登录按钮

    # 以下是控制窗口移动的代码
    def mousePressEvent(self, event):  # 鼠标左键按下时获取鼠标坐标,按下右键取消
        if event.button() == Qt.LeftButton:
            self.m_flag = True
            self.m_Position = event.globalPos() - self.pos()
            event.accept()
        elif event.button() == Qt.RightButton:
            self.m_flag = False

    def mouseMoveEvent(self, QMouseEvent):  # 鼠标在按下左键的情况下移动时,根据坐标移动界面
        if Qt.LeftButton and self.m_flag:
            self.move(QMouseEvent.globalPos() - self.m_Position)
            QMouseEvent.accept()

    def mouseReleaseEvent(self, QMouseEvent):  # 鼠标按键释放时,取消移动
        self.m_flag = False

    # 登录事件
    def do_login(self):
        username = self.lineEdit_username.text()
        password = self.lineEdit_password.text()
        if not username or not password:
            QMessageBox.warning(self, '警告', '用户名或密码不能为空', QMessageBox.Yes)
            return
        else:
            IDENTIFIER = self.submit.login(username, password)
            if not IDENTIFIER:
                QMessageBox.warning(self, '警告', '用户名或密码错误', QMessageBox.Yes)
                return
            self.hide()  # 隐藏登录界面
            my_submit_form = MySubmitForm(self.submit, IDENTIFIER)
my_submit_form.exec_() # 显示主界面Business Operation
class MySubmitForm(submitform_ui.Ui_Dialog_Submit, QDialog):
    def __init__(self, submit: TransitSubmit, IDENTIFIER: str):
        super().__init__()
        ......
        self.setupUi(self)
        ......
        self.progressBar.hide()  # 关闭进度条显示
        self.setWindowFlags(Qt.FramelessWindowHint)  # 无边框
        self.setAttribute(Qt.WA_TranslucentBackground)  # 设置窗口透明
        self.pushButton_mini.clicked.connect(self.showMinimized)  # 实现最小化
        self.pushButton_close.clicked.connect(self.close)  # 实现关闭功能
        ......
        self.show()

    # 实现鼠标拖拽功能
    def mousePressEvent(self, event):
        self.pressX = event.x()  # 记录鼠标按下的时候的坐标
        self.pressY = event.y()

    def mouseMoveEvent(self, event):
        x = event.x()
        y = event.y()  # 获取移动后的坐标
        moveX = x - self.pressX
        moveY = y - self.pressY  # 计算移动了多少
        positionX = self.frameGeometry().x() + moveX
        positionY = self.frameGeometry().y() + moveY  # 计算移动后主窗口在桌面的位置
        self.move(positionX, positionY)  # 移动主窗口
......Let me say more here. At first, I used QFrame the same as login, but it does not have an exec() method. It cannot pop up after successful login. It may also be that my knowledge is limited and I cannot do it. By analyzing the source code, I found that QDialog has this method to achieve pop-up. Later, I changed it and used QDialog to create a borderless interface.
I won’t say much about the rest of the packaging. There are many tutorials on the Internet. What I use here is D packaging, upx compression, and changed icons. The entire packaged project is more than 50 MB.
The above is the detailed content of How to automatically enter ERP system data in Python. For more information, please follow other related articles on the PHP Chinese website!

Hot AI Tools

Undresser.AI Undress
AI-powered app for creating realistic nude photos

AI Clothes Remover
Online AI tool for removing clothes from photos.

Undress AI Tool
Undress images for free

Clothoff.io
AI clothes remover

Video Face Swap
Swap faces in any video effortlessly with our completely free AI face swap tool!

Hot Article
Hot Tools

Notepad++7.3.1
Easy-to-use and free code editor

SublimeText3 Chinese version
Chinese version, very easy to use

Zend Studio 13.0.1
Powerful PHP integrated development environment

Dreamweaver CS6
Visual web development tools

SublimeText3 Mac version
God-level code editing software (SublimeText3)
Hot Topics
 1392
1392
 52
52

 Choosing Between PHP and Python: A Guide
Apr 18, 2025 am 12:24 AM
Choosing Between PHP and Python: A Guide
Apr 18, 2025 am 12:24 AM
PHP is suitable for web development and rapid prototyping, and Python is suitable for data science and machine learning. 1.PHP is used for dynamic web development, with simple syntax and suitable for rapid development. 2. Python has concise syntax, is suitable for multiple fields, and has a strong library ecosystem.
 PHP and Python: Different Paradigms Explained
Apr 18, 2025 am 12:26 AM
PHP and Python: Different Paradigms Explained
Apr 18, 2025 am 12:26 AM
PHP is mainly procedural programming, but also supports object-oriented programming (OOP); Python supports a variety of paradigms, including OOP, functional and procedural programming. PHP is suitable for web development, and Python is suitable for a variety of applications such as data analysis and machine learning.
 Can vs code run in Windows 8
Apr 15, 2025 pm 07:24 PM
Can vs code run in Windows 8
Apr 15, 2025 pm 07:24 PM
VS Code can run on Windows 8, but the experience may not be great. First make sure the system has been updated to the latest patch, then download the VS Code installation package that matches the system architecture and install it as prompted. After installation, be aware that some extensions may be incompatible with Windows 8 and need to look for alternative extensions or use newer Windows systems in a virtual machine. Install the necessary extensions to check whether they work properly. Although VS Code is feasible on Windows 8, it is recommended to upgrade to a newer Windows system for a better development experience and security.
 Is the vscode extension malicious?
Apr 15, 2025 pm 07:57 PM
Is the vscode extension malicious?
Apr 15, 2025 pm 07:57 PM
VS Code extensions pose malicious risks, such as hiding malicious code, exploiting vulnerabilities, and masturbating as legitimate extensions. Methods to identify malicious extensions include: checking publishers, reading comments, checking code, and installing with caution. Security measures also include: security awareness, good habits, regular updates and antivirus software.
 Can visual studio code be used in python
Apr 15, 2025 pm 08:18 PM
Can visual studio code be used in python
Apr 15, 2025 pm 08:18 PM
VS Code can be used to write Python and provides many features that make it an ideal tool for developing Python applications. It allows users to: install Python extensions to get functions such as code completion, syntax highlighting, and debugging. Use the debugger to track code step by step, find and fix errors. Integrate Git for version control. Use code formatting tools to maintain code consistency. Use the Linting tool to spot potential problems ahead of time.
 How to run programs in terminal vscode
Apr 15, 2025 pm 06:42 PM
How to run programs in terminal vscode
Apr 15, 2025 pm 06:42 PM
In VS Code, you can run the program in the terminal through the following steps: Prepare the code and open the integrated terminal to ensure that the code directory is consistent with the terminal working directory. Select the run command according to the programming language (such as Python's python your_file_name.py) to check whether it runs successfully and resolve errors. Use the debugger to improve debugging efficiency.
 Python vs. JavaScript: The Learning Curve and Ease of Use
Apr 16, 2025 am 12:12 AM
Python vs. JavaScript: The Learning Curve and Ease of Use
Apr 16, 2025 am 12:12 AM
Python is more suitable for beginners, with a smooth learning curve and concise syntax; JavaScript is suitable for front-end development, with a steep learning curve and flexible syntax. 1. Python syntax is intuitive and suitable for data science and back-end development. 2. JavaScript is flexible and widely used in front-end and server-side programming.
 Can vscode be used for mac
Apr 15, 2025 pm 07:36 PM
Can vscode be used for mac
Apr 15, 2025 pm 07:36 PM
VS Code is available on Mac. It has powerful extensions, Git integration, terminal and debugger, and also offers a wealth of setup options. However, for particularly large projects or highly professional development, VS Code may have performance or functional limitations.
