Step one:
Add Mybatis dependency
<!--mybatis整合springboot框架的起步依赖-->
<dependency>
    <groupid>org.mybatis.spring.boot</groupid>
    <artifactid>mybatis-spring-boot-starter</artifactid>
    <version>2.0.0</version>
</dependency>
Step two:
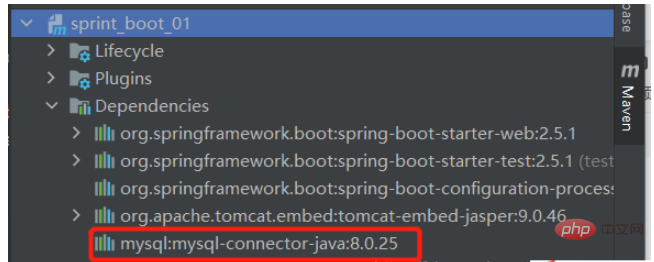
Add mysql driver
The reason why there is no version number is because it inherits from the parent project. Of course, you can also specify a version number yourself
<!--添加mysql驱动-->
<dependency>
    <groupid>mysql</groupid>
    <artifactid>mysql-connector-java</artifactid>
    <!-- 指定版本号 <version>5.1.9<version> -->
</dependency>

Step one:
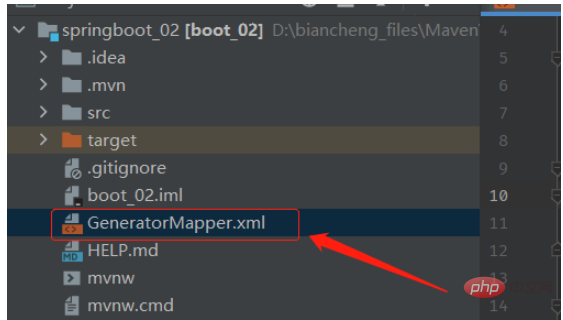
Create the GeneratorMapper.xml file in the project root directory with the following configuration:

<?xml  version="1.0" encoding="utf-8"?>
nbsp;generatorConfiguration
        PUBLIC "-//mybatis.org//DTD MyBatis Generator Configuration 1.0//EN"
        "http://mybatis.org/dtd/mybatis-generator-config_1_0.dtd">
<generatorconfiguration>
    <!--指向连接数据库的 JDBC 驱动包所在位置,指定到你本机的完整路径-->
    <classpathentry></classpathentry>
    <!--配置table表信息内容体,targetRuntime 指定采用MyBatis3的版本-->
    <context>
        <commentgenerator>
            <property></property>
        </commentgenerator>
        <!--配置数据库连接信息-->
        <jdbcconnection>
        </jdbcconnection>
        <!--生成Model类,targetPackage指定model类的包名,
        targetProject指定生成的model类放在eclipse的哪个工程下边、-->
        <javamodelgenerator>
            <property></property>
            <property></property>
        </javamodelgenerator>
        <!--生成Mybatis的Mapper.xml 文件,targetPackage指定mapper.xml文件的包名,
        targetProject指定生成的mapper.xml放在eclipse的哪个工程下边-->
        <sqlmapgenerator>
            <property></property>
        </sqlmapgenerator>
        <!--生成Mybatis的Mapper接口类文件,targetPackage指定Mapper接口类的包名,
        targetProject指定生成的Mapper接口放在eclipse的哪个工程下边-->
        <javaclientgenerator>
            <property></property>
        </javaclientgenerator>

        <!--数据库表名及对应的Java模型类名
        有100张表,就需要指定100个table
        tableName:数据库中表的名字;
        domainObjectName:表对应生成的实体类的名字叫什么
        -->
        <table></table>
    </context>
</generatorconfiguration> The second step
is configured as follows in pom.xml:
<!--在plugins标签中,添加如下代码-->
<!--mybatis 代码自动生成插件-->
<plugin>
    <groupid>org.mybatis.generator</groupid>
    <artifactid>mybatis-generator-maven-plugin</artifactid>
    <version>1.3.7</version>
    <dependencies>
        <dependency>
            <groupid>mysql</groupid>
            <artifactid>mysql-connector-java</artifactid>
            <version>8.0.15</version>
        </dependency>
    </dependencies>
    <configuration>
        <!--配置文件的位置-->
        <configurationfile>GeneratorMapper.xml</configurationfile>
        <verbose>true</verbose>
        <overwrite>true</overwrite>
    </configuration>
</plugin>
The third step
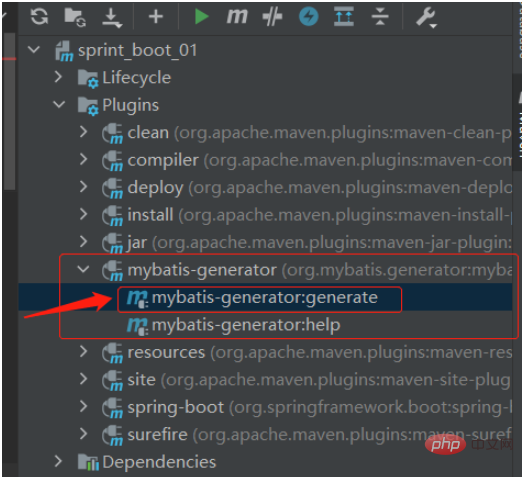
When double-clicking the following to execute,

There is a pit here. Mine reported an error here. The error message is as follows:
Failed to execute goal org.mybatis.generator:mybatis-generator-maven-plugin:1.3.7: generate (default-cli) on project sprint_boot_01: Communications link failure

99% is because the connectionURL in the driver and configuration database information is configured incorrectly. My solution:
driverClass="com.mysql.cj.jdbc.Driver"
connectionURL="jdbc:mysql://127.0.0.1:3306/java_pro?serverTimezone=Asia/Shanghai&useUnicode=true&characterEncoding=utf8&useSSL=false"
Then double-click to execute, success:

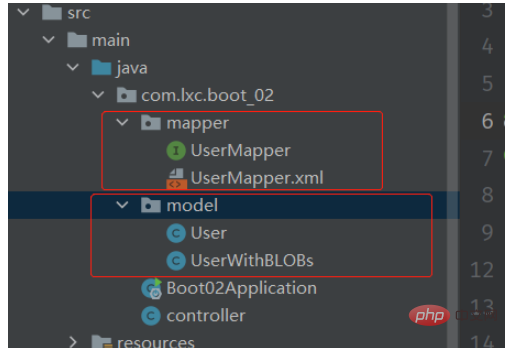
The generated directory is as follows:

The above is the detailed content of How to use Mybatis in springboot. For more information, please follow other related articles on the PHP Chinese website!
 mybatis first level cache and second level cache
 SpringBoot project building steps
 What is the difference between ibatis and mybatis
 How to configure database connection in mybatis
 What is the working principle and process of mybatis
 What are the differences between hibernate and mybatis
 What is the difference between j2ee and springboot
 How to open python after it is installed
 The difference between random and pseudo-random


