
 Backend Development
Python Tutorial
How to use python to implement speech recognition function under Linux
Backend Development
Python Tutorial
How to use python to implement speech recognition function under Linux
How to use python to implement speech recognition function under Linux

Introduction to how speech recognition works
Speech recognition originated from research done at Bell Labs in the early 1950s. Early speech recognition systems could only recognize a single speaker and a vocabulary of only about a dozen words. Modern speech recognition systems have come a long way to recognize multiple speakers and have large vocabularies that recognize multiple languages.
The first part of speech recognition is of course speech. Through the microphone, speech is converted from physical sound into electrical signals, and then into data through an analog-to-digital converter. Once digitized, several models can be applied to transcribe audio to text.
Most modern speech recognition systems rely on Hidden Markov Models (HMM). Its working principle is: the speech signal can be approximated as a stationary process on a very short time scale (such as 10 milliseconds), that is, a process whose statistical characteristics do not change with time.
Many modern speech recognition systems use neural networks before HMM recognition to simplify the speech signal through feature transformation and dimensionality reduction techniques. Voice activity detectors (VAD) can also be used to reduce the audio signal to parts that may only contain speech.
Fortunately for Python users, some speech recognition services are available online through APIs, and most of them also provide Python SDKs.
Choose the right python speech recognition package
There are some ready-made speech recognition packages in PyPI. These include:
apiai
google-cloud-speech
pocketsphinx
SpeechRcognition
watson-developer-cloud
wit
Some software packages (such as wit and apiai) provide some Built-in capabilities beyond basic speech recognition, such as natural language processing to identify speaker intent. Other software packages, such as Google Cloud Speech, focus on speech-to-text conversion.
Among them, SpeechRecognition stands out for its ease of use.
Recognizing speech requires audio input, and retrieving the audio input in SpeechRecognition is very simple. It does not require building a script to access the microphone and process the audio file from scratch. It only takes a few minutes to automatically complete the retrieval. and run.
Installing SpeechRecognition
SpeechRecognition is compatible with Python2.6, 2.7 and 3.3, but some additional installation steps are required if used in Python 2. You can use the pip command to install SpeechRecognition from the terminal: pip3 install SpeechRecognition
After the installation is complete, you can open the interpreter window to verify the installation:

Note: Do not close this session, you will use it in the next few steps.
If you are dealing with existing audio files, just call SpeechRecognition directly, paying attention to some dependencies of the specific use case. Also note, install the PyAudio package to get microphone input
Recognizer class
The core of SpeechRecognition is the recognizer class.
The main purpose of the Recognizer API is to recognize speech. Each API has a variety of settings and functions to recognize the speech of the audio source. Here I choose recognize_sphinx(): CMU Sphinx - requires installing PocketSphinx (supports offline Speech recognition)
Then we need to install PocketSphinx through the pip command. During the installation process, a large series of errors in red fonts are also prone to occur.
Use of audio files
Download related audio files and save them to a specific directory (save directly to the ubuntu desktop)
Note:
AudioFile class can be performed through the path of the audio file Initializes and provides a context manager interface for reading and processing file contents.
SpeechRecognition currently supports the following file types:
WAV: must be in PCM/LPCM format
AIFF
AIFF-CFLAC: must be the initial FLAC format; OGG-FLAC format is not available
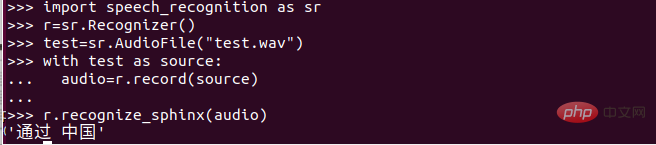
English speech recognition
After completing the above basic work , you can perform English speech recognition.
(1) Open the terminal
(2) Enter the directory where the voice test file is located (the blogger’s is the desktop)
(3) Open the python interpreter
(4) Enter the relevant commands as shown below
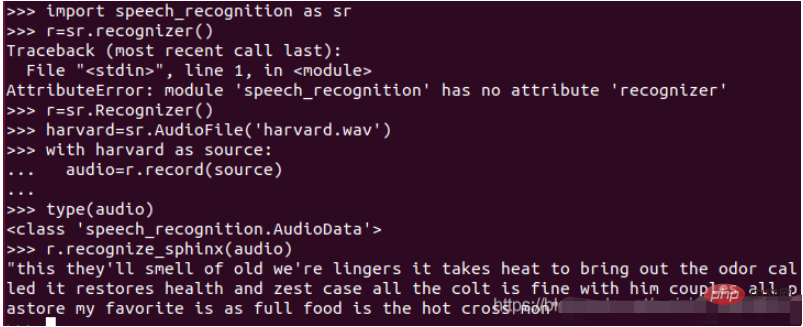
Finally, you can see the speech-to-text content (this they’ll smell...). In fact, the effect is very good! Because it's in English and there's no noise.
The impact of noise on speech recognition
Noise does exist in the real world, all recordings have some degree of noise, and unprocessed noise can destroy the accuracy of speech recognition applications sex.
By trying to transcribe the effect is not good, we can try calling the adjust_for_ambient_noise() command of the Recognizer class.
Use of microphone
To use SpeechRecognizer to access the microphone, you must install the PyAudio package.
If you are using Debian-based Linux (such as Ubuntu), you can use apt to install PyAudio: sudo apt-get install python-pyaudio python3-pyaudioYou may still need to enable pip3 install pyaudio after the installation is complete. , especially when running virtually.
After installing pyaudio, you can use python to generate voice input and generate related files.
Notes on the use of pocketsphinx:
Supported file formats: wav
Decoding requirements for audio files: 16KHZ, mono
Use python to implement recording and generate related files. The program code is as follows:
from pyaudio import PyAudio, paInt16
import numpy as np
import wave
class recoder:
     NUM_SAMPLES = 2000
     SAMPLING_RATE = 16000
     LEVEL = 500
     COUNT_NUM = 20
     SAVE_LENGTH = 8
     Voice_String = []
     def savewav(self,filename):
         wf = wave.open(filename, 'wb')
         wf.setnchannels(1)
         wf.setsampwidth(2)
         wf.setframerate(self.SAMPLING_RATE)
         wf.writeframes(np.array(self.Voice_String).tostring())
         wf.close()
     def recoder(self):
         pa = PyAudio()
         stream = pa.open(format=paInt16, channels=1, rate=self.SAMPLING_RATE, input=True,frames_per_buffer=self.NUM_SAMPLES)
         save_count = 0
         save_buffer = []
         while True:
            string_audio_data = stream.read(self.NUM_SAMPLES)
            audio_data = np.fromstring(string_audio_data, dtype=np.short)
            large_sample_count = np.sum(audio_data > self.LEVEL)
            print(np.max(audio_data))
            if large_sample_count > self.COUNT_NUM:
                save_count = self.SAVE_LENGTH
            else:
                save_count -= 1
            if save_count < 0:
                save_count = 0
            if save_count > 0:
                save_buffer.append(string_audio_data )
            else:
                if len(save_buffer) > 0:
                    self.Voice_String = save_buffer
                    save_buffer = []
                    print("Recode a piece of voice successfully!")
                    return True
		 else:
                    return False
if __name__ == "__main__":
    r = recoder()
    r.recoder()
r.savewav("test.wav")Note: Be sure to pay attention to spaces when implementing using the python interpreter! ! !
The final generated file is in the directory where the Python interpreter session is located. You can play it through play to test it. If play is not installed, you can install it through the apt command.
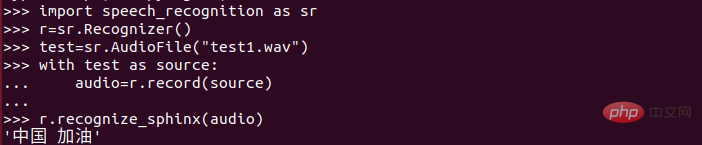
Chinese speech recognition
After completing the previous work, we have a certain understanding of the speech recognition process, but as a Chinese, we have to do a Chinese speech recognition. !
We need to download the corresponding Mandarin admission and language model from the CMU Sphinx speech recognition toolkit.
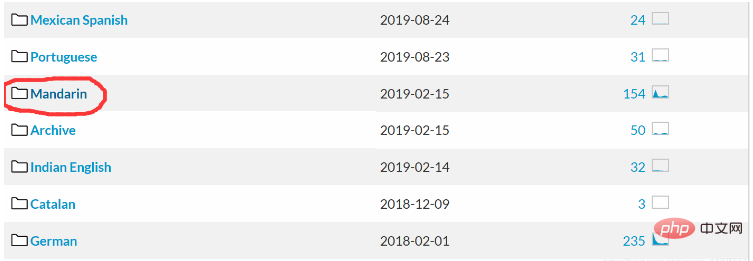
The words marked in the picture are Mandarin! Download the relevant speech recognition toolkit.
But we need to convert zh_broadcastnews_64000_utf8.DMP into language-model.lm.bin, and then unzip zh_broadcastnews_16k_ptm256_8000.tar.bz2 to get the zh_broadcastnews_ptm256_8000 folder.
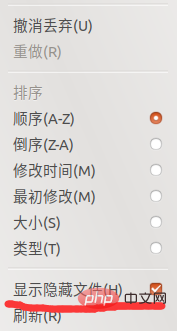
Learn from the blogger’s method just now and find the speech_recognition folder under Ubuntu. There may be many friends who cannot find the relevant folders, but they are actually under hidden files. You can click on the three bars in the upper right corner of the folder. As shown in the picture below:

Then check Show hidden files, as shown in the picture below:
Then You can find it by following the following directories:

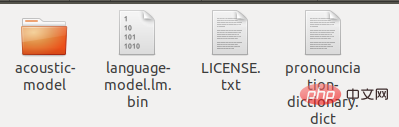
en-US to en-US-bak , create a new folder en-US, change the extracted zh_broadcastnews_ptm256_8000 to acoustic-model, and change chinese.lm.bin to language -model.lm.bin, change the suffix of pronounciation-dictionary.dic to dict, and copy these three files to en-US. At the same time, copy LICENSE.txt in the original en-US file directory to the current folder. Finally, there are the following files in this folder:
In this Open the python interpreter in the file directory and enter the following content:
Find the 4 folders you just copied. There is a folder of pronounciation-dictionary.dict. After opening it, the following content is found:
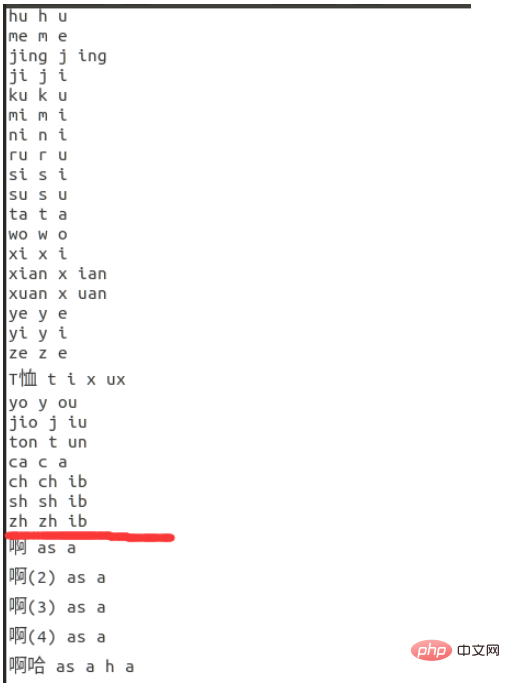
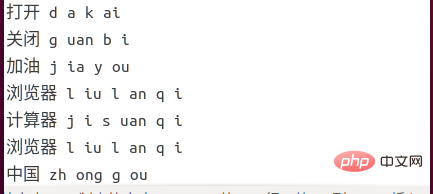
My approach is:
(1) Keep the content above the red mark in the picture, and delete the content below the red mark. Of course, for insurance reasons, it is recommended that you back up this file!
(2) Enter the content you want to identify below the red line! (Input according to the rules, different from pinyin!!!) The situation of new pneumonia has been getting better recently. The most heard sentence is "Come on, China". So today's content is to convert "Come on, China" into text! I hope school can start soon, hahahaha.
Speech synthesis
My personal understanding of speech synthesis is text-to-speech. However, in this sentence you can set client = AipSpeech(APP_ID, API_KEY, SECRET_KEY) result = client.synthesis('Hello Baidu', 'zh', 1, { 'vol': 5,'spd': 3 ,'pit':9,'per': 3})Volume, tone, speed, male/female/loli/carefree.
The above is the detailed content of How to use python to implement speech recognition function under Linux. For more information, please follow other related articles on the PHP Chinese website!

Hot AI Tools

Undresser.AI Undress
AI-powered app for creating realistic nude photos

AI Clothes Remover
Online AI tool for removing clothes from photos.

Undress AI Tool
Undress images for free

Clothoff.io
AI clothes remover

AI Hentai Generator
Generate AI Hentai for free.

Hot Article
Hot Tools

Notepad++7.3.1
Easy-to-use and free code editor

SublimeText3 Chinese version
Chinese version, very easy to use

Zend Studio 13.0.1
Powerful PHP integrated development environment

Dreamweaver CS6
Visual web development tools

SublimeText3 Mac version
God-level code editing software (SublimeText3)
Hot Topics
 1386
1386
 52
52

 Python: Automation, Scripting, and Task Management
Apr 16, 2025 am 12:14 AM
Python: Automation, Scripting, and Task Management
Apr 16, 2025 am 12:14 AM
Python excels in automation, scripting, and task management. 1) Automation: File backup is realized through standard libraries such as os and shutil. 2) Script writing: Use the psutil library to monitor system resources. 3) Task management: Use the schedule library to schedule tasks. Python's ease of use and rich library support makes it the preferred tool in these areas.
 How to switch Chinese mode with vscode
Apr 15, 2025 pm 11:39 PM
How to switch Chinese mode with vscode
Apr 15, 2025 pm 11:39 PM
VS Code To switch Chinese mode: Open the settings interface (Windows/Linux: Ctrl, macOS: Cmd,) Search for "Editor: Language" settings Select "Chinese" in the drop-down menu Save settings and restart VS Code
 vscode Previous Next Shortcut Key
Apr 15, 2025 pm 10:51 PM
vscode Previous Next Shortcut Key
Apr 15, 2025 pm 10:51 PM
VS Code One-step/Next step shortcut key usage: One-step (backward): Windows/Linux: Ctrl ←; macOS: Cmd ←Next step (forward): Windows/Linux: Ctrl →; macOS: Cmd →
 How to use VSCode
Apr 15, 2025 pm 11:21 PM
How to use VSCode
Apr 15, 2025 pm 11:21 PM
Visual Studio Code (VSCode) is a cross-platform, open source and free code editor developed by Microsoft. It is known for its lightweight, scalability and support for a wide range of programming languages. To install VSCode, please visit the official website to download and run the installer. When using VSCode, you can create new projects, edit code, debug code, navigate projects, expand VSCode, and manage settings. VSCode is available for Windows, macOS, and Linux, supports multiple programming languages and provides various extensions through Marketplace. Its advantages include lightweight, scalability, extensive language support, rich features and version
 vscode setting Chinese tutorial
Apr 15, 2025 pm 11:45 PM
vscode setting Chinese tutorial
Apr 15, 2025 pm 11:45 PM
VS Code supports Chinese settings, which can be completed by following the steps: Open the settings panel and search for "locale". Set "locale.language" to "zh-CN" (Simplified Chinese) or "zh-TW" (Traditional Chinese). Save settings and restart VS Code. The settings menu, toolbar, code prompts, and documents will be displayed in Chinese. Other language settings can also be customized, such as file tag format, entry description, and diagnostic process language.
 Python vs. JavaScript: The Learning Curve and Ease of Use
Apr 16, 2025 am 12:12 AM
Python vs. JavaScript: The Learning Curve and Ease of Use
Apr 16, 2025 am 12:12 AM
Python is more suitable for beginners, with a smooth learning curve and concise syntax; JavaScript is suitable for front-end development, with a steep learning curve and flexible syntax. 1. Python syntax is intuitive and suitable for data science and back-end development. 2. JavaScript is flexible and widely used in front-end and server-side programming.
 What is the difference between vscode and pycharm
Apr 15, 2025 pm 11:54 PM
What is the difference between vscode and pycharm
Apr 15, 2025 pm 11:54 PM
The main differences between VS Code and PyCharm are: 1. Extensibility: VS Code is highly scalable and has a rich plug-in market, while PyCharm has wider functions by default; 2. Price: VS Code is free and open source, and PyCharm is paid for professional version; 3. User interface: VS Code is modern and friendly, and PyCharm is more complex; 4. Code navigation: VS Code is suitable for small projects, and PyCharm is more suitable for large projects; 5. Debugging: VS Code is basic, and PyCharm is more powerful; 6. Code refactoring: VS Code is basic, and PyCharm is richer; 7. Code
 What is the main purpose of Linux?
Apr 16, 2025 am 12:19 AM
What is the main purpose of Linux?
Apr 16, 2025 am 12:19 AM
The main uses of Linux include: 1. Server operating system, 2. Embedded system, 3. Desktop operating system, 4. Development and testing environment. Linux excels in these areas, providing stability, security and efficient development tools.
