How to deploy Java projects to cloud servers
1. Purchasing a cloud server and installing the system
When placing an order, you usually choose which operating system to install. I usually use CentOS, either 6.x or 7.x.
2. Install the Pagoda Panel
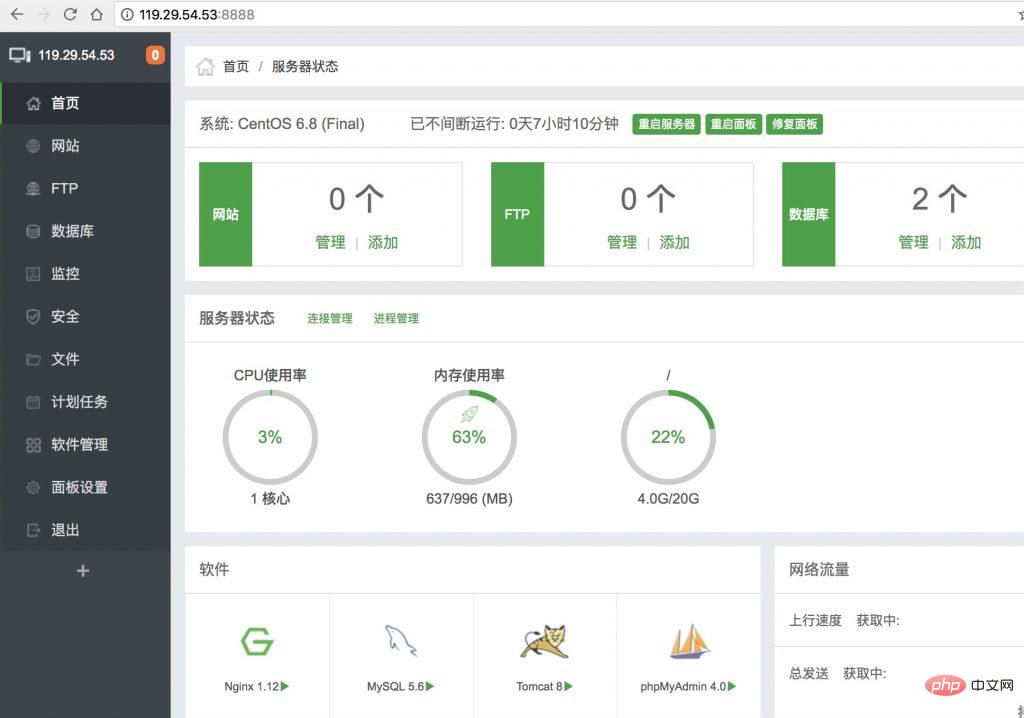 It is the same for any server, but the commands may be different for different operating systems.
1. SSH connection to the server
The SSH account and password are generally set when purchasing the server, and can be modified later.
If ssh cannot connect, make sure port 22 is allowed.
2. Type the installation command
Centos installation script yum install -y wget && wget -O install.sh http://download.bt.cn/install/install_6.0.sh && sh install.sh 8c0882dde
Ubuntu/Deepin installation script wget -O install.sh http://download.bt.cn/install/install-ubuntu_6.0.sh && sudo bash install.sh 8c0882dde
Debian installation script wget -O install.sh http://download.bt.cn/install/install-ubuntu_6.0.sh && bash install.sh 8c0882dde
Fedora installation script wget - O install.sh http://download.bt.cn/install/install_6.0.sh && bash install.sh 8c0882dde
Upgrade script wget -O update.sh http://download.bt.cn /install/update.sh && sh update.sh
3. Save the account password
It will take about two minutes to install
After the installation is completed, you can see this Picture

#Copy the text above and save it. Inside is the backend address, login account and password, which can be modified
4. Modify the security group and release the port.
In order to ensure that you can log in to the backend and not be blocked by the firewall.
We must let the following ports 8888 888 80 find a few ports
If you want to access the remote database 3306, you must also let it go
If you want to use the ftp tool to let 21, ssh let it 22
Configure HTTPS and allow 443
Of course, our Tomcat and the default port 8080 must also be allowed
If you are using Tencent Cloud, you can set up to allow all ports , if you can’t use Alibaba Cloud, you need to let them go one by one.
3. Installation environment
The environment here refers to the project running environment, which requires at least JDK Tomcat MySQL.
In the pagoda panel, we can install it directly
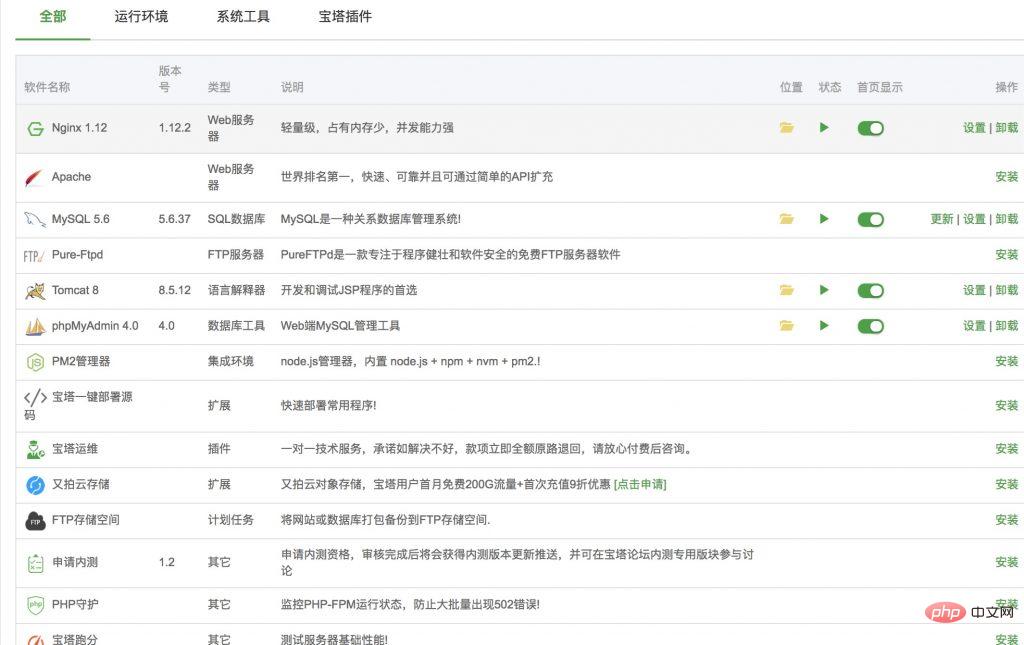
It is recommended to install Tomcat8 (it will come with jdk1.8 installed), if you install Tomcat7 (it will come with jdk1.7 installed).
Then MySQL must be installed, the version is optional.
Under normal circumstances, this is fine.
Of course, if you want to manage the database conveniently, you can download another phpmyadmin. You need to follow nginx and php first, which may consume some memory.
After Tomcat is installed, let’s try to visit
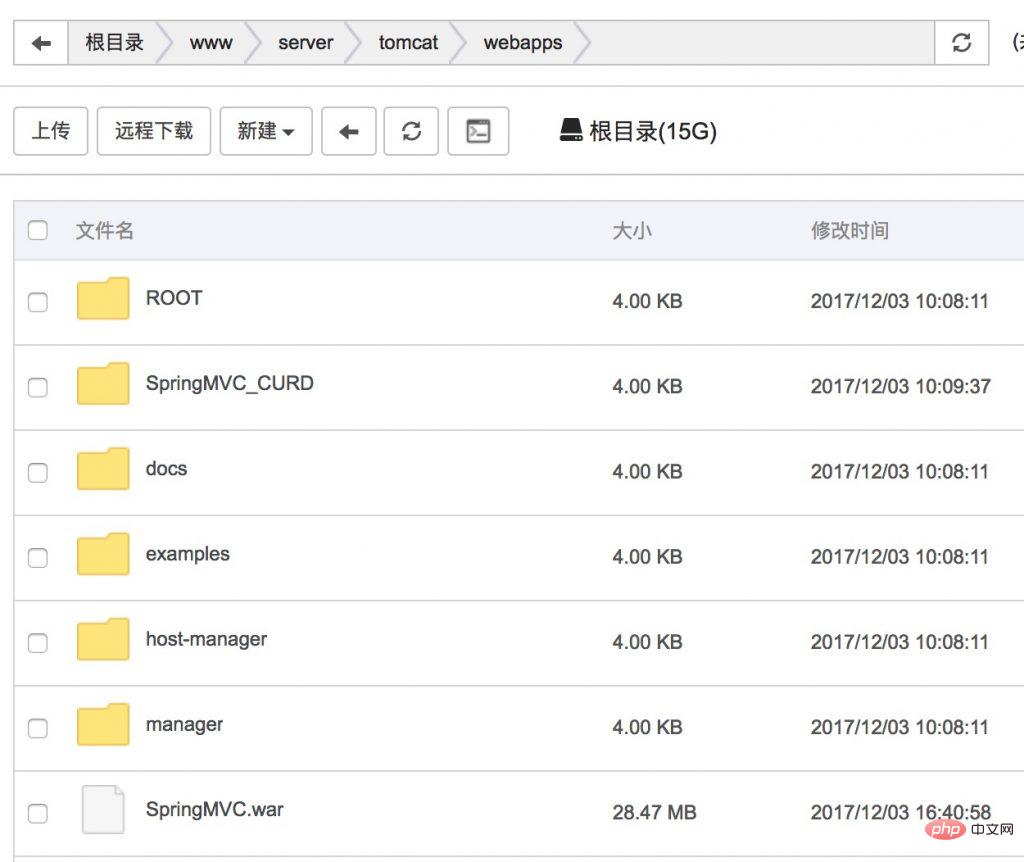
The directory where Tomcat is installed is: /www/server/tomcat
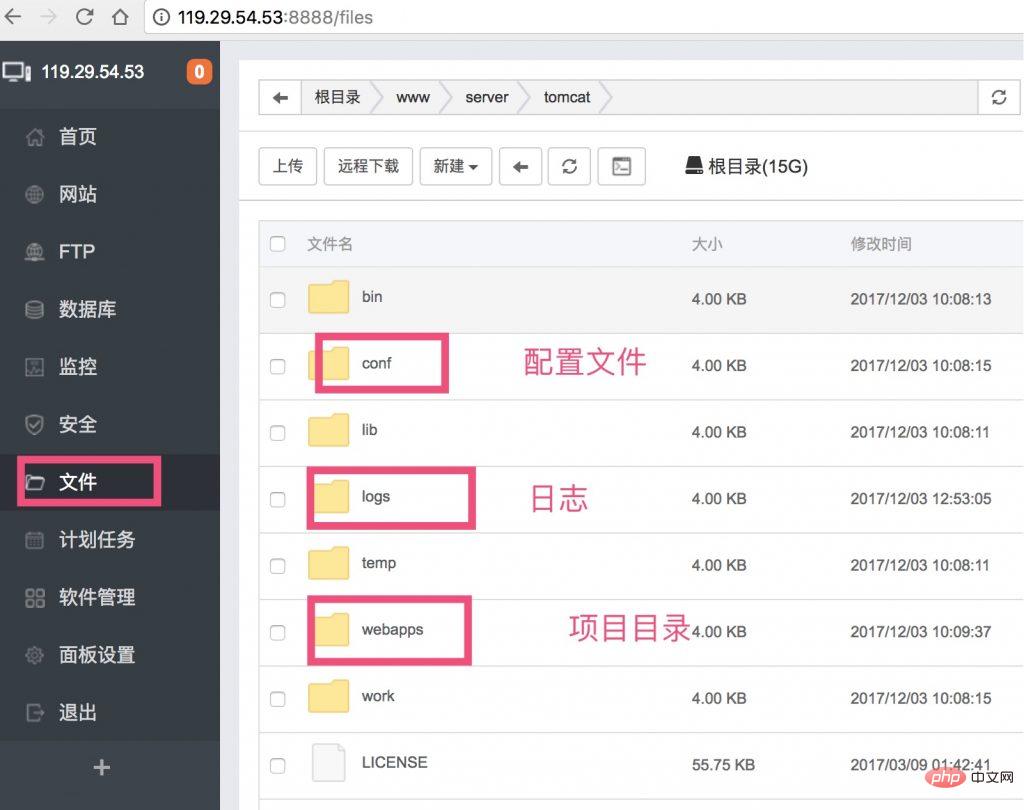
4. Package the project and upload files
1. Use Maven clean project
2. Run the project
3.Maven package project
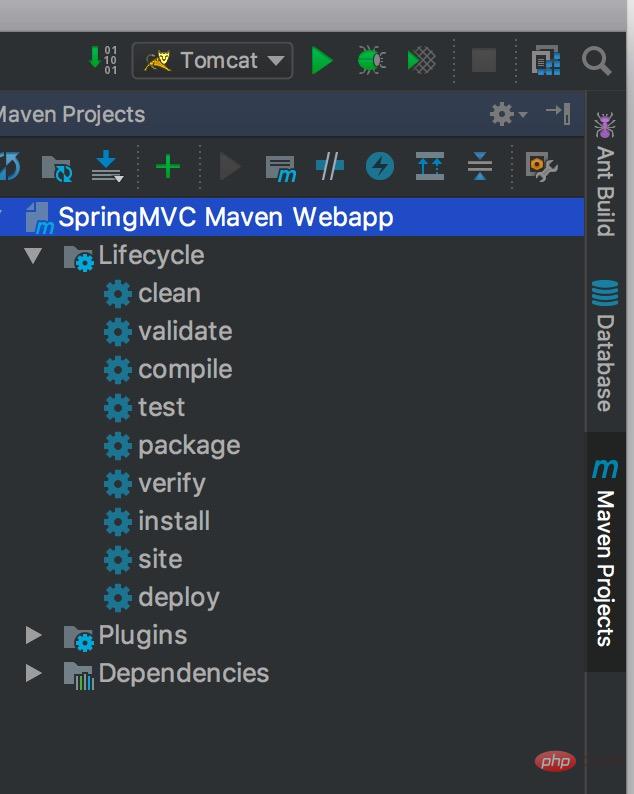
4. Obtain the war file in the target directory
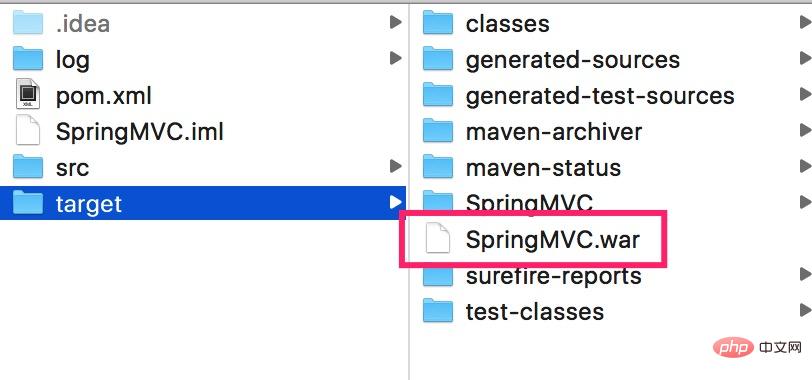
5. Upload the war file to the webapps directory of the tomcat installation directory
5. Access project
The blogger changed the Tomcat port from 8080 to 80 before
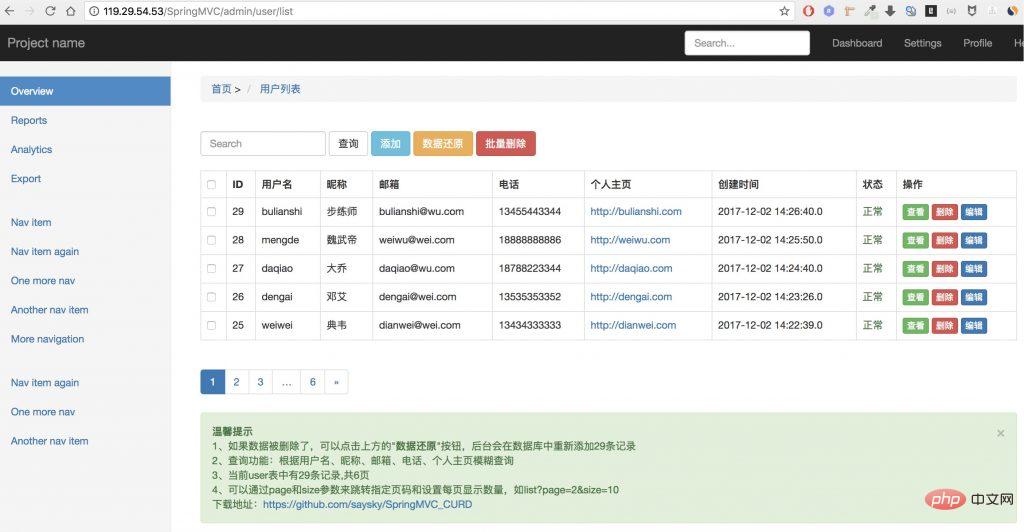
Access project: http://119.29. 54.53/SpringMVC
Success
6. What should I do if I cannot start Tomcat or access the project 404?
Unable to start Tomcat is usually because the configuration settings of tomcat are wrong or there are syntax errors. It is common in server.xml
Project access 404, indicating that the deployment was not successful and the project was not started successfully. wrong. For example, database connection error, jdk version is not enough, dependencies are not imported, etc.
How to troubleshoot errors if project deployment fails?
It’s very simple. Doesn’t Tomcat have a log file?
You can view it in the /www/server/tomcat/logs directory.
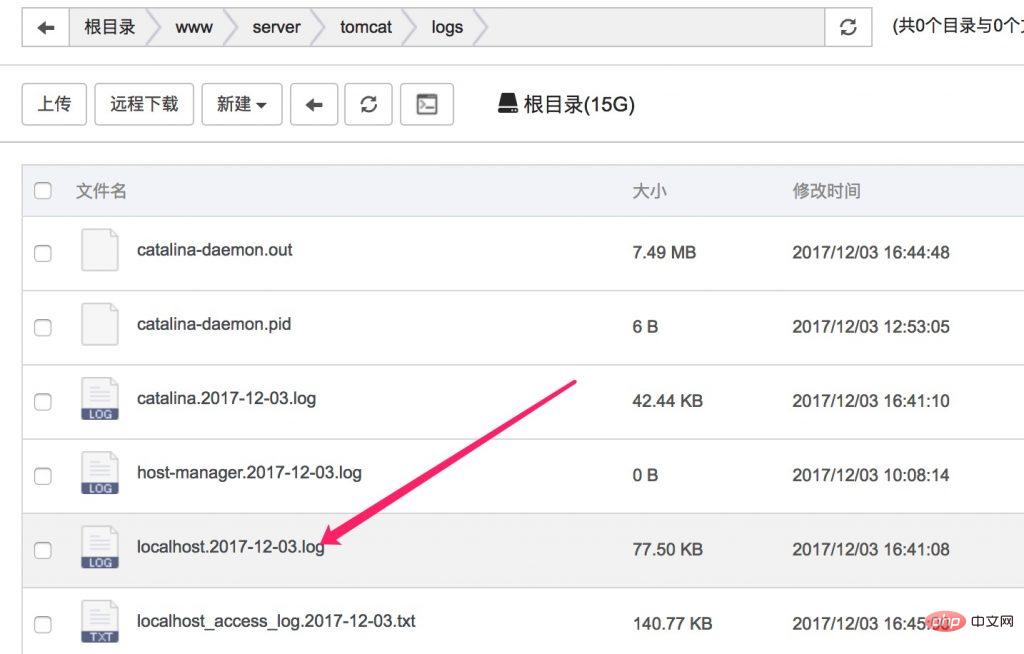
Check the localhost log for the corresponding date.
For example, the error below is a database connection failure
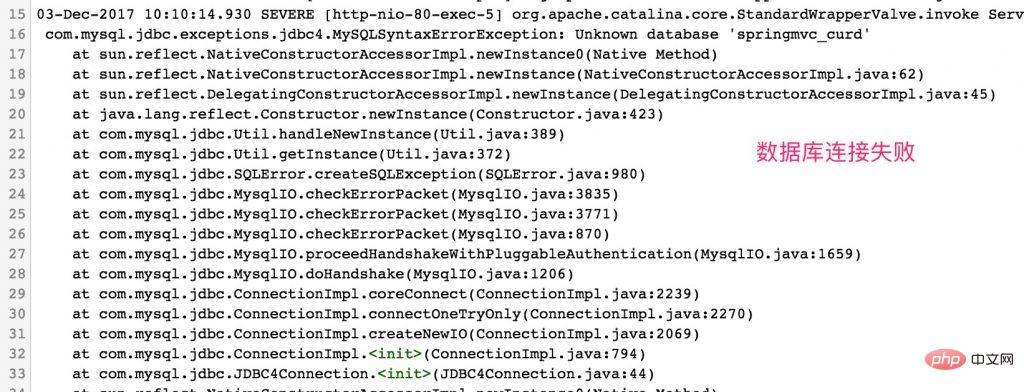
This error is that Spring Data JPA requires jdk1.8, which is java 8 (so it was previously recommended to install Tomcat8, which will install jdk1.8 by itself)

7. Configure static resource mapping and resolve domain name
1. Static resource mapping
Everyone should know about static resource mapping, it is in tomcat’s server.xml There
means access to http ://119.29.54.53 You can access the projects under the SpringMVC folder
There is also a static resource mapping for the upload directory
For example, I have an upload directory /www/ uploads, pictures uploaded by users will be saved to this uploads folder.
How to access this directory on the server?
That's it
For example, if you visit http://119.29.54.53/uploads/2017/12/Cao Cao.png, you can access /www/uploads/2017/12/Cao Cao.png
2, resolve the domain name
IP addresses are generally difficult to remember, and sometimes it is best not to expose the public IP address.
I want to enter the domain name to access the project website, for example, enter demo.56vps.cn to access 119.29.54.53
Just need to add it to the domain name server
The above is the detailed content of How to deploy Java projects to cloud servers. For more information, please follow other related articles on the PHP Chinese website!

Hot AI Tools

Undresser.AI Undress
AI-powered app for creating realistic nude photos

AI Clothes Remover
Online AI tool for removing clothes from photos.

Undress AI Tool
Undress images for free

Clothoff.io
AI clothes remover

AI Hentai Generator
Generate AI Hentai for free.

Hot Article

Hot Tools

Notepad++7.3.1
Easy-to-use and free code editor

SublimeText3 Chinese version
Chinese version, very easy to use

Zend Studio 13.0.1
Powerful PHP integrated development environment

Dreamweaver CS6
Visual web development tools

SublimeText3 Mac version
God-level code editing software (SublimeText3)

Hot Topics
 1378
1378
 52
52
 Perfect Number in Java
Aug 30, 2024 pm 04:28 PM
Guide to Perfect Number in Java. Here we discuss the Definition, How to check Perfect number in Java?, examples with code implementation.
 Random Number Generator in Java
Aug 30, 2024 pm 04:27 PM
Guide to Random Number Generator in Java. Here we discuss Functions in Java with examples and two different Generators with ther examples.
 Weka in Java
Aug 30, 2024 pm 04:28 PM
Guide to Weka in Java. Here we discuss the Introduction, how to use weka java, the type of platform, and advantages with examples.
 Smith Number in Java
Aug 30, 2024 pm 04:28 PM
Guide to Smith Number in Java. Here we discuss the Definition, How to check smith number in Java? example with code implementation.
 Java Spring Interview Questions
Aug 30, 2024 pm 04:29 PM
In this article, we have kept the most asked Java Spring Interview Questions with their detailed answers. So that you can crack the interview.
 Break or return from Java 8 stream forEach?
Feb 07, 2025 pm 12:09 PM
Java 8 introduces the Stream API, providing a powerful and expressive way to process data collections. However, a common question when using Stream is: How to break or return from a forEach operation? Traditional loops allow for early interruption or return, but Stream's forEach method does not directly support this method. This article will explain the reasons and explore alternative methods for implementing premature termination in Stream processing systems. Further reading: Java Stream API improvements Understand Stream forEach The forEach method is a terminal operation that performs one operation on each element in the Stream. Its design intention is
 TimeStamp to Date in Java
Aug 30, 2024 pm 04:28 PM
Guide to TimeStamp to Date in Java. Here we also discuss the introduction and how to convert timestamp to date in java along with examples.
 Java Program to Find the Volume of Capsule
Feb 07, 2025 am 11:37 AM
Capsules are three-dimensional geometric figures, composed of a cylinder and a hemisphere at both ends. The volume of the capsule can be calculated by adding the volume of the cylinder and the volume of the hemisphere at both ends. This tutorial will discuss how to calculate the volume of a given capsule in Java using different methods. Capsule volume formula The formula for capsule volume is as follows: Capsule volume = Cylindrical volume Volume Two hemisphere volume in, r: The radius of the hemisphere. h: The height of the cylinder (excluding the hemisphere). Example 1 enter Radius = 5 units Height = 10 units Output Volume = 1570.8 cubic units explain Calculate volume using formula: Volume = π × r2 × h (4


