

How to use the selenium module of python crawler

1. What is Selenium
Selenium is a complete web application testing system, including test recording ( selenium IDE), writing and running (Selenium Remote Control) and parallel processing of tests (Selenium Grid). The core of Selenium, Selenium Core, is based on JsUnit and is written entirely in JavaScript, so it can be used on any browser that supports JavaScript.
Selenium can simulate real browsers, automated testing tools, supports multiple browsers, and is mainly used to solve JavaScript rendering problems in crawlers.
2. Selenium installation
When writing a crawler in python, we mainly use selenium's Webdriver. We can first see which browsers Selenium.Webdriver supports through the following method
from selenium import webdrive
help(webdriver)
The execution results are as follows. From the results, we can also see that the mountain basically supports all common browsers:
NAME: selenium.webdriver
PACKAGE CONTENTS:
- ##android (package)
- blackberry (package)
- chrome (package)
- common (package) ##edge (package)
- firefox (package)
- ie (package)
- ##opera (package)
- phantomjs ( package)
- remote (package)
- safari (package)
- support (package)
- webkitgtk (package)
- VERSION
1, PhantomJS: None Visual interface browser (headless browser)
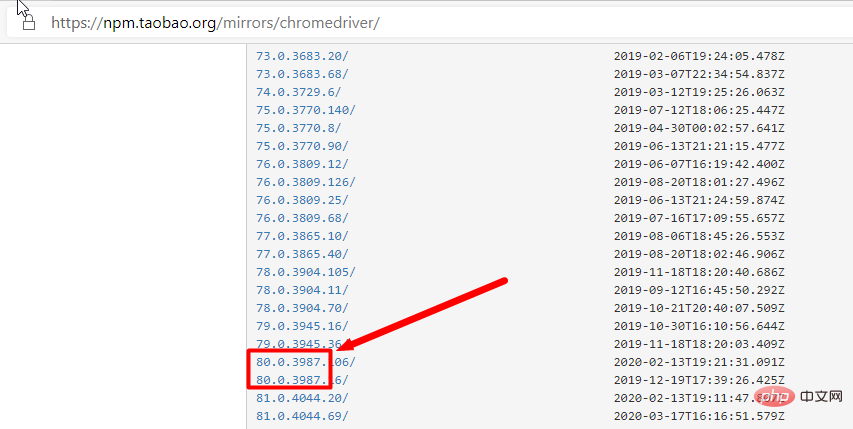
PhantomJS is a server-side JavaScript API based on WebKit that supports the Web without browser support. It quickly and natively supports various Web standards: Dom processing , CSS selectors, JSON and more. PhantomJS can be used for page automation, network monitoring, web page screenshots, and interfaceless testing. 2. Download the browser driverWhen selenium is upgraded to 3.0, different browser drivers are standardized. If you want to use selenium to drive different browsers, you must download and set up different browser drivers separately. Download address for each browser: Firefox browser driver: geckodriver##Chrome browser driver: chromedriver, taobao Alternate address
IE browser driver: IEDriverServer
Edge browser driver: MicrosoftWebDriver
Note : The webdriver needs to correspond to the corresponding browser version and selenium version.
Check the mapping relationship between driver and browser version:
According to the driver corresponding to the chrome version, directly find the corresponding driver according to the browser version (only corresponding to the larger version)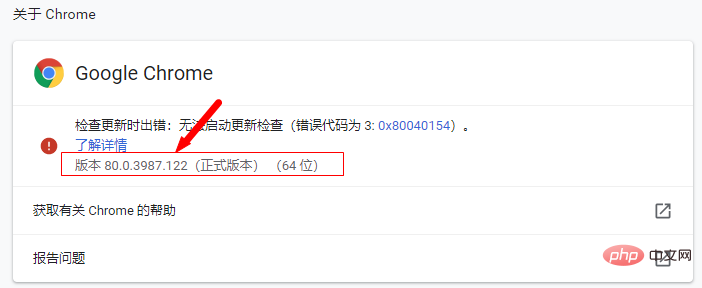
 The browser driver file (the .exe file obtained after downloading and decompressing in the win environment) needs to be placed in the same directory as python.exe before it can be used. Or configure the computer environment variables
You can manually create a directory to store the browser driver, such as: C:\driver, and drop the downloaded browser driver files (for example: chromedriver, geckodriver) into this directory.
My Computer-->Properties-->System Settings-->Advanced-->Environment Variables-->System Variables-->Path, change "C:\driver" The directory is added to the value of Path.
3. Basic use of selenium
1. Declare browser objects
We know above that selenium supports many browsers, but if you want to declare and call the browser, then Required:
Only two examples are written here. Of course, other supported browsers can call this method to start
from selenium import webdriver

browser = webdriver.Chrome()
# browser = webdriver.Firefox()
Headless mode
Headless Chrome Yes The interface-less form of the Chrome browser allows you to run your program using all the features supported by Chrome without opening the browser. Compared with modern browsers, Headless Chrome is more convenient for testing web applications, taking screenshots of websites, crawling to capture information, etc. Compared with earlier PhantomJS, SlimerJS, etc., Headless Chrome is closer to the browser environment.
Headless Chrome Chrome version requirements: According to the official documentation, the mac and linux environments require chrome version 59, while the windows version of chrome requires version 60, and the chromedriver requires version 2.30.
from selenium import webdriver
from selenium.webdriver.common.by import By
from selenium.webdriver.support.ui import WebDriverWait
from selenium.webdriver.support import expected_conditions as EC
from selenium.webdriver.common.action_chains import ActionChains
from selenium.webdriver.common.keys import Keys

chrome_options = webdriver.ChromeOptions()
# 使用headless无界面浏览器模式
chrome_options.add_argument('--headless') //增加无界面选项
chrome_options.add_argument('--disable-gpu') //如果不加这个选项,有时定位会出现问题
# 启动浏览器,获取网页源代码
browser = webdriver.Chrome(chrome_options=chrome_options)
mainUrl = "https://www.taobao.com/"
browser.get(mainUrl)
print(f"browser text = {browser.page_source}")
browser.quit()2. Visit the pageAfter running the following code, the Chrome browser will automatically open, log in to Baidu and print the source code of Baidu homepage, and then close the browser
from selenium import webdriver

browser = webdriver.Chrome()

browser.get("http://www.baidu.com")
print(browser.page_source)
browser.close()3. Search for elements
1. Search for a single element
browser.get(<a href="http://www.taobao.com/" rel="external nofollow" rel="external nofollow" target="_blank">http://www.taobao.com</a>)
input_first = browser.find_element_by_id("q")
input_second = browser.find_element_by_css_selector("#q")
input_third = browser.find_element_by_xpath('//*[@id="q"]')
print(input_first)
print(input_second)
print(input_third)
browser.close()Here we get the response elements in three different ways. The first is through id, and the second is CSS selector, the third one is xpath selector, the results are the same.
The results are as follows:
常用的查找元素方法:
find_element_by_name:通过元素name定位
find_element_by_id:通过元素id定位
find_element_by_xpath:通过xpath表达式定位
find_element_by_link_text:通过完整超链接文本定位
find_element_by_partial_link_text:通过部分链接文本定位
find_element_by_tag_name:通过标签定位
find_element_by_class_name:通过类名进行定位
find_element_by_css_selector:通过css选择器进行定位
举例:
通过xpath定位,xpath定位有N种写法,这里列几个常用写法:
dr.find_element_by_xpath("//*[@id='kw']")
dr.find_element_by_xpath("//*[@name='wd']")
dr.find_element_by_xpath("//input[@class='s_ipt']")
dr.find_element_by_xpath("/html/body/form/span/input")
dr.find_element_by_xpath("//span[@class='soutu-btn']/input")
dr.find_element_by_xpath("//form[@id='form']/span/input")
dr.find_element_by_xpath("//input[@id='kw' and @name='wd']")通过css定位,css定位有N种写法,这里列几个常用写法:
dr.find_element_by_css_selector("#kw")
dr.find_element_by_css_selector("[name=wd]")
dr.find_element_by_css_selector(".s_ipt")
dr.find_element_by_css_selector("html > body > form > span > input")
dr.find_element_by_css_selector("span.soutu-btn> input#kw")
dr.find_element_by_css_selector("form#form > span > input")xpath的使用方法
1. 第一种方法:通过绝对路径做定位(相信大家不会使用这种方式)
By.xpath(“html/body/div/form/input”)
2. 第二种方法:通过相对路径做定位,两个斜杠代表相对路径
By.xpath(“//input//div”)
3. 第三种方法:通过元素索引定位
By.xpath(“//input[4]”)
4. 第四种方法:使用xpath+节点属性定位(结合第2、第3中方法可以使用)
By.xpath(“//input[@id='kw1']”)
By.xpath(“//input[@type='name' and @name='kw1']”)
5. 第五种方法:使用部分属性值匹配(最强大的方法)
By.xpath(“//input[start-with(@id,'nice')]”)
By.xpath(“//input[ends-with(@id,'很漂亮')]”)
By.xpath(“//input[contains(@id,'那么美')]”)
6. 第六种方法:使用前集中方法的组合
By.xpath(“//input[@id='kw1']//input[start-with(@id,'nice']/div[1]/form[3])
下面这种方式是比较通用的一种方式:这里需要记住By模块所以需要导入。
from selenium import webdriver

from selenium.webdriver.common.by import By

browser = webdriver.Chrome()

browser.get("http://www.taobao.com")
input_first = browser.find_element(By.ID,"q")
print(input_first)
browser.close()当然这种方法和上述的方式是通用的,browser.find_element(By.ID,"q")这里By.ID中的ID可以替换为其他几个
2、多个元素查找
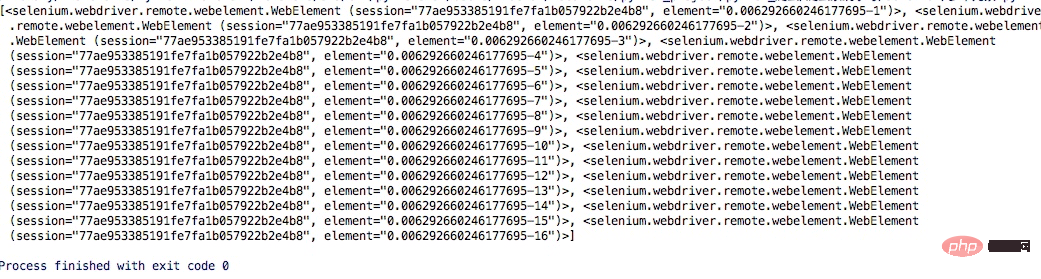
多个元素find_elements,单个元素是find_element,其他使用上没什么区别,通过其中的一个例子演示:
browser.get(<a href="http://www.taobao.com/" rel="external nofollow" rel="external nofollow" target="_blank">http://www.taobao.com</a>) lis = browser.find_elements_by_css_selector('.service-bd li') print(lis) browser.close()
这样获得就是一个列表
当然上面的方式也是可以通过导入from selenium.webdriver.common.by import By 这种方式实现
lis = browser.find_elements(By.CSS_SELECTOR,'.service-bd li')
同样的在单个元素中查找的方法在多个元素查找中同样存在:
find_elements_by_name
find_elements_by_id
find_elements_by_xpath
find_elements_by_link_text
find_elements_by_partial_link_text
find_elements_by_tag_name
find_elements_by_class_name
find_elements_by_css_selector
4、元素交互操作
一般来说,webdriver 中比较常用的操作对象的方法有下面几个:
click——点击对象
send_keys——在对象上模拟按键输入
clear——清除对象的内容,如果可以的话
submit——提交对象的内容,如果可以的话
text——用于获取元素的文本信息
1、键盘事件
要想调用键盘按键操作需要引入 keys 包:
from selenium.webdriver.common.keys import Keys
通过 send_keys()调用按键:
send_keys(Keys.TAB) # TAB
send_keys(Keys.ENTER) # 回车
send_keys(Keys.CONTROL,'a') # ctrl+a 全选输入框内容
send_keys(Keys.CONTROL,'x') # ctrl+x 剪切输入框内容
import time

browser.get(http://www.taobao.com)
input_str = browser.find_element_by_id('q')
input_str.send_keys("ipad")
time.sleep(1)
input_str.clear()
input_str.send_keys("MakBook pro")
button = browser.find_element_by_class_name('btn-search')
button.click()运行的结果可以看出程序会自动打开Chrome浏览器并打开淘宝输入ipad,然后删除,重新输入MakBook pro,并点击搜索。
2、鼠标事件
鼠标事件一般包括鼠标右键、双击、拖动、移动鼠标到某个元素上等等。需要引入ActionChains类。引入方法:
from selenium.webdriver.common.action_chains import ActionChains
ActionChains 常用方法:
context_click() :右击;
double_click() :双击;
drag_and_drop(): 拖动;
move_to_element() :鼠标悬停。
perform(): 执行所有ActionChains 中存储的行为;
鼠标双击示例:
qqq =driver.find_element_by_xpath("xxx")  #定位到要双击的元素
ActionChains(driver).double_click(qqq).perform() #对定位到的元素执行鼠标双击操作鼠标拖放示例:
from selenium.webdriver import ActionChains

url = "http://www.runoob.com/try/try.php?filename=jqueryui-api-droppable"
browser.get(url)
browser.switch_to.frame('iframeResult')
source = browser.find_element_by_css_selector('#draggable')
target = browser.find_element_by_css_selector('#droppable')
actions = ActionChains(browser)
actions.drag_and_drop(source, target)
actions.perform()
更多操作参考:
http://selenium-python.readthedocs.io/api.html#module-selenium.webdriver.common.action_chains
5、执行JavaScript
这是一个非常有用的方法,这里就可以直接调用js方法来实现一些操作,下面的例子是通过登录知乎然后通过js翻到页面底部,并弹框提示
browser.get(<a href="http://www.zhihu.com/explore" rel="external nofollow" target="_blank">http://www.zhihu.com/explore</a>)
browser.execute_script('window.scrollTo(0, document.body.scrollHeight)')
browser.execute_script('alert("To Bottom")')6、获取DOM
1、获取元素属性:get_attribute('class')
url = 'https://www.zhihu.com/explore'
browser.get(url)
logo = browser.find_element_by_id('zh-top-link-logo')
print(logo)
print(logo.get_attribute('class'))
2、获取文本值:text
url = 'https://www.zhihu.com/explore'
browser.get(url)
input = browser.find_element_by_class_name('zu-top-add-question')
print(input.text)
3、获取ID,位置,标签名
id
location
tag_name
size
url = 'https://www.zhihu.com/explore'
browser.get(url)
input = browser.find_element_by_class_name('zu-top-add-question')
print(input.id)
print(input.location)
print(input.tag_name)
print(input.size)
7、Frame
在很多网页中都是有Frame标签,所以我们爬取数据的时候就涉及到切入到frame中以及切出来的问题,通过下面的例子演示
这里常用的是switch_to.from()和switch_to.parent_frame()
import time
from selenium import webdriver
from selenium.common.exceptions import NoSuchElementException

browser = webdriver.Chrome()
url = 'http://www.runoob.com/try/try.php?filename=jqueryui-api-droppable'
browser.get(url)
browser.switch_to.frame('iframeResult')
source = browser.find_element_by_css_selector('#draggable')
print(source)

try:
    logo = browser.find_element_by_class_name('logo')
except NoSuchElementException:
    print('NO LOGO')
browser.switch_to.parent_frame()
logo = browser.find_element_by_class_name('logo')
print(logo)
print(logo.text)8、等待
1、隐式等待
当使用了隐式等待执行测试的时候,如果 WebDriver没有在 DOM中找到元素,将继续等待,超出设定时间后则抛出找不到元素的异常。
换句话说,当查找元素或元素并没有立即出现的时候,隐式等待将等待一段时间再查找 DOM,默认的时间是0
到了一定的时间发现元素还没有加载,则继续等待我们指定的时间,如果超过了我们指定的时间还没有加载就会抛出异常,如果没有需要等待的时候就已经加载完毕就会立即执行
browser.implicitly_wait(10)
browser.get('https://www.zhihu.com/explore')
input = browser.find_element_by_class_name('zu-top-add-question')
print(input)
2、显示等待
指定一个等待条件,并且指定一个最长等待时间,会在这个时间内进行判断是否满足等待条件。
如果成立就会立即返回,如果不成立,就会一直等待,直到等待你指定的最长等待时间,如果还是不满足,就会抛出异常,如果满足了就会正常返回。
from selenium import webdriver
from selenium.webdriver.common.by import By
from selenium.webdriver.support.ui import WebDriverWait
from selenium.webdriver.support import expected_conditions as EC

browser = webdriver.Chrome()
browser.get('https://www.taobao.com/')
wait = WebDriverWait(browser, 10)
input = wait.until(EC.presence_of_element_located((By.ID, 'q')))
button = wait.until(EC.element_to_be_clickable((By.CSS_SELECTOR, '.btn-search')))
print(input, button)
上述的例子中的条件:EC.presence_of_element_located()是确认元素是否已经出现了。EC.element_to_be_clickable()是确认元素是否是可点击的
3、常用的判断条件:
title_is :标题是某内容
title_contains :标题包含某内容
presence_of_element_located :元素加载出,传入定位元组,如(By.ID, 'p')
visibility_of_element_located :元素可见,传入定位元组
visibility_of :可见,传入元素对象
presence_of_all_elements_located :所有元素加载出
text_to_be_present_in_element :某个元素文本包含某文字
text_to_be_present_in_element_value :某个元素值包含某文字
frame_to_be_available_and_switch_to_it :frame加载并切换
invisibility_of_element_located :元素不可见
element_to_be_clickable :元素可点击
staleness_of :判断一个元素是否仍在DOM,可判断页面是否已经刷新
element_to_be_selected :元素可选择,传元素对象
element_located_to_be_selected :元素可选择,传入定位元组
element_selection_state_to_be :传入元素对象以及状态,相等返回True,否则返回False
element_located_selection_state_to_be :传入定位元组以及状态,相等返回True,否则返回False
alert_is_present :是否出现Alert
实例:博客园标题判断
# coding: utf-8
from selenium import webdriver
from selenium.webdriver.support import expected_conditions as EC
driver = webdriver.Firefox()
driver.get("http://www.cnblogs.com/101718qiong/")

title = EC.title_is(u"Silence&QH - 博客园") # 判断title完全等于
print title(driver)

title1 = EC.title_contains("Silence&QH") # 判断title包含
print title1(driver)

r1 = EC.title_is(u"Silence&QH - 博客园")(driver) # 另外写法
r2 = EC.title_contains("Silence&QH")(driver)
print r1
print r2更多操作参考:
http://selenium-python.readthedocs.io/api.html#module-selenium.webdriver.support.expected_conditions
9、浏览器浏览器操作
浏览器最大化、最小化
browser.maximize_window() # 将浏览器最大化显示
browser.minimize_window() # 将浏览器最小化显示
浏览器设置窗口大小
browser.set_window_size(480, 800) # 设置浏览器宽480、高800显示
浏览器前进后退
back() :后退
forward():前进
import time
from selenium import webdriver

browser = webdriver.Chrome()
browser.get('https://www.baidu.com/')
browser.get('https://www.taobao.com/')
browser.get('https://www.python.org/')
browser.back()
time.sleep(1)
browser.forward()
browser.close()
10、cookie操作
get_cookies()
delete_all_cookes()
add_cookie()
browser.get('https://www.zhihu.com/explore')
print(browser.get_cookies())
browser.add_cookie({'name': 'name', 'domain': 'www.zhihu.com', 'value': 'zhaofan'})
print(browser.get_cookies())
browser.delete_all_cookies()
print(browser.get_cookies())11、多窗口管理
通过执行js命令实现新开选项卡window.open(),不同的选项卡是存在列表里browser.window_handles。
通过browser.window_handles[0]就可以操作第一个选项卡,current_window_handle:获得当前窗口句柄
import time

browser.get('https://www.baidu.com')
browser.execute_script('window.open()')
print(browser.window_handles)
browser.switch_to.window(browser.window_handles[1])
browser.get('https://www.taobao.com')
time.sleep(1)
browser.switch_to.window(browser.window_handles[0])
browser.get('https://python.org')
12、异常处理
这里的异常比较复杂,官网的参考地址:
http://selenium-python.readthedocs.io/api.html#module-selenium.common.exceptions
这里只进行简单的演示,查找一个不存在的元素
from selenium import webdriver
from selenium.common.exceptions import TimeoutException, NoSuchElementException

browser = webdriver.Chrome()
try:
    browser.get('https://www.baidu.com')
except TimeoutException:
    print('Time Out')
try:
    browser.find_element_by_id('hello')
except NoSuchElementException:
    print('No Element')
finally:
browser.close()13.警告框处理
在WebDriver中处理JavaScript所生成的alert、confirm以及prompt十分简单,具体做法是使用 switch_to.alert 方法定位到 alert/confirm/prompt,然后使用text/accept/dismiss/ send_keys等方法进行操作。
方法
text : 返回 alert/confirm/prompt 中的文字信息
accept() : 接受现有警告框
dismiss() : 解散现有警告框
send_keys(keysToSend) : 发送文本至警告框。keysToSend:将文本发送至警告框。
实例演示
from selenium import webdriver
from selenium.webdriver.common.action_chains import ActionChains
import time

driver = webdriver.Chrome("F:\Chrome\ChromeDriver\chromedriver")
driver.implicitly_wait(10)
driver.get('http://www.baidu.com')

# 鼠标悬停至“设置”链接
link = driver.find_element_by_link_text('设置')
ActionChains(driver).move_to_element(link).perform()

# 打开搜索设置
driver.find_element_by_link_text("搜索设置").click()

#在此处设置等待2s否则可能报错
time.sleep(2)
 # 保存设置
driver.find_element_by_class_name("prefpanelgo").click()
 time.sleep(2)

# 接受警告框
driver.switch_to.alert.accept()

driver.quit()14、下拉框选择操作
导入选择下拉框Select类,使用该类处理下拉框操作。
from selenium.webdriver.support.select import Select
Select类的方法:
select_by_value(“选择值”) select标签的value属性的值
select_by_index(“索引值”) 下拉框的索引
select_by_visible_testx(“文本值”) 下拉框的文本值
有时我们会碰到下拉框,WebDriver提供了Select类来处理下拉框。 如百度搜索设置的下拉框。
from selenium import webdriver
 from selenium.webdriver.support.select import Select
 from time import sleep

driver = webdriver.Chrome("F:\Chrome\ChromeDriver\chromedriver")
 driver.implicitly_wait(10)
 driver.get('http://www.baidu.com')

#1.鼠标悬停至“设置”链接
driver.find_element_by_link_text('设置').click()
 sleep(1)
 #2.打开搜索设置
driver.find_element_by_link_text("搜索设置").click()
 sleep(2)

#3.搜索结果显示条数
sel = driver.find_element_by_xpath("//select[@id='nr']")
 Select(sel).select_by_value('50')  # 显示50条

sleep(3)
driver.quit()15、文件上传
对于通过input标签实现的上传功能,可以将其看作是一个输入框,即通过send_keys()指定本地文件路径的方式实现文件上传。
通过send_keys()方法来实现文件上传:
from selenium import webdriver
import os

driver = webdriver.Firefox()
file_path = 'file:///' + os.path.abspath('upfile.html')
driver.get(file_path)

# 定位上传按钮,添加本地文件
driver.find_element_by_name("file").send_keys('D:\\upload_file.txt')

driver.quit()16、窗口截图
自动化用例是由程序去执行的,因此有时候打印的错误信息并不十分明确。如果在脚本执行出错的时候能对当前窗口截图保存,那么通过图片就可以非常直观地看出出错的原因。WebDriver提供了截图函数get_screenshot_as_file()来截取当前窗口。
截屏方法:
get_screenshot_as_file(self, filename) 用于截取当前窗口,并把图片保存到本地
from selenium import webdriver
from time import sleep

driver =webdriver.Firefox(executable_path ="F:\GeckoDriver\geckodriver")
driver.get('http://www.baidu.com')

driver.find_element_by_id('kw').send_keys('selenium')
 driver.find_element_by_id('su').click()
 sleep(2)

#1.截取当前窗口,并指定截图图片的保存位置
driver.get_screenshot_as_file("D:\\baidu_img.jpg")

driver.quit()17、关闭浏览器
在前面的例子中我们一直使用quit()方法,其含义为退出相关的驱动程序和关闭所有窗口。除此之外,WebDriver还提供了close()方法,用来关闭当前窗口。例多窗口的处理,在用例执行的过程中打开了多个窗口,我们想要关闭其中的某个窗口,这时就要用到close()方法进行关闭了。
close() 关闭单个窗口
quit() 关闭所有窗口
18、selenium规避被检测识别
现在不少大网站有对selenium采取了监测机制。比如正常情况下我们用浏览器访问淘宝等网站的 window.navigator.webdriver的值为
undefined。而使用selenium访问则该值为true。那么如何解决这个问题呢?
只需要设置Chromedriver的启动参数即可解决问题。在启动Chromedriver之前,为Chrome开启实验性功能参数excludeSwitches,它的值为['enable-automation'],完整代码如下:
from selenium.webdriver import Chrome
from selenium.webdriver import ChromeOptions

option = ChromeOptions()
option.add_experimental_option('excludeSwitches', ['enable-automation'])
driver = Chrome(options=option)
19、实例:
自动登陆CSDN
import time
import numpy as np
from numpy import random
from selenium import webdriver
from selenium.webdriver import ActionChains
from selenium.webdriver.common.by import By
from selenium.webdriver.support.ui import WebDriverWait
from selenium.webdriver.support import expected_conditions as EC


def ease_out_expo(x):
    if x == 1:
        return 1
    else:
        return 1 - pow(2, -10 * x)


def get_tracks(distance, seconds, ease_func):
    tracks = [0]
    offsets = [0]
    for t in np.arange(0.0, seconds+0.1, 0.1):
        ease = globals()[ease_func]
        offset = round(ease(t / seconds) * distance)
        tracks.append(offset - offsets[-1])
        offsets.append(offset)
    return offsets, tracks


def drag_and_drop(browser, offset):
    # 定位滑块元素
    WebDriverWait(browser, 20).until(
        EC.visibility_of_element_located((By.XPATH, "//*[@class='nc_iconfont btn_slide']"))
    )
    knob = browser.find_element_by_xpath("//*[@class='nc_iconfont btn_slide']")
    offsets, tracks = get_tracks(offset, 0.2, 'ease_out_expo')
    ActionChains(browser).click_and_hold(knob).perform()
    for x in tracks:
        ActionChains(browser).move_by_offset(x, 0).perform()
    # 放开
    ActionChains(browser).pause(random.randint(6, 14) / 10).release().perform()


chrome_options = webdriver.ChromeOptions()
chrome_options.add_argument("--start-maximized")
browser = webdriver.Chrome(chrome_options=chrome_options)

browser.get('http://www.baidu.com')
browser.find_element_by_id('kw').send_keys('CSDN')
browser.find_element_by_id('su').click()
WebDriverWait(browser, 20).until(
    EC.visibility_of_element_located((By.PARTIAL_LINK_TEXT, "-专业IT技术社区"))
)

browser.find_element_by_partial_link_text('-专业IT技术社区').click()

browser.switch_to.window(browser.window_handles[1])  # 移动句柄
time.sleep(1)
browser.find_element_by_partial_link_text('登录').click()
browser.find_element_by_link_text('账号密码登录').click()
browser.find_element_by_id('all').send_keys('yangbobin')
browser.find_element_by_name('pwd').send_keys('pass-word')
browser.find_element_by_css_selector("button[data-type='account']").click()
time.sleep(5)  # 等待滑动模块和其他JS文件加载完毕!
while True:
    # 定义鼠标拖放动作
    drag_and_drop(browser, 261)
    # 等待JS认证运行,如果不等待容易报错
    time.sleep(2)
    # 查看是否认证成功,获取text值
    WebDriverWait(browser, 20).until(
        EC.visibility_of_element_located((By.LINK_TEXT, "刷新"))
    )
browser.find_element_by_link_text('刷新').click()自动登陆163邮箱
首先,是163.的登陆为iframe
browser.switch_to_frame('x-URS-iframe')
The above is the detailed content of How to use the selenium module of python crawler. For more information, please follow other related articles on the PHP Chinese website!

Hot AI Tools

Undresser.AI Undress
AI-powered app for creating realistic nude photos

AI Clothes Remover
Online AI tool for removing clothes from photos.

Undress AI Tool
Undress images for free

Clothoff.io
AI clothes remover

AI Hentai Generator
Generate AI Hentai for free.

Hot Article
Hot Tools

Notepad++7.3.1
Easy-to-use and free code editor

SublimeText3 Chinese version
Chinese version, very easy to use

Zend Studio 13.0.1
Powerful PHP integrated development environment

Dreamweaver CS6
Visual web development tools

SublimeText3 Mac version
God-level code editing software (SublimeText3)
Hot Topics
 1385
1385
 52
52

 PHP and Python: Code Examples and Comparison
Apr 15, 2025 am 12:07 AM
PHP and Python: Code Examples and Comparison
Apr 15, 2025 am 12:07 AM
PHP and Python have their own advantages and disadvantages, and the choice depends on project needs and personal preferences. 1.PHP is suitable for rapid development and maintenance of large-scale web applications. 2. Python dominates the field of data science and machine learning.
 Python vs. JavaScript: Community, Libraries, and Resources
Apr 15, 2025 am 12:16 AM
Python vs. JavaScript: Community, Libraries, and Resources
Apr 15, 2025 am 12:16 AM
Python and JavaScript have their own advantages and disadvantages in terms of community, libraries and resources. 1) The Python community is friendly and suitable for beginners, but the front-end development resources are not as rich as JavaScript. 2) Python is powerful in data science and machine learning libraries, while JavaScript is better in front-end development libraries and frameworks. 3) Both have rich learning resources, but Python is suitable for starting with official documents, while JavaScript is better with MDNWebDocs. The choice should be based on project needs and personal interests.
 Detailed explanation of docker principle
Apr 14, 2025 pm 11:57 PM
Detailed explanation of docker principle
Apr 14, 2025 pm 11:57 PM
Docker uses Linux kernel features to provide an efficient and isolated application running environment. Its working principle is as follows: 1. The mirror is used as a read-only template, which contains everything you need to run the application; 2. The Union File System (UnionFS) stacks multiple file systems, only storing the differences, saving space and speeding up; 3. The daemon manages the mirrors and containers, and the client uses them for interaction; 4. Namespaces and cgroups implement container isolation and resource limitations; 5. Multiple network modes support container interconnection. Only by understanding these core concepts can you better utilize Docker.
 Python: Automation, Scripting, and Task Management
Apr 16, 2025 am 12:14 AM
Python: Automation, Scripting, and Task Management
Apr 16, 2025 am 12:14 AM
Python excels in automation, scripting, and task management. 1) Automation: File backup is realized through standard libraries such as os and shutil. 2) Script writing: Use the psutil library to monitor system resources. 3) Task management: Use the schedule library to schedule tasks. Python's ease of use and rich library support makes it the preferred tool in these areas.
 How to run programs in terminal vscode
Apr 15, 2025 pm 06:42 PM
How to run programs in terminal vscode
Apr 15, 2025 pm 06:42 PM
In VS Code, you can run the program in the terminal through the following steps: Prepare the code and open the integrated terminal to ensure that the code directory is consistent with the terminal working directory. Select the run command according to the programming language (such as Python's python your_file_name.py) to check whether it runs successfully and resolve errors. Use the debugger to improve debugging efficiency.
 What is vscode What is vscode for?
Apr 15, 2025 pm 06:45 PM
What is vscode What is vscode for?
Apr 15, 2025 pm 06:45 PM
VS Code is the full name Visual Studio Code, which is a free and open source cross-platform code editor and development environment developed by Microsoft. It supports a wide range of programming languages and provides syntax highlighting, code automatic completion, code snippets and smart prompts to improve development efficiency. Through a rich extension ecosystem, users can add extensions to specific needs and languages, such as debuggers, code formatting tools, and Git integrations. VS Code also includes an intuitive debugger that helps quickly find and resolve bugs in your code.
 Can visual studio code be used in python
Apr 15, 2025 pm 08:18 PM
Can visual studio code be used in python
Apr 15, 2025 pm 08:18 PM
VS Code can be used to write Python and provides many features that make it an ideal tool for developing Python applications. It allows users to: install Python extensions to get functions such as code completion, syntax highlighting, and debugging. Use the debugger to track code step by step, find and fix errors. Integrate Git for version control. Use code formatting tools to maintain code consistency. Use the Linting tool to spot potential problems ahead of time.
 Is the vscode extension malicious?
Apr 15, 2025 pm 07:57 PM
Is the vscode extension malicious?
Apr 15, 2025 pm 07:57 PM
VS Code extensions pose malicious risks, such as hiding malicious code, exploiting vulnerabilities, and masturbating as legitimate extensions. Methods to identify malicious extensions include: checking publishers, reading comments, checking code, and installing with caution. Security measures also include: security awareness, good habits, regular updates and antivirus software.
