

How to configure SpringBoot integrated Tomcat service architecture

一、Tomcat集成
使用的成本越低,内部封装越复杂
1、依赖层级
在SpringBoot框架的web依赖包中,引入的是内嵌Tomcat组件,基于SpringBoot的版本,Tomcat集成的是9.0版本;
<!-- 1、项目工程依赖 -->
<dependency>
    <groupId>org.springframework.boot</groupId>
    <artifactId>spring-boot-starter-web</artifactId>
    <version>2.2.5.RELEASE</version>
</dependency>
<!-- 2、starter-web依赖 -->
<dependency>
  <groupId>org.springframework.boot</groupId>
  <artifactId>spring-boot-starter-tomcat</artifactId>
  <version>2.2.5.RELEASE</version>
  <scope>compile</scope>
</dependency>
<!-- 3、starter-tomcat依赖 -->
<dependency>
  <groupId>org.apache.tomcat.embed</groupId>
  <artifactId>tomcat-embed-core</artifactId>
  <version>9.0.31</version>
  <scope>compile</scope>
</dependency>2、自动化配置
在SpringBoot框架的自动配置类中,Web项目中不显式更换其他服务依赖时,默认提供了对Tomcat服务的管理;
@ConditionalOnWebApplication(type = Type.SERVLET)
@EnableConfigurationProperties(ServerProperties.class)
@Import({ ServletWebServerFactoryAutoConfiguration.BeanPostProcessorsRegistrar.class,
		ServletWebServerFactoryConfiguration.EmbeddedTomcat.class})
public class ServletWebServerFactoryAutoConfiguration {
	@Bean
	@ConditionalOnClass(name = "org.apache.catalina.startup.Tomcat")
	public TomcatServletWebServerFactoryCustomizer tomcatServletWebServerFactoryCustomizer(
			ServerProperties serverProperties) {
		return new TomcatServletWebServerFactoryCustomizer(serverProperties);
	}
}二、Tomcat架构
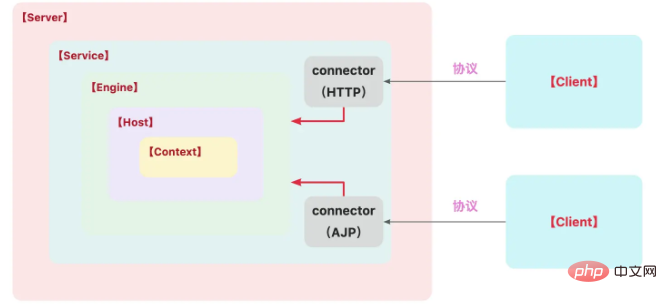
Server:代表整个Tomcat容器;
Service:服务器内部的中间组件,将一个或多个Connector绑定到一个Engine上;
Engine:表示特定服务的请求处理管道,接收Connector的请求并响应;
Host:网络主机名称;
Connector:连接器处理与客户端的通信;
Context:代表一个Web应用程序的上下文;
参考Tomcat9.0版本的核心组件描述,对于框架有大致的了解后,再去分析集成原理,会更容易把握主线逻辑;
三、Tomcat配置
1、基础配置
在配置文件中,对Tomcat做一些基础性的设置,查看下面的配置类可以知道,这些属性存在默认值;
server:
  port: 8082                # 端口号
  tomcat:                   # Tomcat组件
    uri-encoding: UTF-8     # URI编码
    max-threads: 100        # 最大工作线程
min-spare-threads: 10 # 最小工作线程2、属性配置类
在服务配置中,提供多种服务器的适配,像Tomcat、Jetty、Netty、Undertow,从策略上看,配置分为公共属性以及各种服务器的适配属性;
更多配置信息,可以参考完整的源码和注释说明;
@ConfigurationProperties(prefix = "server", ignoreUnknownFields = true)
public class ServerProperties {
    private Integer port;
    public static class Tomcat {
        private Charset uriEncoding = StandardCharsets.UTF_8;
        private int maxThreads = 200;
        private int minSpareThreads = 10;
    }
}3、配置加载分析
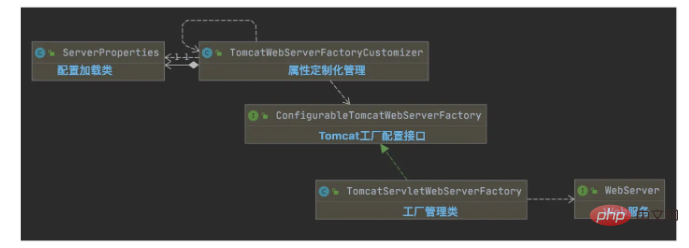
基于配置的属性,定制化管理Tomcat服务的信息;
public class TomcatWebServerFactoryCustomizer
        implements WebServerFactoryCustomizer<ConfigurableTomcatWebServerFactory> {
    @Override
    public void customize(ConfigurableTomcatWebServerFactory factory) {
        ServerProperties properties = this.serverProperties;
        ServerProperties.Tomcat tomcatProperties = properties.getTomcat();
        PropertyMapper propertyMapper = PropertyMapper.get();
        customizeStaticResources(factory);
    }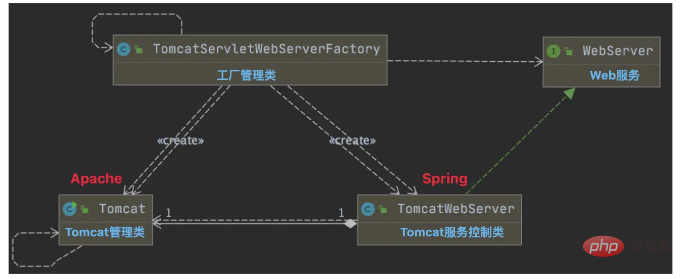
}TomcatWeb服务工厂,这里在创建WebServer时,使用的是Tomcat,需要适当的了解一下Tomcat架构;
public class TomcatServletWebServerFactory extends AbstractServletWebServerFactory
        implements ConfigurableTomcatWebServerFactory, ResourceLoaderAware {
    @Override
    public WebServer getWebServer(ServletContextInitializer... initializers) {
        Tomcat tomcat = new Tomcat();
        Connector connector = new Connector(this.protocol);
        connector.setThrowOnFailure(true);
        tomcat.getService().addConnector(connector);
        customizeConnector(connector);
        tomcat.setConnector(connector);
        tomcat.getHost().setAutoDeploy(false);
        configureEngine(tomcat.getEngine());
        prepareContext(tomcat.getHost(), initializers);
        return getTomcatWebServer(tomcat);
    }
}四、周期管理方法
1、控制类
WebServer的简单接口,只声明端口获取,服务启动和停止相关方法;
public interface WebServer {
	// 获取监听的端口
	int getPort();
	// 服务启动
	void start() throws WebServerException;
	// 服务停止
	void stop() throws WebServerException;
}SpringBoot中,Tomcat服务核心控制类,通过TomcatServletWebServerFactory工厂类创建,对Tomcat生命周期的管理提供了一层包装;
public class TomcatWebServer implements WebServer {
    private final Tomcat tomcat;
    private final Map<Service, Connector[]> serviceConnectors = new HashMap<>();
}Apache组件中,轻量级Tomcat启动器,提供了Tomcat基础配置,比如默认的Port和HostName,以及生命周期管理的方法,TomcatWebServer类中调用的就是该API中的具体方法;
public class Tomcat {
    protected Server server;
    protected int port = 8080;
    protected String hostname = "localhost";
    // 初始化服务
    public void init() throws LifecycleException {
        getServer();
        server.init();
    }
    // 启动服务
    public void start() throws LifecycleException {
        getServer();
        server.start();
    }
    // 停止服务
    public void stop() throws LifecycleException {
        getServer();
        server.stop();
    }
}2、核心方法
2.1 初始化,初始化时,调用Apache-Tomcat类中启动方法;
public class TomcatWebServer implements WebServer {
    /**
     * 初始化方法
     */
    private void initialize() throws WebServerException {
        // 控制台日志
        logger.info("Tomcat initialized with port(s): " + getPortsDescription(false));
        synchronized (this.monitor) {
            // 调用Apache-Tomcat类中启动方法
            this.tomcat.start();
        }
    }
}2.2 启动,在初始化的方法中,调用的Tomcat启动方法,这里对状态进行校验并输出日志;
public class TomcatWebServer implements WebServer {
    /**
     * 启动方法
     */
    public void start() throws WebServerException {
        synchronized (this.monitor) {
            if (this.started) {
                return;
            }
            checkThatConnectorsHaveStarted();
            // 启动状态的标识
            this.started = true;
            // 控制台日志
            logger.info("Tomcat started on port(s): " + getPortsDescription(true) + " with context path '"
                    + getContextPath() + "'");
        }
    }
}2.3 停止,在组件生命周期的常规管理逻辑中,停止服务之后进行销毁动作的执行,其中自然涉及到多个状态标识的转换;
public class TomcatWebServer implements WebServer {
    /**
     * 停止方法
     */
    public void stop() throws WebServerException {
        synchronized (this.monitor) {
            // 状态变化
            boolean wasStarted = this.started;
            this.started = false;
            // Tomcat服务停止
            stopTomcat();
            this.tomcat.destroy();
        }
    }
}The above is the detailed content of How to configure SpringBoot integrated Tomcat service architecture. For more information, please follow other related articles on the PHP Chinese website!

Hot AI Tools

Undresser.AI Undress
AI-powered app for creating realistic nude photos

AI Clothes Remover
Online AI tool for removing clothes from photos.

Undress AI Tool
Undress images for free

Clothoff.io
AI clothes remover

Video Face Swap
Swap faces in any video effortlessly with our completely free AI face swap tool!

Hot Article
Hot Tools

Notepad++7.3.1
Easy-to-use and free code editor

SublimeText3 Chinese version
Chinese version, very easy to use

Zend Studio 13.0.1
Powerful PHP integrated development environment

Dreamweaver CS6
Visual web development tools

SublimeText3 Mac version
God-level code editing software (SublimeText3)
Hot Topics
 1386
1386
 52
52

 How to deploy jar project in tomcat
Apr 21, 2024 am 07:27 AM
How to deploy jar project in tomcat
Apr 21, 2024 am 07:27 AM
To deploy a JAR project to Tomcat, follow these steps: Download and unzip Tomcat. Configure the server.xml file, set the port and project deployment path. Copies the JAR file to the specified deployment path. Start Tomcat. Access the deployed project using the provided URL.
 How to allow external network access to tomcat server
Apr 21, 2024 am 07:22 AM
How to allow external network access to tomcat server
Apr 21, 2024 am 07:22 AM
To allow the Tomcat server to access the external network, you need to: modify the Tomcat configuration file to allow external connections. Add a firewall rule to allow access to the Tomcat server port. Create a DNS record pointing the domain name to the Tomcat server public IP. Optional: Use a reverse proxy to improve security and performance. Optional: Set up HTTPS for increased security.
 Where is the tomcat installation directory?
Apr 21, 2024 am 07:48 AM
Where is the tomcat installation directory?
Apr 21, 2024 am 07:48 AM
Tomcat installation directory: Default path: Windows: C:\Program Files\Apache Software Foundation\Tomcat 9.0macOS:/Library/Tomcat/Tomcat 9.0Linux:/opt/tomcat/tomcat9 Custom path: You can specify it during installation. Find the installation directory: use whereis or locate command.
 How to deploy multiple projects in tomcat
Apr 21, 2024 am 09:33 AM
How to deploy multiple projects in tomcat
Apr 21, 2024 am 09:33 AM
To deploy multiple projects through Tomcat, you need to create a webapp directory for each project and then: Automatic deployment: Place the webapp directory in Tomcat's webapps directory. Manual deployment: Manually deploy the project in Tomcat's manager application. Once the project is deployed, it can be accessed by its deployment name, for example: http://localhost:8080/project1.
 How to check the number of concurrent connections in tomcat
Apr 21, 2024 am 08:12 AM
How to check the number of concurrent connections in tomcat
Apr 21, 2024 am 08:12 AM
How to check the number of concurrent Tomcat connections: Visit the Tomcat Manager page (http://localhost:8080/manager/html) and enter your user name and password. Click Status->Sessions in the left navigation bar to see the number of concurrent connections at the top of the page.
 Where is the root directory of the tomcat website?
Apr 21, 2024 am 09:27 AM
Where is the root directory of the tomcat website?
Apr 21, 2024 am 09:27 AM
The Tomcat website root directory is located in Tomcat's webapps subdirectory and is used to store web application files, static resources, and the WEB-INF directory; it can be found by looking for the docBase attribute in the Tomcat configuration file.
 How to check the port number of tomcat
Apr 21, 2024 am 08:00 AM
How to check the port number of tomcat
Apr 21, 2024 am 08:00 AM
The Tomcat port number can be viewed by checking the port attribute of the <Connector> element in the server.xml file. Visit the Tomcat management interface (http://localhost:8080/manager/html) and view the "Status" tab. Run "catalina.sh version" from the command line and look at the "Port:" line.
 How to run two projects with different port numbers in tomcat
Apr 21, 2024 am 09:00 AM
How to run two projects with different port numbers in tomcat
Apr 21, 2024 am 09:00 AM
Running projects with different port numbers on the Tomcat server requires the following steps: Modify the server.xml file and add a Connector element to define the port number. Add a Context element to define the application associated with the port number. Create a WAR file and deploy it to the corresponding directory (webapps or webapps/ROOT). Restart Tomcat to apply changes.
