How SpringBoot implements multiple file uploads
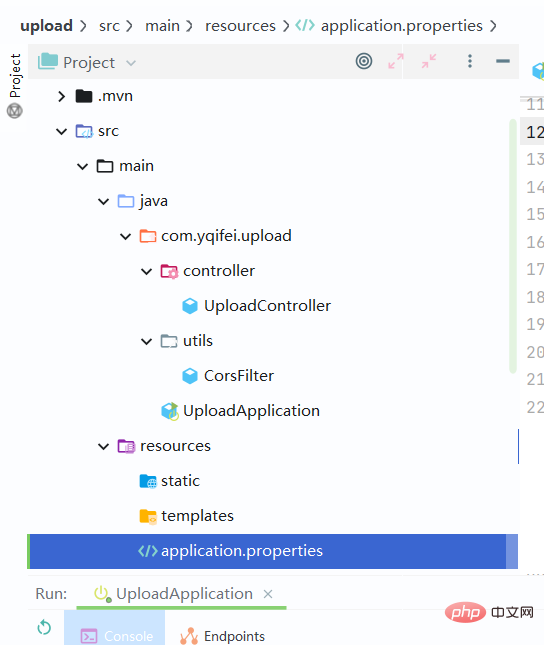
1. Code structure:

2.Controller layer
package com.yqifei.upload.controller;

import io.swagger.annotations.Api;
import org.springframework.web.bind.annotation.*;
import org.springframework.web.multipart.MultipartFile;

import javax.servlet.http.HttpServletRequest;
import java.io.File;
import java.io.IOException;
import java.util.ArrayList;
import java.util.List;
import java.util.UUID;

/**
 * @ClassName UploadController
 * @Description TODO
 * @Author jiangyuntao
 * @Data 2023/3/7 23:52
 * @Version 1.0
 * @Email yuntaojiang@foxmail.com
 */

@RestController
@CrossOrigin
@RequestMapping("/posts")
@Api(tags = "文件上传控制器")
public class UploadController {

/*
http://localhost:8088/swagger-ui.html#
*/
    @PostMapping(value="/upload")
    @CrossOrigin
    public List<String> fileload(@RequestParam(value = "file") MultipartFile[] file, HttpServletRequest request) throws IOException {
        System.out.println(file.length);
        String savaLaction="d:/data/";
        String fileSaveName;
        List<String> imageUri = new ArrayList<>();
        for (MultipartFile multipartFile:file) {
            System.out.println("文件"+multipartFile.getOriginalFilename());
            fileSaveName = UUID.randomUUID().toString()+multipartFile.getOriginalFilename();
            multipartFile.transferTo(new File(savaLaction,fileSaveName));
            String res = request.getScheme()+"://"+request.getServerName()+":"+"8080"+savaLaction+"/"+fileSaveName;
            imageUri.add(res);
        }
        System.out.println(imageUri);
        return imageUri;
    }

}3. Cross-domain interceptor configuration
package com.yqifei.upload.utils;

import org.springframework.context.annotation.Configuration;
import javax.servlet.*;
import javax.servlet.annotation.WebFilter;
import javax.servlet.http.HttpServletResponse;
import java.io.IOException;
@WebFilter(filterName = "CorsFilter")
@Configuration
public class CorsFilter implements Filter {
    @Override
    public void doFilter(ServletRequest req, ServletResponse res, FilterChain chain) throws IOException, ServletException {
        HttpServletResponse response = (HttpServletResponse) res;
        response.setHeader("Access-Control-Allow-Origin","*");
        response.setHeader("Access-Control-Allow-Credentials", "true");
        response.setHeader("Access-Control-Allow-Methods", "POST, GET, PATCH, DELETE, PUT");
        response.setHeader("Access-Control-Max-Age", "3600");
        response.setHeader("Access-Control-Allow-Headers", "Origin, X-Requested-With, Content-Type, Accept");
        chain.doFilter(req, res);
    }
}4. application.properties configuration
# 应用名称
spring.application.name=upload
# 应用服务 WEB 访问端口
server.port=8088

spring.web.resources.static-locations=file:d:/data/

spring.servlet.multipart.max-request-size=50MB
spring.servlet.multipart.max-file-size=50MB
5. Front-end page
<!DOCTYPE html>
<html>
  <head>
    <meta charset="UTF-8" />
    <title>Multiple File Upload</title>
  </head>
  <body>
    <h2 id="Multiple-nbsp-File-nbsp-Upload">Multiple File Upload</h2>
    <form>
      <input type="file" id="fileInput" multiple />
      <button type="button" onclick="uploadFiles()">Upload</button>
    </form>
    <div id="progress"></div>
    <div>图片返回值地址:</div>
    <div id="result"></div>
  </body>
  <script>
    function uploadFiles() {
      const files = document.getElementById("fileInput").files;
      const xhr = new XMLHttpRequest();
      const formData = new FormData();

      for (let i = 0; i < files.length; i++) {
        formData.append("file", files[i]);
      }

      xhr.open("POST", "http://localhost:8088/posts/upload");
      xhr.upload.addEventListener("progress", function (event) {
        if (event.lengthComputable) {
          const percent = Math.round((event.loaded / event.total) * 100);
          const progress = document.getElementById("progress");
          progress.innerHTML = "Upload progress: " + percent + "%";
        }
      });
      xhr.addEventListener("load", function (event) {
        const response = JSON.parse(event.target.responseText);
        console.log(response);
        // 在HTML页面上找到需要显示响应结果的元素
        const resultElement = document.getElementById("result");
        // 更新元素的文本内容为服务器返回的值
        resultElement.textContent = response;
      });
      xhr.send(formData);
    }
  </script>
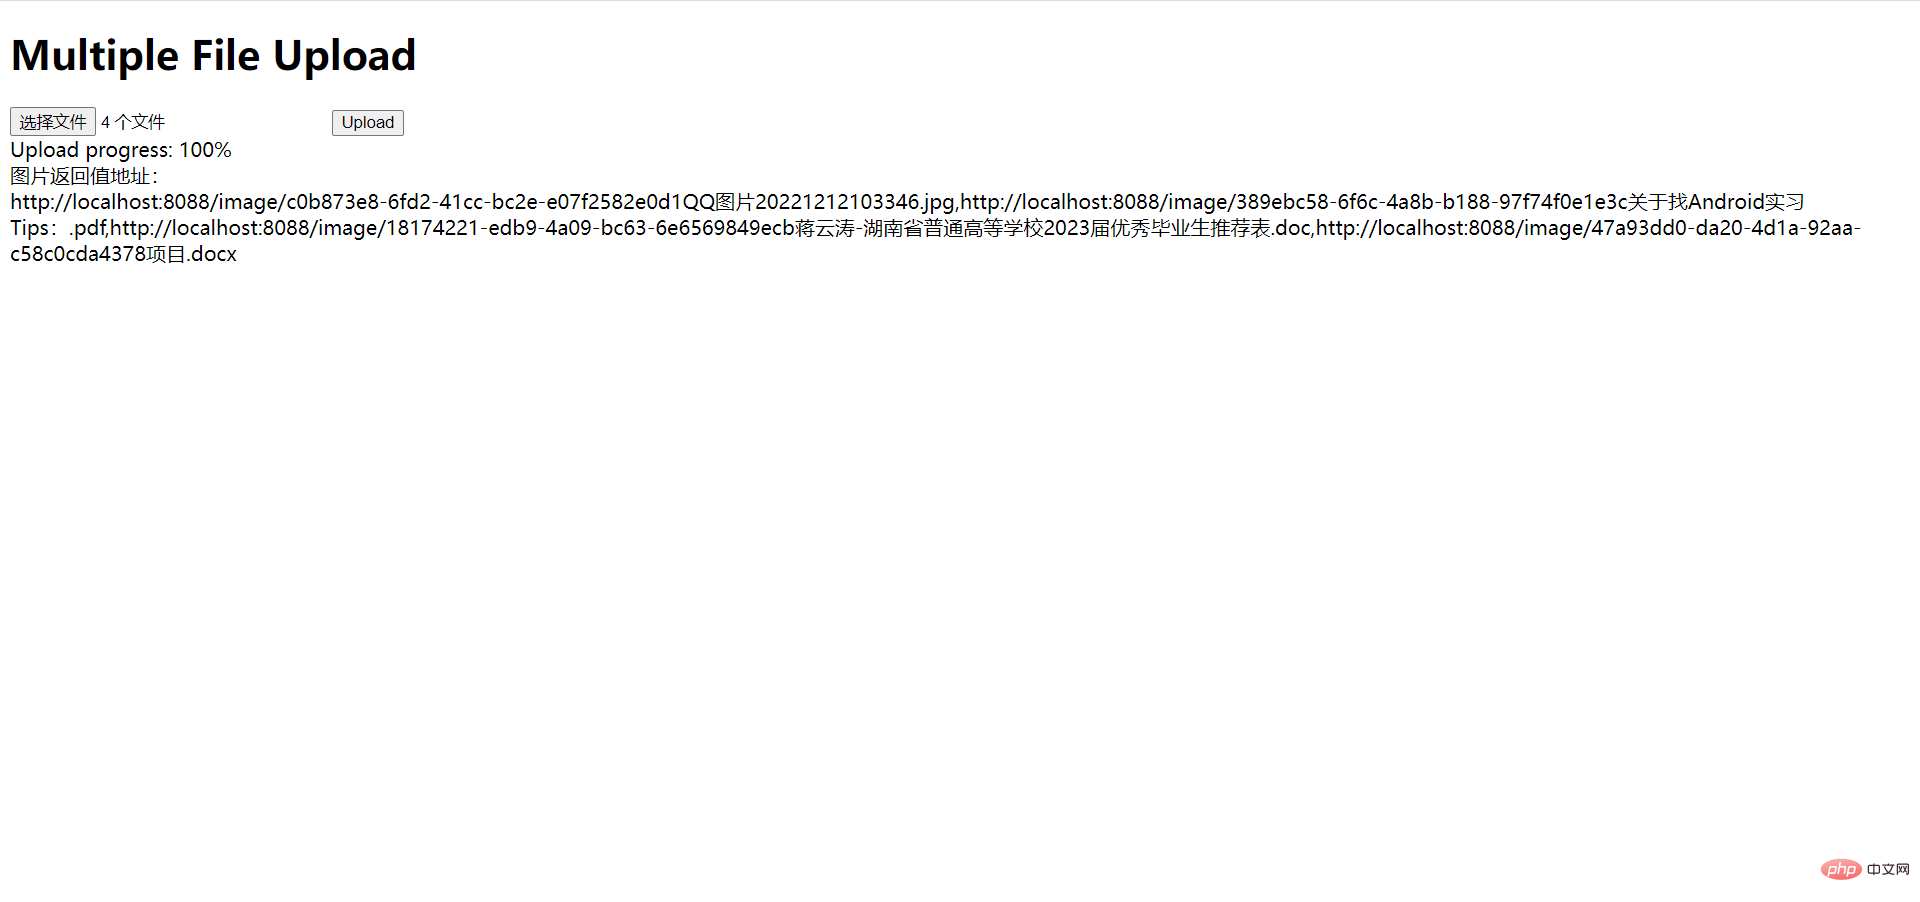
</html>6. Effect display

7. Get the url of the image and read it Picture

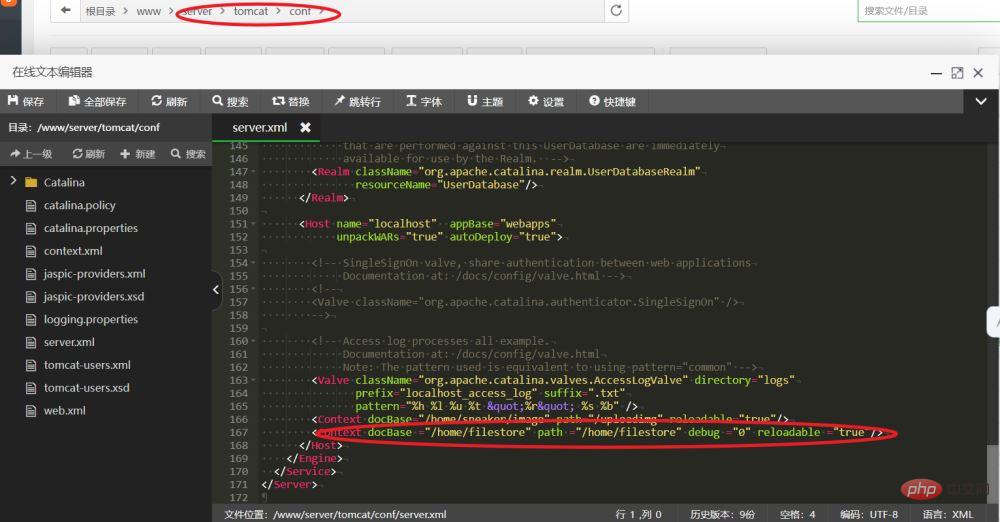
Modify tomcat’s server.xml file

Add the following sentence
<Context docBase ="/home/springbootVue/files" path ="/home/springbootVue/files" debug ="0" reloadable ="true"/>
// 	docBase代表文件路径,path是浏览器访问时的路径。
// 若自己创建的文件夹在tomcat目录的webapps中,不同之处: docBase直接写文件夹文字即可(注意:没有/) 例如 docBase ="home/springbootVue/files"
The above is the detailed content of How SpringBoot implements multiple file uploads. For more information, please follow other related articles on the PHP Chinese website!

Hot AI Tools

Undresser.AI Undress
AI-powered app for creating realistic nude photos

AI Clothes Remover
Online AI tool for removing clothes from photos.

Undress AI Tool
Undress images for free

Clothoff.io
AI clothes remover

AI Hentai Generator
Generate AI Hentai for free.

Hot Article

Hot Tools

Notepad++7.3.1
Easy-to-use and free code editor

SublimeText3 Chinese version
Chinese version, very easy to use

Zend Studio 13.0.1
Powerful PHP integrated development environment

Dreamweaver CS6
Visual web development tools

SublimeText3 Mac version
God-level code editing software (SublimeText3)

Hot Topics
 How Springboot integrates Jasypt to implement configuration file encryption
Jun 01, 2023 am 08:55 AM
Introduction to Jasypt Jasypt is a java library that allows a developer to add basic encryption functionality to his/her project with minimal effort and does not require a deep understanding of how encryption works. High security for one-way and two-way encryption. , standards-based encryption technology. Encrypt passwords, text, numbers, binaries... Suitable for integration into Spring-based applications, open API, for use with any JCE provider... Add the following dependency: com.github.ulisesbocchiojasypt-spring-boot-starter2. 1.1Jasypt benefits protect our system security. Even if the code is leaked, the data source can be guaranteed.
 How to use Redis to implement distributed locks in SpringBoot
Jun 03, 2023 am 08:16 AM
1. Redis implements distributed lock principle and why distributed locks are needed. Before talking about distributed locks, it is necessary to explain why distributed locks are needed. The opposite of distributed locks is stand-alone locks. When we write multi-threaded programs, we avoid data problems caused by operating a shared variable at the same time. We usually use a lock to mutually exclude the shared variables to ensure the correctness of the shared variables. Its scope of use is in the same process. If there are multiple processes that need to operate a shared resource at the same time, how can they be mutually exclusive? Today's business applications are usually microservice architecture, which also means that one application will deploy multiple processes. If multiple processes need to modify the same row of records in MySQL, in order to avoid dirty data caused by out-of-order operations, distribution needs to be introduced at this time. The style is locked. Want to achieve points
 How SpringBoot integrates Redisson to implement delay queue
May 30, 2023 pm 02:40 PM
Usage scenario 1. The order was placed successfully but the payment was not made within 30 minutes. The payment timed out and the order was automatically canceled. 2. The order was signed and no evaluation was conducted for 7 days after signing. If the order times out and is not evaluated, the system defaults to a positive rating. 3. The order is placed successfully. If the merchant does not receive the order for 5 minutes, the order is cancelled. 4. The delivery times out, and push SMS reminder... For scenarios with long delays and low real-time performance, we can Use task scheduling to perform regular polling processing. For example: xxl-job Today we will pick
 How to solve the problem that springboot cannot access the file after reading it into a jar package
Jun 03, 2023 pm 04:38 PM
Springboot reads the file, but cannot access the latest development after packaging it into a jar package. There is a situation where springboot cannot read the file after packaging it into a jar package. The reason is that after packaging, the virtual path of the file is invalid and can only be accessed through the stream. Read. The file is under resources publicvoidtest(){Listnames=newArrayList();InputStreamReaderread=null;try{ClassPathResourceresource=newClassPathResource("name.txt");Input
 Comparison and difference analysis between SpringBoot and SpringMVC
Dec 29, 2023 am 11:02 AM
SpringBoot and SpringMVC are both commonly used frameworks in Java development, but there are some obvious differences between them. This article will explore the features and uses of these two frameworks and compare their differences. First, let's learn about SpringBoot. SpringBoot was developed by the Pivotal team to simplify the creation and deployment of applications based on the Spring framework. It provides a fast, lightweight way to build stand-alone, executable
 How SpringBoot customizes Redis to implement cache serialization
Jun 03, 2023 am 11:32 AM
1. Customize RedisTemplate1.1, RedisAPI default serialization mechanism. The API-based Redis cache implementation uses the RedisTemplate template for data caching operations. Here, open the RedisTemplate class and view the source code information of the class. publicclassRedisTemplateextendsRedisAccessorimplementsRedisOperations, BeanClassLoaderAware{//Declare key, Various serialization methods of value, the initial value is empty @NullableprivateRedisSe
 How to implement Springboot+Mybatis-plus without using SQL statements to add multiple tables
Jun 02, 2023 am 11:07 AM
When Springboot+Mybatis-plus does not use SQL statements to perform multi-table adding operations, the problems I encountered are decomposed by simulating thinking in the test environment: Create a BrandDTO object with parameters to simulate passing parameters to the background. We all know that it is extremely difficult to perform multi-table operations in Mybatis-plus. If you do not use tools such as Mybatis-plus-join, you can only configure the corresponding Mapper.xml file and configure The smelly and long ResultMap, and then write the corresponding sql statement. Although this method seems cumbersome, it is highly flexible and allows us to
 How to get the value in application.yml in springboot
Jun 03, 2023 pm 06:43 PM
In projects, some configuration information is often needed. This information may have different configurations in the test environment and the production environment, and may need to be modified later based on actual business conditions. We cannot hard-code these configurations in the code. It is best to write them in the configuration file. For example, you can write this information in the application.yml file. So, how to get or use this address in the code? There are 2 methods. Method 1: We can get the value corresponding to the key in the configuration file (application.yml) through the ${key} annotated with @Value. This method is suitable for situations where there are relatively few microservices. Method 2: In actual projects, When business is complicated, logic


