

Gitlab CI-CD method to automatically deploy SpringBoot projects

1. Overview
This article mainly records how to automatically deploy the SpringBoot project jar package through Gitlab CI/CD.
2. Early preparation
Prepare three CentOS7 servers and deploy the following services respectively:
| Serial number | System | IP | Service |
|---|---|---|---|
| 1 | CentOS7 | 192.168.56.10 | Gitlab |
| 2 | CentOS7 | 192.168.56.11 | Runner (install Docker) |
| 3 | CentOS7 | 192.168.56.12 | SpringBoot project jar package (install jdk, maven, etc.) |
The above services can also use only one CentOS7 and deploy all programs on the same machine, but it is more recommended to deploy them separately;
3. Overall architecture diagram

Description:
Gitlab Server is used to deploy Gitlab remote warehouse. It has high CPU and memory requirements. It is recommended to have a 4-core CPU and more than 4GB of memory;
Runner Server is used to deploy and execute the stage defined in the .gitlab-ci.yml file; you need to have permission to access the Gitlab warehouse, you can download the code and implement it through registration (gitlab-runner register) ;
Your Laptop Server user deploys your application, here is the SpringBoot jar package, you need to install JDK and Maven in advance and configure the environment variables;
4. Environment setup
1. Environment preparation (optional)
Execute the following commands on three servers:
1 2 3 |
|
2. Gitlab installation
Reference address:
https://about.gitlab.com/install/#centos-7
https://www.xieniao.com/article/188877.htm
(1) Install and configure necessary dependencies
1 2 3 4 5 6 7 |
|
(2) Install mail service
1 2 3 |
|
(3) Add gitlab mirror
1 |
|
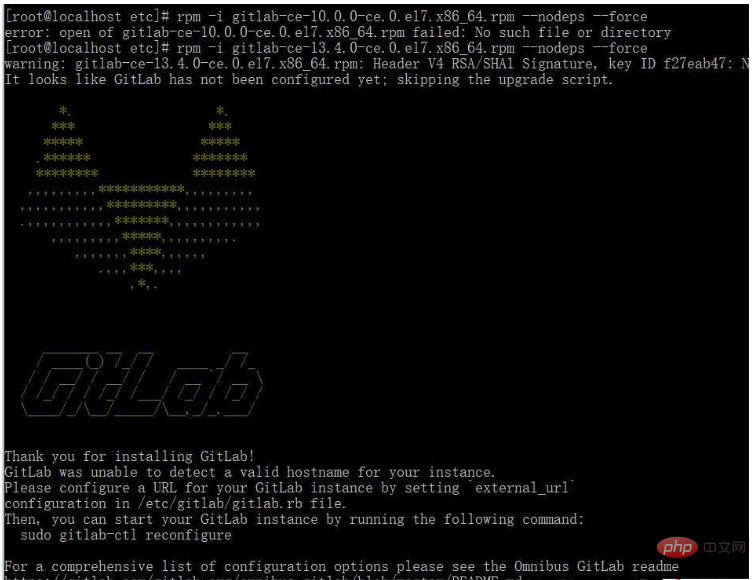
(4) Install gitlab installation command
1 |
|
Picture after successful installation:
(5) Modify the gitlab configuration file to specify the server IP and custom port
1 |
|
(6) Reset and start GitLab
1 2 |
|
The prompt "ok: run:" indicates successful startup
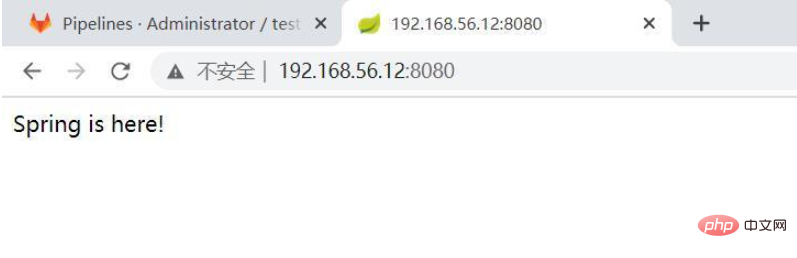
(7) Visit the GitLab page
If 502 is reported, wait for a while Try refreshing after a certain amount of time, usually about 1-2 minutes.

The account set in this article: root, new password: 11112222
3. Install Runner
(1) Download one Binary file
1 |
|
(2) Modify execution permissions
1 |
|
(3) Create GitLab CI user
1 |
|
(4) Install and run as a service
1 2 |
|
If you encounter the prompt sudo: gitlab-runner: command not found, switch to the root user, you can remove sudo and execute the above command.
(5) Register Runner
Reference address: https://docs.gitlab.com/runner/register/index.html
Execute gitlab-runner register command:
1 2 3 4 5 6 7 8 9 10 11 12 13 14 15 16 17 18 19 20 21 22 23 |
|
Note: The docker method is selected here, so additional docker needs to be installed on the server
1 2 3 4 5 6 7 8 9 10 11 12 13 14 15 16 17 18 19 20 21 22 23 24 25 26 27 28 29 30 31 32 33 34 35 36 37 38 39 40 41 42 43 44 45 46 47 48 |
|
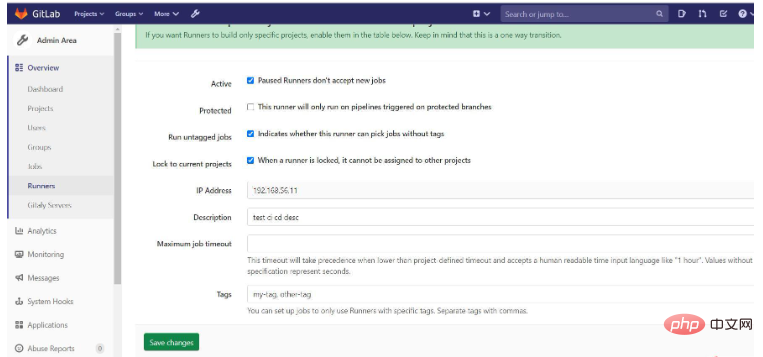
Register a globally shared Runner here (administrator Permissions, copy server address and Token), can be used by all projects, or you can register a separate Runner at the project level (enter the project Runner settings page, copy the address and Token).

After successful registration, the registered Runner can be viewed in the Runner list

Check :Run untagged jobs Indicates whether this runner can pick jobs without tags
4. Install the application server environment
(1) Allow users to log in remotely (Optional)
1 2 3 4 5 6 7 |
|
(2) Install JDK1.8
(2) Decompress
1 2 3 |
|
(3) Configure environment variables
1 2 3 4 5 6 7 8 9 10 |
|
(3 ) Install Maven3.3.9
(2) Unzip
1 2 3 4 |
|
(3) Configure environment variables
1 2 3 4 5 6 7 8 9 |
|
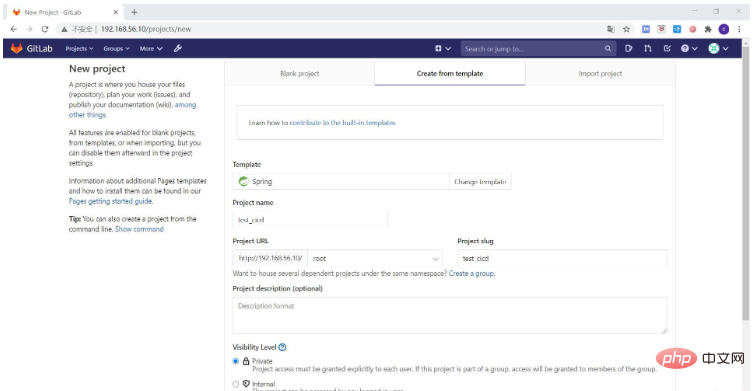
5. Create SpringBoot project
1. Use Gitlab Spring template quickly creates a SpringBoot project;
If an error is reported, delete this line in pom.xml
If you report this error:
[FATAL] Non-resolvable parent POM for com.example:demo:0.0.1-SNAPSHOT: Could not transfer artifact org.springframework.boot:spring-boot-starter- parent:pom:2.0.1.RELEASE from/to central (https://repo.maven.apache.org/maven2): Connect to repo.maven.apache.org:443 [repo.maven.apache.org/151.101 .40.215] failed: Connection timed out (Connection timed out) and 'parent.relativePath' points at wrong local POM @ line 14, column 10
Modified version
1.5.9 .RELEASE
2、添加环境变量(登录应用服务器密码)
注: 其中 ssh_password 这个添加到环境变量中,取消勾选 Protect Branch (仅保护分支);修改和添加都是默认勾选,需要取消,否则,其他分支不能读取到该变量;

先在应用服务器上创建一个目录,用于上传存放项目 jar 包:
1 |
|
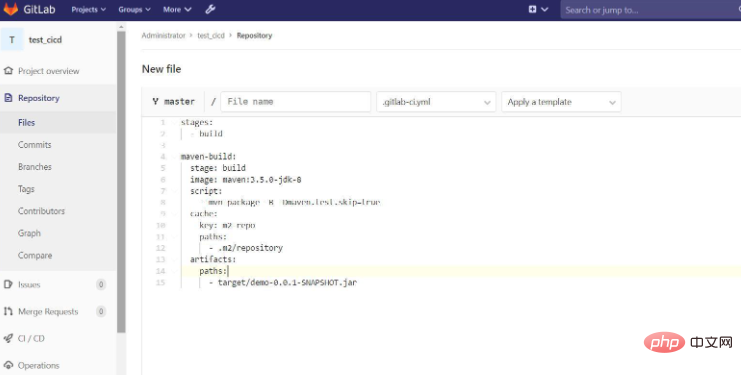
添加 .gitlab-ci.yml 文件时,可以先再 CI/CD Pipeline 中 的 CI Lint 中检验 .gitlab-ci.yml 文件格式
1 2 3 4 5 6 7 8 9 10 11 12 13 14 15 16 17 18 19 20 21 22 23 24 25 26 27 28 29 30 31 32 33 34 35 36 37 38 39 40 41 |
|
这里使用了DockerHub上面的一个公共镜像(ictu/sshpass),主要是想使用启动自带的sshpass命令执行scp和ssh命令。
如果一切顺利的话,就会自动触发 CI/CD ;失败的话查看报错信息,可使用 Debug 模式执行调试命令 。
1 2 3 4 5 |
|
可能遇到的问题总结:
权限问题:可以先使用 root 用户看看是不是权限问题导致,如果是的话,提升执行用户的权限;并发问题:这里没有修改 Runner 的并发数,可以修改同时可以进行的任务并发数;其他问题:读取不到配置的环境变量,取消勾选仅保护分支的选项;
未执行job:没有勾选未配置 tags 也执行选项;
The above is the detailed content of Gitlab CI-CD method to automatically deploy SpringBoot projects. For more information, please follow other related articles on the PHP Chinese website!

Hot AI Tools

Undresser.AI Undress
AI-powered app for creating realistic nude photos

AI Clothes Remover
Online AI tool for removing clothes from photos.

Undress AI Tool
Undress images for free

Clothoff.io
AI clothes remover

Video Face Swap
Swap faces in any video effortlessly with our completely free AI face swap tool!
Hot Article
Hot Tools

Notepad++7.3.1
Easy-to-use and free code editor

SublimeText3 Chinese version
Chinese version, very easy to use

Zend Studio 13.0.1
Powerful PHP integrated development environment

Dreamweaver CS6
Visual web development tools

SublimeText3 Mac version
God-level code editing software (SublimeText3)
Hot Topics
 1387
1387
 52
52

 How to use Redis to implement distributed locks in SpringBoot
Jun 03, 2023 am 08:16 AM
How to use Redis to implement distributed locks in SpringBoot
Jun 03, 2023 am 08:16 AM
1. Redis implements distributed lock principle and why distributed locks are needed. Before talking about distributed locks, it is necessary to explain why distributed locks are needed. The opposite of distributed locks is stand-alone locks. When we write multi-threaded programs, we avoid data problems caused by operating a shared variable at the same time. We usually use a lock to mutually exclude the shared variables to ensure the correctness of the shared variables. Its scope of use is in the same process. If there are multiple processes that need to operate a shared resource at the same time, how can they be mutually exclusive? Today's business applications are usually microservice architecture, which also means that one application will deploy multiple processes. If multiple processes need to modify the same row of records in MySQL, in order to avoid dirty data caused by out-of-order operations, distribution needs to be introduced at this time. The style is locked. Want to achieve points
 How to solve the problem that springboot cannot access the file after reading it into a jar package
Jun 03, 2023 pm 04:38 PM
How to solve the problem that springboot cannot access the file after reading it into a jar package
Jun 03, 2023 pm 04:38 PM
Springboot reads the file, but cannot access the latest development after packaging it into a jar package. There is a situation where springboot cannot read the file after packaging it into a jar package. The reason is that after packaging, the virtual path of the file is invalid and can only be accessed through the stream. Read. The file is under resources publicvoidtest(){Listnames=newArrayList();InputStreamReaderread=null;try{ClassPathResourceresource=newClassPathResource("name.txt");Input
 How to use GitLab for project document management
Oct 20, 2023 am 10:40 AM
How to use GitLab for project document management
Oct 20, 2023 am 10:40 AM
How to use GitLab for project document management 1. Background introduction In the software development process, project documents are very important information. They can not only help the development team understand the needs and design of the project, but also provide reference to the testing team and customers. In order to facilitate version control and team collaboration of project documents, we can use GitLab for project document management. GitLab is a version control system based on Git. In addition to supporting code management, it can also manage project documents. 2. GitLab environment setup First, I
 Comparison and difference analysis between SpringBoot and SpringMVC
Dec 29, 2023 am 11:02 AM
Comparison and difference analysis between SpringBoot and SpringMVC
Dec 29, 2023 am 11:02 AM
SpringBoot and SpringMVC are both commonly used frameworks in Java development, but there are some obvious differences between them. This article will explore the features and uses of these two frameworks and compare their differences. First, let's learn about SpringBoot. SpringBoot was developed by the Pivotal team to simplify the creation and deployment of applications based on the Spring framework. It provides a fast, lightweight way to build stand-alone, executable
 How SpringBoot customizes Redis to implement cache serialization
Jun 03, 2023 am 11:32 AM
How SpringBoot customizes Redis to implement cache serialization
Jun 03, 2023 am 11:32 AM
1. Customize RedisTemplate1.1, RedisAPI default serialization mechanism. The API-based Redis cache implementation uses the RedisTemplate template for data caching operations. Here, open the RedisTemplate class and view the source code information of the class. publicclassRedisTemplateextendsRedisAccessorimplementsRedisOperations, BeanClassLoaderAware{//Declare key, Various serialization methods of value, the initial value is empty @NullableprivateRedisSe
 Centos offline installation of Chinese version of GitLab
Feb 19, 2024 am 11:36 AM
Centos offline installation of Chinese version of GitLab
Feb 19, 2024 am 11:36 AM
1. Download the gitlab installation package. Download the latest Chinese version of the gitlab installation package from [Tsinghua University Open Source Software Mirror Station]. The installation package comes with a simplified Chinese localization package. Download the latest gitlab installation package from [gitlab official website]. 2. Install gitlab, take gitlab-ce-14.9.4-ce.0.el7.x86_64 as an example, upload it to the centos server and use yum to install gitlabyum-yinstallgitlab-ce-14.3.2-ce.0.el7.x86_64. rpm uses yum to install gityum-yinstallgit#Install git and modify the gitlab configuration file vi
 How to get the value in application.yml in springboot
Jun 03, 2023 pm 06:43 PM
How to get the value in application.yml in springboot
Jun 03, 2023 pm 06:43 PM
In projects, some configuration information is often needed. This information may have different configurations in the test environment and the production environment, and may need to be modified later based on actual business conditions. We cannot hard-code these configurations in the code. It is best to write them in the configuration file. For example, you can write this information in the application.yml file. So, how to get or use this address in the code? There are 2 methods. Method 1: We can get the value corresponding to the key in the configuration file (application.yml) through the ${key} annotated with @Value. This method is suitable for situations where there are relatively few microservices. Method 2: In actual projects, When business is complicated, logic
 SpringBoot+Dubbo+Nacos development practical tutorial
Aug 15, 2023 pm 04:49 PM
SpringBoot+Dubbo+Nacos development practical tutorial
Aug 15, 2023 pm 04:49 PM
This article will write a detailed example to talk about the actual development of dubbo+nacos+Spring Boot. This article will not cover too much theoretical knowledge, but will write the simplest example to illustrate how dubbo can be integrated with nacos to quickly build a development environment.
