
High concurrency systems have three powerful tools: caching, downgrading and current limiting;
The purpose of current limiting is to protect the system by limiting the speed of concurrent access/requests. Once the limit is reached The rate can be denial of service (directed to the error page), waiting in line (quick kill), downgrade (returning to the bottom of the data or default data); Pool), limit the number of instantaneous concurrency (such as nginx's limit_conn module, used to limit the number of instantaneous concurrent connections), limit the average rate within the time window (nginx's limit_req module, used to limit the average rate per second);
In addition, you can also limit the flow based on the number of network connections, network traffic, cpu or memory load, etc.
1. Current limiting algorithmThe counter method is the simplest and easiest to implement among the current limiting algorithms. For example, we stipulate that for interface a, the number of accesses in one minute cannot exceed 100.
Then we can set a counter counter with a valid time of 1 minute (that is, the counter will be reset to 0 every minute). Whenever a request comes, the counter will increase by 1. If the counter If the value is greater than 100, it means that there are too many requests;
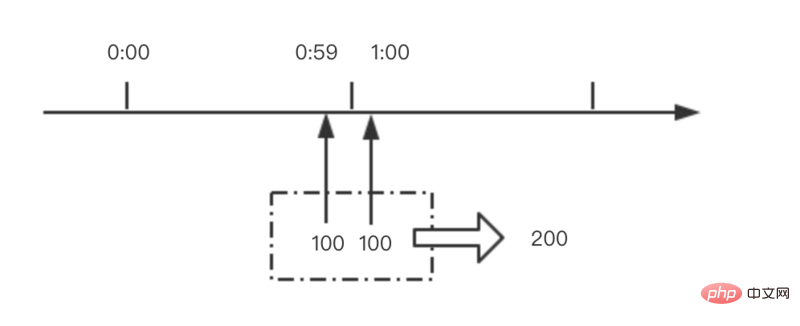
Although this algorithm is simple, it has a very fatal problem, which is the criticality problem.
As shown in the figure below, 100 requests arrive at the moment before 1:00, the 1:00 counter is reset, and 100 requests arrive at the moment after 1:00. Obviously the counter will not exceed 100, all requests None will be intercepted;
However, the number of requests during this period has reached 200, far exceeding 100.
As shown in the figure below, there is a leaky bucket with a fixed capacity, and water drops flow out at a constant fixed rate. ; If the bucket is empty, no water drops will flow out; the speed of water flowing into the leaky bucket is arbitrary; if the incoming water exceeds the capacity of the bucket, the incoming water will overflow (be discarded);
You can see that the leaky bucket algorithm inherently limits the speed of requests and can be used for traffic shaping and current limiting control;

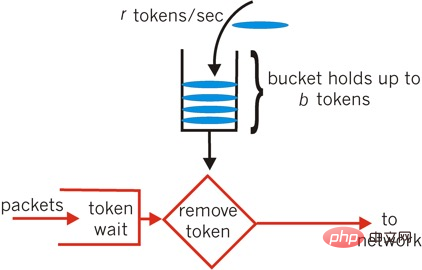
The token bucket is a bucket that stores tokens with a fixed capacity. Tokens are added to the bucket at a fixed rate r; a maximum of b tokens are stored in the bucket. When the bucket is full, newly added tokens Discarded;
When a request arrives, it will try to obtain the token from the bucket; if there is one, continue to process the request; if not, it will be queued or discarded directly;
can be found, The outflow rate of the leaky bucket algorithm is constant or 0, while the outflow rate of the token bucket algorithm may be greater than r;
Before learning the current limiting module, you need to understand nginx’s http request processing process, nginx event processing process, etc.;
2.1http request processing processnginx divides the http request processing process into 11 stages, most of which The http module will add its own handler to a certain stage (four stages cannot add custom handlers). When nginx processes http requests, it will call all handlers one by one;
typedef enum {
 ngx_http_post_read_phase = 0, //目前只有realip模块会注册handler(nginx作为代理服务器时有用,后端以此获取客户端原始ip)

 ngx_http_server_rewrite_phase, //server块中配置了rewrite指令,重写url

 ngx_http_find_config_phase, //查找匹配location;不能自定义handler;
 ngx_http_rewrite_phase,  //location块中配置了rewrite指令,重写url
 ngx_http_post_rewrite_phase, //检查是否发生了url重写,如果有,重新回到find_config阶段;不能自定义handler;

 ngx_http_preaccess_phase,  //访问控制,限流模块会注册handler到此阶段

 ngx_http_access_phase,  //访问权限控制
 ngx_http_post_access_phase, //根据访问权限控制阶段做相应处理;不能自定义handler;

 ngx_http_try_files_phase,  //只有配置了try_files指令,才会有此阶段;不能自定义handler;
 ngx_http_content_phase,  //内容产生阶段,返回响应给客户端

 ngx_http_log_phase   //日志记录
} ngx_http_phases;nginx uses the structure ngx_module_s to represent A module, in which the field ctx is a pointer to the module context structure; nginx's http module context structure is as follows (the fields of the context structure are all function pointers):
typedef struct {
 ngx_int_t (*preconfiguration)(ngx_conf_t *cf);
 ngx_int_t (*postconfiguration)(ngx_conf_t *cf); //此方法注册handler到相应阶段

 void  *(*create_main_conf)(ngx_conf_t *cf); //http块中的主配置
 char  *(*init_main_conf)(ngx_conf_t *cf, void *conf);

 void  *(*create_srv_conf)(ngx_conf_t *cf); //server配置
 char  *(*merge_srv_conf)(ngx_conf_t *cf, void *prev, void *conf);

 void  *(*create_loc_conf)(ngx_conf_t *cf); //location配置
 char  *(*merge_loc_conf)(ngx_conf_t *cf, void *prev, void *conf);
} ngx_http_module_t;Take the ngx_http_limit_req_module module For example, the postconfiguration method is simply implemented as follows:
static ngx_int_t ngx_http_limit_req_init(ngx_conf_t *cf)
{
 h = ngx_array_push(&cmcf->phases[ngx_http_preaccess_phase].handlers);

 *h = ngx_http_limit_req_handler; //ngx_http_limit_req_module模块的限流方法;nginx处理http请求时,都会调用此方法判断应该继续执行还是拒绝请求

 return ngx_ok;
}Assume that nginx uses epoll.
nginx needs to register all the fds it cares about to epoll, and add the method life as follows:
static ngx_int_t ngx_epoll_add_event(ngx_event_t *ev, ngx_int_t event, ngx_uint_t flags);
The first parameter of the method is the ngx_event_t structure pointer, which represents a read or write event of concern; nginx A timeout timer may be set for the event to handle the event timeout situation; the definition is as follows:
struct ngx_event_s {

 ngx_event_handler_pt handler; //函数指针:事件的处理函数

 ngx_rbtree_node_t timer;  //超时定时器,存储在红黑树中(节点的key即为事件的超时时间)

 unsigned   timedout:1; //记录事件是否超时

};Generally, epoll_wait is called cyclically to monitor all fds and handle the read and write events that occur; epoll_wait is a blocking call, and the last one The parameter timeout is the timeout, that is, the maximum blocking timeout time. If no event occurs, the method will return;
When nginx sets the timeout timeout, it will search from the red-black tree that records the timeout timer mentioned above. The node that is due to expire recently is used as the timeout time of epoll_wait, as shown in the following code;
ngx_msec_t ngx_event_find_timer(void)
{
 node = ngx_rbtree_min(root, sentinel);
 timer = (ngx_msec_int_t) (node->key - ngx_current_msec);

 return (ngx_msec_t) (timer > 0 ? timer : 0);
}At the same time, nginx will check whether any events have expired from the red-black tree at the end of each cycle. If it expires, mark timeout=1 and call the event handler;
void ngx_event_expire_timers(void)
{
 for ( ;; ) {
  node = ngx_rbtree_min(root, sentinel);

  if ((ngx_msec_int_t) (node->key - ngx_current_msec) <= 0) { //当前事件已经超时
   ev = (ngx_event_t *) ((char *) node - offsetof(ngx_event_t, timer));

   ev->timedout = 1;

   ev->handler(ev);

   continue;
  }

  break;
 }
}nginx就是通过上面的方法实现了socket事件的处理,定时事件的处理;
ngx_http_limit_req_module模块解析
ngx_http_limit_req_module模块是对请求进行限流,即限制某一时间段内用户的请求速率;且使用的是令牌桶算法;
3.1配置指令
ngx_http_limit_req_module模块提供一下配置指令,供用户配置限流策略
//每个配置指令主要包含两个字段:名称,解析配置的处理方法
static ngx_command_t ngx_http_limit_req_commands[] = {

 //一般用法:limit_req_zone $binary_remote_addr zone=one:10m rate=1r/s;
 //$binary_remote_addr表示远程客户端ip;
 //zone配置一个存储空间(需要分配空间记录每个客户端的访问速率,超时空间限制使用lru算法淘汰;注意此空间是在共享内存分配的,所有worker进程都能访问)
 //rate表示限制速率,此例为1qps
 { ngx_string("limit_req_zone"),
  ngx_http_limit_req_zone,
  },

 //用法:limit_req zone=one burst=5 nodelay;
 //zone指定使用哪一个共享空间
 //超出此速率的请求是直接丢弃吗?burst配置用于处理突发流量,表示最大排队请求数目,当客户端请求速率超过限流速率时,请求会排队等待;而超出burst的才会被直接拒绝;
 //nodelay必须与burst一起使用;此时排队等待的请求会被优先处理;否则假如这些请求依然按照限流速度处理,可能等到服务器处理完成后,客户端早已超时
 { ngx_string("limit_req"),
  ngx_http_limit_req,
  },

 //当请求被限流时,日志记录级别;用法:limit_req_log_level info | notice | warn | error;
 { ngx_string("limit_req_log_level"),
  ngx_conf_set_enum_slot,
  },

 //当请求被限流时,给客户端返回的状态码;用法:limit_req_status 503
 { ngx_string("limit_req_status"),
  ngx_conf_set_num_slot,
 },
};注意:$binary_remote_addr是nginx提供的变量,用户在配置文件中可以直接使用;nginx还提供了许多变量,在ngx_http_variable.c文件中查找ngx_http_core_variables数组即可:
static ngx_http_variable_t ngx_http_core_variables[] = {

 { ngx_string("http_host"), null, ngx_http_variable_header,
  offsetof(ngx_http_request_t, headers_in.host), 0, 0 },

 { ngx_string("http_user_agent"), null, ngx_http_variable_header,
  offsetof(ngx_http_request_t, headers_in.user_agent), 0, 0 },
 …………
}3.2源码解析
ngx_http_limit_req_module在postconfiguration过程会注册ngx_http_limit_req_handler方法到http处理的ngx_http_preaccess_phase阶段;
ngx_http_limit_req_handler会执行漏桶算法,判断是否超出配置的限流速率,从而进行丢弃或者排队或者通过;
当用户第一次请求时,会新增一条记录(主要记录访问计数、访问时间),以客户端ip地址(配置$binary_remote_addr)的hash值作为key存储在红黑树中(快速查找),同时存储在lru队列中(存储空间不够时,淘汰记录,每次都是从尾部删除);当用户再次请求时,会从红黑树中查找这条记录并更新,同时移动记录到lru队列首部;
3.2.1数据结构
limit_req_zone配置限流算法所需的存储空间(名称及大小),限流速度,限流变量(客户端ip等),结构如下:
typedef struct {
 ngx_http_limit_req_shctx_t *sh;
 ngx_slab_pool_t    *shpool;//内存池
 ngx_uint_t     rate; //限流速度(qps乘以1000存储)
 ngx_int_t     index; //变量索引(nginx提供了一系列变量,用户配置的限流变量索引)
 ngx_str_t     var; //限流变量名称
 ngx_http_limit_req_node_t *node;
} ngx_http_limit_req_ctx_t;

//同时会初始化共享存储空间
struct ngx_shm_zone_s {
 void      *data; //data指向ngx_http_limit_req_ctx_t结构
 ngx_shm_t     shm; //共享空间
 ngx_shm_zone_init_pt  init; //初始化方法函数指针
 void      *tag; //指向ngx_http_limit_req_module结构体
};limit_req配置限流使用的存储空间,排队队列大小,是否紧急处理,结构如下:
typedef struct {
 ngx_shm_zone_t    *shm_zone; //共享存储空间

 ngx_uint_t     burst;  //队列大小
 ngx_uint_t     nodelay; //有请求排队时是否紧急处理,与burst配合使用(如果配置,则会紧急处理排队请求,否则依然按照限流速度处理)
} ngx_http_limit_req_limit_t;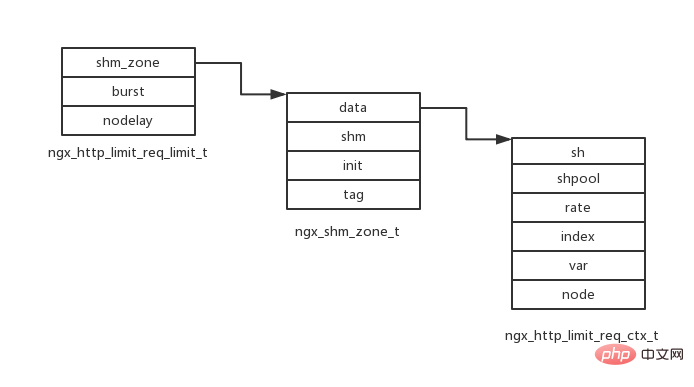
前面说过用户访问记录会同时存储在红黑树与lru队列中,结构如下:
//记录结构体
typedef struct {
 u_char      color;
 u_char      dummy;
 u_short      len; //数据长度
 ngx_queue_t     queue;
 ngx_msec_t     last; //上次访问时间

 ngx_uint_t     excess; //当前剩余待处理的请求数(nginx用此实现令牌桶限流算法)
 ngx_uint_t     count; //此类记录请求的总数
 u_char      data[1];//数据内容(先按照key(hash值)查找,再比较数据内容是否相等)
} ngx_http_limit_req_node_t;

//红黑树节点,key为用户配置限流变量的hash值;
struct ngx_rbtree_node_s {
 ngx_rbtree_key_t  key;
 ngx_rbtree_node_t  *left;
 ngx_rbtree_node_t  *right;
 ngx_rbtree_node_t  *parent;
 u_char     color;
 u_char     data;
};


typedef struct {
 ngx_rbtree_t     rbtree; //红黑树
 ngx_rbtree_node_t    sentinel; //nil节点
 ngx_queue_t     queue; //lru队列
} ngx_http_limit_req_shctx_t;

//队列只有prev和next指针
struct ngx_queue_s {
 ngx_queue_t *prev;
 ngx_queue_t *next;
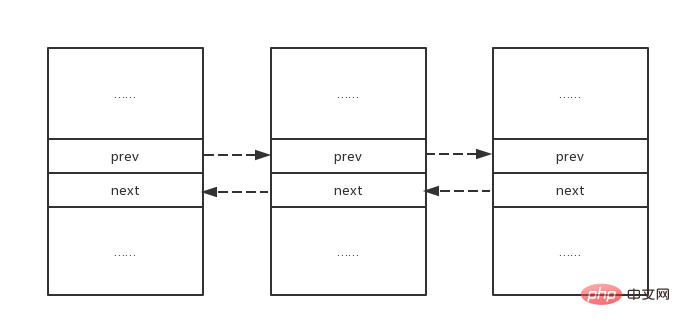
};思考1:ngx_http_limit_req_node_t记录通过prev和next指针形成双向链表,实现lru队列;最新访问的节点总会被插入链表头部,淘汰时从尾部删除节点;
ngx_http_limit_req_ctx_t *ctx;
ngx_queue_t    *q;

q = ngx_queue_last(&ctx->sh->queue);

lr = ngx_queue_data(q, ngx_http_limit_req_node_t, queue);//此方法由ngx_queue_t获取ngx_http_limit_req_node_t结构首地址,实现如下:

#define ngx_queue_data(q, type, link) (type *) ((u_char *) q - offsetof(type, link)) //queue字段地址减去其在结构体中偏移,为结构体首地址
思考2:限流算法首先使用key查找红黑树节点,从而找到对应的记录,红黑树节点如何与记录ngx_http_limit_req_node_t结构关联起来呢?在ngx_http_limit_req_module模块可以找到以代码:
size = offsetof(ngx_rbtree_node_t, color) //新建记录分配内存,计算所需空间大小
  + offsetof(ngx_http_limit_req_node_t, data)
  + len;

node = ngx_slab_alloc_locked(ctx->shpool, size);

node->key = hash;

lr = (ngx_http_limit_req_node_t *) &node->color; //color为u_char类型,为什么能强制转换为ngx_http_limit_req_node_t指针类型呢?

lr->len = (u_char) len;
lr->excess = 0;

ngx_memcpy(lr->data, data, len);

ngx_rbtree_insert(&ctx->sh->rbtree, node);

ngx_queue_insert_head(&ctx->sh->queue, &lr->queue);
通过分析上面代码,ngx_rbtree_node_s结构体的color与data字段其实是无意义的,结构体的生命形式与最终存储形式是不同的,nginx最终使用以下存储形式存储每条记录;
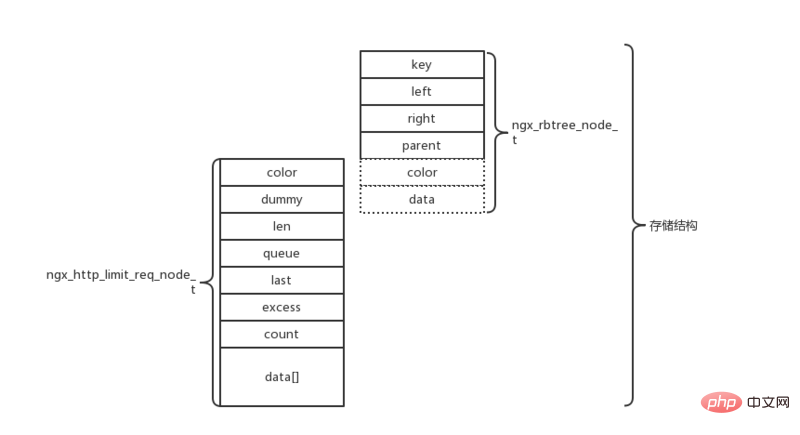
3.2.2限流算法
上面提到在postconfiguration过程会注册ngx_http_limit_req_handler方法到http处理的ngx_http_preaccess_phase阶段;
因此在处理http请求时,会执行ngx_http_limit_req_handler方法判断是否需要限流;
3.2.2.1漏桶算法实现
用户可能同时配置若干限流,因此对于http请求,nginx需要遍历所有限流策略,判断是否需要限流;
ngx_http_limit_req_lookup方法实现了漏桶算法,方法返回3种结果:
ngx_busy:请求速率超出限流配置,拒绝请求;
ngx_again:请求通过了当前限流策略校验,继续校验下一个限流策略;
ngx_ok:请求已经通过了所有限流策略的校验,可以执行下一阶段;
ngx_error:出错
//limit,限流策略;hash,记录key的hash值;data,记录key的数据内容;len,记录key的数据长度;ep,待处理请求数目;account,是否是最后一条限流策略
static ngx_int_t ngx_http_limit_req_lookup(ngx_http_limit_req_limit_t *limit, ngx_uint_t hash, u_char *data, size_t len, ngx_uint_t *ep, ngx_uint_t account)
{
 //红黑树查找指定界定
 while (node != sentinel) {

  if (hash < node->key) {
   node = node->left;
   continue;
  }

  if (hash > node->key) {
   node = node->right;
   continue;
  }

  //hash值相等,比较数据是否相等
  lr = (ngx_http_limit_req_node_t *) &node->color;

  rc = ngx_memn2cmp(data, lr->data, len, (size_t) lr->len);
  //查找到
  if (rc == 0) {
   ngx_queue_remove(&lr->queue);
   ngx_queue_insert_head(&ctx->sh->queue, &lr->queue); //将记录移动到lru队列头部

   ms = (ngx_msec_int_t) (now - lr->last); //当前时间减去上次访问时间

   excess = lr->excess - ctx->rate * ngx_abs(ms) / 1000 + 1000; //待处理请求书-限流速率*时间段+1个请求(速率,请求数等都乘以1000了)

   if (excess < 0) {
    excess = 0;
   }

   *ep = excess;

   //待处理数目超过burst(等待队列大小),返回ngx_busy拒绝请求(没有配置burst时,值为0)
   if ((ngx_uint_t) excess > limit->burst) {
    return ngx_busy;
   }

   if (account) { //如果是最后一条限流策略,则更新上次访问时间,待处理请求数目,返回ngx_ok
    lr->excess = excess;
    lr->last = now;
    return ngx_ok;
   }
   //访问次数递增
   lr->count++;

   ctx->node = lr;

   return ngx_again; //非最后一条限流策略,返回ngx_again,继续校验下一条限流策略
  }

  node = (rc < 0) ? node->left : node->right;
 }

 //假如没有查找到节点,需要新建一条记录
 *ep = 0;
 //存储空间大小计算方法参照3.2.1节数据结构
 size = offsetof(ngx_rbtree_node_t, color)
   + offsetof(ngx_http_limit_req_node_t, data)
   + len;
 //尝试淘汰记录(lru)
 ngx_http_limit_req_expire(ctx, 1);


 node = ngx_slab_alloc_locked(ctx->shpool, size);//分配空间
 if (node == null) { //空间不足,分配失败
  ngx_http_limit_req_expire(ctx, 0); //强制淘汰记录

  node = ngx_slab_alloc_locked(ctx->shpool, size); //分配空间
  if (node == null) { //分配失败,返回ngx_error
   return ngx_error;
  }
 }

 node->key = hash; //赋值
 lr = (ngx_http_limit_req_node_t *) &node->color;
 lr->len = (u_char) len;
 lr->excess = 0;
 ngx_memcpy(lr->data, data, len);

 ngx_rbtree_insert(&ctx->sh->rbtree, node); //插入记录到红黑树与lru队列
 ngx_queue_insert_head(&ctx->sh->queue, &lr->queue);

 if (account) { //如果是最后一条限流策略,则更新上次访问时间,待处理请求数目,返回ngx_ok
  lr->last = now;
  lr->count = 0;
  return ngx_ok;
 }

 lr->last = 0;
 lr->count = 1;

 ctx->node = lr;

 return ngx_again; //非最后一条限流策略,返回ngx_again,继续校验下一条限流策略

}举个例子,假如burst配置为0,待处理请求数初始为excess;令牌产生周期为t;如下图所示
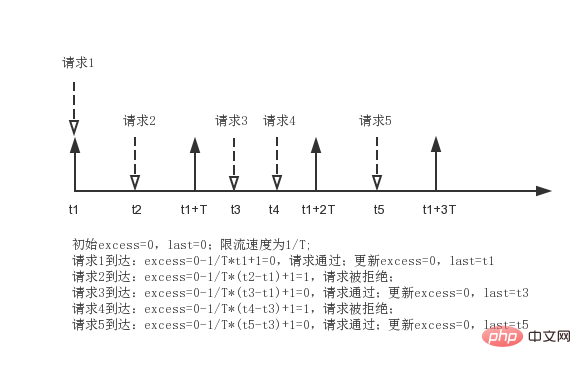
3.2.2.2lru淘汰策略
上一节叩痛算法中,会执行ngx_http_limit_req_expire淘汰一条记录,每次都是从lru队列末尾删除;
第二个参数n,当n==0时,强制删除末尾一条记录,之后再尝试删除一条或两条记录;n==1时,会尝试删除一条或两条记录;代码实现如下:
static void ngx_http_limit_req_expire(ngx_http_limit_req_ctx_t *ctx, ngx_uint_t n)
{
 //最多删除3条记录
 while (n < 3) {
  //尾部节点
  q = ngx_queue_last(&ctx->sh->queue);
  //获取记录
  lr = ngx_queue_data(q, ngx_http_limit_req_node_t, queue);

  //注意:当为0时,无法进入if代码块,因此一定会删除尾部节点;当n不为0时,进入if代码块,校验是否可以删除
  if (n++ != 0) {

   ms = (ngx_msec_int_t) (now - lr->last);
   ms = ngx_abs(ms);
   //短时间内被访问,不能删除,直接返回
   if (ms < 60000) {
    return;
   }

   //有待处理请求,不能删除,直接返回
   excess = lr->excess - ctx->rate * ms / 1000;
   if (excess > 0) {
    return;
   }
  }

  //删除
  ngx_queue_remove(q);

  node = (ngx_rbtree_node_t *)
     ((u_char *) lr - offsetof(ngx_rbtree_node_t, color));

  ngx_rbtree_delete(&ctx->sh->rbtree, node);

  ngx_slab_free_locked(ctx->shpool, node);
 }
}3.2.2.3 burst实现
burst是为了应对突发流量的,偶然间的突发流量到达时,应该允许服务端多处理一些请求才行;
当burst为0时,请求只要超出限流速率就会被拒绝;当burst大于0时,超出限流速率的请求会被排队等待 处理,而不是直接拒绝;
排队过程如何实现?而且nginx还需要定时去处理排队中的请求;
2.2小节提到事件都有一个定时器,nginx是通过事件与定时器配合实现请求的排队与定时处理;
ngx_http_limit_req_handler方法有下面的代码:
//计算当前请求还需要排队多久才能处理
delay = ngx_http_limit_req_account(limits, n, &excess, &limit);

//添加可读事件
if (ngx_handle_read_event(r->connection->read, 0) != ngx_ok) {
 return ngx_http_internal_server_error;
}

r->read_event_handler = ngx_http_test_reading;
r->write_event_handler = ngx_http_limit_req_delay; //可写事件处理函数
ngx_add_timer(r->connection->write, delay); //可写事件添加定时器(超时之前是不能往客户端返回的)计算delay的方法很简单,就是遍历所有的限流策略,计算处理完所有待处理请求需要的时间,返回最大值;
if (limits[n].nodelay) { //配置了nodelay时,请求不会被延时处理,delay为0
 continue;
}

delay = excess * 1000 / ctx->rate;

if (delay > max_delay) {
 max_delay = delay;
 *ep = excess;
 *limit = &limits[n];
}简单看看可写事件处理函数ngx_http_limit_req_delay的实现
static void ngx_http_limit_req_delay(ngx_http_request_t *r)
{

 wev = r->connection->write;

 if (!wev->timedout) { //没有超时不会处理

  if (ngx_handle_write_event(wev, 0) != ngx_ok) {
   ngx_http_finalize_request(r, ngx_http_internal_server_error);
  }

  return;
 }

 wev->timedout = 0;

 r->read_event_handler = ngx_http_block_reading;
 r->write_event_handler = ngx_http_core_run_phases;

 ngx_http_core_run_phases(r); //超时了,继续处理http请求
}4.1测试普通限流
1)配置nginx限流速率为1qps,针对客户端ip地址限流(返回状态码默认为503),如下:
http{
 limit_req_zone $binary_remote_addr zone=test:10m rate=1r/s;

 server {
  listen  80;
  server_name localhost;
  location / {
   limit_req zone=test;
   root html;
   index index.html index.htm;
  }
}2)连续并发发起若干请求;3)查看服务端access日志,可以看到22秒连续到达3个请求,只处理1个请求;23秒到达两个请求,第一个请求处理,第二个请求被拒绝
xx.xx.xx.xxx - - [22/sep/2018:23:33:22 +0800] "get / http/1.0" 200 612 "-" "apachebench/2.3"
xx.xx.xx.xxx - - [22/sep/2018:23:33:22 +0800] "get / http/1.0" 503 537 "-" "apachebench/2.3"
xx.xx.xx.xxx - - [22/sep/2018:23:33:22 +0800] "get / http/1.0" 503 537 "-" "apachebench/2.3"
xx.xx.xx.xxx - - [22/sep/2018:23:33:23 +0800] "get / http/1.0" 200 612 "-" "apachebench/2.3"
xx.xx.xx.xxx - - [22/sep/2018:23:33:23 +0800] "get / http/1.0" 503 537 "-" "apachebench/2.3"
4.2测试burst
1)限速1qps时,超过请求会被直接拒绝,为了应对突发流量,应该允许请求被排队处理;因此配置burst=5,即最多允许5个请求排队等待处理;
http{
 limit_req_zone $binary_remote_addr zone=test:10m rate=1r/s;

 server {
  listen  80;
  server_name localhost;
  location / {
   limit_req zone=test burst=5;
   root html;
   index index.html index.htm;
  }
}2)使用ab并发发起10个请求,ab -n 10 -c 10 http://xxxxx;
3)查看服务端access日志;根据日志显示第一个请求被处理,2到5四个请求拒绝,6到10五个请求被处理;为什么会是这样的结果呢?
查看ngx_http_log_module,注册handler到ngx_http_log_phase阶段(http请求处理最后一个阶段);
因此实际情况应该是这样的:10个请求同时到达,第一个请求到达直接被处理,第2到6个请求到达,排队延迟处理(每秒处理一个);第7到10个请求被直接拒绝,因此先打印access日志;
第2到6个请求米诶秒处理一个,处理完成打印access日志,即49到53秒每秒处理一个;
xx.xx.xx.xxx - - [22/sep/2018:23:41:48 +0800] "get / http/1.0" 200 612 "-" "apachebench/2.3"
xx.xx.xx.xxx - - [22/sep/2018:23:41:48 +0800] "get / http/1.0" 503 537 "-" "apachebench/2.3"
xx.xx.xx.xxx - - [22/sep/2018:23:41:48 +0800] "get / http/1.0" 503 537 "-" "apachebench/2.3"
xx.xx.xx.xxx - - [22/sep/2018:23:41:48 +0800] "get / http/1.0" 503 537 "-" "apachebench/2.3"
xx.xx.xx.xxx - - [22/sep/2018:23:41:48 +0800] "get / http/1.0" 503 537 "-" "apachebench/2.3"
xx.xx.xx.xxx - - [22/sep/2018:23:41:49 +0800] "get / http/1.0" 200 612 "-" "apachebench/2.3"
xx.xx.xx.xxx - - [22/sep/2018:23:41:50 +0800] "get / http/1.0" 200 612 "-" "apachebench/2.3"
xx.xx.xx.xxx - - [22/sep/2018:23:41:51 +0800] "get / http/1.0" 200 612 "-" "apachebench/2.3"
xx.xx.xx.xxx - - [22/sep/2018:23:41:52 +0800] "get / http/1.0" 200 612 "-" "apachebench/2.3"
xx.xx.xx.xxx - - [22/sep/2018:23:41:53 +0800] "get / http/1.0" 200 612 "-" "apachebench/2.3"
4)ab统计的响应时间见下面,最小响应时间87ms,最大响应时间5128ms,平均响应时间为1609ms:
min mean[+/-sd] median max
connect:  41 44 1.7  44  46
processing: 46 1566 1916.6 1093 5084
waiting:  46 1565 1916.7 1092 5084
total:   87 1609 1916.2 1135 5128
4.3测试nodelay
1)4.2显示,配置burst后,虽然突发请求会被排队处理,但是响应时间过长,客户端可能早已超时;因此添加配置nodelay,使得nginx紧急处理等待请求,以减小响应时间:
http{
 limit_req_zone $binary_remote_addr zone=test:10m rate=1r/s;

 server {
  listen  80;
  server_name localhost;
  location / {
   limit_req zone=test burst=5 nodelay;
   root html;
   index index.html index.htm;
  }
}2)使用ab并发发起10个请求,ab -n 10 -c 10 http://xxxx/;
3)查看服务端access日志;第一个请求直接处理,第2到6个五个请求排队处理(配置nodelay,nginx紧急处理),第7到10四个请求被拒绝
xx.xx.xx.xxx - - [23/sep/2018:00:04:47 +0800] "get / http/1.0" 200 612 "-" "apachebench/2.3"
xx.xx.xx.xxx - - [23/sep/2018:00:04:47 +0800] "get / http/1.0" 200 612 "-" "apachebench/2.3"
xx.xx.xx.xxx - - [23/sep/2018:00:04:47 +0800] "get / http/1.0" 200 612 "-" "apachebench/2.3"
xx.xx.xx.xxx - - [23/sep/2018:00:04:47 +0800] "get / http/1.0" 200 612 "-" "apachebench/2.3"
xx.xx.xx.xxx - - [23/sep/2018:00:04:47 +0800] "get / http/1.0" 200 612 "-" "apachebench/2.3"
xx.xx.xx.xxx - - [23/sep/2018:00:04:47 +0800] "get / http/1.0" 200 612 "-" "apachebench/2.3"
xx.xx.xx.xxx - - [23/sep/2018:00:04:47 +0800] "get / http/1.0" 503 537 "-" "apachebench/2.3"
xx.xx.xx.xxx - - [23/sep/2018:00:04:47 +0800] "get / http/1.0" 503 537 "-" "apachebench/2.3"
xx.xx.xx.xxx - - [23/sep/2018:00:04:47 +0800] "get / http/1.0" 503 537 "-" "apachebench/2.3"
xx.xx.xx.xxx - - [23/sep/2018:00:04:47 +0800] "get / http/1.0" 503 537 "-" "apachebench/2.3"
4)ab统计的响应时间见下面,最小响应时间85ms,最大响应时间92ms,平均响应时间为88ms:
min mean[+/-sd] median max
connect:  42 43 0.5  43  43
processing: 43 46 2.4  47  49
waiting:  42 45 2.5  46  49
total:   85 88 2.8  90  92
The above is the detailed content of nginx current limiting module source code analysis. For more information, please follow other related articles on the PHP Chinese website!


