How to configure Java environment variables and Tomcat server
Step one: Configure jdk environment variables consistent with the system (32-bit/64-bit)
(1) Download the jdk installation package from the official website:
Official website download address:
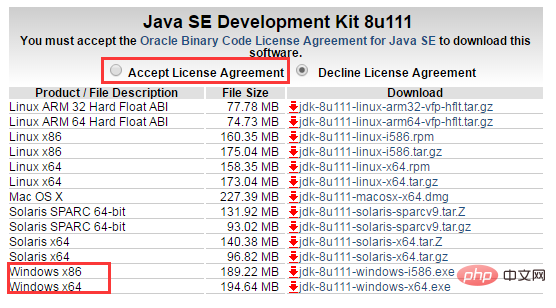
Choose the corresponding installation package according to your operating system (be sure to accept the license agreement)
(2) Install jdk:
Install jdk. Select the installation directory. During the installation process, two installation prompts will appear. The first time is to install jdk, and the second time is to install jre. It is recommended to install both in different folders within the same java folder. (They cannot both be installed in the root directory of the java folder. An error will occur if jdk and jre are installed in the same folder)
The installation is completed as shown in the figure below

(3) Configure environment variables
Configure environment variables after installing jdk Computer→Properties→Advanced System Settings→Advanced→Environment Variables
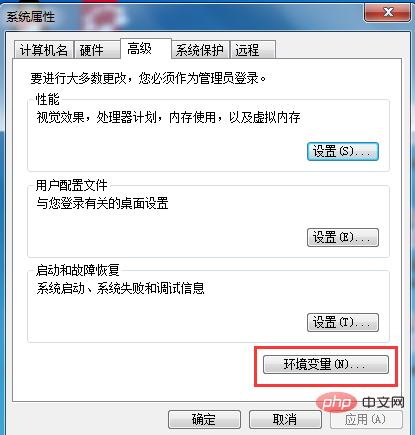
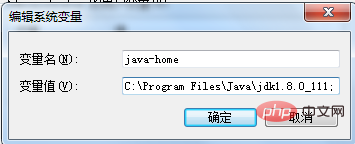
System variables→New java-home variable.
Fill in the installation directory of jdk with the variable value (I am c:\programfiles\java\jdk1.8.0_111)
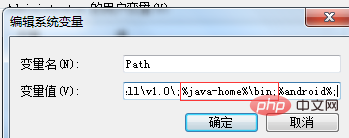
System variables→Look for path variables→ Edit
Enter %java-home%\bin;
at the end of the variable value (note whether there is a ; sign at the end of the variable value of the original path. If not, enter the ; sign first and then enter the above Code)
System variables→Create new classpath variable
Fill in the variable value .;%java-home%\lib;%java-home%\lib\ tools.jar (note the dot at the front)
System variables are configured.
Second step: Verify whether jdk is configured successfully (32-bit/64-bit)
Verify whether the configuration is successful. Run cmd and enter java -version (between java and -version There are spaces between them)
If the version information is displayed as shown in the figure, the installation and configuration are successful.
64-bit is as shown below, there will be a clear version comment, if not, it will be 32-bit


##Step Three: tomcat9 installation and configuration
(1) Download tomcat9 from the official website
Download the latest version of tomcat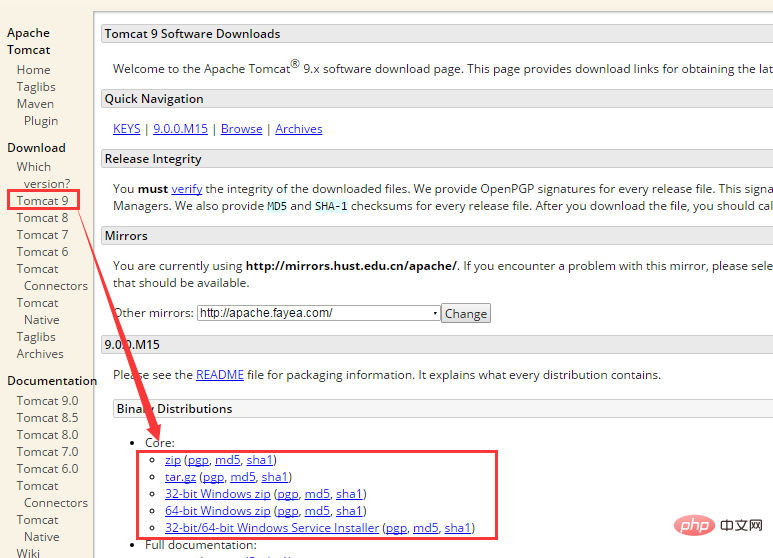
Note that 32 is located in a 64-bit jdk, otherwise a specific error 1 will be reported when starting tomcat
(2) cmd command to configure tomcat

(3) Four ways to start tomcat
- Double-click startup.bat batch processing in the bin directory to run tomcat (The advantage of this is that you can see the running status, the database appears, and the code reports errors. Recommended)
- Run cmd as an administrator to run the net starttomcat9 command (9 is the version number)
- Run through the service in the task manager
- Double-click tomcat9w.exe in the bin directory to check in and click start to run tomcat. The demonstration picture is as follows:
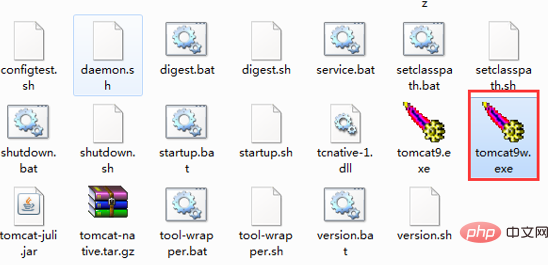
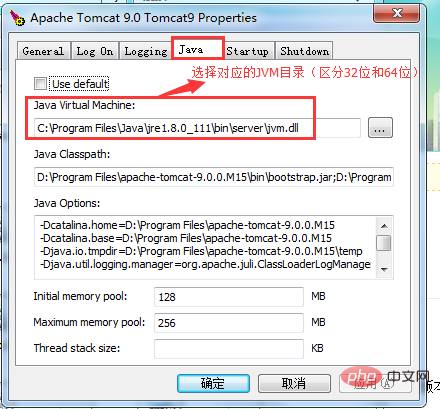
(4) Successful demonstration
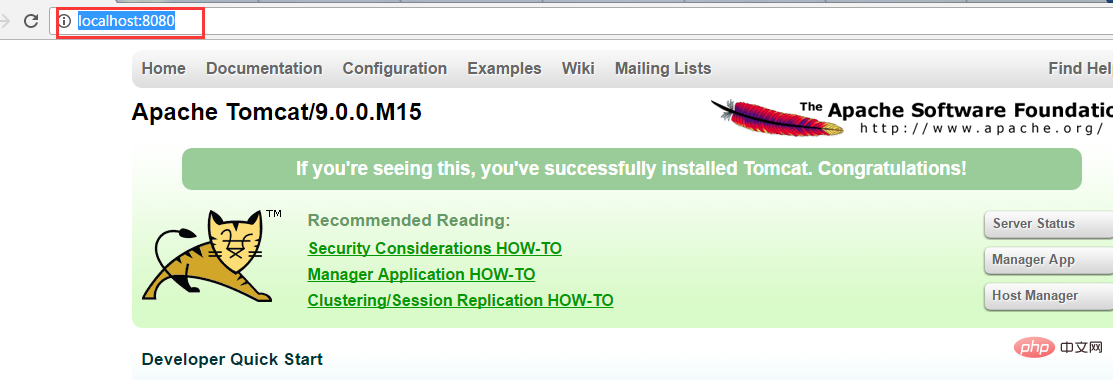
The above is the detailed content of How to configure Java environment variables and Tomcat server. For more information, please follow other related articles on the PHP Chinese website!

Hot AI Tools

Undresser.AI Undress
AI-powered app for creating realistic nude photos

AI Clothes Remover
Online AI tool for removing clothes from photos.

Undress AI Tool
Undress images for free

Clothoff.io
AI clothes remover

AI Hentai Generator
Generate AI Hentai for free.

Hot Article

Hot Tools

Notepad++7.3.1
Easy-to-use and free code editor

SublimeText3 Chinese version
Chinese version, very easy to use

Zend Studio 13.0.1
Powerful PHP integrated development environment

Dreamweaver CS6
Visual web development tools

SublimeText3 Mac version
God-level code editing software (SublimeText3)

Hot Topics
 1375
1375
 52
52
 Square Root in Java
Aug 30, 2024 pm 04:26 PM
Guide to Square Root in Java. Here we discuss how Square Root works in Java with example and its code implementation respectively.
 Perfect Number in Java
Aug 30, 2024 pm 04:28 PM
Guide to Perfect Number in Java. Here we discuss the Definition, How to check Perfect number in Java?, examples with code implementation.
 Random Number Generator in Java
Aug 30, 2024 pm 04:27 PM
Guide to Random Number Generator in Java. Here we discuss Functions in Java with examples and two different Generators with ther examples.
 Weka in Java
Aug 30, 2024 pm 04:28 PM
Guide to Weka in Java. Here we discuss the Introduction, how to use weka java, the type of platform, and advantages with examples.
 Smith Number in Java
Aug 30, 2024 pm 04:28 PM
Guide to Smith Number in Java. Here we discuss the Definition, How to check smith number in Java? example with code implementation.
 Java Spring Interview Questions
Aug 30, 2024 pm 04:29 PM
In this article, we have kept the most asked Java Spring Interview Questions with their detailed answers. So that you can crack the interview.
 Break or return from Java 8 stream forEach?
Feb 07, 2025 pm 12:09 PM
Java 8 introduces the Stream API, providing a powerful and expressive way to process data collections. However, a common question when using Stream is: How to break or return from a forEach operation? Traditional loops allow for early interruption or return, but Stream's forEach method does not directly support this method. This article will explain the reasons and explore alternative methods for implementing premature termination in Stream processing systems. Further reading: Java Stream API improvements Understand Stream forEach The forEach method is a terminal operation that performs one operation on each element in the Stream. Its design intention is
 TimeStamp to Date in Java
Aug 30, 2024 pm 04:28 PM
Guide to TimeStamp to Date in Java. Here we also discuss the introduction and how to convert timestamp to date in java along with examples.


