

How to achieve keepalived+nginx high availability

1.Keepalived introduction
keepalived was originally designed for the lvs load balancing software to manage and monitor the status of each service node in the lvs cluster system. It was later added Implement highly available vrrp function. In addition to managing LVS software, keepalived can also support high-availability solutions for other services.
keepalived implements high availability function through vrrp protocol. vrrp (virtual router redundancy protocol) virtual router redundancy protocol. The purpose of vrrp is to solve the single point of failure problem of static routing. It can ensure that when individual nodes go down, the entire network can run uninterrupted.
2. Keepalived high-availability failover principle
Failover between keepalived high-availability services is achieved through vrrp. When the keepalived service is working, the master node will continuously send (multicast) heartbeat messages to the backup node to tell the backup node that it is still alive.
When the master node fails, heartbeat messages cannot be sent to the backup node. If the backup node cannot continue to detect the heartbeat from the master node. It will call its own takeover program to take over the IP resources and services of the master node. When the primary node recovers, the standby node will release the IP resources and services it took over when the primary node failed, and return to its original standby role
3. Install nginx
3.1. Master node (192.168.80.22)
3.1.1. Install compilation tools and library files
yum -y install make zlib zlib-devel gcc-c++ libtool openssl openssl-devel
3.1.2. Install pcre
#进入目录
cd /usr/local/develop/anginx

#上传安装文件并解压
tar -zxvf pcre-8.38.tar.gz

#进入安装目录
cd pcre-8.38

#检查配置
./configure

#编译、安装
make && make install

#查看pcre版本
pcre-config --version
3.1.3. Install nginx
#进入目录
cd /usr/local/develop/anginx

#上传安装文件,并解压
tar -zxvf nginx-1.8.1.tar.gz

#进入安装目录
cd nginx-1.8.1

#检查配置
./configure --prefix=/usr/local/develop/anginx/webserver/nginx --with-http_stub_status_module --with-http_ssl_module --with-pcre=/usr/local/develop/anginx/pcre-8.38

#编译安装
make && make install

#查看nginx版本
 /usr/local/develop/anginx/webserver/nginx/sbin/nginx -v
--------------------------------------------------------
[root@hadoop02 webserver]# /usr/local/develop/anginx/webserver/nginx/sbin/nginx -v
nginx version: nginx/1.8.1

#配置nginx(检查)
/usr/local/develop/anginx/webserver/nginx/sbin/nginx -t

#nginx管理命令
/usr/local/develop/anginx/webserver/nginx/sbin/nginx       # 启动 nginx
/usr/local/develop/anginx/webserver/nginx/sbin/nginx -s stop       # 停止 nginx
/usr/local/develop/anginx/webserver/nginx/sbin/nginx -s reload      # 重新载入配置文件
/usr/local/develop/anginx/webserver/nginx/sbin/nginx -s reopen      # 重启 nginx
3.1.4.nginx basic configuration
vi nginx.conf

#user nobody;
worker_processes 1;

#error_log logs/error.log;
#error_log logs/error.log notice;
#error_log logs/error.log info;

pid    logs/nginx.pid;


events {
  worker_connections 1024;
}


http {
  include    mime.types;
  default_type application/octet-stream;

  log_format main '$remote_addr - $remote_user [$time_local] "$request" '
           '$status $body_bytes_sent "$http_referer" '
           '"$http_user_agent" "$http_x_forwarded_for"';

  access_log logs/access.log main;

  sendfile    on;
  #tcp_nopush   on;

  #keepalive_timeout 0;
  keepalive_timeout 65;

  #gzip on;

  #添加tomcat列表,真实应用服务器都放在这
  upstream tomcat_pool{
    #server tomcat地址:端口号 weight表示权值,权值越大,被分配的几率越大;
    server 192.168.80.22:8080 weight=4 max_fails=2 fail_timeout=30s;
    server 192.168.80.22:8081 weight=4 max_fails=2 fail_timeout=30s;

  }

  server {
    listen    80;
    server_name tomcat_pool;

    #charset koi8-r;

    #access_log logs/host.access.log main;

    location / {
      #root  html;
      #index index.html index.htm;
      proxy_pass http://tomcat_pool;  #转向tomcat处理
      proxy_set_header  host       $host;
      proxy_set_header  x-real-ip    $remote_addr;
      proxy_set_header  x-forwarded-for $proxy_add_x_forwarded_for;
    }

    #error_page 404       /404.html;

    # redirect server error pages to the static page /50x.html
    #
    error_page  500 502 503 504 /50x.html;
    location = /50x.html {
      root  html;
    }


}3.2. Standby node (192.168.80.21)
Instructions : The installation method is the same as the nginx master node.
4. Install keepalived
4.1. Master node (192.168.80.22)
#安装keepalived
yum install keepalived -y

#启动keepalived服务
/etc/init.d/keepalived start
-------------------------------------------
[root@hadoop02 anginx]# /etc/init.d/keepalived start
正在启动 keepalived:                   [确定]
[root@hadoop02 anginx]# ps -ef |grep keepalived
root   15723   1 0 00:59 ?    00:00:00 /usr/sbin/keepalived -d
root   15724 15723 0 00:59 ?    00:00:00 /usr/sbin/keepalived -d
root   15725 15723 0 00:59 ?    00:00:00 /usr/sbin/keepalived -d
root   15731 15622 0 00:59 pts/1  00:00:00 grep keepalived
[root@hadoop02 anginx]#

#设置开机自启动
echo "/etc/init.d/keepalived start" >>/etc/rc.local

#关闭keepalived服务
/etc/init.d/keepalived stop

#编辑keepalived配置文件
vi /etc/keepalived/keepalived.conf

-----------------------------------------------------------
! configuration file for keepalived

global_defs {
  notification_email {
   acassen@firewall.loc
   failover@firewall.loc
   sysadmin@firewall.loc
  }
  notification_email_from alexandre.cassen@firewall.loc
  smtp_server 192.168.200.1
  smtp_connect_timeout 30
  router_id lb01
}

vrrp_instance vi_1 {
  state master
  interface eth1
  virtual_router_id 55
  priority 150
  advert_int 1
  authentication {
    auth_type pass
    auth_pass server123
  }
  virtual_ipaddress {
    192.168.80.100 dev eth1 label eth1:1
  }
}
...........................................................About configuration instructions:
[router_id] is the routing identifier, which should be unique in a LAN
[vrrp_instance vi_1]{...}This It is a vrrp instance, which defines the active and backup status, interface, priority, authentication and IP information of keepalived
[state] defines the role of vrrp
[interface] Define the interface used. The network cards used by my server here are all eth1
[virtual_router_id] is the virtual routing id identifier, which is in a set of keepalived configurations The active and standby settings are consistent
[priority] is the priority. The larger the number, the greater the priority.
[auth_type] is Authentication method
[auth_pass] is the password for authentication
[virtual_ipaddress] {...} Define the virtual ip address, you can Configure multiple IP addresses, here I define it as 192.168.80.100, bound to the network interface of eth1, virtual interface eth1:1
4.2. Standby node (192.168.80.21 )
#安装keepalived
yum install keepalived -y

#启动keepalived服务
/etc/init.d/keepalived start
-------------------------------------------
[root@hadoop02 anginx]# /etc/init.d/keepalived start
正在启动 keepalived:                   [确定]
[root@hadoop02 anginx]# ps -ef |grep keepalived
root   15723   1 0 00:59 ?    00:00:00 /usr/sbin/keepalived -d
root   15724 15723 0 00:59 ?    00:00:00 /usr/sbin/keepalived -d
root   15725 15723 0 00:59 ?    00:00:00 /usr/sbin/keepalived -d
root   15731 15622 0 00:59 pts/1  00:00:00 grep keepalived
[root@hadoop02 anginx]#

#设置开机自启动
echo "/etc/init.d/keepalived start" >>/etc/rc.local

#关闭keepalived服务
/etc/init.d/keepalived stop

#编辑keepalived配置文件
vi /etc/keepalived/keepalived.conf

-----------------------------------------------------------------
! configuration file for keepalived

global_defs {
  notification_email {
   acassen@firewall.loc
   failover@firewall.loc
   sysadmin@firewall.loc
  }
  notification_email_from alexandre.cassen@firewall.loc
  smtp_server 192.168.200.1
  smtp_connect_timeout 30
  router_id lb02
}

vrrp_instance vi_1 {
  state backup
  interface eth1
  virtual_router_id 55
  priority 100
  advert_int 1
  authentication {
    auth_type pass
    auth_pass server123
  }
  virtual_ipaddress {
    192.168.80.100 dev eth1 label eth1:1
  }
}
.............................................................5. Test
5.1. Start the keepalived service of the active and backup nodes
#在节点一执行(192.168.80.22)
/etc/init.d/keepalived start
-------------------------------------
[root@hadoop02 anginx]# ps -ef |grep keepalived
root   15788   1 0 01:09 ?    00:00:00 /usr/sbin/keepalived -d
root   15790 15788 0 01:09 ?    00:00:00 /usr/sbin/keepalived -d
root   15791 15788 0 01:09 ?    00:00:00 /usr/sbin/keepalived -d
root   15807 15622 0 01:33 pts/1  00:00:00 grep keepalived
[root@hadoop02 anginx]#


#在节点二执行(192.168.80.21)
/etc/init.d/keepalived start
---------------------------------------
[root@hadoop01 ~]# ps -ef |grep keepalived
root   11542   1 0 01:30 ?    00:00:00 /usr/sbin/keepalived -d
root   11544 11542 0 01:30 ?    00:00:00 /usr/sbin/keepalived -d
root   11545 11542 0 01:30 ?    00:00:00 /usr/sbin/keepalived -d
root   11550 11512 0 01:33 pts/1  00:00:00 grep keepalived
[root@hadoop01 ~]#
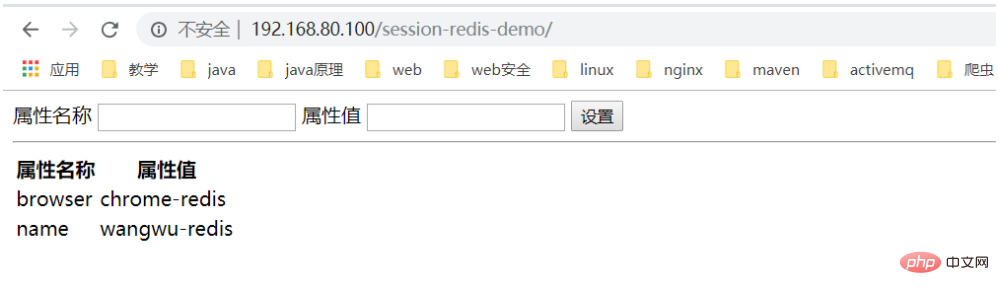
5.2. Access the service through virtual ip
http://192.168.80.100/session-redis-demo/
5.3. Stop the host Node keepalived service
#在节点一执行(192.168.80.22)
/etc/init.d/keepalived stop

#观察备节点变化
ip addr
-------------------------------------------
[root@hadoop01 ~]# ip addr
1: lo: <loopback,up,lower_up> mtu 65536 qdisc noqueue state unknown
  link/loopback 00:00:00:00:00:00 brd 00:00:00:00:00:00
  inet 127.0.0.1/8 scope host lo
  inet6 ::1/128 scope host
    valid_lft forever preferred_lft forever
2: eth1: <broadcast,multicast,up,lower_up> mtu 1500 qdisc pfifo_fast state up qlen 1000
  link/ether 00:50:56:38:e5:46 brd ff:ff:ff:ff:ff:ff
  inet 192.168.80.21/24 brd 192.168.80.255 scope global eth1
  inet 192.168.80.100/32 scope global eth1:1
  inet6 fe80::250:56ff:fe38:e546/64 scope link
    valid_lft forever preferred_lft forever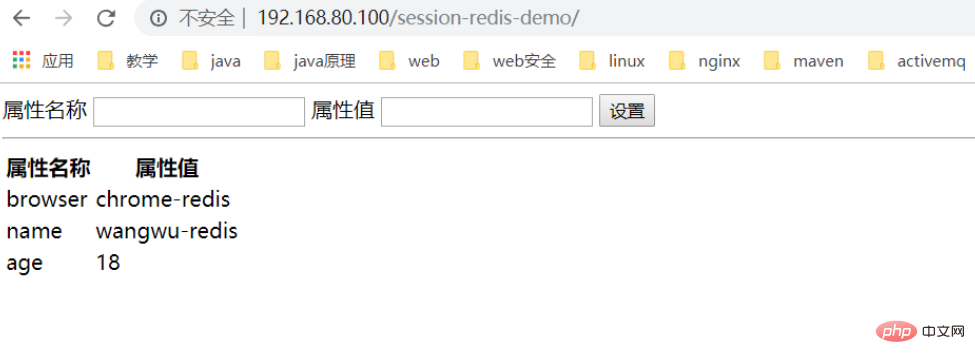
[root@hadoop01 ~]#5.4. Continue to access the service through virtual ip
http://192.168.80.100/session-redis-demo/
6.keepalived nginx integration
Instructions: Write an nginx daemon script. If the nginx service fails, stop the keepalived service of the current node. Automatically switches to the backup node.
6.1. Write nginx daemon script
vi nginx_check.sh

--------------------------------------
#!/bin/bash
while true
do
if [ $(netstat -tlnp|grep nginx|wc -l) -ne 1 ]
then
  /etc/init.d/keepalived stop
fi
sleep 2
done

#给脚本授权
chmod u+x nginx_check.sh

#执行脚本
nohup /usr/local/develop/anginx/shell/nginx_check.sh &
6.2. Stop the main node nginx service
#停止主节点nginx服务
/usr/local/develop/anginx/webserver/nginx/sbin/nginx -s stop

#查找进程
[root@hadoop02 ~]# ps -ef |grep nginx
root   15915   1 0 01:51 ?    00:00:00 /bin/bash /usr/local/develop/anginx/shell/nginx_check.sh
root   16516 15753 0 01:54 pts/5  00:00:00 grep nginx
[root@hadoop02 ~]#

#观察备用节点变化【服务正常】
ip addr
--------------------------------------
[root@hadoop01 shell]# ip addr
1: lo: <loopback,up,lower_up> mtu 65536 qdisc noqueue state unknown
  link/loopback 00:00:00:00:00:00 brd 00:00:00:00:00:00
  inet 127.0.0.1/8 scope host lo
  inet6 ::1/128 scope host
    valid_lft forever preferred_lft forever
2: eth1: <broadcast,multicast,up,lower_up> mtu 1500 qdisc pfifo_fast state up qlen 1000
  link/ether 00:50:56:38:e5:46 brd ff:ff:ff:ff:ff:ff
  inet 192.168.80.21/24 brd 192.168.80.255 scope global eth1
  inet 192.168.80.100/32 scope global eth1:1
  inet6 fe80::250:56ff:fe38:e546/64 scope link
    valid_lft forever preferred_lft forever
[root@hadoop01 shell]#

#再次重新启动主节点nginx和keepalived服务
/usr/local/develop/anginx/webserver/nginx/sbin/nginx

/etc/init.d/keepalived startThe above is the detailed content of How to achieve keepalived+nginx high availability. For more information, please follow other related articles on the PHP Chinese website!

Hot AI Tools

Undresser.AI Undress
AI-powered app for creating realistic nude photos

AI Clothes Remover
Online AI tool for removing clothes from photos.

Undress AI Tool
Undress images for free

Clothoff.io
AI clothes remover

AI Hentai Generator
Generate AI Hentai for free.

Hot Article
Hot Tools

Notepad++7.3.1
Easy-to-use and free code editor

SublimeText3 Chinese version
Chinese version, very easy to use

Zend Studio 13.0.1
Powerful PHP integrated development environment

Dreamweaver CS6
Visual web development tools

SublimeText3 Mac version
God-level code editing software (SublimeText3)
Hot Topics
 1375
1375
 52
52

 How to allow external network access to tomcat server
Apr 21, 2024 am 07:22 AM
How to allow external network access to tomcat server
Apr 21, 2024 am 07:22 AM
To allow the Tomcat server to access the external network, you need to: modify the Tomcat configuration file to allow external connections. Add a firewall rule to allow access to the Tomcat server port. Create a DNS record pointing the domain name to the Tomcat server public IP. Optional: Use a reverse proxy to improve security and performance. Optional: Set up HTTPS for increased security.
 How to run thinkphp
Apr 09, 2024 pm 05:39 PM
How to run thinkphp
Apr 09, 2024 pm 05:39 PM
Steps to run ThinkPHP Framework locally: Download and unzip ThinkPHP Framework to a local directory. Create a virtual host (optional) pointing to the ThinkPHP root directory. Configure database connection parameters. Start the web server. Initialize the ThinkPHP application. Access the ThinkPHP application URL and run it.
 Welcome to nginx!How to solve it?
Apr 17, 2024 am 05:12 AM
Welcome to nginx!How to solve it?
Apr 17, 2024 am 05:12 AM
To solve the "Welcome to nginx!" error, you need to check the virtual host configuration, enable the virtual host, reload Nginx, if the virtual host configuration file cannot be found, create a default page and reload Nginx, then the error message will disappear and the website will be normal show.
 How to communicate between docker containers
Apr 07, 2024 pm 06:24 PM
How to communicate between docker containers
Apr 07, 2024 pm 06:24 PM
There are five methods for container communication in the Docker environment: shared network, Docker Compose, network proxy, shared volume, and message queue. Depending on your isolation and security needs, choose the most appropriate communication method, such as leveraging Docker Compose to simplify connections or using a network proxy to increase isolation.
 How to generate URL from html file
Apr 21, 2024 pm 12:57 PM
How to generate URL from html file
Apr 21, 2024 pm 12:57 PM
Converting an HTML file to a URL requires a web server, which involves the following steps: Obtain a web server. Set up a web server. Upload HTML file. Create a domain name. Route the request.
 How to deploy nodejs project to server
Apr 21, 2024 am 04:40 AM
How to deploy nodejs project to server
Apr 21, 2024 am 04:40 AM
Server deployment steps for a Node.js project: Prepare the deployment environment: obtain server access, install Node.js, set up a Git repository. Build the application: Use npm run build to generate deployable code and dependencies. Upload code to the server: via Git or File Transfer Protocol. Install dependencies: SSH into the server and use npm install to install application dependencies. Start the application: Use a command such as node index.js to start the application, or use a process manager such as pm2. Configure a reverse proxy (optional): Use a reverse proxy such as Nginx or Apache to route traffic to your application
 What are the most common instructions in a dockerfile
Apr 07, 2024 pm 07:21 PM
What are the most common instructions in a dockerfile
Apr 07, 2024 pm 07:21 PM
The most commonly used instructions in Dockerfile are: FROM: Create a new image or derive a new image RUN: Execute commands (install software, configure the system) COPY: Copy local files to the image ADD: Similar to COPY, it can automatically decompress tar archives or obtain URL files CMD: Specify the command when the container starts EXPOSE: Declare the container listening port (but not public) ENV: Set the environment variable VOLUME: Mount the host directory or anonymous volume WORKDIR: Set the working directory in the container ENTRYPOINT: Specify what to execute when the container starts Executable file (similar to CMD, but cannot be overwritten)
 Can nodejs be accessed from the outside?
Apr 21, 2024 am 04:43 AM
Can nodejs be accessed from the outside?
Apr 21, 2024 am 04:43 AM
Yes, Node.js can be accessed from the outside. You can use the following methods: Use Cloud Functions to deploy the function and make it publicly accessible. Use the Express framework to create routes and define endpoints. Use Nginx to reverse proxy requests to Node.js applications. Use Docker containers to run Node.js applications and expose them through port mapping.
