What to do if Zoom can't detect microphone in Windows 11, how to fix it
Zoom has become a necessity lately. Whether students or working class professionals, we are all doing video conferencing for one reason or another. But what do you do if Zoom can’t detect your microphone in Windows 11?
Now, many of us may have been in a similar situation where the microphone doesn’t seem to be working properly, but just unmuting it worked. This is always the case now. There may be several other issues that may cause the same issue.
So, without further ado, let’s discuss the root causes and the most effective solutions for Zoom not detecting microphone in Windows 11.
Why can’t Zoom detect the microphone?
If we started listing the possible causes of this problem, it would be a never-ending list. But after going through several forums during our research, we were able to identify the most common issues and list them below:
- Misconfigured Settings
- Improper Connection
- Incorrect microphone selection
- Running an outdated version of Zoom or microphone driver
The best part though is that most of these issues can be fixed within minutes Detect and eliminate so you don't miss any important Zoom calls. If Zoom cannot detect the microphone in Windows 11, let us now show you how to fix it.
What should I do if Zoom can't detect the microphone in Windows 11?
1. Check the connection
If you are using an external microphone, whether wired or wireless, you must first check the connection. In most cases, incorrect connection behind Zoom fails to detect the microphone in Windows 11.
2. Make sure to join using audio
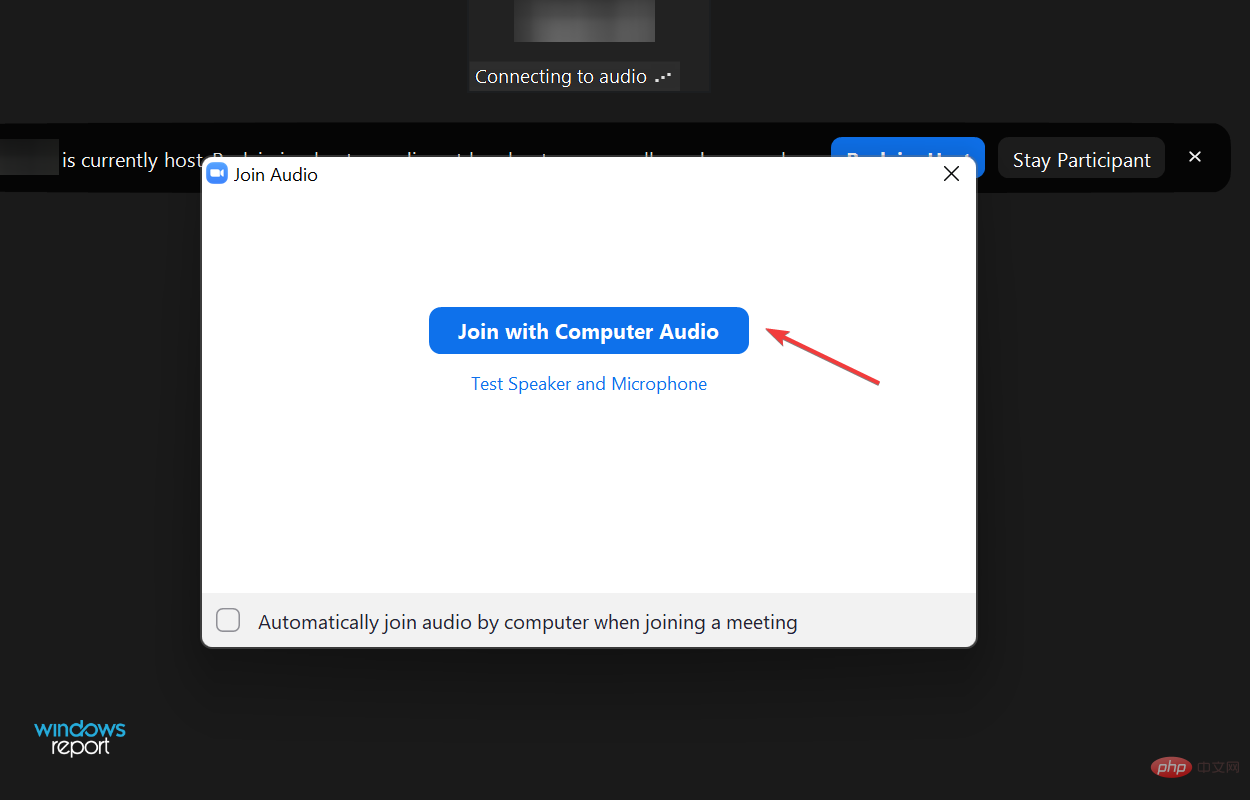
- When you click the Zoom call link to join, you will be asked if you want to join with audio. Make sure the Join computer audio option is selected.

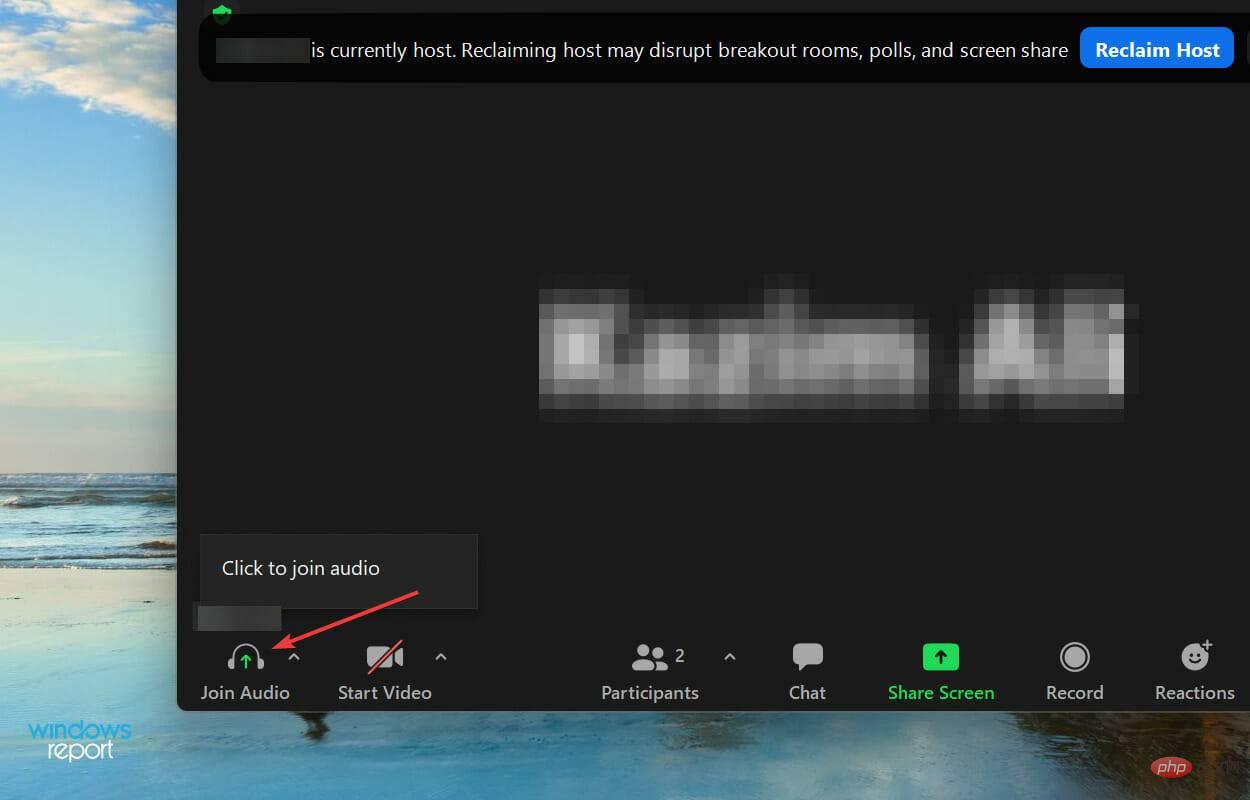
- If you somehow missed that part, you can always enable audio. Just click the Join Audio button in the lower left corner, then click the Join Audio option when prompted.

-
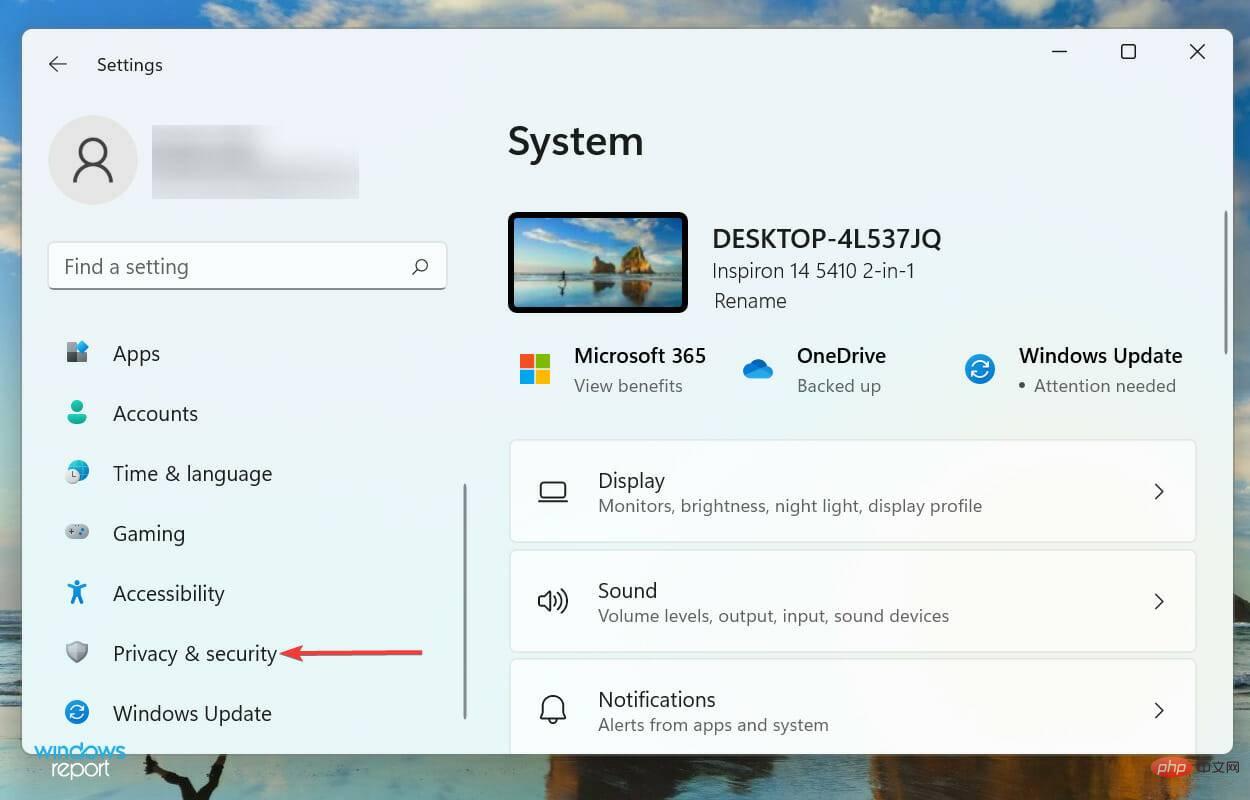
Press Windows IStartSettings Application and select Privacy & Security from the tabs listed in the left navigation pane.

-
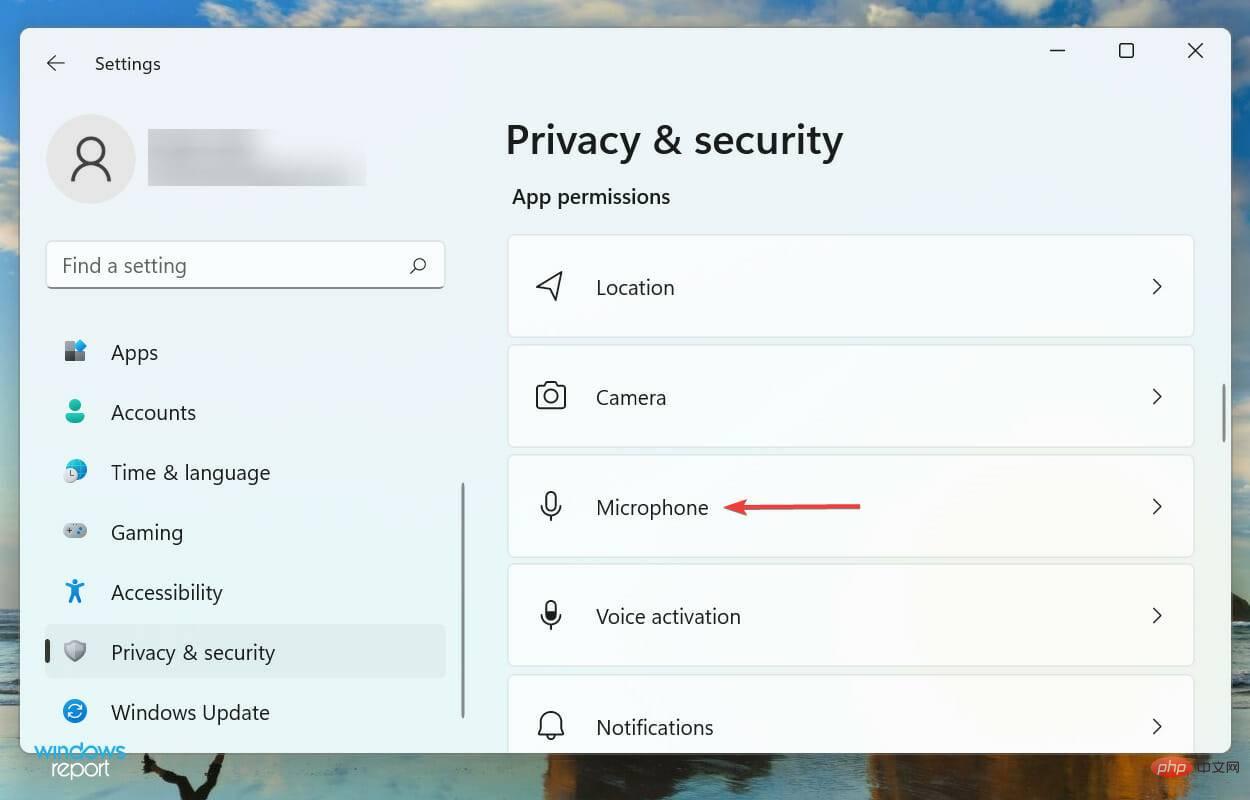
Click Microphone under App Permissions
 .
. -
Scroll down to find the Zoom
 app and make sure the section listed below it has access to the microphone, in addition to the app itself.
4. Check if the correct microphone is selected
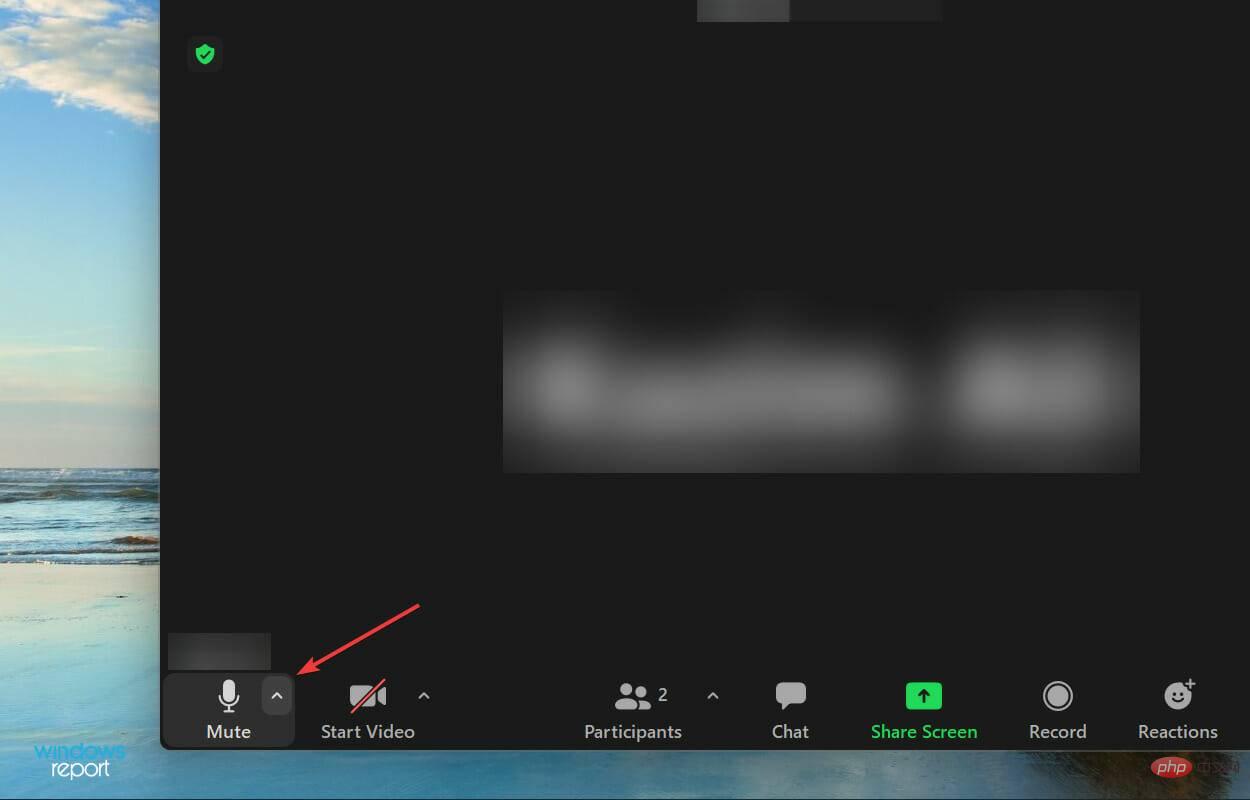
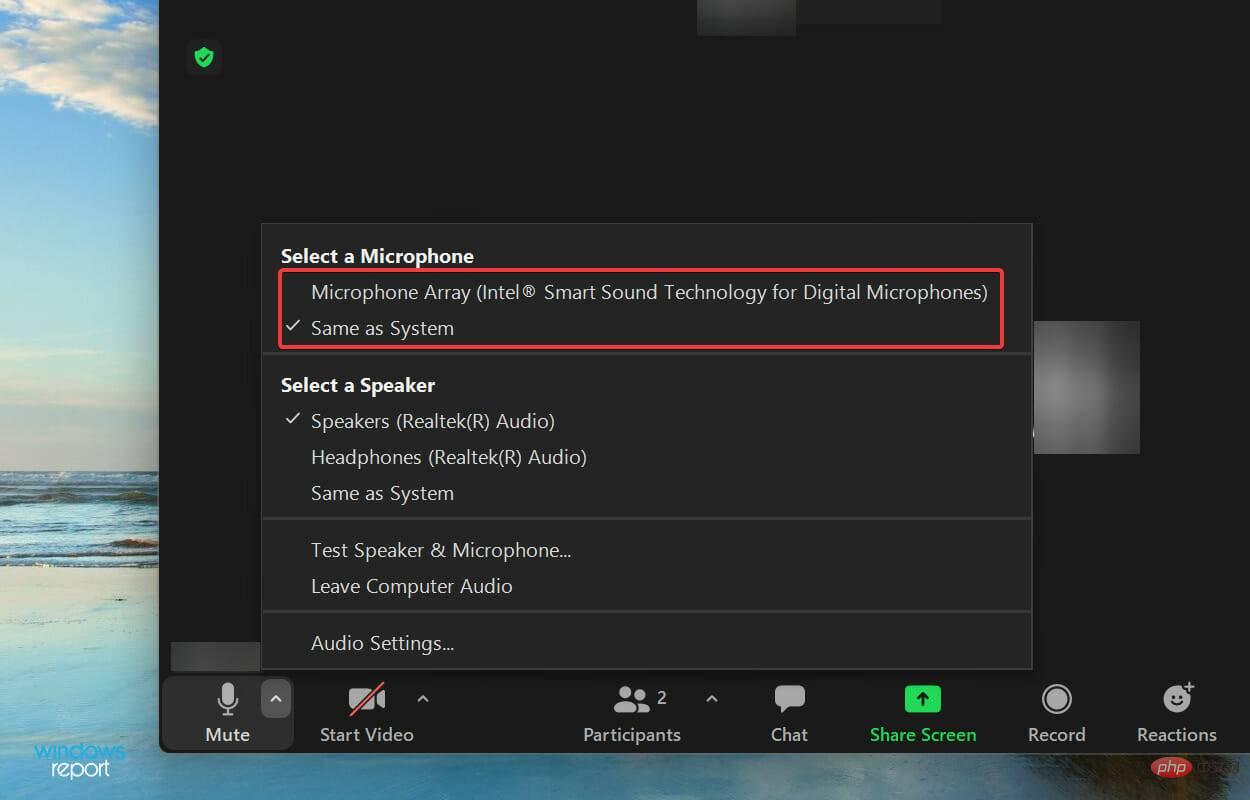
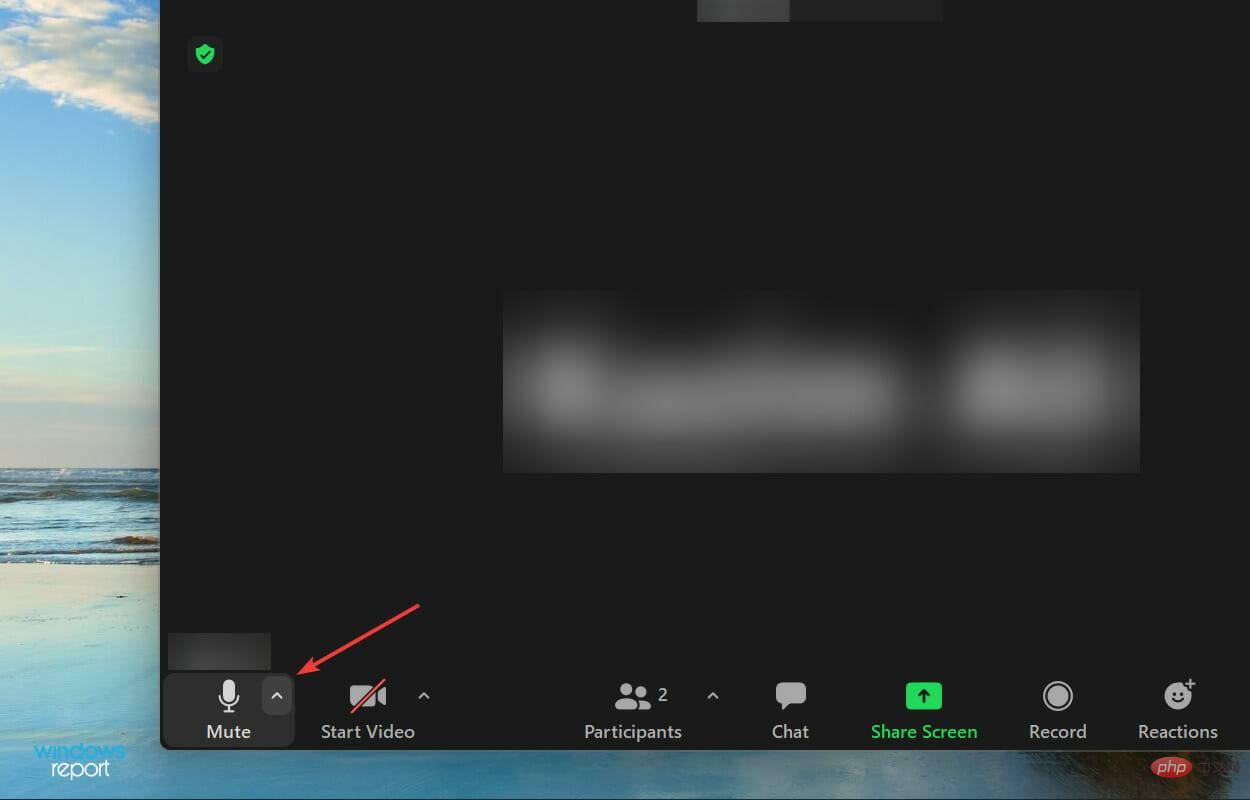
- Click the small karat icon near the upper right corner of the "Mute" button.

- Now, select the desired microphone from the ones listed here.

5. Increase the volume and zoom settings of Windows 11
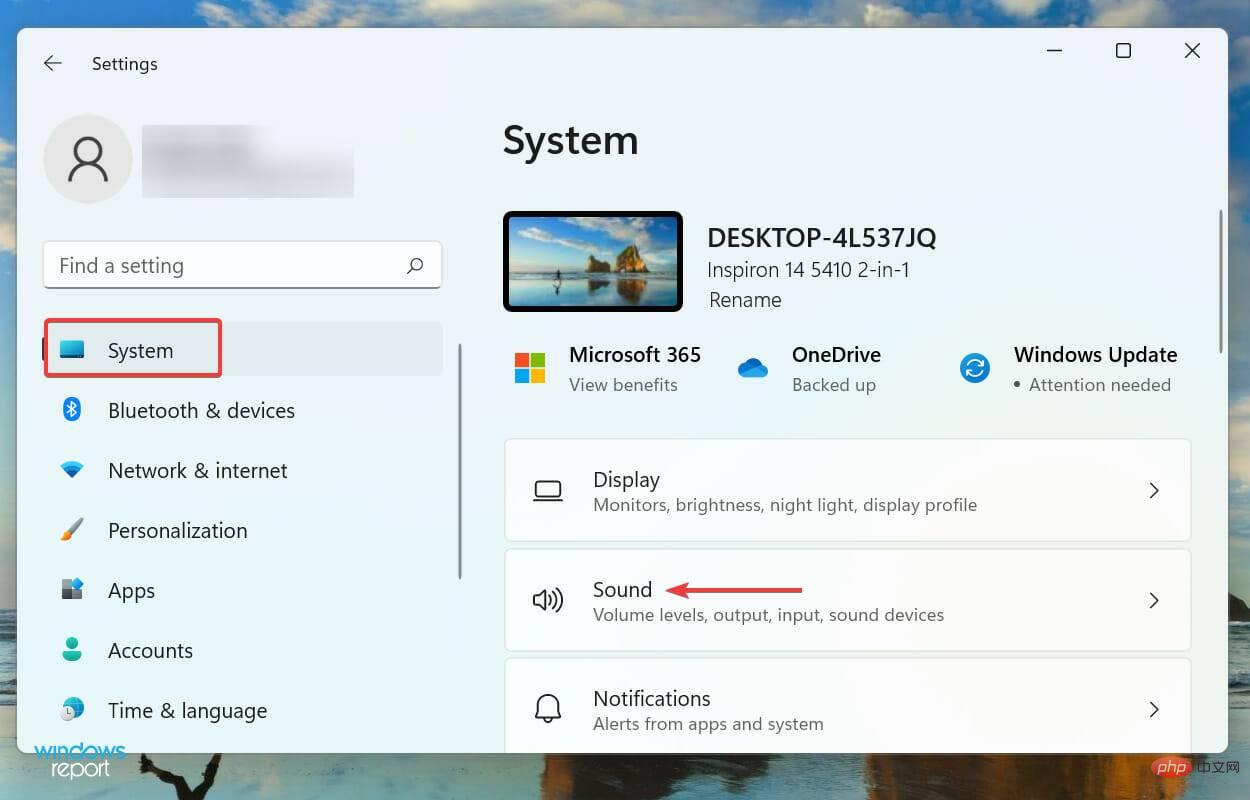
- Press Windows IStart "Settings" application and select "Sound" from the list of options to the right of the "System" tab.

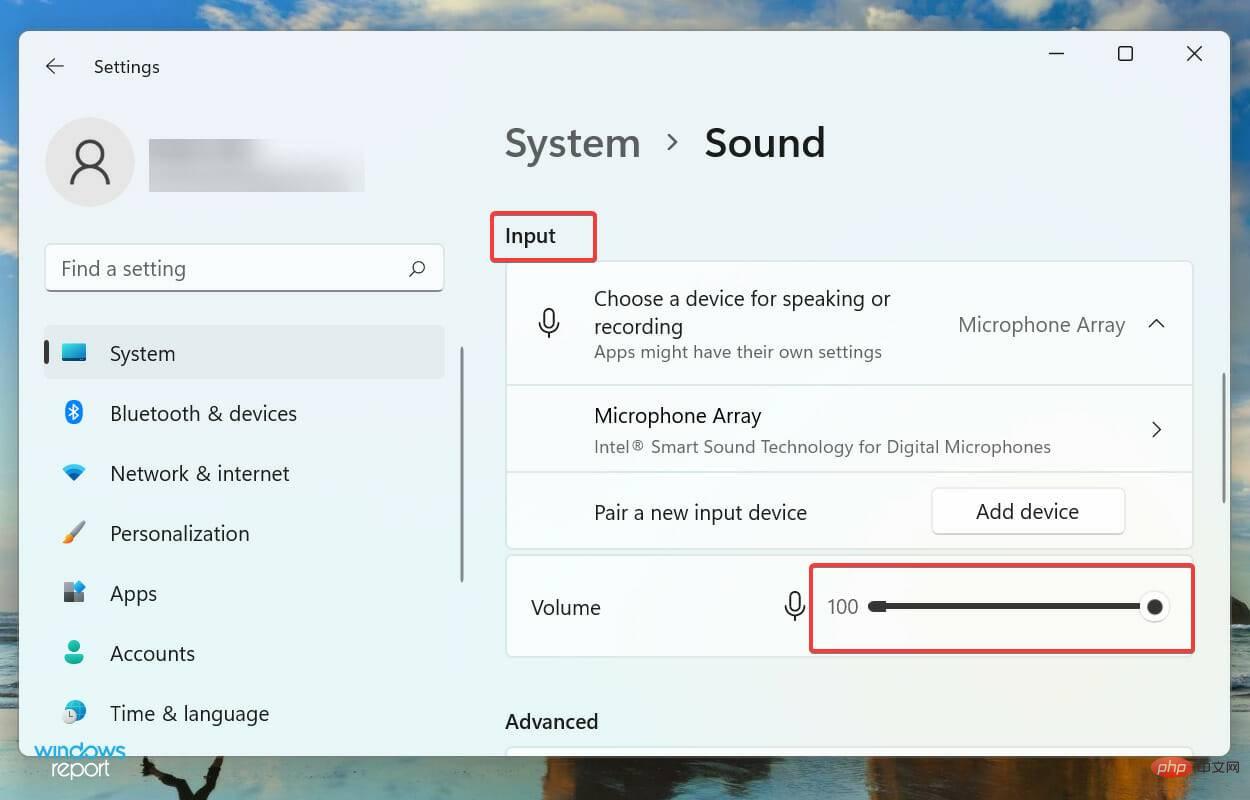
- Now, drag the volume slider to the right below the input section until you get the desired level.

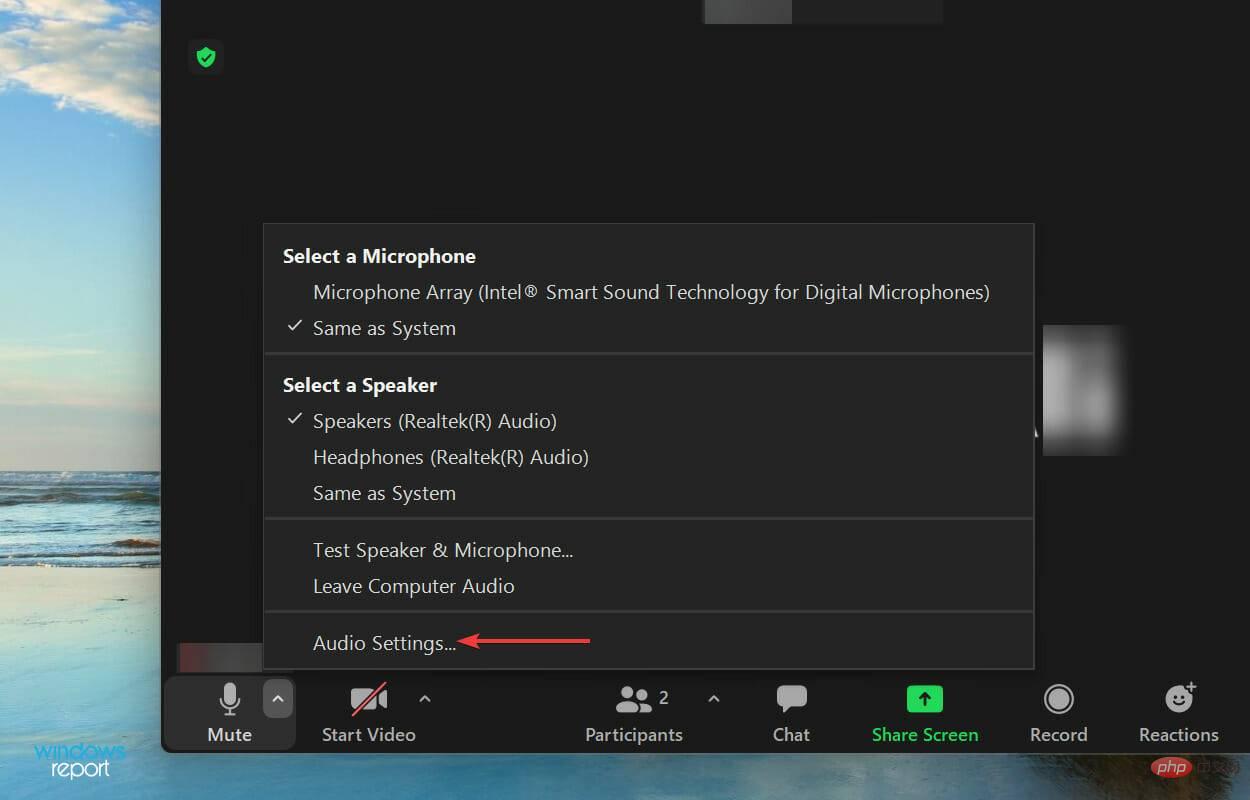
- Next, click the karat icon near the upper right corner of the Mute button to see the various audio options in your Zoom call.

- SelectAudio Settings from the menu's list of options.

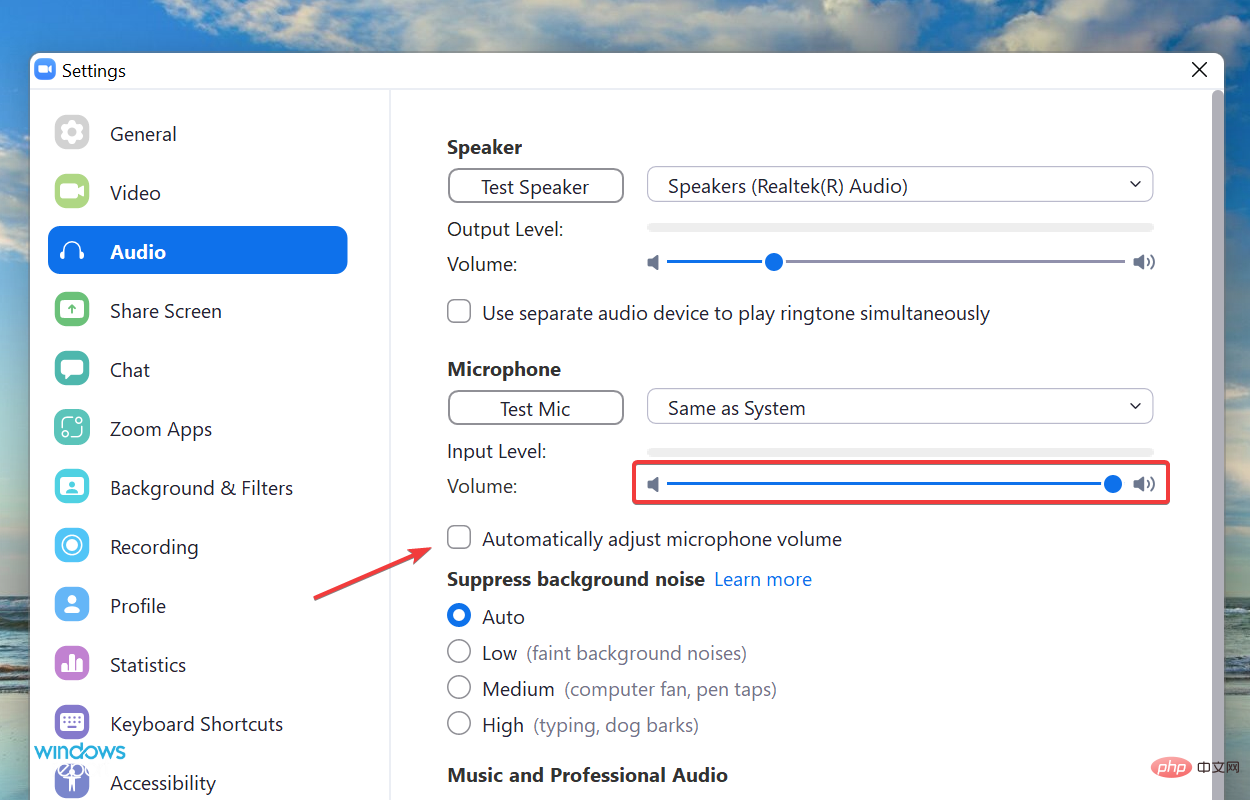
- Now, drag the slider for Input Level Volume to the right until you get the desired output and uncheck Automatically adjust microphone volume Checkbox.

If you previously set the volume too low or perhaps misconfigured it, increasing the microphone input should solve the problem. If you notice any improvement in moving the slider, drag it all the way to the right for maximum input.
Although in this case, Zoom doesn't actually detect the microphone in Windows 11, it appears so because others can't hear you. However, if that's the case, these steps should help.
6. Update Zoom
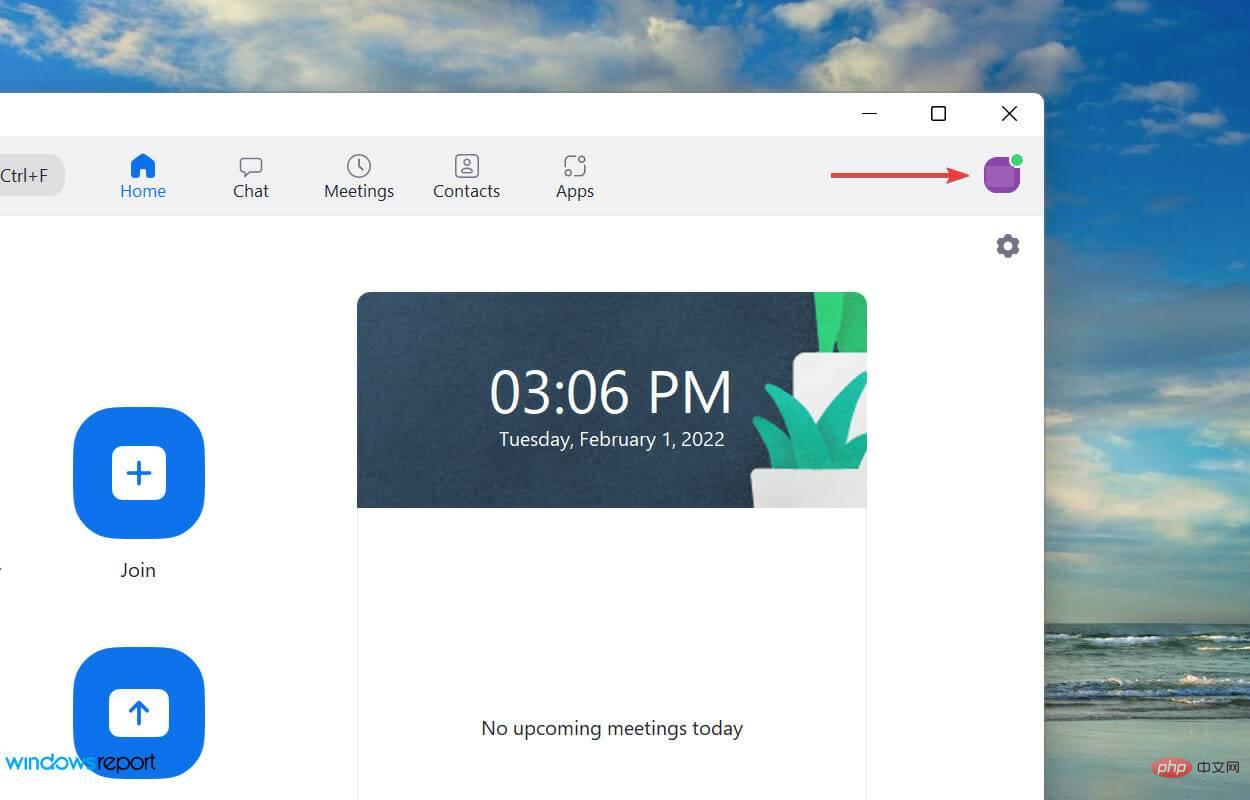
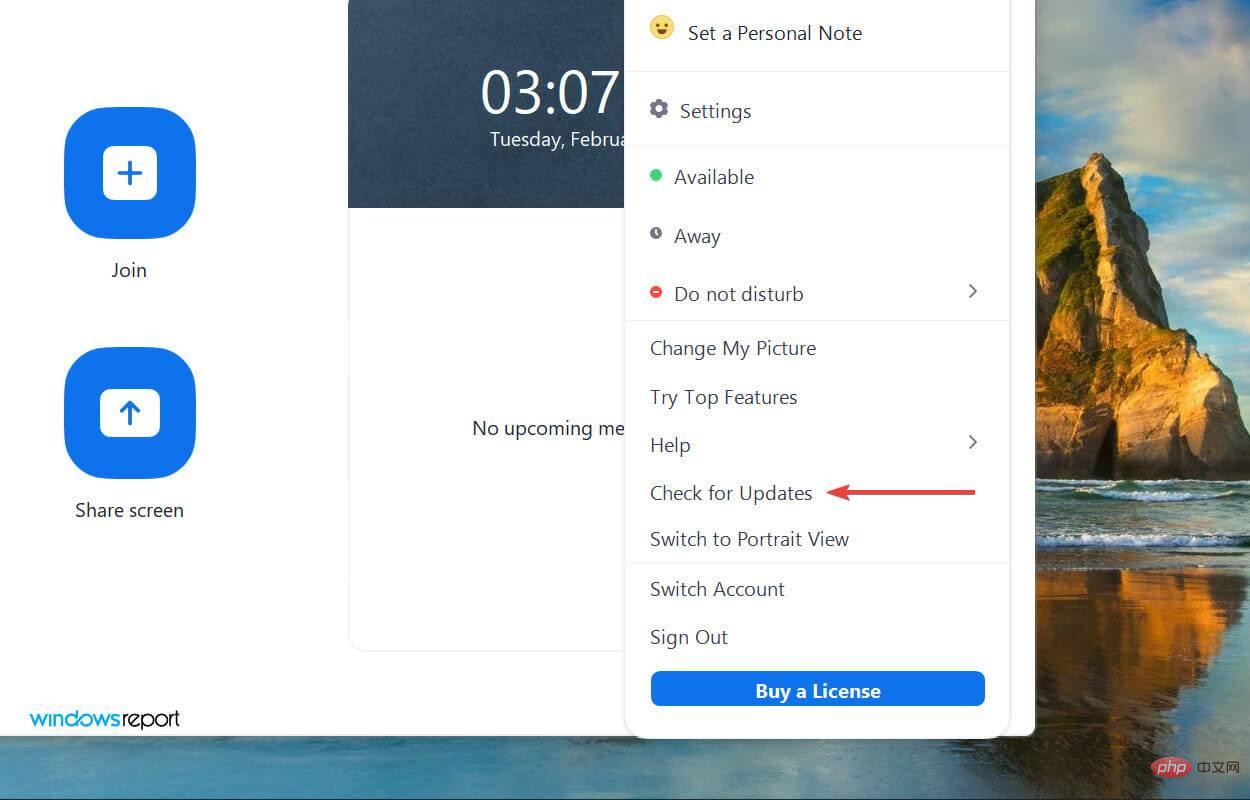
- Click the ZoomProfile icon in the upper right corner of the home screen.

- Next, selectCheck for Updates from the list of options that appears.

7. Update the microphone driver
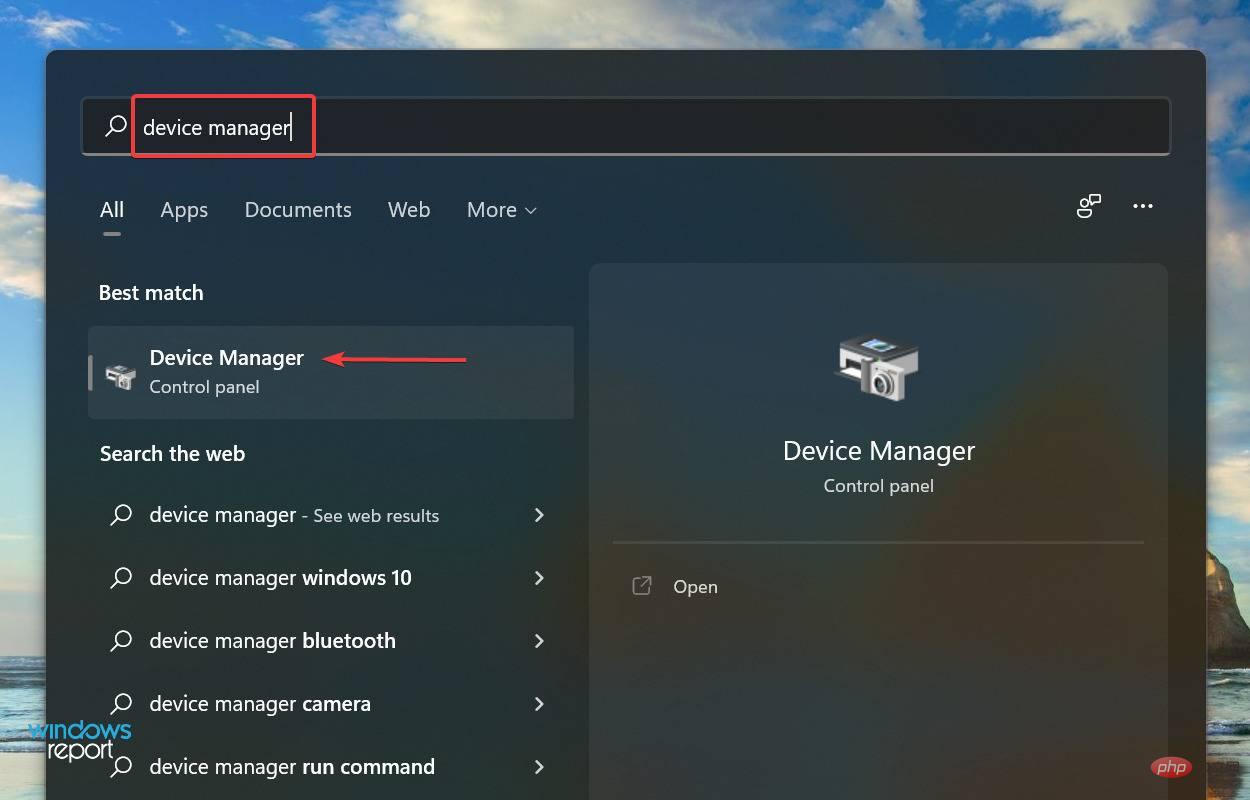
- Press Windows SStartSearch menu, enter Device Manager in the text field at the top and click on the relevant search results that appear.

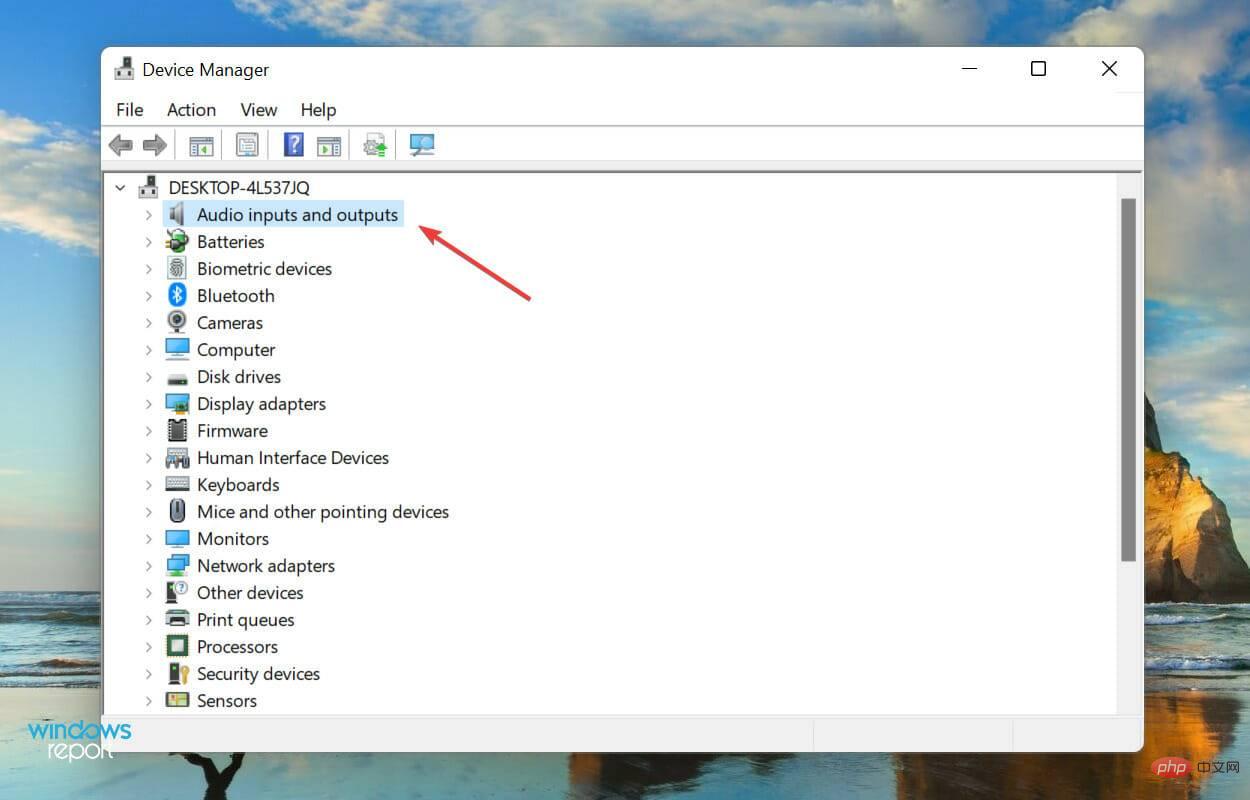
- Locate and double-click the Audio Input and Output entry.

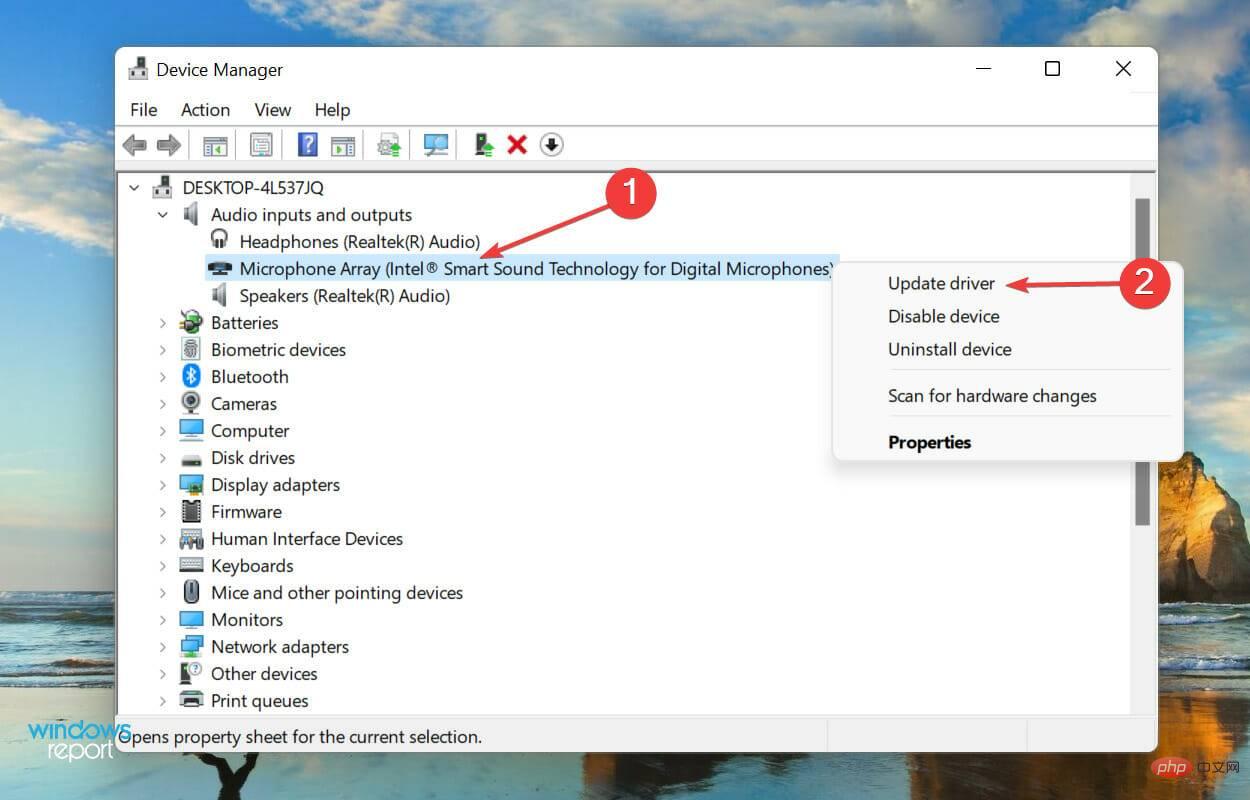
- Now, right-click on the problematic microphone and select Update Driver from the context menu.

-
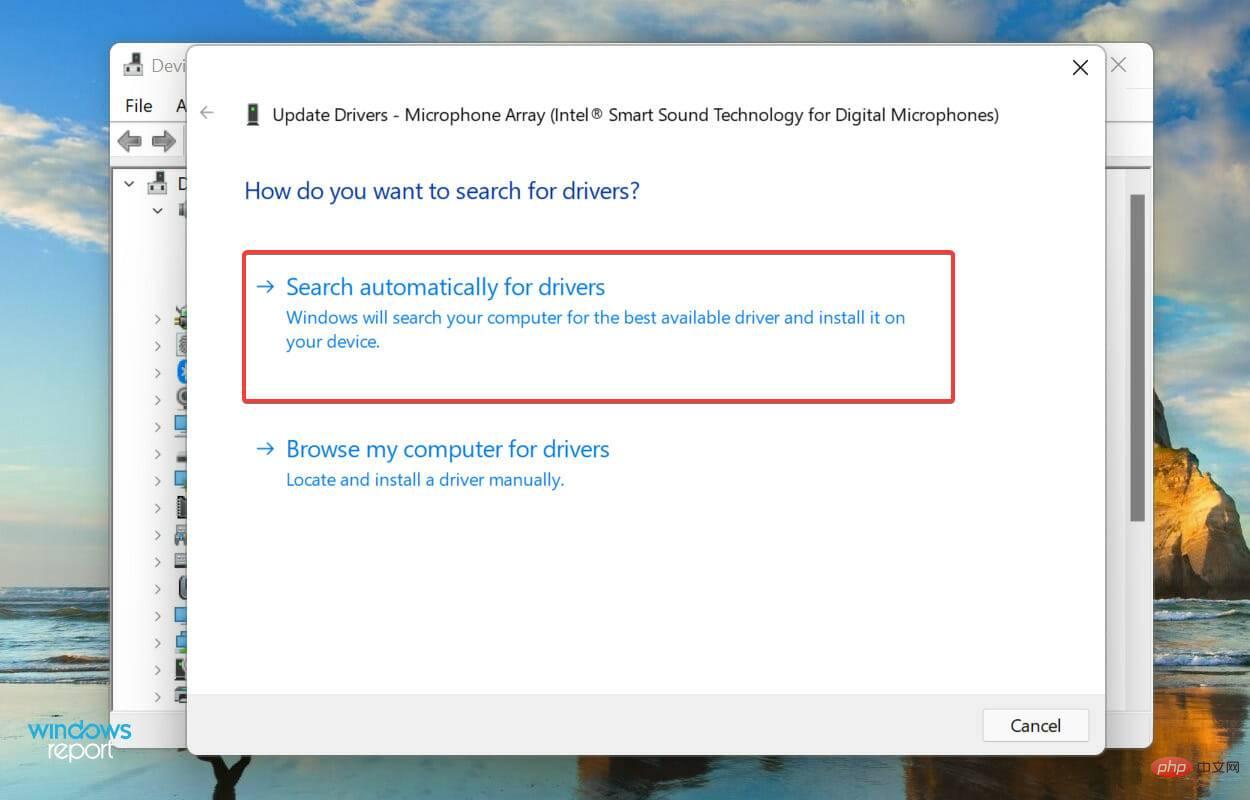
Select Automatically search for drivers from the two options listed in the Update Driver window.

- Your operating system will now scan for the best driver available on your system and install it for the microphone.
Drivers are critical software that help relay commands between the device and the operating system. If these are outdated or broken for some reason, you may run into problems with your device, in this case the microphone.
So, if Zoom fails to detect the microphone in Windows 11, updating its driver may help. The Device Manager methods listed above only scan for already downloaded versions, so if you haven't gotten one before, your chances of updating are bleak.
8. Reinstall Zoom
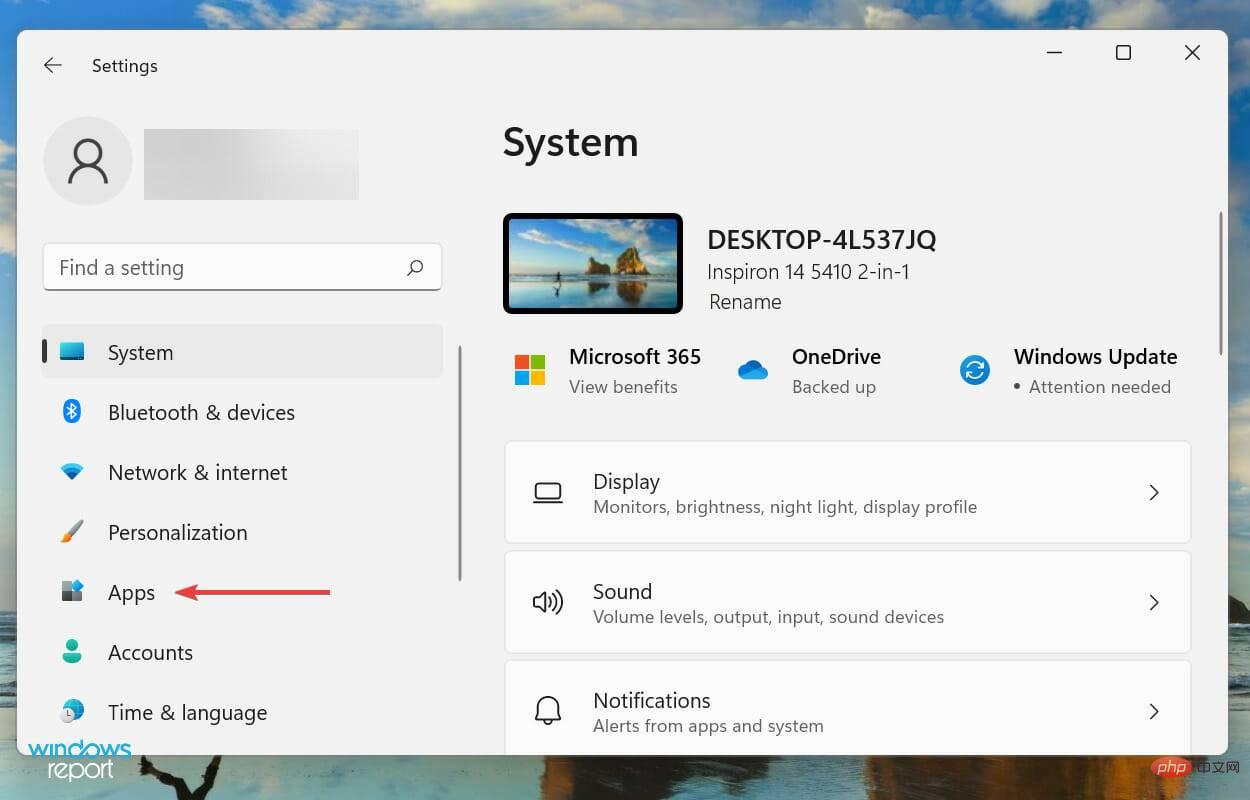
- Press Windows ILaunch Settings and select from the left navigation pane Application tab.

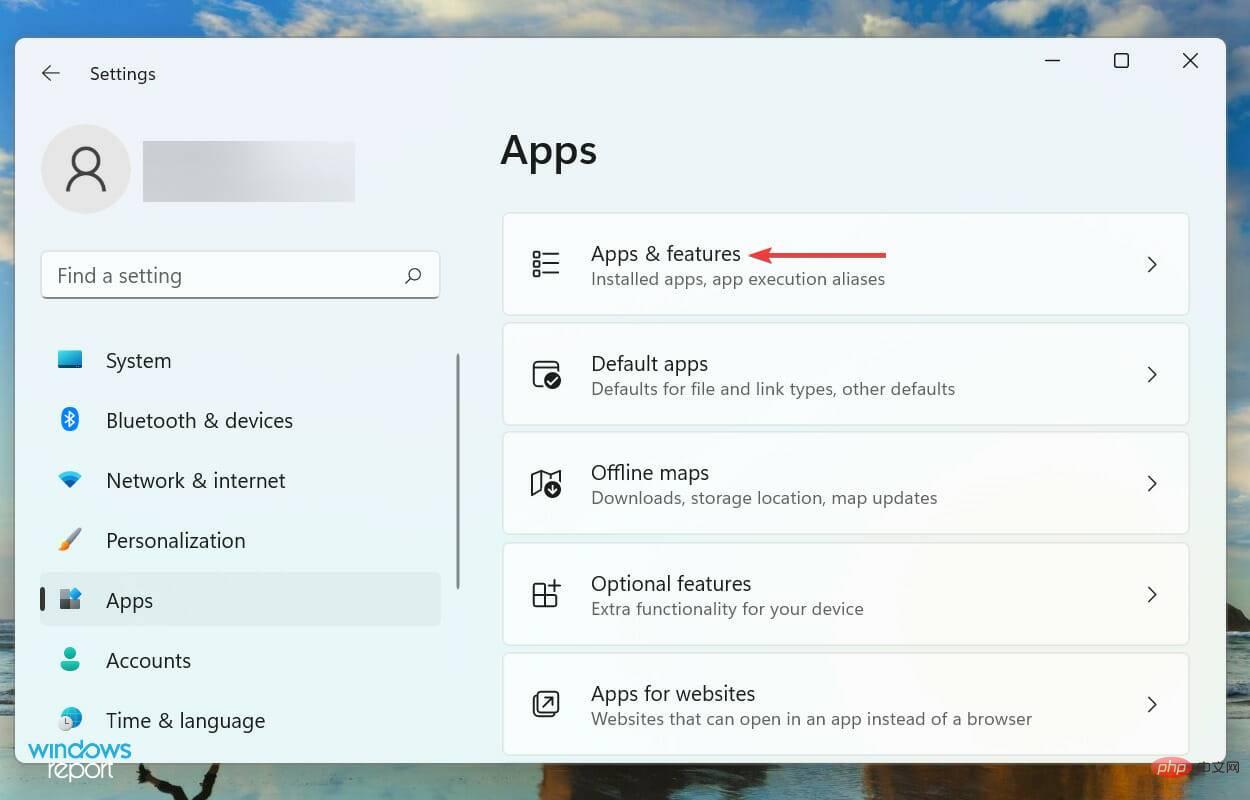
- Click Apps and Features on the right.

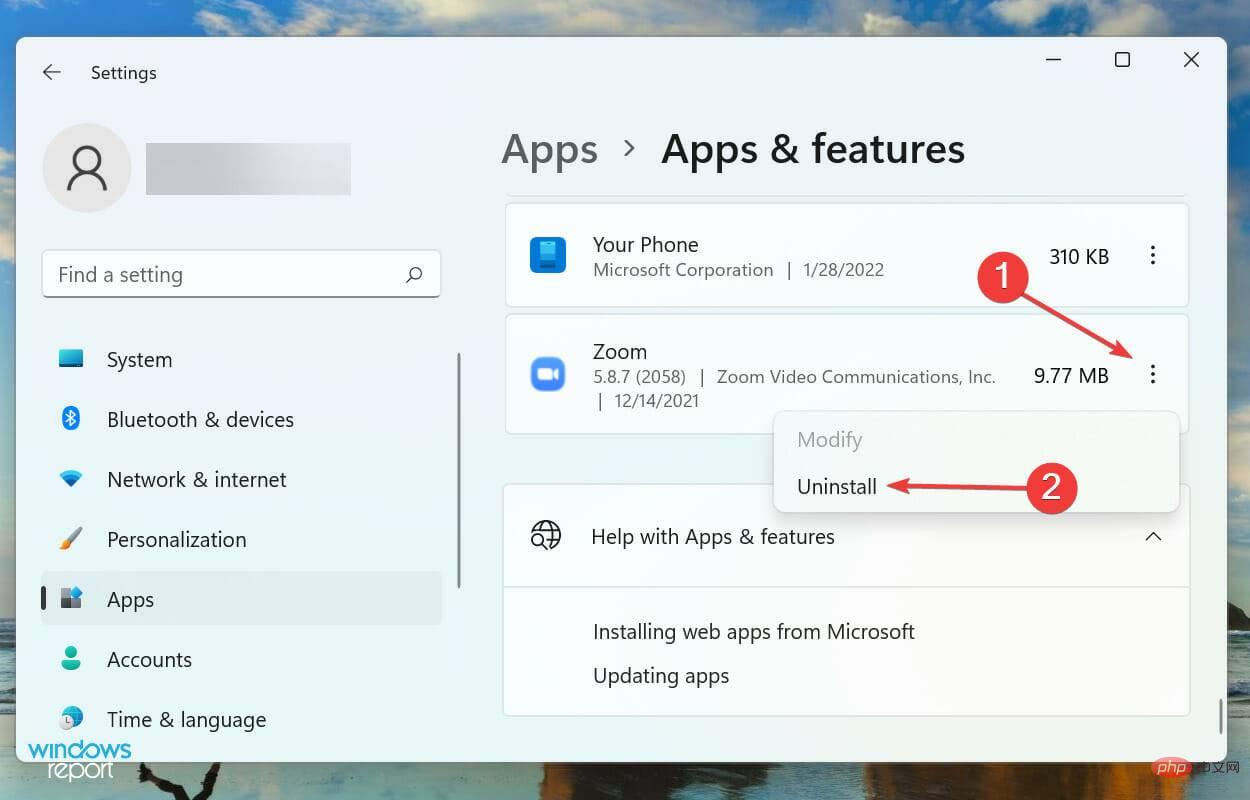
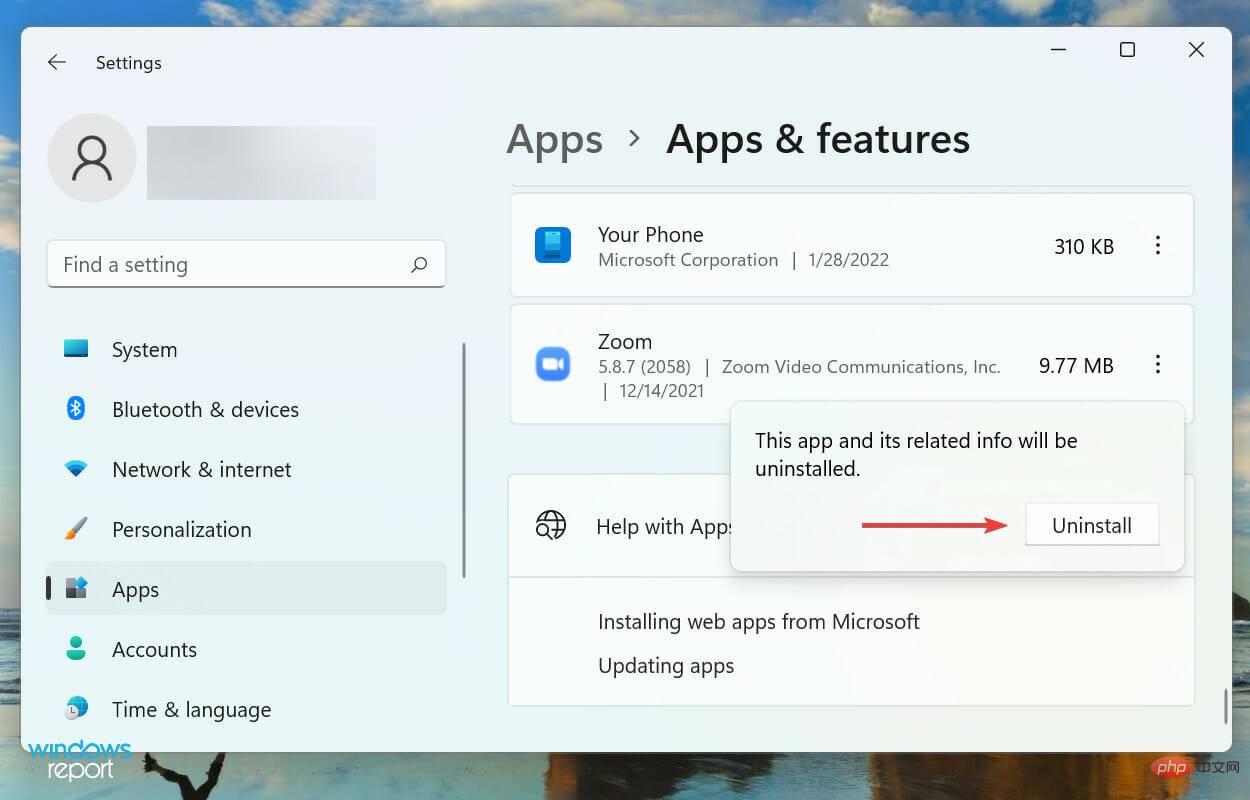
- Next, find the Zoom application, click the ellipsis next to it, and select Uninstall from the menu.

- Again, click Uninstall in the confirmation prompt that pops up.

- After deletion, follow the steps listed in this tutorial to reinstall Zoom.
If none of the above methods resolve the issue of Zoom not detecting the microphone in Windows 11, it is most likely an issue with the application itself. In this case, uninstalling the app and then reinstalling it will get it up and running.
What should I do if Zoom cannot detect the camera/webcam in Windows 11?
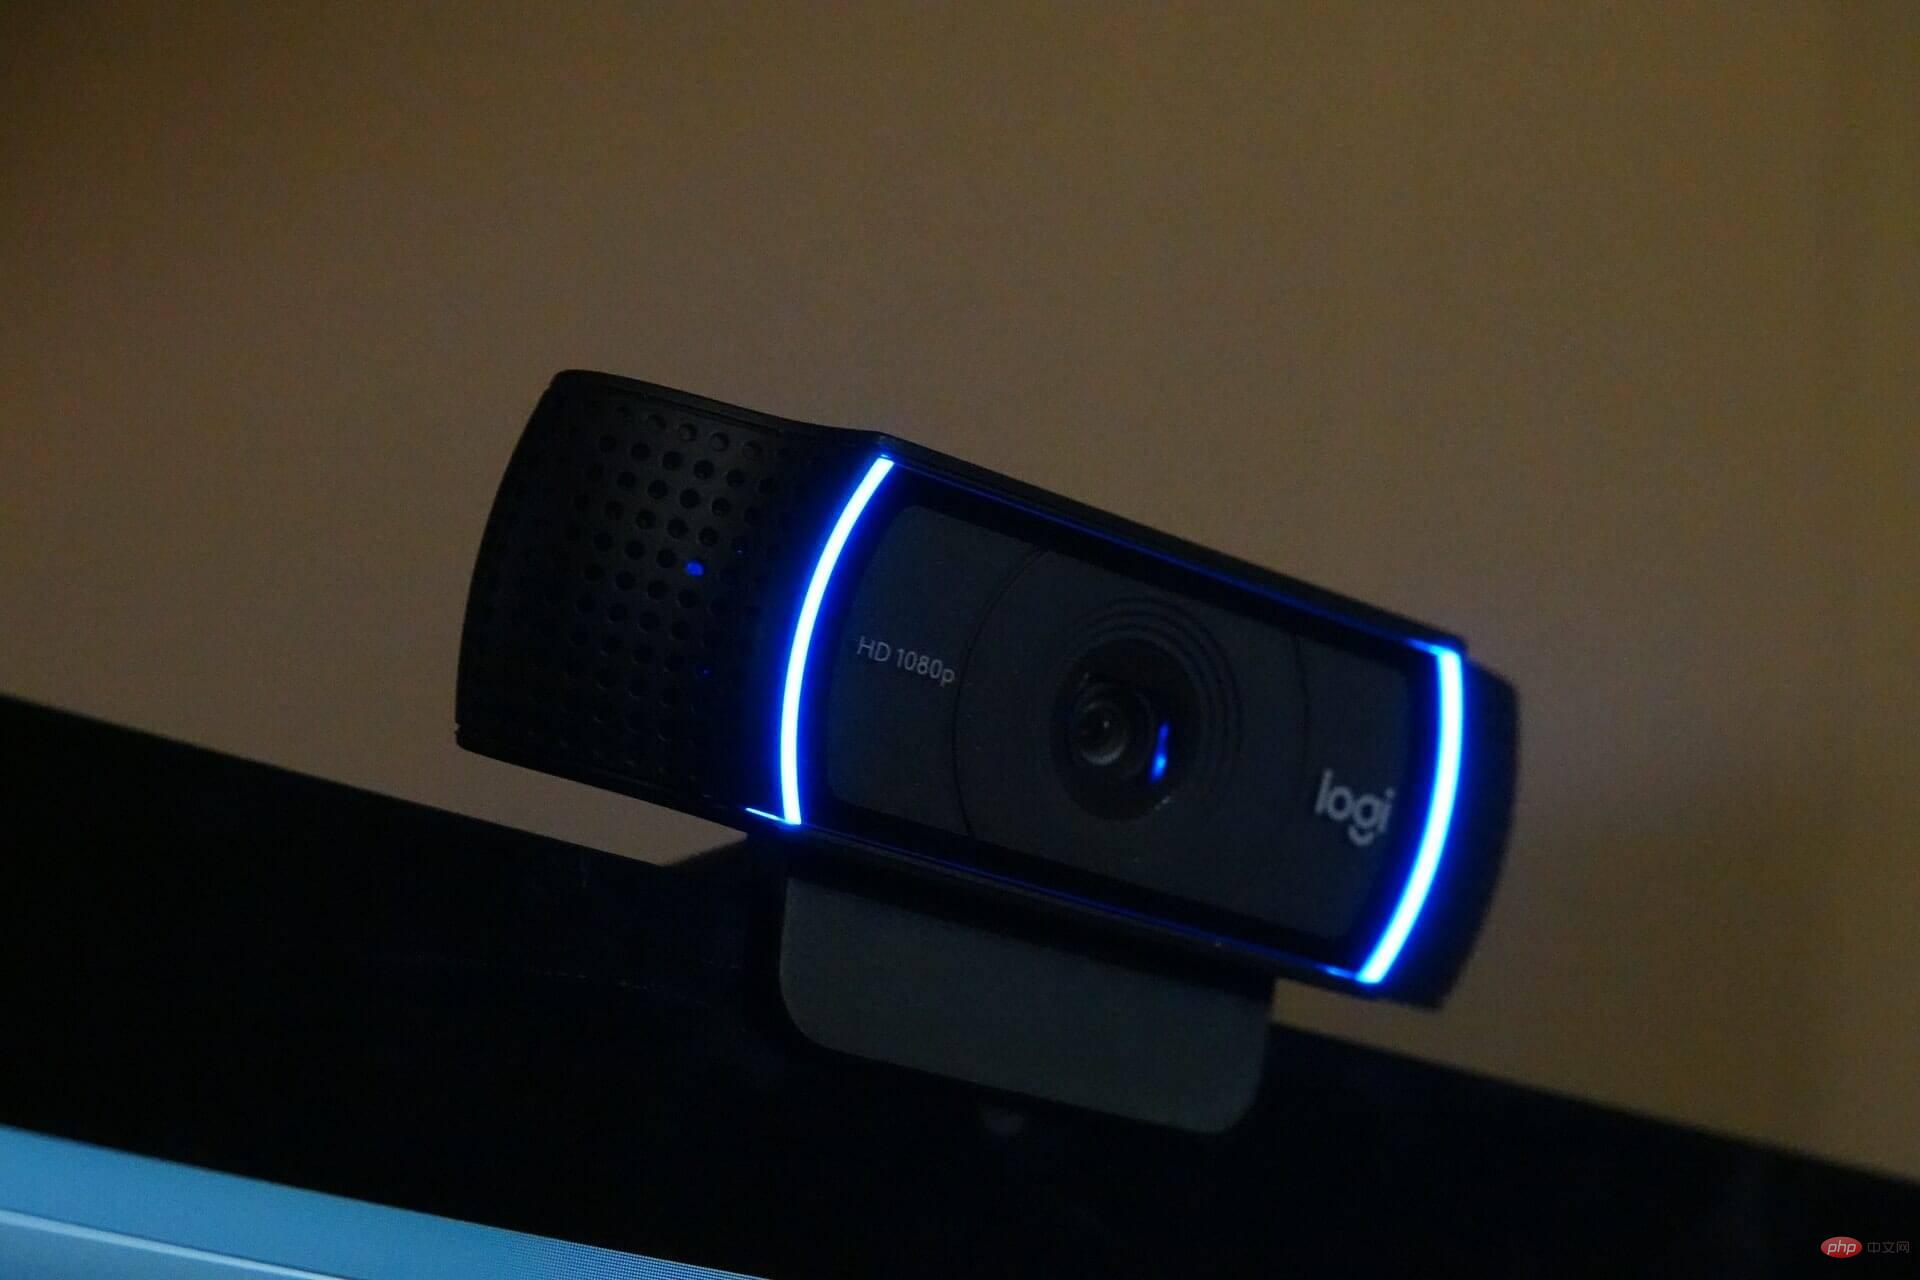
Now that you know how to fix microphone issues in Zoom, another common issue users encounter is camera issues. Many people have reported that Zoom is not detecting the camera in Windows 11.
#These are the most effective ways to fix Zoom not detecting microphone in Windows 11. Zoom is such an important app during these work-from-home days, so resolving issues quickly becomes even more important.
The above is the detailed content of What to do if Zoom can't detect microphone in Windows 11, how to fix it. For more information, please follow other related articles on the PHP Chinese website!

Hot AI Tools

Undresser.AI Undress
AI-powered app for creating realistic nude photos

AI Clothes Remover
Online AI tool for removing clothes from photos.

Undress AI Tool
Undress images for free

Clothoff.io
AI clothes remover

AI Hentai Generator
Generate AI Hentai for free.

Hot Article

Hot Tools

Notepad++7.3.1
Easy-to-use and free code editor

SublimeText3 Chinese version
Chinese version, very easy to use

Zend Studio 13.0.1
Powerful PHP integrated development environment

Dreamweaver CS6
Visual web development tools

SublimeText3 Mac version
God-level code editing software (SublimeText3)

Hot Topics
 Hyperx headset microphone has no sound
Feb 16, 2024 am 09:12 AM
The quality of hyperx headphones has always been very good, but some users find that the microphone of the headphones has no sound when using it. There are many possible reasons for this situation. Here are some of them. Several kinds. There is no sound from the hyperx headset microphone. 1. Connect and check whether the microphone is fully inserted into the headphone jack. You can try plugging and unplugging it a few times. 2. If other equipment conditions permit, you can plug the headset into other normally operating equipment to see if it can be used normally and whether the audio link is normal. 3. Audio settings Check the audio settings to make sure that the speakers and microphone are enabled normally and not muted or at a low volume. 4. To disable the software, you can try disabling the audio adapter.
 Your microphone is muted by system settings on Google Meet on Windows 10/11
May 12, 2023 pm 11:58 PM
GoogleMeet is used for communication and collaboration purposes. High-quality video conferences can be held where people can talk and share their views. But a few users face microphone issues, and the most common error is "Your microphone has been muted by the system setting." If this happens, others will not be able to hear you. But don’t panic this problem can be solved. A few reasons for microphone issues are, your microphone gets muted, changes in microphone settings, outdated drivers, etc. In this article, we will see different ways on how to fix “Your microphone is muted by the system” Settings issue in Windows 10. Method One: Check if the Microphone is Mute Before jumping into different solutions, just check the screen when you are in a meeting
 Error 0x80049dd3 error occurs in Windows 10/11
Apr 29, 2023 pm 11:28 PM
Error code 0x80049d is bound to the voice input function. Some users have encountered this issue when trying to voice type in Windows 11. Mainly when the audio device driver is faulty or it does have an old, corrupt driver, this error message will show "There is a problem with 0x80049dd3". So, don’t waste any more time and follow the steps below to quickly resolve the issue and start using your microphone again. Fix 1 – Run the Recording Audio Troubleshooter You should run the Recording Audio Troubleshooter so that it can identify the issue and resolve it accordingly. 1. Open Settings by right-clicking on the Windows icon and clicking "Settings". 2. Once you reach the "Settings" page, click "System" settings. 3. In the right window
 How to Fix Error Code 1132 in Zoom on Windows PC
May 30, 2023 am 11:08 AM
Zoom's video conferencing capabilities have made it popular among users while working from home. Many Zoom desktop client users have reported seeing error code 1132 along with an “Unknown error has occurred” message on their Windows PCs. Usually, this error code pops up when users try to log into their account and join any meeting in Zoom. In the error window, the user has the option to open a browser and join the meeting. However, some users reported that they were unable to open the meeting even on the browser. Windows firewall settings, outdated Zoom installation, or Zoom blacklisting your account could be some of the possible reasons for this error. Are you encountering an error code while using the Zoom app
 Discord microphone not working in Windows 11? Apply these fixes
Apr 28, 2023 pm 04:04 PM
Discord is a popular platform not only among gamers but also among people who want to interact with like-minded people. However, many people have reported that the Discord microphone is not working in Windows 11. Discord allows you to connect with other users individually or in groups via text, audio, and video. While the former works fine, microphone issues may affect your audio and video interactions. But the fix here is still quite simple and you can easily fix Discord microphone not working issue in Windows 11. Please read the following section to find out everything you need to know about this issue. Why does Discord microphone work on Window?
 How to Fix Acer Swift 3 Laptop Microphone Not Working
May 01, 2023 pm 10:40 PM
This can be annoying if your AcerSwift3 laptop microphone is not detected and there is no sound. Although the microphone appears active, you won't hear anything at all while playing or recording audio, playing games on apps like Discord, or communicating on Skype. There may be different reasons that may trigger this issue, some common ones include outdated or corrupted drivers, etc. This article will cover all these issues and more and provide you with different solutions to fix Acer Swift 3 built-in microphone not working issue. What should I do if the AcerSwift3 microphone is not detected? 1. Run Record Audio Troubleshooter while pressing
 Why can't my computer detect the microphone?
Sep 12, 2023 pm 05:11 PM
The reason why the microphone is not detected on the computer may be a microphone connection problem, a microphone driver problem, a system settings problem, a microphone failure, an operating system problem, a firewall or security software problem, etc. Detailed introduction: 1. Microphone connection problem, please make sure the microphone is correctly connected to the computer, check whether the microphone is plugged into the correct audio jack, and make sure the connection is firm. If you are using a USB microphone, make sure the USB plug is correctly plugged into the computer's USB interface. , the plug is not inserted to the bottom, which may cause the computer to be unable to detect the microphone, etc.
 How to solve the microphone mute problem in Win10 Knives Out
Jan 11, 2024 am 10:24 AM
Knives Out is a very popular game on Windows 10 computers. Many friends like to play it with their friends, but many of them encounter the situation where the microphone has no sound, so what should I do? Let’s take a look at the solution below. What to do if there is no sound from the Knives Out microphone in Windows 10: 1. Enter the Knives Out game interface and turn on the microphone switch. 2. Enter the game settings and check "My Microphone" in the sound settings. 3. If it still doesn’t work, click Start in the lower left corner and open the “Control Panel”. 4. After opening, click "Hardware and Sound" and then "Manage Audio Devices". 5. Select the "Recording" tab and double-click "Microphone". 6. Click "Use this device". 7. Then turn up the volume.


 .
. 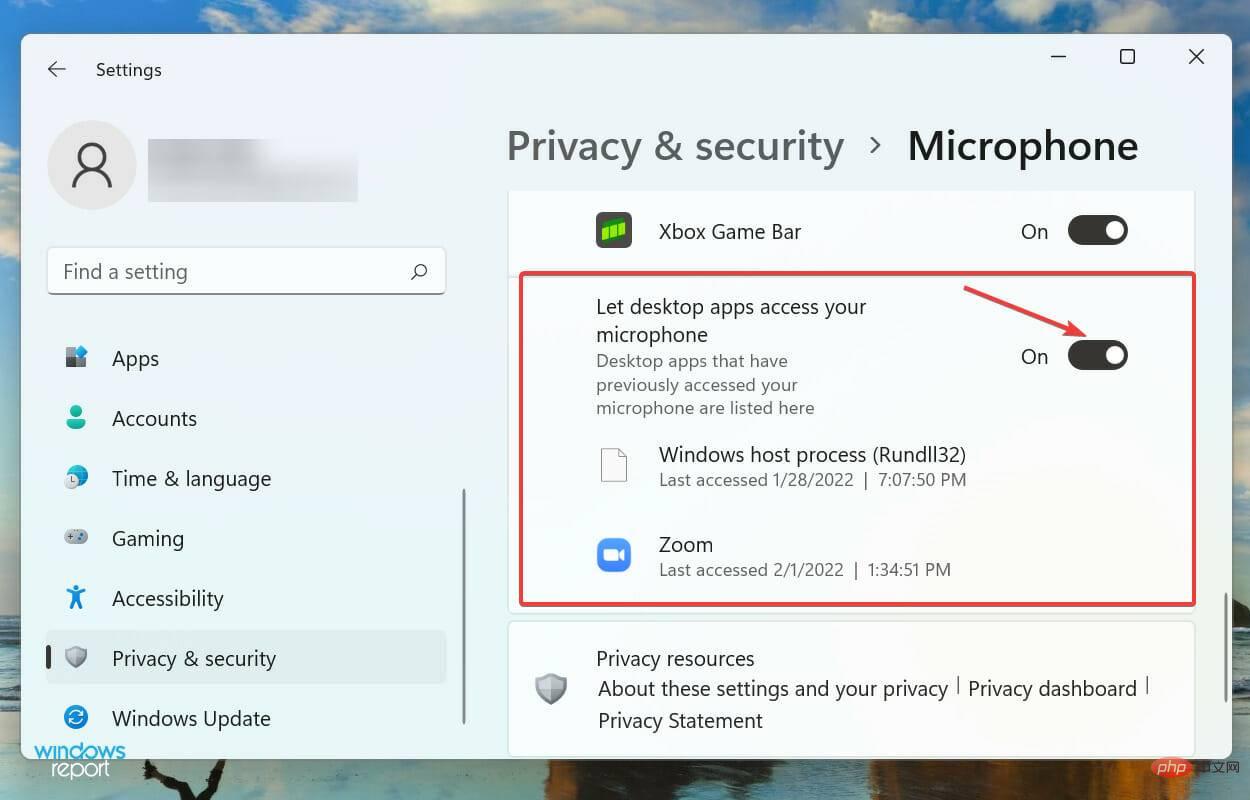 app and make sure the section listed below it has access to the microphone, in addition to the app itself.