Table of Contents
1. Front-end settings
2. Back-end code
1. Establish database
2. Entity class, Mapper
3. Accept the request and return the data
3. Display pictures
1. Backend configuration
2. Front end Configuration
Home Java javaTutorial How to use Springboot+vue to upload images to the database and display them

How to use Springboot+vue to upload images to the database and display them

May 12, 2023 am 09:52 AM
vue database springboot

    1. Front-end settings

    The front-end is Vue Element-UI and uses the el-upload component (drawing from the official) to upload images:

    1

    2

    3

    4

    5

    6

    7

    8

    9

    10

    11

    12

    13

    14

    <el-upload

         ref="upload"

         class="avatar-uploader"

         action="/setimg"

         :http-request="picUpload"

         :show-file-list="false"

         :auto-upload="false"

         :on-success="handleAvatarSuccess"

         :before-upload="beforeAvatarUpload">

       <img  class="avatar lazy"  src="/static/imghw/default1.png"  data-src="$hostURL+imageUrl"  v-if="$hostURL+imageUrl" :  alt="How to use Springboot+vue to upload images to the database and display them" >

       <i v-else class="el-icon-plus avatar-uploader-icon"></i>

     </el-upload>


    <el-button type="primary" @click="submitUpload">修改</el-button>

    Copy after login

    actionYou can set it casually here, because there is :http-request at the back to set the request yourself. Note that since you write the request yourself, you need :auto-upload="false" , and since the front-end and back-end connections need to solve cross-domain problems, a global variable is defined in $hostURL imageUrl:

    1

    2

    //在main.js中

        Vue.prototype.$hostURL=&#39;http://localhost:8082&#39;

    Copy after login

    In methods:

    1

    2

    3

    4

    5

    6

    7

    8

    9

    10

    11

    12

    13

    14

    15

    16

    17

    18

    19

    20

    21

    22

    23

    24

    25

    26

    27

    28

    29

    30

    31

    32

    33

    34

    35

    36

    37

    38

    39

    40

    41

    42

    methods:{

    //这里是官方的方法不变

        handleAvatarSuccess(res, file){

              this.imageUrl = URL.createObjectURL(file.raw);

        },

        beforeAvatarUpload(file) {

          const isJPG = file.type === &#39;image/jpeg&#39;;

          const isLt2M = file.size / 1024 / 1024 < 2;


          if (!isJPG) {

            this.$message.error(&#39;上传头像图片只能是 JPG 格式!&#39;);

          }

          if (!isLt2M) {

            this.$message.error(&#39;上传头像图片大小不能超过 2MB!&#39;);

          }

          return isJPG && isLt2M;

        },

    //这里是自定义发送请求

        picUpload(f){

         let params = new FormData()

         //注意在这里一个坑f.file

         params.append("file",f.file);

         this.$axios({

           method:&#39;post&#39;,

           //这里的id是我要改变用户的ID值

           url:&#39;/setimg/&#39;+this.userForm.id,

           data:params,

           headers:{

             &#39;content-type&#39;:&#39;multipart/form-data&#39;

           }

         }).then(res=>{

         //这里是接受修改完用户头像后的JSON数据

           this.$store.state.menu.currentUserInfo=res.data.data.backUser

           //这里返回的是头像的url

           this.imageUrl = res.data.data.backUser.avatar

         })

       },

       //触发请求

        submitUpload(){

       this.$refs.upload.submit();

        }

    }

    Copy after login

    There is a pitfall in the above code f.file. I read many blogs and found that some blogs only have f but not .file, resulting in 401 and 505 errors.

    2. Back-end code

    1. Establish database

    How to use Springboot+vue to upload images to the database and display them

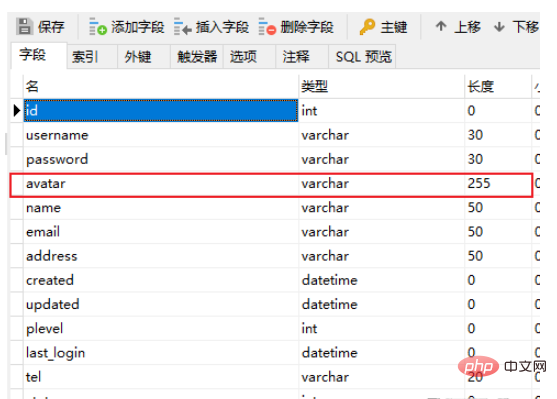
    Here the avatar is the saved partial url of the uploaded image

    2. Entity class, Mapper

    Entity class:

    Using mybatis plus

    1

    2

    3

    4

    5

    6

    7

    8

    9

    10

    11

    12

    13

    14

    15

    16

    17

    18

    19

    20

    21

    22

    23

    24

    @Data

    public class SysUser extends BaseEntity{

    //这里的BaseEntity是id,statu,created,updated数据

        private static final Long serialVersionUID = 1L;


        @NotBlank(message = "用户名不能为空")

        private String username;


    //    @TableField(exist = false)

        private String password;

        @NotBlank(message = "用户名称不能为空")

        private String name;

        //头像

        private String avatar;


        @NotBlank(message = "邮箱不能为空")

        @Email(message = "邮箱格式不正确")

        private String email;

        private String tel;

        private String address;

        @TableField("plevel")

        private Integer plevel;

        private LocalDateTime lastLogin;

    }

    Copy after login

    1

    2

    3

    4

    @Mapper

    @TableName("sys_user")

    public interface SysUserMapper extends BaseMapper<SysUser> {

    }

    Copy after login

    3. Accept the request and return the data

    1

    2

    3

    4

    5

    6

    7

    8

    9

    10

    11

    12

    13

    14

    15

    16

    17

    18

    19

    20

    21

    22

    23

    24

    25

    26

    27

    28

    29

    @Value("${file.upload-path}")

    private String pictureurl;

    @PostMapping("/setimg/{id}")

    public Result setImg(@PathVariable("id") Long id, @RequestBody MultipartFile file){

        String fileName = file.getOriginalFilename();

        File saveFile = new File(pictureurl);

        //拼接url,采用随机数,保证每个图片的url不同

        UUID uuid = UUID.randomUUID();

        //重新拼接文件名,避免文件名重名

        int index = fileName.indexOf(".");

        String newFileName ="/avatar/"+fileName.replace(".","")+uuid+fileName.substring(index);

        //存入数据库,这里可以加if判断

        SysUser user = new SysUser();

        user.setId(id);

        user.setAvatar(newFileName);

        sysUserMapper.updateById(user);

        try {

            //将文件保存指定目录

            file.transferTo(new File(pictureurl + newFileName));

        } catch (Exception e) {

            e.printStackTrace();

        }

        System.out.println("保存成功");

        SysUser ret_user = sysUserMapper.selectById(user.getId());

        ret_user.setPassword("");

        return Result.succ(MapUtil.builder()

                .put("backUser",ret_user)

                .map());

    }

    Copy after login

    Save address of pictures in yml file:

    1

    2

    file:

      upload-path: D:\Study\MyAdmin\scr

    Copy after login

    3. Display pictures

    1. Backend configuration

    Implement front-end Vue :scr If you want to display the avatar image in the url, you must set the static resource configuration in WebMVC

    Create the WebConfig class

    1

    2

    3

    4

    5

    6

    7

    8

    9

    @Configuration

    public class WebConfig implements WebMvcConfigurer{

        private String filePath = "D:/Study/MyAdmin/scr/avatar/";

        @Override

        public void addResourceHandlers(ResourceHandlerRegistry registry) {

            registry.addResourceHandler("/avatar/**").addResourceLocations("file:"+filePath);

            System.out.println("静态资源获取");

        }

    }

    Copy after login

    This way you can display the avatar image

    2. Front end Configuration

    Pay attention to cross-domain issues and the previous global address variable

    vue.config.js file (if not, create it in the same directory as scr):

    1

    2

    3

    4

    5

    6

    7

    8

    9

    10

    11

    12

    13

    14

    15

    16

    17

    18

    19

    20

    21

    22

    23

    module.exports = {

        devServer: {

            // 端口号

            open: true,

            host: &#39;localhost&#39;,

            port: 8080,

            https: false,

            hotOnly: false,

            // 配置不同的后台API地址

            proxy: {

                &#39;/api&#39;: {

                //后端端口号

                    target: &#39;http://localhost:8082&#39;,

                    ws: true,

                    changOrigin: true,

                    pathRewrite: {

                        &#39;^/api&#39;: &#39;&#39;

                    }

                }

            },

            before: app => {}

        }

    }

    Copy after login

    main .js:

    1

    axios.defaults.baseURL = &#39;/api&#39;

    Copy after login

    The above is the detailed content of How to use Springboot+vue to upload images to the database and display them. For more information, please follow other related articles on the PHP Chinese website!

    Statement of this Website
    The content of this article is voluntarily contributed by netizens, and the copyright belongs to the original author. This site does not assume corresponding legal responsibility. If you find any content suspected of plagiarism or infringement, please contact admin@php.cn

    Hot AI Tools

    Undresser.AI Undress

    Undresser.AI Undress

    AI-powered app for creating realistic nude photos

    AI Clothes Remover

    AI Clothes Remover

    Online AI tool for removing clothes from photos.

    Undress AI Tool

    Undress AI Tool

    Undress images for free

    Clothoff.io

    Clothoff.io

    AI clothes remover

    Video Face Swap

    Video Face Swap

    Swap faces in any video effortlessly with our completely free AI face swap tool!

    Hot Tools

    Notepad++7.3.1

    Notepad++7.3.1

    Easy-to-use and free code editor

    SublimeText3 Chinese version

    SublimeText3 Chinese version

    Chinese version, very easy to use

    Zend Studio 13.0.1

    Zend Studio 13.0.1

    Powerful PHP integrated development environment

    Dreamweaver CS6

    Dreamweaver CS6

    Visual web development tools

    SublimeText3 Mac version

    SublimeText3 Mac version

    God-level code editing software (SublimeText3)

    How to add functions to buttons for vue How to add functions to buttons for vue Apr 08, 2025 am 08:51 AM

    You can add a function to the Vue button by binding the button in the HTML template to a method. Define the method and write function logic in the Vue instance.

    MySQL: Simple Concepts for Easy Learning MySQL: Simple Concepts for Easy Learning Apr 10, 2025 am 09:29 AM

    MySQL is an open source relational database management system. 1) Create database and tables: Use the CREATEDATABASE and CREATETABLE commands. 2) Basic operations: INSERT, UPDATE, DELETE and SELECT. 3) Advanced operations: JOIN, subquery and transaction processing. 4) Debugging skills: Check syntax, data type and permissions. 5) Optimization suggestions: Use indexes, avoid SELECT* and use transactions.

    What does vue multi-page development mean? What does vue multi-page development mean? Apr 07, 2025 pm 11:57 PM

    Vue multi-page development is a way to build applications using the Vue.js framework, where the application is divided into separate pages: Code Maintenance: Splitting the application into multiple pages can make the code easier to manage and maintain. Modularity: Each page can be used as a separate module for easy reuse and replacement. Simple routing: Navigation between pages can be managed through simple routing configuration. SEO Optimization: Each page has its own URL, which helps SEO.

    MySQL: An Introduction to the World's Most Popular Database MySQL: An Introduction to the World's Most Popular Database Apr 12, 2025 am 12:18 AM

    MySQL is an open source relational database management system, mainly used to store and retrieve data quickly and reliably. Its working principle includes client requests, query resolution, execution of queries and return results. Examples of usage include creating tables, inserting and querying data, and advanced features such as JOIN operations. Common errors involve SQL syntax, data types, and permissions, and optimization suggestions include the use of indexes, optimized queries, and partitioning of tables.

    How to use vue traversal How to use vue traversal Apr 07, 2025 pm 11:48 PM

    There are three common methods for Vue.js to traverse arrays and objects: the v-for directive is used to traverse each element and render templates; the v-bind directive can be used with v-for to dynamically set attribute values ​​for each element; and the .map method can convert array elements into new arrays.

    How to use function intercept vue How to use function intercept vue Apr 08, 2025 am 06:51 AM

    Function interception in Vue is a technique used to limit the number of times a function is called within a specified time period and prevent performance problems. The implementation method is: import the lodash library: import { debounce } from 'lodash'; Use the debounce function to create an intercept function: const debouncedFunction = debounce(() =&gt; { / Logical / }, 500); Call the intercept function, and the control function is called at most once in 500 milliseconds.

    How to jump a tag to vue How to jump a tag to vue Apr 08, 2025 am 09:24 AM

    The methods to implement the jump of a tag in Vue include: using the a tag in the HTML template to specify the href attribute. Use the router-link component of Vue routing. Use this.$router.push() method in JavaScript. Parameters can be passed through the query parameter and routes are configured in the router options for dynamic jumps.

    What does the vue component pass value mean? What does the vue component pass value mean? Apr 07, 2025 pm 11:51 PM

    Vue component passing values ​​is a mechanism for passing data and information between components. It can be implemented through properties (props) or events: Props: Declare the data to be received in the component and pass the data in the parent component. Events: Use the $emit method to trigger an event and listen to it in the parent component using the v-on directive.

    See all articles