 Backend Development
 Python Tutorial
 How to mix synchronous and asynchronous functions in Python
How to mix synchronous and asynchronous functions in Python
Call the synchronization function in the coroutine function
Directly calling the synchronization function in the coroutine function will block the event loop, thus affecting the performance of the entire program. Let’s look at an example first:
The following is an example written using the asynchronous web framework FastAPI. FastAPI is relatively fast, but incorrect operations will become very slow.
import time

from fastapi import FastAPI

app = FastAPI()


@app.get("/")
async def root():
    time.sleep(10)
    return {"message": "Hello World"}


@app.get("/health")
async def health():
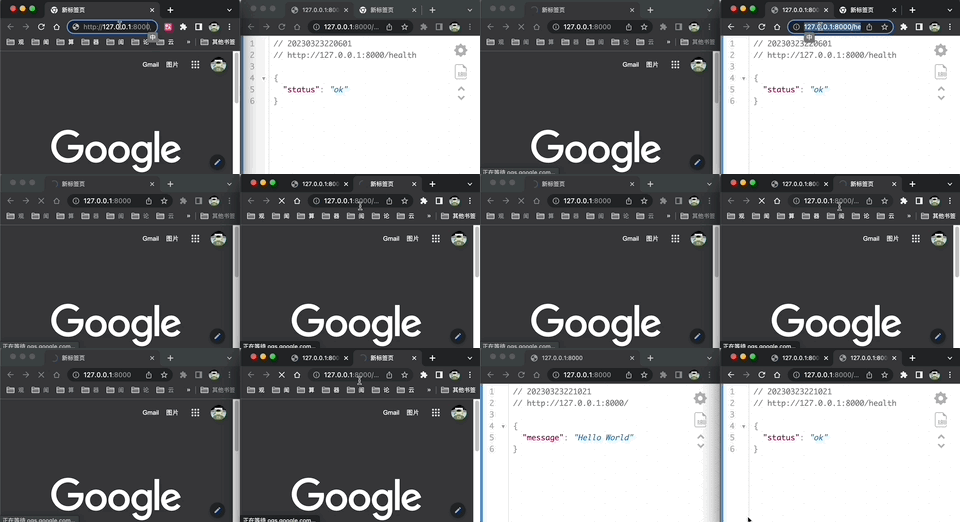
return {"status": "ok"} We have written two interfaces above. Assume that the root interface function takes 10 seconds. During these 10 seconds, the health interface is accessed. Think about what will happen. What?

Access root interface (left), immediately access health interface (right), health interface Blocked until the root interface returns, the health interface responds successfully.
time.sleep is a "synchronization" function that blocks the entire event loop.
How to solve it? Think about the previous processing method. If a function blocks the main thread, then open another thread to let the blocking function run alone. Therefore, the same principle applies here. Open a thread to run blocking operations separately, such as reading files, etc.
loop.run_in_executor method converts the synchronous function into an asynchronous non-blocking mode for processing. Specifically, loop.run_in_executor() You can create the synchronization function as a thread or process and execute the function in it, thereby avoiding blocking the event loop .
Official example: Execute code in a thread or process pool.
Then, we use loop.run_in_executor to rewrite the above example as follows:
import asyncio
import time

from fastapi import FastAPI

app = FastAPI()


@app.get("/")
async def root():
    loop = asyncio.get_event_loop()

    def do_blocking_work():
        time.sleep(10)
        print("Done blocking work!!")

    await loop.run_in_executor(None, do_blocking_work)
    return {"message": "Hello World"}


@app.get("/health")
async def health():
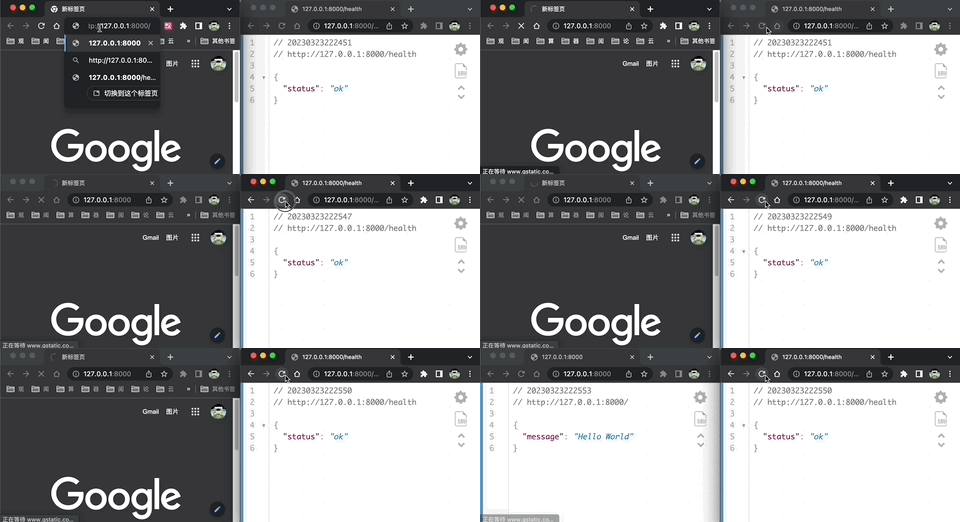
return {"status": "ok"}The effect is as follows:

root While the interface is blocked, health can still access normally without affecting each other.
Note: This is all for demonstration. When actually developing using FastAPI, you can directly replace
async def rootwithdef root, that is, replace it with a synchronous interface function. FastAPI will automatically create a thread internally to process this synchronous interface function. In general, FastAPI internally relies on threads to handle synchronization functions to avoid blocking the main thread (or the event loop in the main thread).
Call asynchronous functions in synchronous functions
Coroutines can only be executed within the "event loop", and only one coroutine can be executed at the same time.
So, the essence of calling an asynchronous function in a synchronous function is to "throw" the coroutine into the event loop and wait for the coroutine to finish executing to obtain the result.
The following functions can achieve this effect:
asyncio.runasyncio.run_coroutine_threadsafeloop.run_until_completecreate_task
Next, we will explain these methods one by one and give examples.
asyncio.run
This method is the simplest to use. Let’s first look at how to use it, and then talk about which scenarios cannot be used directlyasyncio.run
import asyncio

async def do_work():
    return 1

def main():
    result = asyncio.run(do_work())
    print(result)  # 1

if __name__ == "__main__":
main()Justrun is done, and then accept the return value.
But it is necessary to note that asyncio.run will open a new event loop every time it is called, and automatically close the event loop when it ends.
There is only one event loop in a thread, so if the current thread already has an existing event loop, you should not use asyncio.run, otherwise it will The following exception will be thrown:
RuntimeError: asyncio.run() cannot be called from a running event loop
Therefore, asyncio.run Used when opening a new event loop.
asyncio.run_coroutine_threadsafe
Documentation: https://docs.python.org/zh-cn/3/library/asyncio-task.html#asyncio.run_coroutine_threadsafe
Submit a coroutine to the specified event loop. (Thread-safe)
Return aconcurrent.futures.Futureto wait for results from other OS threads.
In other words, throw the coroutine to the event loop in other threads to run.
It is worth noting that the "event loop" here should be the event loop in other threads, not the event loop of the current thread.
The result returned is a future object. If you need to obtain the execution result of the coroutine, you can use future.result() to obtain it. For more information on future objects, see https: //docs.python.org/zh-cn/3/library/concurrent.futures.html#concurrent.futures.Future
下方给了一个例子,一共有两个线程:thread_with_loop 和 another_thread,分别用于启动事件循环和调用 run_coroutine_threadsafe
import asyncio
import threading
import time

loop = None


def get_loop():
    global loop
    if loop is None:
        loop = asyncio.new_event_loop()
    return loop


def another_thread():
    async def coro_func():
        return 1

    loop = get_loop()
    # 将协程提交到另一个线程的事件循环中执行
    future = asyncio.run_coroutine_threadsafe(coro_func(), loop)
    # 等待协程执行结果
    print(future.result())
    # 停止事件循环
    loop.call_soon_threadsafe(loop.stop)


def thread_with_loop():
    loop = get_loop()
    # 启动事件循环,确保事件循环不会退出,直到 loop.stop() 被调用
    loop.run_forever()
    loop.close()


# 启动一个线程,线程内部启动了一个事件循环
threading.Thread(target=thread_with_loop).start()
time.sleep(1)
# 在主线程中启动一个协程, 并将协程提交到另一个线程的事件循环中执行
t = threading.Thread(target=another_thread)
t.start()
t.join()loop.run_until_complete
文档: https://docs.python.org/zh-cn/3.10/library/asyncio-eventloop.html#asyncio.loop.run_until_complete
运行直到 future (
Future的实例 ) 被完成。
这个方法和
asyncio.run类似。
具体就是传入一个协程对象或者任务,然后可以直接拿到协程的返回值。
run_until_complete 属于 loop 对象的方法,所以这个方法的使用前提是有一个事件循环,注意这个事件循环必须是非运行状态,如果是运行中就会抛出如下异常:
RuntimeError: This event loop is already running
例子:
loop = asyncio.new_event_loop()
loop.run_until_complete(do_async_work())
create_task
文档: https://docs.python.org/zh-cn/3/library/asyncio-task.html#creating-tasks
再次准确一点:要运行一个协程函数的本质是将携带协程函数的任务提交至事件循环中,由事件循环发现、调度并执行。
其实一共就是满足两个条件:
任务;
事件循环。
我们使用 async def func 定义的函数叫做协程函数,func() 这样调用之后返回的结果是协程对象,到这一步协程函数内的代码都没有被执行,直到协程对象被包装成了任务,事件循环才会“正眼看它们”。
所以事件循环调度运行的基本单元就是任务,那为什么我们在使用 async/await 这些语句时没有涉及到任务这个概念呢?
这是因为 await 语法糖在内部将协程对象封装成了任务,再次强调事件循环只认识任务。
所以,想要运行一个协程对象,其实就是将协程对象封装成一个任务,至于事件循环是如何发现、调度和执行的,这个我们不用关心。
那将协程封装成的任务的方法有哪些呢?
asyncio.create_taskasyncio.ensure_futureloop.create_task
看着有好几个的,没关系,我们只关心 loop.create_task,因为其他方法最终都是调用 loop.create_task。
使用起来也是很简单的,将协程对象传入,返回值是一个任务对象。
async def do_work():
    return 222

task = loop.create_task(do_work())do_work 会被异步执行,那么 do_work 的结果怎么获取呢,task.result() 可以吗?
分情况:
如果是在一个协程函数内使用
await task.result(),这是可以的;如果是在普通函数内则不行。你不可能立即获得协程函数的返回值,因为协程函数还没有被执行呢。
asyncio.Task 运行使用 add_done_callback 添加完成时的回调函数,所以我们可以「曲线救国」,使用回调函数将结果添加到队列、Future 等等。
我这里给个基于 concurrent.futures.Future 获取结果的例子,如下:
import asyncio
from asyncio import Task
from concurrent.futures import Future

from fastapi import FastAPI

app = FastAPI()
loop = asyncio.get_event_loop()


async def do_work1():
    return 222


@app.get("/")
def root():
    # 新建一个 future 对象,用于接受结果值
    future = Future()

    # 提交任务至事件循环
    task = loop.create_task(do_work1())

    # 回调函数
    def done_callback(task: Task):
        # 设置结果
        future.set_result(task.result())

    # 为这个任务添加回调函数
    task.add_done_callback(done_callback)

    # future.result 会被阻塞,直到有结果返回为止
return future.result() # 222The above is the detailed content of How to mix synchronous and asynchronous functions in Python. For more information, please follow other related articles on the PHP Chinese website!

Hot AI Tools

Undresser.AI Undress
AI-powered app for creating realistic nude photos

AI Clothes Remover
Online AI tool for removing clothes from photos.

Undress AI Tool
Undress images for free

Clothoff.io
AI clothes remover

AI Hentai Generator
Generate AI Hentai for free.

Hot Article

Hot Tools

Notepad++7.3.1
Easy-to-use and free code editor

SublimeText3 Chinese version
Chinese version, very easy to use

Zend Studio 13.0.1
Powerful PHP integrated development environment

Dreamweaver CS6
Visual web development tools

SublimeText3 Mac version
God-level code editing software (SublimeText3)

Hot Topics
 1384
1384
 52
52
 PHP and Python: Code Examples and Comparison
Apr 15, 2025 am 12:07 AM
PHP and Python have their own advantages and disadvantages, and the choice depends on project needs and personal preferences. 1.PHP is suitable for rapid development and maintenance of large-scale web applications. 2. Python dominates the field of data science and machine learning.
 Python vs. JavaScript: Community, Libraries, and Resources
Apr 15, 2025 am 12:16 AM
Python and JavaScript have their own advantages and disadvantages in terms of community, libraries and resources. 1) The Python community is friendly and suitable for beginners, but the front-end development resources are not as rich as JavaScript. 2) Python is powerful in data science and machine learning libraries, while JavaScript is better in front-end development libraries and frameworks. 3) Both have rich learning resources, but Python is suitable for starting with official documents, while JavaScript is better with MDNWebDocs. The choice should be based on project needs and personal interests.
 How is the GPU support for PyTorch on CentOS
Apr 14, 2025 pm 06:48 PM
Enable PyTorch GPU acceleration on CentOS system requires the installation of CUDA, cuDNN and GPU versions of PyTorch. The following steps will guide you through the process: CUDA and cuDNN installation determine CUDA version compatibility: Use the nvidia-smi command to view the CUDA version supported by your NVIDIA graphics card. For example, your MX450 graphics card may support CUDA11.1 or higher. Download and install CUDAToolkit: Visit the official website of NVIDIACUDAToolkit and download and install the corresponding version according to the highest CUDA version supported by your graphics card. Install cuDNN library:
 Detailed explanation of docker principle
Apr 14, 2025 pm 11:57 PM
Docker uses Linux kernel features to provide an efficient and isolated application running environment. Its working principle is as follows: 1. The mirror is used as a read-only template, which contains everything you need to run the application; 2. The Union File System (UnionFS) stacks multiple file systems, only storing the differences, saving space and speeding up; 3. The daemon manages the mirrors and containers, and the client uses them for interaction; 4. Namespaces and cgroups implement container isolation and resource limitations; 5. Multiple network modes support container interconnection. Only by understanding these core concepts can you better utilize Docker.
 MiniOpen Centos compatibility
Apr 14, 2025 pm 05:45 PM
MinIO Object Storage: High-performance deployment under CentOS system MinIO is a high-performance, distributed object storage system developed based on the Go language, compatible with AmazonS3. It supports a variety of client languages, including Java, Python, JavaScript, and Go. This article will briefly introduce the installation and compatibility of MinIO on CentOS systems. CentOS version compatibility MinIO has been verified on multiple CentOS versions, including but not limited to: CentOS7.9: Provides a complete installation guide covering cluster configuration, environment preparation, configuration file settings, disk partitioning, and MinI
 How to operate distributed training of PyTorch on CentOS
Apr 14, 2025 pm 06:36 PM
PyTorch distributed training on CentOS system requires the following steps: PyTorch installation: The premise is that Python and pip are installed in CentOS system. Depending on your CUDA version, get the appropriate installation command from the PyTorch official website. For CPU-only training, you can use the following command: pipinstalltorchtorchvisiontorchaudio If you need GPU support, make sure that the corresponding version of CUDA and cuDNN are installed and use the corresponding PyTorch version for installation. Distributed environment configuration: Distributed training usually requires multiple machines or single-machine multiple GPUs. Place
 How to choose the PyTorch version on CentOS
Apr 14, 2025 pm 06:51 PM
When installing PyTorch on CentOS system, you need to carefully select the appropriate version and consider the following key factors: 1. System environment compatibility: Operating system: It is recommended to use CentOS7 or higher. CUDA and cuDNN:PyTorch version and CUDA version are closely related. For example, PyTorch1.9.0 requires CUDA11.1, while PyTorch2.0.1 requires CUDA11.3. The cuDNN version must also match the CUDA version. Before selecting the PyTorch version, be sure to confirm that compatible CUDA and cuDNN versions have been installed. Python version: PyTorch official branch
 How to update PyTorch to the latest version on CentOS
Apr 14, 2025 pm 06:15 PM
Updating PyTorch to the latest version on CentOS can follow the following steps: Method 1: Updating pip with pip: First make sure your pip is the latest version, because older versions of pip may not be able to properly install the latest version of PyTorch. pipinstall--upgradepip uninstalls old version of PyTorch (if installed): pipuninstalltorchtorchvisiontorchaudio installation latest


