

How to build a picture server with Nginx

效果图:
需求:实现图片的上传和批量上传
技术:nginx,vsftpd,spring,springmvc,kindeditor,centos
说明:本章节内容主要是实现图片的上传功能。使用 kindediter 是为了更好的演示图片的上传,回显,批量效果。后台代码与kindediter没有直接关系,放心阅读。另外源码中有mybatis的jar,不用理会,本章内容用不到,是为后续内容做准备!
源码:见文章底部
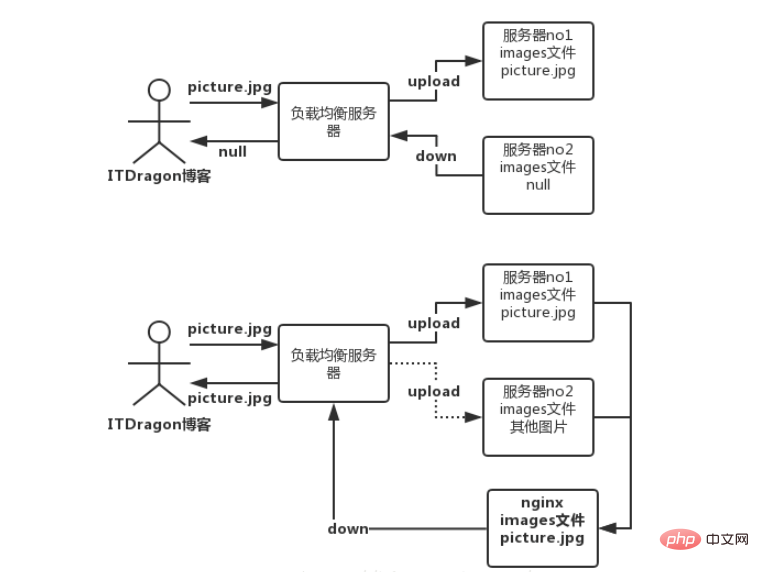
场景:用户将图片上传到 tomcat 服务器上,再由 tomcat 服务器通过ftp上传到 nginx 服务器上。
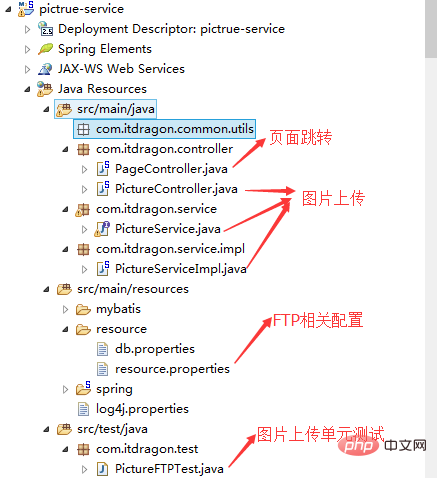
项目结构:
单元测试
首先要攻破核心技术。通过单元测试实现图片上传的功能。
package com.itdragon.test;
import java.io.file;
import java.io.fileinputstream;
import org.apache.commons.net.ftp.ftp;
import org.apache.commons.net.ftp.ftpclient;
import org.junit.test;
public class pictureftptest {
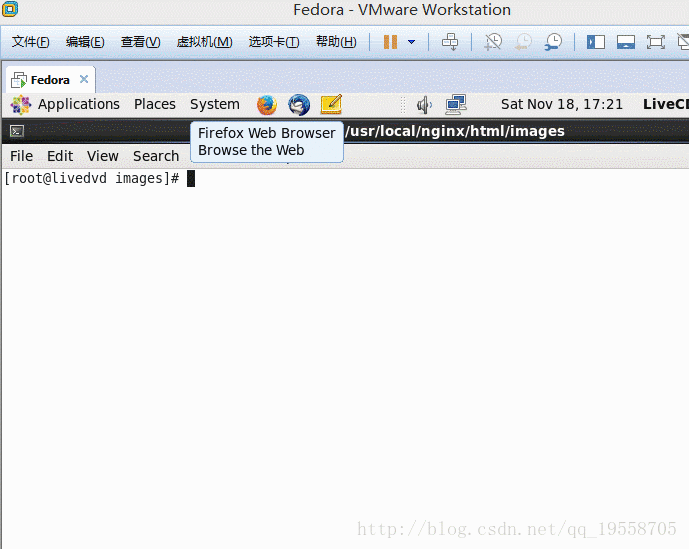
// 测试 ftp 上传图片功能
@test
public void testftpclient() throws exception {
// 1. 创建一个ftpclient对象
ftpclient ftpclient = new ftpclient();
// 2. 创建 ftp 连接
ftpclient.connect("192.168.0.11", 21);
// 3. 登录 ftp 服务器
ftpclient.login("ftpuser", "root");
// 4. 读取本地文件
fileinputstream inputstream = new fileinputstream(new file("f:\\hello.png"));
// 5. 设置上传的路径
ftpclient.changeworkingdirectory("/usr/local/nginx/html/images");
// 6. 修改上传文件的格式为二进制
ftpclient.setfiletype(ftp.binary_file_type);
// 7. 服务器存储文件,第一个参数是存储在服务器的文件名,第二个参数是文件流
ftpclient.storefile("hello.jpg", inputstream);
// 8. 关闭连接
ftpclient.logout();
}
}说明:这里的ip地址,端口,ftp用户名,密码,本地文件路径,以及nginx服务器图片路径等,这些字符串参数都要根据自己实际设置的来填写的。如果你的nginx和vsftpd安装是按照我提供的链接来做的。那你只需要改ip地址即可。
maven 的web 项目
搭建maven的web 项目,之前有写过。这里就不过多描述。
项目核心配置文件
首先是 maven 的核心文件 pom.xml
<project xmlns="http://maven.apache.org/pom/4.0.0" xmlns:xsi="http://www.w3.org/2001/xmlschema-instance"
  xsi:schemalocation="http://maven.apache.org/pom/4.0.0 http://maven.apache.org/xsd/maven-4.0.0.xsd">
  <modelversion>4.0.0</modelversion>
  <groupid>com.itdragon.upload</groupid>
  <artifactid>pictrue-service</artifactid>
  <version>0.0.1-snapshot</version>
  <packaging>war</packaging>

  <!-- 集中定义依赖版本号 -->
  <properties>
    <junit.version>4.12</junit.version>
    <spring.version>4.1.3.release</spring.version>
    <mybatis.version>3.2.8</mybatis.version>
    <mybatis.spring.version>1.2.2</mybatis.spring.version>
    <mybatis.paginator.version>1.2.15</mybatis.paginator.version>
    <mysql.version>5.1.6</mysql.version>
    <slf4j.version>1.6.4</slf4j.version>
    <jackson.version>2.4.2</jackson.version>
    <druid.version>1.0.9</druid.version>
    <httpclient.version>4.3.5</httpclient.version>
    <jstl.version>1.2</jstl.version>
    <servlet-api.version>2.5</servlet-api.version>
    <jsp-api.version>2.0</jsp-api.version>
    <joda-time.version>2.5</joda-time.version>
    <commons-lang3.version>3.3.2</commons-lang3.version>
    <commons-io.version>1.3.2</commons-io.version>
    <commons-net.version>3.3</commons-net.version>
    <pagehelper.version>3.4.2</pagehelper.version>
    <jsqlparser.version>0.9.1</jsqlparser.version>
    <commons-fileupload.version>1.3.1</commons-fileupload.version>
    <jedis.version>2.7.2</jedis.version>
    <solrj.version>4.10.3</solrj.version>
  </properties>
  <dependencies>
    <!-- 时间操作组件 -->
    <dependency>
      <groupid>joda-time</groupid>
      <artifactid>joda-time</artifactid>
      <version>${joda-time.version}</version>
    </dependency>
    <!-- apache工具组件 -->
    <dependency>
      <groupid>org.apache.commons</groupid>
      <artifactid>commons-lang3</artifactid>
      <version>${commons-lang3.version}</version>
    </dependency>
    <dependency>
      <groupid>org.apache.commons</groupid>
      <artifactid>commons-io</artifactid>
      <version>${commons-io.version}</version>
    </dependency>
    <dependency>
      <groupid>commons-net</groupid>
      <artifactid>commons-net</artifactid>
      <version>${commons-net.version}</version>
    </dependency>
    <!-- jackson json处理工具包 -->
    <dependency>
      <groupid>com.fasterxml.jackson.core</groupid>
      <artifactid>jackson-databind</artifactid>
      <version>${jackson.version}</version>
    </dependency>
    <!-- httpclient -->
    <dependency>
      <groupid>org.apache.httpcomponents</groupid>
      <artifactid>httpclient</artifactid>
      <version>${httpclient.version}</version>
    </dependency>
    <!-- 单元测试 -->
    <dependency>
      <groupid>junit</groupid>
      <artifactid>junit</artifactid>
      <version>${junit.version}</version>
      <scope>test</scope>
    </dependency>
    <!-- 日志处理 -->
    <dependency>
      <groupid>org.slf4j</groupid>
      <artifactid>slf4j-log4j12</artifactid>
      <version>${slf4j.version}</version>
    </dependency>
    <!-- mybatis -->
    <dependency>
      <groupid>org.mybatis</groupid>
      <artifactid>mybatis</artifactid>
      <version>${mybatis.version}</version>
    </dependency>
    <dependency>
      <groupid>org.mybatis</groupid>
      <artifactid>mybatis-spring</artifactid>
      <version>${mybatis.spring.version}</version>
    </dependency>
    <dependency>
      <groupid>com.github.miemiedev</groupid>
      <artifactid>mybatis-paginator</artifactid>
      <version>${mybatis.paginator.version}</version>
    </dependency>
    <dependency>
      <groupid>com.github.pagehelper</groupid>
      <artifactid>pagehelper</artifactid>
      <version>${pagehelper.version}</version>
    </dependency>
    <!-- mysql -->
    <dependency>
      <groupid>mysql</groupid>
      <artifactid>mysql-connector-java</artifactid>
      <version>${mysql.version}</version>
    </dependency>
    <!-- 连接池 -->
    <dependency>
      <groupid>com.alibaba</groupid>
      <artifactid>druid</artifactid>
      <version>${druid.version}</version>
    </dependency>
    <!-- spring -->
    <dependency>
      <groupid>org.springframework</groupid>
      <artifactid>spring-context</artifactid>
      <version>${spring.version}</version>
    </dependency>
    <dependency>
      <groupid>org.springframework</groupid>
      <artifactid>spring-beans</artifactid>
      <version>${spring.version}</version>
    </dependency>
    <dependency>
      <groupid>org.springframework</groupid>
      <artifactid>spring-webmvc</artifactid>
      <version>${spring.version}</version>
    </dependency>
    <dependency>
      <groupid>org.springframework</groupid>
      <artifactid>spring-jdbc</artifactid>
      <version>${spring.version}</version>
    </dependency>
    <dependency>
      <groupid>org.springframework</groupid>
      <artifactid>spring-aspects</artifactid>
      <version>${spring.version}</version>
    </dependency>
    <!-- jsp相关 -->
    <dependency>
      <groupid>jstl</groupid>
      <artifactid>jstl</artifactid>
      <version>${jstl.version}</version>
    </dependency>
    <dependency>
      <groupid>javax.servlet</groupid>
      <artifactid>servlet-api</artifactid>
      <version>${servlet-api.version}</version>
      <scope>provided</scope>
    </dependency>
    <dependency>
      <groupid>javax.servlet</groupid>
      <artifactid>jsp-api</artifactid>
      <version>${jsp-api.version}</version>
      <scope>provided</scope>
    </dependency>
    <!-- 文件上传组件 -->
    <dependency>
      <groupid>commons-fileupload</groupid>
      <artifactid>commons-fileupload</artifactid>
      <version>${commons-fileupload.version}</version>
    </dependency>
    <!-- redis客户端 -->
    <dependency>
      <groupid>redis.clients</groupid>
      <artifactid>jedis</artifactid>
      <version>${jedis.version}</version>
    </dependency>
    <!-- solr客户端 -->
    <dependency>
      <groupid>org.apache.solr</groupid>
      <artifactid>solr-solrj</artifactid>
      <version>${solrj.version}</version>
    </dependency>
  </dependencies>

  <build>
    <finalname>${project.artifactid}</finalname>
    <plugins>
      <!-- 资源文件拷贝插件 -->
      <plugin>
        <groupid>org.apache.maven.plugins</groupid>
        <artifactid>maven-resources-plugin</artifactid>
        <version>2.7</version>
        <configuration>
          <encoding>utf-8</encoding>
        </configuration>
      </plugin>
      <!-- java编译插件 -->
      <plugin>
        <groupid>org.apache.maven.plugins</groupid>
        <artifactid>maven-compiler-plugin</artifactid>
        <version>3.2</version>
        <configuration>
          <source>1.7</source>
          <target>1.7</target>
          <encoding>utf-8</encoding>
        </configuration>
      </plugin>
    </plugins>
    <pluginmanagement>
      <plugins>
        <!-- 配置tomcat插件 -->
        <plugin>
          <groupid>org.apache.tomcat.maven</groupid>
          <artifactid>tomcat7-maven-plugin</artifactid>
          <version>2.2</version>
        </plugin>
      </plugins>
    </pluginmanagement>
  </build>
</project>说明:和文件上传有直接关系的是:
<dependency>
      <groupid>commons-fileupload</groupid>
      <artifactid>commons-fileupload</artifactid>
</dependency>然后是 web 项目的核心文件 web.xml
<?xml version="1.0" encoding="utf-8"?>
<web-app xmlns:xsi="http://www.w3.org/2001/xmlschema-instance"
  xmlns="http://java.sun.com/xml/ns/javaee" xmlns:web="http://java.sun.com/xml/ns/javaee/web-app_2_5.xsd"
  xsi:schemalocation="http://java.sun.com/xml/ns/javaee http://java.sun.com/xml/ns/javaee/web-app_2_5.xsd"
  id="taotao" version="2.5">
  <display-name>pictrue-service</display-name>
  <!-- 加载spring容器 -->
  <context-param>
    <param-name>contextconfiglocation</param-name>
    <param-value>classpath:spring/applicationcontext-*.xml</param-value>
  </context-param>
  <listener>
    <listener-class>org.springframework.web.context.contextloaderlistener</listener-class>
  </listener>
  <!-- 解决post乱码 -->
  <filter>
    <filter-name>characterencodingfilter</filter-name>
    <filter-class>org.springframework.web.filter.characterencodingfilter</filter-class>
    <init-param>
      <param-name>encoding</param-name>
      <param-value>utf-8</param-value>
    </init-param>
  </filter>
  <filter-mapping>
    <filter-name>characterencodingfilter</filter-name>
    <url-pattern>/*</url-pattern>
  </filter-mapping>
  <!-- springmvc的前端控制器 -->
  <servlet>
    <servlet-name>pictrue-service</servlet-name>
    <servlet-class>org.springframework.web.servlet.dispatcherservlet</servlet-class>
    <init-param>
      <param-name>contextconfiglocation</param-name>
      <param-value>classpath:spring/springmvc.xml</param-value>
    </init-param>
    <load-on-startup>1</load-on-startup>
  </servlet>
  <servlet-mapping>
    <servlet-name>pictrue-service</servlet-name>
    <url-pattern>/</url-pattern>
  </servlet-mapping>
</web-app>再是 springmvc 配置文件 springmvc.xml,需要添加文件上传解析器
<!-- 定义文件上传解析器 -->
  <bean id="multipartresolver"
    class="org.springframework.web.multipart.commons.commonsmultipartresolver">
    <!-- 设定默认编码 -->
    <property name="defaultencoding" value="utf-8"></property>
    <!-- 设定文件上传的最大值5mb,5*1024*1024 -->
    <property name="maxuploadsize" value="5242880"></property>
</bean>最后是 ftp 配置文件 resource.properties
ftp_address=192.168.0.11
ftp_port=21
ftp_username=ftpuser
ftp_password=root
ftp_base_path=/usr/local/nginx/html/images
image_base_url=http://192.168.0.11/images
service 层
上传图片的接口 pictureservice.java
package com.itdragon.service;
import java.util.map;
import org.springframework.web.multipart.multipartfile;
public interface pictureservice {

  /**
   * 上传,批量上传接口
   * @param uploadfile
   * @return
   */
  map uploadpicture(multipartfile uploadfile);
}上传图片接口实现类 pictureserviceimpl.java
package com.itdragon.service.impl;

import java.io.ioexception;
import java.io.inputstream;
import java.util.hashmap;
import java.util.map;

import org.apache.commons.net.ftp.ftp;
import org.apache.commons.net.ftp.ftpclient;
import org.apache.commons.net.ftp.ftpreply;
import org.springframework.beans.factory.annotation.value;
import org.springframework.stereotype.service;
import org.springframework.web.multipart.multipartfile;

import com.itdragon.service.pictureservice;

@service
@suppresswarnings({"rawtypes", "unchecked"})
public class pictureserviceimpl implements pictureservice {

  // 通过 spring4 的 value注解,获取配置文件中的属性值
  @value("${ftp_address}")
  private string ftp_address;   // ftp 服务器ip地址
  @value("${ftp_port}")
  private integer ftp_port;    // ftp 服务器port,默认是21
  @value("${ftp_username}")
  private string ftp_username;  // ftp 服务器用户名
  @value("${ftp_password}")
  private string ftp_password;  // ftp 服务器密码
  @value("${ftp_base_path}")
  private string ftp_base_path;  // ftp 服务器存储图片的绝对路径
  @value("${image_base_url}")
  private string image_base_url; // ftp 服务器外网访问图片路径

  @override
  public map uploadpicture(multipartfile uploadfile) {
    map resultmap = new hashmap<>();
    try {
      // 1. 取原始文件名
      string oldname = uploadfile.getoriginalfilename();

      // 2. ftp 服务器的文件名
      string newname = oldname;
      //图片上传
      boolean result = uploadfile(ftp_address, ftp_port, ftp_username, ftp_password,
          uploadfile.getinputstream(), ftp_base_path, newname);
      //返回结果
      if(!result) {
        resultmap.put("error", 1);
        resultmap.put("message", "upload fail");
        return resultmap;
      }
      resultmap.put("error", 0);
      resultmap.put("url", image_base_url + "/" + newname);
      return resultmap;

    } catch (exception e) {
      e.printstacktrace();
      resultmap.put("error", 1);
      resultmap.put("message", "upload fail");
      return resultmap;
    }
  }

  /**
   * ftp 上传图片方法
   * @param ip      ftp 服务器ip地址
   * @param port     ftp 服务器port,默认是21
   * @param account    ftp 服务器用户名
   * @param passwd    ftp 服务器密码
   * @param inputstream  文件流
   * @param workingdir  ftp 服务器存储图片的绝对路径
   * @param filename   上传到ftp 服务器文件名
   * @throws exception
   *
   */
  public boolean uploadfile(string ip, integer port, string account, string passwd,
      inputstream inputstream, string workingdir, string filename) throws exception{
    boolean result = false;
    // 1. 创建一个ftpclient对象
    ftpclient ftpclient = new ftpclient();
    try {
      // 2. 创建 ftp 连接
      ftpclient.connect(ip, port);
      // 3. 登录 ftp 服务器
      ftpclient.login(account, passwd);
      int reply = ftpclient.getreplycode(); // 获取连接ftp 状态返回值
      system.out.println("code : " + reply);
      if (!ftpreply.ispositivecompletion(reply)) {
        ftpclient.disconnect(); // 如果返回状态不再 200 ~ 300 则认为连接失败
        return result;
      }
      // 4. 读取本地文件
//     fileinputstream inputstream = new fileinputstream(new file("f:\\hello.png"));
      // 5. 设置上传的路径
      ftpclient.changeworkingdirectory(workingdir);
      // 6. 修改上传文件的格式为二进制
      ftpclient.setfiletype(ftp.binary_file_type);
      // 7. 服务器存储文件,第一个参数是存储在服务器的文件名,第二个参数是文件流
      if (!ftpclient.storefile(filename, inputstream)) {
        return result;
      }
      // 8. 关闭连接
      inputstream.close();
      ftpclient.logout();
      result = true;
    } catch (exception e) {
      e.printstacktrace();
    }finally {
      // fixme 听说,项目里面最好少用try catch 捕获异常,这样会导致spring的事务回滚出问题???难道之前写的代码都是假代码!!!
      if (ftpclient.isconnected()) {
        try {
          ftpclient.disconnect();
        } catch (ioexception ioe) {
        }
      }
    }
    return result;
  }

}说明:
① @value 注解是spring4 中提供的,@value("${xxx}")
② 返回值是一个map,并且key有error,url,message。这是根据kindediter的语法要求来的。
controller 层
负责页面跳转的 pagecontroller.java
package com.itdragon.controller;

import org.springframework.stereotype.controller;
import org.springframework.web.bind.annotation.pathvariable;
import org.springframework.web.bind.annotation.requestmapping;

@controller
public class pagecontroller {

  /**
   * 打开首页
   */
  @requestmapping("/")
  public string showindex() {
    return "index";
  }

  @requestmapping("/{page}")
  public string showpage(@pathvariable string page) {
    system.out.println("page : " + page);
    return page;
  }
}负责图片上传的 picturecontroller.java
package com.itdragon.controller;

import java.util.map;

import org.springframework.beans.factory.annotation.autowired;
import org.springframework.web.bind.annotation.requestmapping;
import org.springframework.web.bind.annotation.requestparam;
import org.springframework.web.bind.annotation.restcontroller;
import org.springframework.web.multipart.multipartfile;

import com.fasterxml.jackson.core.jsonprocessingexception;
import com.fasterxml.jackson.databind.objectmapper;
import com.itdragon.service.pictureservice;

@restcontroller
public class picturecontroller {

  @autowired
  private pictureservice pictureservice;

  @requestmapping("pic/upload")
  public string pictureupload(@requestparam(value = "fileupload") multipartfile uploadfile) {
    string json = "";
    try {
      map result = pictureservice.uploadpicture(uploadfile);
      // 浏览器擅长处理json格式的字符串,为了减少因为浏览器内核不同导致的bug,建议用json
      json = new objectmapper().writevalueasstring(result);
    } catch (jsonprocessingexception e) {
      e.printstacktrace();
    }
    return json;
  }
}说明:
① @restcontroller 也是spring4 提供的,是 @controller + @responsebody 的组合注解。
② controller层的返回值是一个json格式的字符串。是考虑到浏览器对json解析兼容性比较好。
views视图层
负责上传图片的jsp页面 pic-upload.jsp
<%@ page language="java" contenttype="text/html; utf-8" pageencoding="utf-8"%>
<!doctype html>
<html>
<head>
<meta http-equiv="content-type" content="text/html; charset=utf-8">
<title>itdragon 图片上传</title>
</head>
<link href="/js/kindeditor-4.1.10/themes/default/default.css" rel="external nofollow" type="text/css" rel="stylesheet">
<script type="text/javascript" src="js/jquery.min.js"></script>
<script type="text/javascript" charset="utf-8" src="/js/kindeditor-4.1.10/kindeditor-all-min.js"></script>
<script type="text/javascript" charset="utf-8" src="/js/kindeditor-4.1.10/lang/zh_cn.js"></script>
</head>
<body>
<h3 id="测试上传图片功能接口的form表单">测试上传图片功能接口的form表单</h3>
<form action="pic/upload" method="post" enctype="multipart/form-data">
<input type="file" name="fileupload" />
<input type="submit" value="上传文件" />
</form>
<hr />
<h3 id="借用kindeditor富文本编辑器实现批量上传图片">借用kindeditor富文本编辑器实现批量上传图片</h3>
<textarea id="kindeditordesc" style="width:800px;height:300px;visibility:hidden;"></textarea>
<script type="text/javascript">
$(function(){
//初始化富文本编辑器
kindeditor.create("#kindeditordesc", {
// name值,必须和controller 的参数对应,不然会提示 400 的错误
filepostname : "fileupload",
// action值,
uploadjson : '/pic/upload',
// 设置上传类型,分别为image、flash、media、file
dir : "image"
});
});
</script>
</body>
</html>说明:pic-upload.jsp 分为两个部分,第一个部分是为了测试上传图片功能的form表单。第二个部分是为了更好的体验上传,批量上传,回显功能的kindediter 富文本编辑器。
The above is the detailed content of How to build a picture server with Nginx. For more information, please follow other related articles on the PHP Chinese website!

Hot AI Tools

Undresser.AI Undress
AI-powered app for creating realistic nude photos

AI Clothes Remover
Online AI tool for removing clothes from photos.

Undress AI Tool
Undress images for free

Clothoff.io
AI clothes remover

AI Hentai Generator
Generate AI Hentai for free.

Hot Article
Hot Tools

Notepad++7.3.1
Easy-to-use and free code editor

SublimeText3 Chinese version
Chinese version, very easy to use

Zend Studio 13.0.1
Powerful PHP integrated development environment

Dreamweaver CS6
Visual web development tools

SublimeText3 Mac version
God-level code editing software (SublimeText3)
Hot Topics
 1382
1382
 52
52

 How to check whether nginx is started
Apr 14, 2025 pm 01:03 PM
How to check whether nginx is started
Apr 14, 2025 pm 01:03 PM
How to confirm whether Nginx is started: 1. Use the command line: systemctl status nginx (Linux/Unix), netstat -ano | findstr 80 (Windows); 2. Check whether port 80 is open; 3. Check the Nginx startup message in the system log; 4. Use third-party tools, such as Nagios, Zabbix, and Icinga.
 How to configure nginx in Windows
Apr 14, 2025 pm 12:57 PM
How to configure nginx in Windows
Apr 14, 2025 pm 12:57 PM
How to configure Nginx in Windows? Install Nginx and create a virtual host configuration. Modify the main configuration file and include the virtual host configuration. Start or reload Nginx. Test the configuration and view the website. Selectively enable SSL and configure SSL certificates. Selectively set the firewall to allow port 80 and 443 traffic.
 How to check whether nginx is started?
Apr 14, 2025 pm 12:48 PM
How to check whether nginx is started?
Apr 14, 2025 pm 12:48 PM
In Linux, use the following command to check whether Nginx is started: systemctl status nginx judges based on the command output: If "Active: active (running)" is displayed, Nginx is started. If "Active: inactive (dead)" is displayed, Nginx is stopped.
 How to start nginx in Linux
Apr 14, 2025 pm 12:51 PM
How to start nginx in Linux
Apr 14, 2025 pm 12:51 PM
Steps to start Nginx in Linux: Check whether Nginx is installed. Use systemctl start nginx to start the Nginx service. Use systemctl enable nginx to enable automatic startup of Nginx at system startup. Use systemctl status nginx to verify that the startup is successful. Visit http://localhost in a web browser to view the default welcome page.
 How to solve the problem of nginx cross-domain
Apr 14, 2025 am 10:15 AM
How to solve the problem of nginx cross-domain
Apr 14, 2025 am 10:15 AM
There are two ways to solve the Nginx cross-domain problem: modify the cross-domain response header: add directives to allow cross-domain requests, specify allowed methods and headers, and set cache time. Use CORS modules: Enable modules and configure CORS rules that allow cross-domain requests, methods, headers, and cache times.
 How to check the running status of nginx
Apr 14, 2025 am 11:48 AM
How to check the running status of nginx
Apr 14, 2025 am 11:48 AM
The methods to view the running status of Nginx are: use the ps command to view the process status; view the Nginx configuration file /etc/nginx/nginx.conf; use the Nginx status module to enable the status endpoint; use monitoring tools such as Prometheus, Zabbix, or Nagios.
 How to start nginx server
Apr 14, 2025 pm 12:27 PM
How to start nginx server
Apr 14, 2025 pm 12:27 PM
Starting an Nginx server requires different steps according to different operating systems: Linux/Unix system: Install the Nginx package (for example, using apt-get or yum). Use systemctl to start an Nginx service (for example, sudo systemctl start nginx). Windows system: Download and install Windows binary files. Start Nginx using the nginx.exe executable (for example, nginx.exe -c conf\nginx.conf). No matter which operating system you use, you can access the server IP
 How to solve nginx304 error
Apr 14, 2025 pm 12:45 PM
How to solve nginx304 error
Apr 14, 2025 pm 12:45 PM
Answer to the question: 304 Not Modified error indicates that the browser has cached the latest resource version of the client request. Solution: 1. Clear the browser cache; 2. Disable the browser cache; 3. Configure Nginx to allow client cache; 4. Check file permissions; 5. Check file hash; 6. Disable CDN or reverse proxy cache; 7. Restart Nginx.
