

How to configure Nginx SSL certificate to deploy HTTPS website

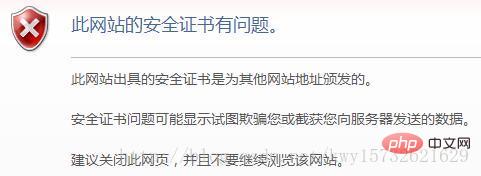
Self-issued ssl certificate that is not trusted by the browser
Manually issued
xshell logs in to the server and uses openssl to generate rsa Key and certificate
# 生成一个rsa密钥
$ openssl genrsa -des3 -out tfjybj.key 1024

# 拷贝一个不需要输入密码的密钥文件
$ openssl rsa -in dmsdbj.key -out tfjybj_nopass.key

# 生成一个证书请求
$ openssl req -new -key tfjybj.key -out tfjybj.csr
Here you will be prompted to enter information such as province, city, domain name, etc. The email must be the domain name suffix. This generates a csr file, which is the csr file when submitted to the ssl provider.
(Since I don’t have a screenshot here, I found a picture from the Internet. What needs to be replaced is the 33iq below, which is replaced by tfjybj)
When entering the password in the middle , nothing is displayed, but just enter it
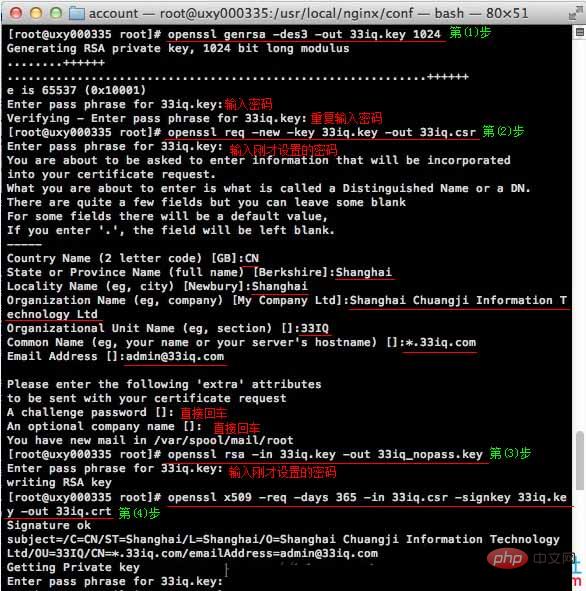
# 自己签发证书
$ openssl x509 -req -days 365 -in tfjybj.csr -signkey tfjybj.key -out tfjybj.crt
Put the generated certificate in the same directory as the nginx configuration file;
nginx configuration
Edit the nginx configuration file nginx.conf and add https protocol
server {
  server_name tfjybj.com;
  listen 443;
  ssl on;
  ssl_certificate /usr/local/nginx/conf/tfjybj.crt;
  ssl_certificate_key /usr/local/nginx/conf/tfjybj_nopass.key;
  # 若ssl_certificate_key使用tfjybj.key,则每次启动nginx服务器都要求输入key的密码。
  (开始我不知道,纳闷为啥启动nginx、关闭nginx都要输入密码)
}Restart nginx
Issue it yourself The SSL certificate can realize the encrypted transmission function, but the browser does not trust it and will give a prompt:
Certificate issued through a third party – Alibaba Cloud
Issue Certificate
Log in to the Alibaba Cloud Management Console, select [Certificate Service] from the [Cloud Shield] menu, and choose to purchase a certificate;
I got the free version for testing. After applying, after a day or two of review, I can download the certificate. After downloading and decompressing, there are two files, one ending with key, the private key, and the other ending with pem, the public key;
Configuring nginx
File description:
The certificate file "Application Certificate Name.pem" contains two paragraphs of content. Please do not delete either paragraph.
If it is a csr created by the certificate system, it also includes: certificate private key file "applied certificate name.key".
(1) Create the cert directory in the nginx installation directory, and copy all the downloaded files to the cert directory. If you create a csr file yourself when applying for a certificate, please put the corresponding private key file in the cert directory and name it "applied certificate name.key";
(2) Open conf in the nginx installation directory nginx.conf file in the directory, find:
# https server
# #server {
# listen 443;
# server_name localhost;
# ssl on;
# ssl_certificate cert.pem;
# ssl_certificate_key cert.key;
# ssl_session_timeout 5m;
# ssl_protocols sslv2 sslv3 tlsv1;
# ssl_ciphers all:!adh:!export56:rc4+rsa:+high:+medium:+low:+sslv2:+exp;
# ssl_prefer_server_ciphers on;
# location / {
#
#
#}
#}(3) Modify it to (The attributes starting with ssl among the following attributes are directly related to the certificate configuration. Please copy or adjust other attributes based on your actual situation. ) :
server {
listen 443;
server_name localhost;
ssl on;
root html;
index index.html index.htm;
ssl_certificate cert/申请的证书名字.pem;
ssl_certificate_key cert/申请的证书名字.key;
ssl_session_timeout 5m;
ssl_ciphers ecdhe-rsa-aes128-gcm-sha256:ecdhe:ecdh:aes:high:!null:!anull:!md5:!adh:!rc4;
ssl_protocols tlsv1 tlsv1.1 tlsv1.2;
ssl_prefer_server_ciphers on;
location / {
root html;
index index.html index.htm;
}
}Save and exit.
(4) Restart nginx.
(5) Access your site via https
The above is the detailed content of How to configure Nginx SSL certificate to deploy HTTPS website. For more information, please follow other related articles on the PHP Chinese website!

Hot AI Tools

Undresser.AI Undress
AI-powered app for creating realistic nude photos

AI Clothes Remover
Online AI tool for removing clothes from photos.

Undress AI Tool
Undress images for free

Clothoff.io
AI clothes remover

AI Hentai Generator
Generate AI Hentai for free.

Hot Article
Hot Tools

Notepad++7.3.1
Easy-to-use and free code editor

SublimeText3 Chinese version
Chinese version, very easy to use

Zend Studio 13.0.1
Powerful PHP integrated development environment

Dreamweaver CS6
Visual web development tools

SublimeText3 Mac version
God-level code editing software (SublimeText3)
Hot Topics
 1378
1378
 52
52

 How to check whether nginx is started
Apr 14, 2025 pm 01:03 PM
How to check whether nginx is started
Apr 14, 2025 pm 01:03 PM
How to confirm whether Nginx is started: 1. Use the command line: systemctl status nginx (Linux/Unix), netstat -ano | findstr 80 (Windows); 2. Check whether port 80 is open; 3. Check the Nginx startup message in the system log; 4. Use third-party tools, such as Nagios, Zabbix, and Icinga.
 How to configure nginx in Windows
Apr 14, 2025 pm 12:57 PM
How to configure nginx in Windows
Apr 14, 2025 pm 12:57 PM
How to configure Nginx in Windows? Install Nginx and create a virtual host configuration. Modify the main configuration file and include the virtual host configuration. Start or reload Nginx. Test the configuration and view the website. Selectively enable SSL and configure SSL certificates. Selectively set the firewall to allow port 80 and 443 traffic.
 How to check whether nginx is started?
Apr 14, 2025 pm 12:48 PM
How to check whether nginx is started?
Apr 14, 2025 pm 12:48 PM
In Linux, use the following command to check whether Nginx is started: systemctl status nginx judges based on the command output: If "Active: active (running)" is displayed, Nginx is started. If "Active: inactive (dead)" is displayed, Nginx is stopped.
 How to start nginx in Linux
Apr 14, 2025 pm 12:51 PM
How to start nginx in Linux
Apr 14, 2025 pm 12:51 PM
Steps to start Nginx in Linux: Check whether Nginx is installed. Use systemctl start nginx to start the Nginx service. Use systemctl enable nginx to enable automatic startup of Nginx at system startup. Use systemctl status nginx to verify that the startup is successful. Visit http://localhost in a web browser to view the default welcome page.
 How to start nginx server
Apr 14, 2025 pm 12:27 PM
How to start nginx server
Apr 14, 2025 pm 12:27 PM
Starting an Nginx server requires different steps according to different operating systems: Linux/Unix system: Install the Nginx package (for example, using apt-get or yum). Use systemctl to start an Nginx service (for example, sudo systemctl start nginx). Windows system: Download and install Windows binary files. Start Nginx using the nginx.exe executable (for example, nginx.exe -c conf\nginx.conf). No matter which operating system you use, you can access the server IP
 How to solve nginx403 error
Apr 14, 2025 pm 12:54 PM
How to solve nginx403 error
Apr 14, 2025 pm 12:54 PM
The server does not have permission to access the requested resource, resulting in a nginx 403 error. Solutions include: Check file permissions. Check the .htaccess configuration. Check nginx configuration. Configure SELinux permissions. Check the firewall rules. Troubleshoot other causes such as browser problems, server failures, or other possible errors.
 How to solve the problem of nginx cross-domain
Apr 14, 2025 am 10:15 AM
How to solve the problem of nginx cross-domain
Apr 14, 2025 am 10:15 AM
There are two ways to solve the Nginx cross-domain problem: modify the cross-domain response header: add directives to allow cross-domain requests, specify allowed methods and headers, and set cache time. Use CORS modules: Enable modules and configure CORS rules that allow cross-domain requests, methods, headers, and cache times.
 How to solve nginx304 error
Apr 14, 2025 pm 12:45 PM
How to solve nginx304 error
Apr 14, 2025 pm 12:45 PM
Answer to the question: 304 Not Modified error indicates that the browser has cached the latest resource version of the client request. Solution: 1. Clear the browser cache; 2. Disable the browser cache; 3. Configure Nginx to allow client cache; 4. Check file permissions; 5. Check file hash; 6. Disable CDN or reverse proxy cache; 7. Restart Nginx.
