How to implement SpringBoot automatic configuration
How to implement springboot
In the previous helloworld example, I have initially experienced the ease of springboot automatically importing dependencies and completing configuration. .
So, how is springboot implemented?
1. Dependency Management Features
First look at the pom.xml in the previous content example:
<!--导入父工程-->
  <parent>
      <groupId>org.springframework.boot</groupId>
      <artifactId>spring-boot-starter-parent</artifactId>
      <version>2.3.4.RELEASE</version>
  </parent>
  <dependencies>
      <dependency>
          <groupId>org.springframework.boot</groupId>
          <artifactId>spring-boot-starter-web</artifactId>
      </dependency>
</dependencies>A parent project is added here, and only one is imported. Relying on spring-boot-starter-web, all our related packages finally come in.
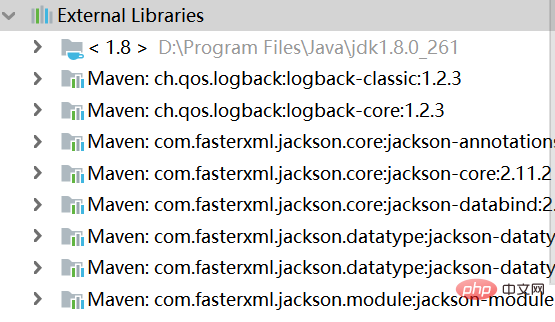
During the whole process, there is no need to worry about the package introduction issue.
1. Parent project
Every springboot project has a parent project, which is generally used for dependency management.
The parent project may declare many dependencies, so as long as the sub-project inherits the parent project, there is no need to add a version number when adding dependencies later.
Taking the above as an example, the parent project uses the springboot version of 2.3.4.RELEASE, so there is no need to write the version number for the dependencies added below.
(1) How the parent project manages versions
You can hold down ctrl and click on the parent project to find out.

#After coming in, I found that he also has a parent project spring-boot-dependencies.
<parent>
    <groupId>org.springframework.boot</groupId>
    <artifactId>spring-boot-dependencies</artifactId>
    <version>2.3.4.RELEASE</version>
</parent>Continue to enter spring-boot-dependencies, and you can see a properties tag below:
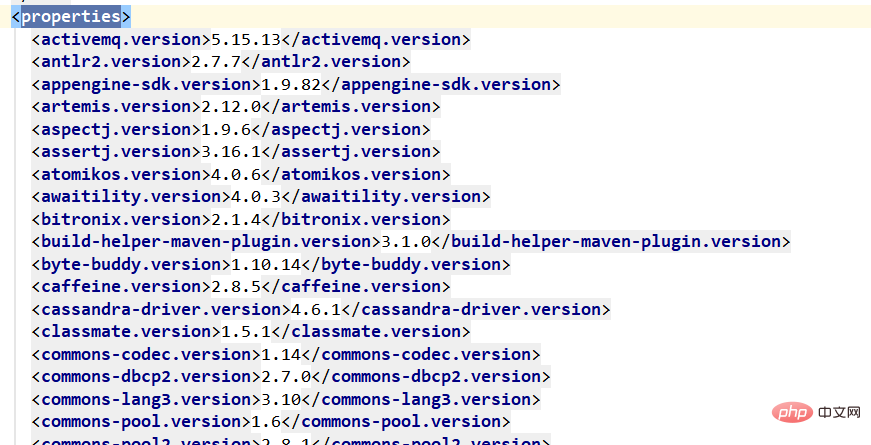
This almost declares all the possibilities we have in development The version of the jar package that will be used.
Continue down to see the specific dependency management dependencyManagement. The version quoted here is the version declared in the properties.
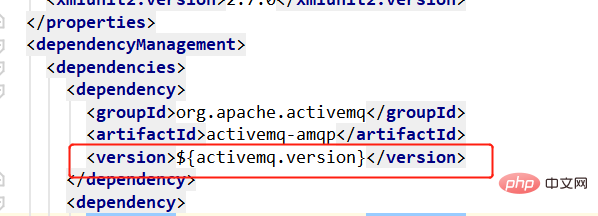
For example:
On the left I saw a package called logback, so I searched inside and found that the version defined here is 1.2.3.

So, the main function of the parent project is dependency management, which almost declares the version numbers of dependencies commonly used in development.
(2) Use the specified version
If you do not want to use the automatically arbitrated version, you can also use the specified version.
For example, for mysql version, the result of automatic arbitration is 8.0.21, but I only want to use version 5.1.43.

Add a properties tag and declare the version in it.
<properties>
      <mysql.version>5.1.43</mysql.version>
</properties>Look at the imported dependencies again and it has become the specified version.

2. Scenario starter
Let’s look at the first imported dependency spring-boot-starter-web:
<dependency>
      <groupId>org.springframework.boot</groupId>
      <artifactId>spring-boot-starter-web</artifactId>
</dependency>You will see more starters named spring-boot-starter in the future. There are also detailed instructions in the official documents

What is a starter?
starter is a set of dependency descriptions, that is, usually we only need to introduce a starter, and then the corresponding entire development scenario will be introduced.
For example, if you want to start using Spring and JPA for database access, then introduce the spring-boot-starter-data-jpa dependency into the project.
In addition, note that spring-boot-starter-* here is the official starter naming method.
So there are still unofficial ones? Yes, if you feel that the official starter scenario still cannot meet your needs, you can customize the starter.
But the official recommendation is to use thirdpartyproject-spring-boot-starter for customized naming.
As for why only one starter can import the dependencies of the entire scene, it is actually the same dependency feature of maven as the parent project above.
Enter spring-boot-starter-web, scroll down, and you can see the dependencies used in developing web scenarios.
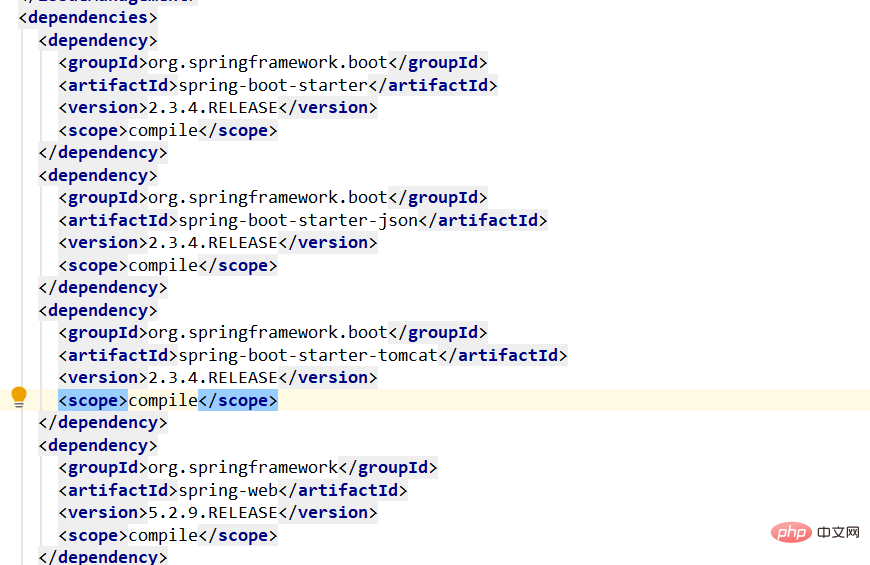
#So, for which scenario you need to develop in the future, just refer to the official documentation and import the corresponding launcher.
2. Automatic configuration
Let’s review what springboot automatically configured in the previous helloworld project:
Automatically configure tomcat
Automatically configure springMVC
Automatically configure common web functions, such as: character encoding issues
默认的包结构:主程序所在包以及下面所有子包里的组件都会被默认扫描
各种配置拥有默认值
按需加载所有自动配置项
......
1. 自动配置组件
不管自动配置好什么,步骤都是:先引入、再配置。
比如 tomcat,那么前提是先引入了 tomcat 依赖,这就由上面第一部分内容所讲的依赖管理完成,在引入了 web starter 后,自动引入场景。
自动引入了场景,也就引入了这个场景下所用到的各种 jar 包,接下来就是要配置这些内容,比如 tomcat、springMVC 等等。
拿 springMVC 举例,在之前要使用 springMVC,肯定要配置DispatcherServlet,帮我们拦截所有请求。
<servlet>
        <servlet-name>springMVC</servlet-name>
        <servlet-class>org.springframework.web.servlet.DispatcherServlet</servlet-class>
        <init-param>
            <param-name>contextConfigLocation</param-name>
            <param-value>classpath:springMVC.xml</param-value>
        </init-param>
        <load-on-startup>1</load-on-startup>
</servlet>现在看下之前的 helloworld 应用中,springboot 是在哪里帮我们做好配置的。
先看主程序类:
// 标记这是一个 springboot应用,这个类是主程序类,所有启动的入口
@SpringBootApplication
public class MainApplication {
    public static void main(String[] args) {
        SpringApplication.run(MainApplication.class, args);
    }
}可以创建个本地变量(alt+enter),可以看到这个是个ConfigurableApplicationContext类型。

@SpringBootApplication
public class MainApplication {
    public static void main(String[] args) {
        ConfigurableApplicationContext run = SpringApplication.run(MainApplication.class, args);
    }
}可以使用getBeanDefinitionNames()方法,查看里面包含了哪些容器,遍历打印出来。
@SpringBootApplication
public class MainApplication {
    public static void main(String[] args) {
        // 返回IOC容器
        final ConfigurableApplicationContext run = SpringApplication.run(MainApplication.class, args);
        // 查看容器里的组件
        final String[] beanDefinitionNames = run.getBeanDefinitionNames();
        for (String name: beanDefinitionNames) {
            System.out.println(name);
        }
    }
}接下来启动应用,看下控制台输出。
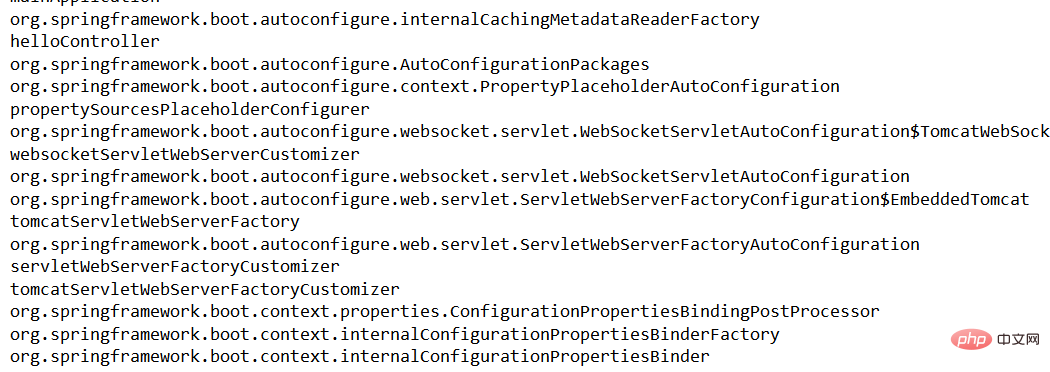
在控制台输出里ctrl+F搜索下DispatcherServlet:

发现 IOC 容器中已经有了对应的组件。
2. 默认的包结构
主程序所在包以及下面所有子包里的组件都会被默认扫描,所以我们不需要配置开启组件扫描,也可以正常使用。
但是要注意这里的范围:
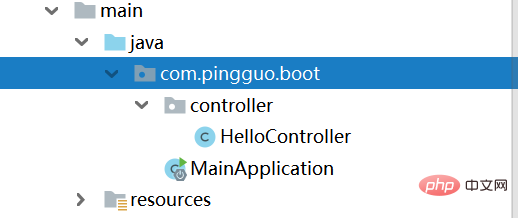
示例中就是com.pingguo.boot包下以及所有子包都可以自动扫描。
如果你就是要放到外面,还希望被扫描到,怎么办?
那么可以使用主程序类中@SpringBootApplication注解中的一个属性scanBasePackages,扩大包的范围即可:
@SpringBootApplication(scanBasePackages = "com.pingguo")
public class MainApplication {
    public static void main(String[] args) {
... ...3. 各种配置拥有默认值
比如 tomcat端口,在application.properties配置文件里使用 idea 输入的时候,就可以看到带有默认值8080:

点击进去可看到后面都是绑定了对应的 java 类。

配置文件的值最终会绑定在对应的类上,这个类会在容器中创建对象。
4. 按需加载所有自动配置项
比如应用中只引入了spring-boot-starter-web,那么就只有web场景的自动配置才会开启。
springboot 中的所有自动配置,都在这里:
<dependency>
    <groupId>org.springframework.boot</groupId>
    <artifactId>spring-boot-autoconfigure</artifactId>
    <version>2.3.4.RELEASE</version>
    <scope>compile</scope>
</dependency>点击spring-boot-starter-web可以找到spring-boot-starter,再进入其中就可以看到spring-boot-autoconfigure。
The above is the detailed content of How to implement SpringBoot automatic configuration. For more information, please follow other related articles on the PHP Chinese website!

Hot AI Tools

Undresser.AI Undress
AI-powered app for creating realistic nude photos

AI Clothes Remover
Online AI tool for removing clothes from photos.

Undress AI Tool
Undress images for free

Clothoff.io
AI clothes remover

Video Face Swap
Swap faces in any video effortlessly with our completely free AI face swap tool!

Hot Article

Hot Tools

Notepad++7.3.1
Easy-to-use and free code editor

SublimeText3 Chinese version
Chinese version, very easy to use

Zend Studio 13.0.1
Powerful PHP integrated development environment

Dreamweaver CS6
Visual web development tools

SublimeText3 Mac version
God-level code editing software (SublimeText3)

Hot Topics
 How Springboot integrates Jasypt to implement configuration file encryption
Jun 01, 2023 am 08:55 AM
Introduction to Jasypt Jasypt is a java library that allows a developer to add basic encryption functionality to his/her project with minimal effort and does not require a deep understanding of how encryption works. High security for one-way and two-way encryption. , standards-based encryption technology. Encrypt passwords, text, numbers, binaries... Suitable for integration into Spring-based applications, open API, for use with any JCE provider... Add the following dependency: com.github.ulisesbocchiojasypt-spring-boot-starter2. 1.1Jasypt benefits protect our system security. Even if the code is leaked, the data source can be guaranteed.
 How SpringBoot integrates Redisson to implement delay queue
May 30, 2023 pm 02:40 PM
Usage scenario 1. The order was placed successfully but the payment was not made within 30 minutes. The payment timed out and the order was automatically canceled. 2. The order was signed and no evaluation was conducted for 7 days after signing. If the order times out and is not evaluated, the system defaults to a positive rating. 3. The order is placed successfully. If the merchant does not receive the order for 5 minutes, the order is cancelled. 4. The delivery times out, and push SMS reminder... For scenarios with long delays and low real-time performance, we can Use task scheduling to perform regular polling processing. For example: xxl-job Today we will pick
 How to use Redis to implement distributed locks in SpringBoot
Jun 03, 2023 am 08:16 AM
1. Redis implements distributed lock principle and why distributed locks are needed. Before talking about distributed locks, it is necessary to explain why distributed locks are needed. The opposite of distributed locks is stand-alone locks. When we write multi-threaded programs, we avoid data problems caused by operating a shared variable at the same time. We usually use a lock to mutually exclude the shared variables to ensure the correctness of the shared variables. Its scope of use is in the same process. If there are multiple processes that need to operate a shared resource at the same time, how can they be mutually exclusive? Today's business applications are usually microservice architecture, which also means that one application will deploy multiple processes. If multiple processes need to modify the same row of records in MySQL, in order to avoid dirty data caused by out-of-order operations, distribution needs to be introduced at this time. The style is locked. Want to achieve points
 How to solve the problem that springboot cannot access the file after reading it into a jar package
Jun 03, 2023 pm 04:38 PM
Springboot reads the file, but cannot access the latest development after packaging it into a jar package. There is a situation where springboot cannot read the file after packaging it into a jar package. The reason is that after packaging, the virtual path of the file is invalid and can only be accessed through the stream. Read. The file is under resources publicvoidtest(){Listnames=newArrayList();InputStreamReaderread=null;try{ClassPathResourceresource=newClassPathResource("name.txt");Input
 How to implement Springboot+Mybatis-plus without using SQL statements to add multiple tables
Jun 02, 2023 am 11:07 AM
When Springboot+Mybatis-plus does not use SQL statements to perform multi-table adding operations, the problems I encountered are decomposed by simulating thinking in the test environment: Create a BrandDTO object with parameters to simulate passing parameters to the background. We all know that it is extremely difficult to perform multi-table operations in Mybatis-plus. If you do not use tools such as Mybatis-plus-join, you can only configure the corresponding Mapper.xml file and configure The smelly and long ResultMap, and then write the corresponding sql statement. Although this method seems cumbersome, it is highly flexible and allows us to
 Comparison and difference analysis between SpringBoot and SpringMVC
Dec 29, 2023 am 11:02 AM
SpringBoot and SpringMVC are both commonly used frameworks in Java development, but there are some obvious differences between them. This article will explore the features and uses of these two frameworks and compare their differences. First, let's learn about SpringBoot. SpringBoot was developed by the Pivotal team to simplify the creation and deployment of applications based on the Spring framework. It provides a fast, lightweight way to build stand-alone, executable
 How SpringBoot customizes Redis to implement cache serialization
Jun 03, 2023 am 11:32 AM
1. Customize RedisTemplate1.1, RedisAPI default serialization mechanism. The API-based Redis cache implementation uses the RedisTemplate template for data caching operations. Here, open the RedisTemplate class and view the source code information of the class. publicclassRedisTemplateextendsRedisAccessorimplementsRedisOperations, BeanClassLoaderAware{//Declare key, Various serialization methods of value, the initial value is empty @NullableprivateRedisSe
 SpringBoot+Dubbo+Nacos development practical tutorial
Aug 15, 2023 pm 04:49 PM
This article will write a detailed example to talk about the actual development of dubbo+nacos+Spring Boot. This article will not cover too much theoretical knowledge, but will write the simplest example to illustrate how dubbo can be integrated with nacos to quickly build a development environment.


