
 Java
javaTutorial
What is the process and principle of SpringBoot's defense against CSRF attacks?
Java
javaTutorial
What is the process and principle of SpringBoot's defense against CSRF attacks?
What is the process and principle of SpringBoot's defense against CSRF attacks?

CSRF Principle
If we want to defend against CSRF attacks, we need to first understand what a CSRF attack is. We will sort out the CSRF attack process through the following illustration:
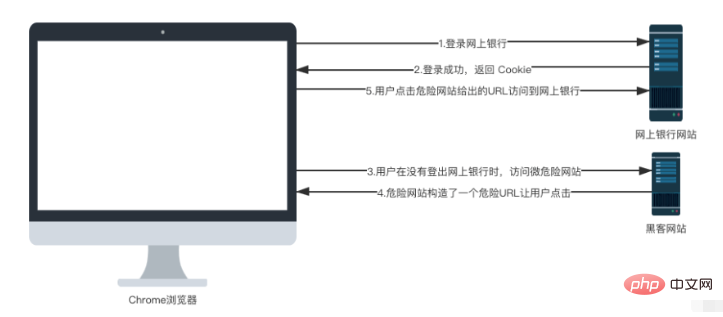
In fact, this process is very simple:
1. Assume that the user opens the China Merchants Online Banking website and logs in.
2. After successful login, online banking will return the cookie to the front end, and the browser will save the cookie.
3. The user opened a new tab in the browser without logging out of online banking, and then visited a dangerous website.
4. There is a hyperlink on this dangerous website, and the address of the hyperlink points to China Merchants Online Banking.
4. The user clicks on this link. Since this hyperlink will automatically carry the cookie saved in the browser, the user unknowingly accesses online banking, which may cause losses to himself.
The process of CSRF is roughly like this. Next, I will use a simple example to show what CSRF is all about.
CSRF Practice
1. I created a Spring Boot project named csrf-mry. This project is equivalent to the online banking website we mentioned above. When creating the project, I introduced Web and Spring Security Dependencies are as follows:
<dependencies>
	<dependency>
		<groupId>org.springframework.boot</groupId>
		<artifactId>spring-boot-starter-security</artifactId>
	</dependency>
	<dependency>
		<groupId>org.springframework.boot</groupId>
		<artifactId>spring-boot-starter-web</artifactId>
	</dependency>
</dependencies>
2. After the creation is successful, for convenience, we directly configure the Spring Security username/password in the application.properties file:
server.port= 8866
spring.security.user.name=javaboy
spring.security.user.password=123
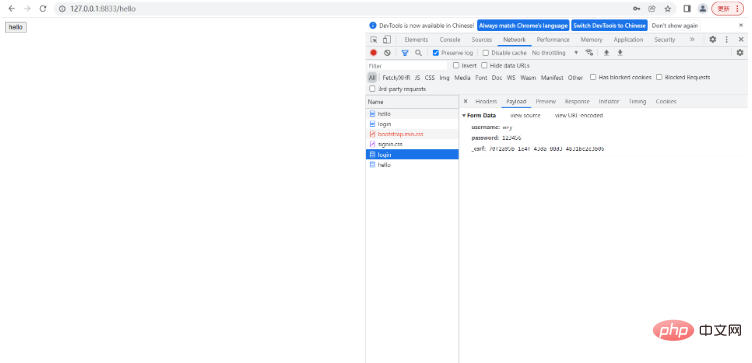
3. Then we provide two A test interface
package com.mry.csrf.controller;
import org.springframework.web.bind.annotation.GetMapping;
import org.springframework.web.bind.annotation.PostMapping;
import org.springframework.web.bind.annotation.RestController;
@RestController
public class CsrfDemoController {
    @PostMapping("/transfer")
    public void transferMoney(String name, Integer money) {
        System.out.println("name = " + name);
        System.out.println("money = " + money);
    }
    @GetMapping("/hello")
    public String hello() {
        return "hello";
    }
}Assume that /transfer is a transfer interface (this is an assumption, mainly to demonstrate CSRF attacks to everyone, the real transfer interface is more complicated than this).
4. We also need to configure Spring Security, because Spring Security can automatically defend against CSRF attacks by default, so we need to turn this off.
package com.mry.csrf.config;
import org.springframework.context.annotation.Configuration;
import org.springframework.security.config.annotation.web.builders.HttpSecurity;
import org.springframework.security.config.annotation.web.configuration.WebSecurityConfigurerAdapter;
@Configuration
public class SecurityConfig extends WebSecurityConfigurerAdapter {
    @Override
    protected void configure(HttpSecurity http) throws Exception {
        http.authorizeRequests().anyRequest().authenticated()
                .and()
                .formLogin()
                .and()
                .csrf()
                .disable();
    }
}After the configuration is completed, we start the csrf-simulate-web project.
5. Let’s create another csrf-loophole-web project. This project is equivalent to a dangerous website. For convenience, we only need to introduce web dependencies when creating it here.
After the project is successfully created, first modify the project port:
server.port= 8855
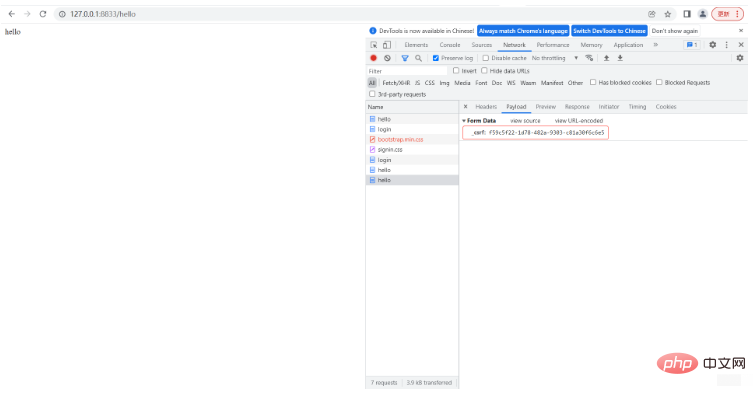
6. Then we create a hello.html in the resources/static directory with the following content.
<!DOCTYPE html>
<html lang="en">
<head>
    <meta charset="UTF-8">
    <title>Title</title>
</head>
<body>
    <form action="http://localhost:8866/transfer" method="post">
        <input type="hidden" value="javaboy" name="name">
        <input type="hidden" value="10000" name="money">
        <input type="submit" value="点击查看美女图片">
    </form>
</body>
</html>There is a hyperlink here. The text of the hyperlink is to click to view pictures of beautiful women. When you click the hyperlink, it will automatically request the http://localhost:8866/transfer interface, and the hidden domain also carries two parameters.
After the configuration is completed, you can start the csrf-loophole-web project.
Next, the user first accesses the interface in the csrf-simulate-web project. When accessing, he needs to log in, and the user performs the login operation. After the access is complete, the user does not perform the logout operation, and then the user I visited the page in csrf-loophole-web and saw the hyperlink. I was curious about what this beauty looked like. As soon as I clicked on it, the money was transferred away.
CSRF Defense
Let’s talk about the defense ideas first.
CSRF defense, a core idea is to add a random number to the front-end request.
Because in a CSRF attack, the hacker website actually does not know what the user's cookie is. It allows the user to send a request to the online banking website by himself, because this process will automatically carry the cookie. information.
So our defense idea is as follows: when the user accesses online banking, in addition to carrying the information in the cookie, he also needs to carry a random number. If the user does not carry this random number, the online banking website will Deny the request. When a hacker website induces users to click on a hyperlink, it will automatically carry the information in the cookie, but it will not automatically carry the random number, thus successfully avoiding CSRF attacks.
Spring Security provides good support for this, let’s take a look.
Backend and backend non-separation solution
Spring Security actually provides csrf defense by default, but developers need to do more things.
First we create a new Spring Boot project and introduce Spring Security, Thymeleaf and web dependencies when creating it.
1.pom information
<dependencies>
	<dependency>
		<groupId>org.springframework.boot</groupId>
		<artifactId>spring-boot-starter-web</artifactId>
	</dependency>
	<dependency>
		<groupId>org.springframework.boot</groupId>
		<artifactId>spring-boot-starter-security</artifactId>
	</dependency>
	<dependency>
		<groupId>org.springframework.boot</groupId>
		<artifactId>spring-boot-starter-thymeleaf</artifactId>
	</dependency>
	<dependency>
		<groupId>org.springframework.boot</groupId>
		<artifactId>spring-boot-starter-test</artifactId>
		<scope>test</scope>
	</dependency>
</dependencies>
2. After the project is created successfully, we still configure the username/password in application.properties
spring.security.user.name=mry
spring.security.user.password=123456
3. Next, we provide A test interface
package com.mry.csrf.controller;
import org.springframework.web.bind.annotation.PostMapping;
import org.springframework.web.bind.annotation.ResponseBody;
import org.springframework.web.bind.annotation.RestController;
@RestController
public class SecurityCsrfController {
    @PostMapping("/hello")
    @ResponseBody
    public String hello() {
        return "hello";
    }
}Note that this test interface is a POST request, because by default, GET, HEAD, TRACE and OPTIONS do not need to be verified for CSRF attacks.
4. Then, we create a new thymeleaf template in the resources/templates directory
<!DOCTYPE html>
<!--导入thymeleaf的名称空间-->
<html lang="en" xmlns:th="http://www.thymeleaf.org">
<head>
    <meta charset="UTF-8">
    <title>Title</title>
</head>
<body>
    <form action="/hello" method="post">
        <input type="hidden" th:value="${_csrf.token}" th:name="${_csrf.parameterName}">
        <input type="submit" value="hello">
    </form>
</body>
</html>Note that when sending the POST request, an additional hidden domain and the key of the hidden domain are carried is ${_csrf.parameterName}, and value is ${_csrf.token}.
The server will automatically bring these two values, we only need to render them on the front end.
5. Next add a controller to the front-end hello.html page
@GetMapping("/hello")
public String hello2() {
	return "hello";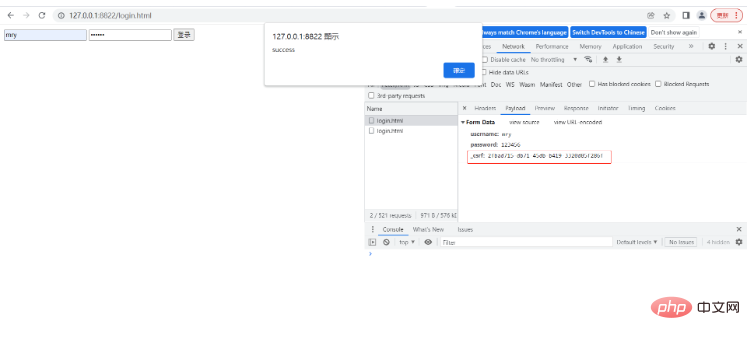
}6. After the addition is completed, start the project, and we access the hello page. When accessing, you need to log in first. Log in After success, we can see that there is an additional parameter in the login request
这里我们用了 Spring Security 的默认登录页面,如果大家使用自定义登录页面,可以参考上面 hello.html 的写法,通过一个隐藏域传递 _csrf 参数。
访问到 hello 页面之后,再去点击【hello】按钮,就可以访问到 hello 接口了。
这是 Spring Security 中默认的方案,通过 Model 将相关的数据带到前端来。
如果你的项目是前后端不分项目,这种方案就可以了,如果你的项目是前后端分离项目,这种方案很明显不够用。
前后端分离方案
如果是前后端分离项目,Spring Security 也提供了解决方案。
这次不是将 _csrf 放在 Model 中返回前端了,而是放在 Cookie 中返回前端,配置方式如下:
package com.mry.csrf.config;
import org.springframework.context.annotation.Configuration;
import org.springframework.security.config.annotation.web.builders.HttpSecurity;
import org.springframework.security.config.annotation.web.configuration.WebSecurityConfigurerAdapter;
import org.springframework.security.web.csrf.CookieCsrfTokenRepository;
@Configuration
public class SecurityConfig extends WebSecurityConfigurerAdapter {
    @Override
    protected void configure(HttpSecurity http) throws Exception {
        http.authorizeRequests().anyRequest().authenticated()
                .and()
                .formLogin()
                .and()
                .csrf().csrfTokenRepository(CookieCsrfTokenRepository.withHttpOnlyFalse());
    }
}有小伙伴可能会说放在 Cookie 中不是又被黑客网站盗用了吗?其实不会的,大家注意如下两个问题:
(1)黑客网站根本不知道你的 Cookie 里边存的啥,他也不需要知道,因为 CSRF 攻击是浏览器自动携带上 Cookie 中的数据的。
(2)我们将服务端生成的随机数放在 Cookie 中,前端需要从 Cookie 中自己提取出来 _csrf 参数,然后拼接成参数传递给后端,单纯的将 Cookie 中的数据传到服务端是没用的。
理解透了上面两点,你就会发现 _csrf 放在 Cookie 中是没有问题的,但是大家注意,配置的时候我们通过 withHttpOnlyFalse 方法获取了 CookieCsrfTokenRepository 的实例,该方法会设置 Cookie 中的 HttpOnly 属性为 false,也就是允许前端通过 js 操作 Cookie(否则你就没有办法获取到 _csrf)。
配置完成后,重启项目,此时我们就发现返回的 Cookie 中多了一项:

接下来,我们通过自定义登录页面,来看看前端要如何操作。
首先我们在 resources/static 目录下新建一个 html 页面叫做 login.html:
<!DOCTYPE html>
<html lang="en">
<head>
<meta charset="UTF-8">
<title>Title</title>
<script src="https://libs.baidu.com/jquery/2.1.4/jquery.min.js"></script>
<script src="https://cdn.bootcss.com/jquery-cookie/1.4.1/jquery.cookie.min.js"></script>
</head>
<body>
<div>
<input type="text" id="username">
<input type="password" id="password">
<input type="button" value="登录" id="loginBtn">
</div>
<script>
$("#loginBtn").click(function () {
let _csrf = $.cookie('XSRF-TOKEN');
$.post('/login.html',{username:$("#username").val(),password:$("#password").val(),_csrf:_csrf},function (data) {
alert(data);
})
})
</script>
</body>
</html>这段 html 给大家解释一下:
(1)首先引入 jquery 和 jquery.cookie ,方便我们一会操作 Cookie。
(2)定义三个 input,前两个是用户名和密码,第三个是登录按钮。
(3)点击登录按钮之后,我们先从 Cookie 中提取出 XSRF-TOKEN,这也就是我们要上传的 csrf 参数。
(4)通过一个 POST 请求执行登录操作,注意携带上 _csrf 参数。
服务端我们也稍作修改,如下:
package com.mry.csrf.config;
import org.springframework.context.annotation.Configuration;
import org.springframework.security.config.annotation.web.builders.HttpSecurity;
import org.springframework.security.config.annotation.web.builders.WebSecurity;
import org.springframework.security.config.annotation.web.configuration.WebSecurityConfigurerAdapter;
import org.springframework.security.web.csrf.CookieCsrfTokenRepository;
@Configuration
public class SecurityConfig extends WebSecurityConfigurerAdapter {
    @Override
    public void configure(WebSecurity web) throws Exception {
        web.ignoring().antMatchers("/static/js/**");
    }
    @Override
    protected void configure(HttpSecurity http) throws Exception {
        http.authorizeRequests().anyRequest().authenticated()
                .and()
                .formLogin()
                .loginPage("/login.html")
                .successHandler((req,resp,authentication)->{
                    resp.getWriter().write("success");
                })
                .permitAll()
                .and()
                .csrf().csrfTokenRepository(CookieCsrfTokenRepository.withHttpOnlyFalse());
    }
}一方面这里给 js 文件放行。
另一方面配置一下登录页面,以及登录成功的回调,这里简单期间,登录成功的回调我就给一个字符串就可以了。在登录成功后回调的详细解释。
OK,所有事情做完之后,我们访问 login.html 页面,输入用户名密码进行登录,结果如下:
可以看到,我们的 _csrf 配置已经生效了。
The above is the detailed content of What is the process and principle of SpringBoot's defense against CSRF attacks?. For more information, please follow other related articles on the PHP Chinese website!

Hot AI Tools

Undresser.AI Undress
AI-powered app for creating realistic nude photos

AI Clothes Remover
Online AI tool for removing clothes from photos.

Undress AI Tool
Undress images for free

Clothoff.io
AI clothes remover

AI Hentai Generator
Generate AI Hentai for free.

Hot Article
Hot Tools

Notepad++7.3.1
Easy-to-use and free code editor

SublimeText3 Chinese version
Chinese version, very easy to use

Zend Studio 13.0.1
Powerful PHP integrated development environment

Dreamweaver CS6
Visual web development tools

SublimeText3 Mac version
God-level code editing software (SublimeText3)
Hot Topics
 1378
1378
 52
52

 How Springboot integrates Jasypt to implement configuration file encryption
Jun 01, 2023 am 08:55 AM
How Springboot integrates Jasypt to implement configuration file encryption
Jun 01, 2023 am 08:55 AM
Introduction to Jasypt Jasypt is a java library that allows a developer to add basic encryption functionality to his/her project with minimal effort and does not require a deep understanding of how encryption works. High security for one-way and two-way encryption. , standards-based encryption technology. Encrypt passwords, text, numbers, binaries... Suitable for integration into Spring-based applications, open API, for use with any JCE provider... Add the following dependency: com.github.ulisesbocchiojasypt-spring-boot-starter2. 1.1Jasypt benefits protect our system security. Even if the code is leaked, the data source can be guaranteed.
 How to use Redis to implement distributed locks in SpringBoot
Jun 03, 2023 am 08:16 AM
How to use Redis to implement distributed locks in SpringBoot
Jun 03, 2023 am 08:16 AM
1. Redis implements distributed lock principle and why distributed locks are needed. Before talking about distributed locks, it is necessary to explain why distributed locks are needed. The opposite of distributed locks is stand-alone locks. When we write multi-threaded programs, we avoid data problems caused by operating a shared variable at the same time. We usually use a lock to mutually exclude the shared variables to ensure the correctness of the shared variables. Its scope of use is in the same process. If there are multiple processes that need to operate a shared resource at the same time, how can they be mutually exclusive? Today's business applications are usually microservice architecture, which also means that one application will deploy multiple processes. If multiple processes need to modify the same row of records in MySQL, in order to avoid dirty data caused by out-of-order operations, distribution needs to be introduced at this time. The style is locked. Want to achieve points
 How to solve the problem that springboot cannot access the file after reading it into a jar package
Jun 03, 2023 pm 04:38 PM
How to solve the problem that springboot cannot access the file after reading it into a jar package
Jun 03, 2023 pm 04:38 PM
Springboot reads the file, but cannot access the latest development after packaging it into a jar package. There is a situation where springboot cannot read the file after packaging it into a jar package. The reason is that after packaging, the virtual path of the file is invalid and can only be accessed through the stream. Read. The file is under resources publicvoidtest(){Listnames=newArrayList();InputStreamReaderread=null;try{ClassPathResourceresource=newClassPathResource("name.txt");Input
 How to implement Springboot+Mybatis-plus without using SQL statements to add multiple tables
Jun 02, 2023 am 11:07 AM
How to implement Springboot+Mybatis-plus without using SQL statements to add multiple tables
Jun 02, 2023 am 11:07 AM
When Springboot+Mybatis-plus does not use SQL statements to perform multi-table adding operations, the problems I encountered are decomposed by simulating thinking in the test environment: Create a BrandDTO object with parameters to simulate passing parameters to the background. We all know that it is extremely difficult to perform multi-table operations in Mybatis-plus. If you do not use tools such as Mybatis-plus-join, you can only configure the corresponding Mapper.xml file and configure The smelly and long ResultMap, and then write the corresponding sql statement. Although this method seems cumbersome, it is highly flexible and allows us to
 How SpringBoot customizes Redis to implement cache serialization
Jun 03, 2023 am 11:32 AM
How SpringBoot customizes Redis to implement cache serialization
Jun 03, 2023 am 11:32 AM
1. Customize RedisTemplate1.1, RedisAPI default serialization mechanism. The API-based Redis cache implementation uses the RedisTemplate template for data caching operations. Here, open the RedisTemplate class and view the source code information of the class. publicclassRedisTemplateextendsRedisAccessorimplementsRedisOperations, BeanClassLoaderAware{//Declare key, Various serialization methods of value, the initial value is empty @NullableprivateRedisSe
 Comparison and difference analysis between SpringBoot and SpringMVC
Dec 29, 2023 am 11:02 AM
Comparison and difference analysis between SpringBoot and SpringMVC
Dec 29, 2023 am 11:02 AM
SpringBoot and SpringMVC are both commonly used frameworks in Java development, but there are some obvious differences between them. This article will explore the features and uses of these two frameworks and compare their differences. First, let's learn about SpringBoot. SpringBoot was developed by the Pivotal team to simplify the creation and deployment of applications based on the Spring framework. It provides a fast, lightweight way to build stand-alone, executable
 How to get the value in application.yml in springboot
Jun 03, 2023 pm 06:43 PM
How to get the value in application.yml in springboot
Jun 03, 2023 pm 06:43 PM
In projects, some configuration information is often needed. This information may have different configurations in the test environment and the production environment, and may need to be modified later based on actual business conditions. We cannot hard-code these configurations in the code. It is best to write them in the configuration file. For example, you can write this information in the application.yml file. So, how to get or use this address in the code? There are 2 methods. Method 1: We can get the value corresponding to the key in the configuration file (application.yml) through the ${key} annotated with @Value. This method is suitable for situations where there are relatively few microservices. Method 2: In actual projects, When business is complicated, logic
 Cross-site scripting (XSS) and cross-site request forgery (CSRF) protection in Laravel
Aug 13, 2023 pm 04:43 PM
Cross-site scripting (XSS) and cross-site request forgery (CSRF) protection in Laravel
Aug 13, 2023 pm 04:43 PM
Cross-site scripting (XSS) and cross-site request forgery (CSRF) protection in Laravel With the development of the Internet, network security issues have become more and more serious. Among them, Cross-SiteScripting (XSS) and Cross-SiteRequestForgery (CSRF) are one of the most common attack methods. Laravel, as a popular PHP development framework, provides users with a variety of security mechanisms
