

How to prevent Google Chrome from storing browsing history on Windows PC

Google Chrome is one of the most popular web browsers on the market today. The reason for this preference is that Chrome syncs with your Google account, supports a library of extensions and add-ons, and is fast and free to use. However, Chrome does not offer an option/setting to automatically clear your browser history when you close the browser, which can be frustrating if you want to stay private. Users can manually clear their browsing history, but will need to do so each time they exit the browser in order to clear their history.
Thankfully, with a few settings changes, you can prevent Chrome from storing your browsing history entirely, regardless of what operating system you're running. Do you want to clear your browsing history in Chrome when you close the browser? Then, continue reading the tips mentioned in this article to prevent your Chrome browsing history from being recorded.
Prevent Chrome from storing browsing history
All browsing history in Chrome is saved in a folder on your PC's hard drive. If you restrict Chrome from modifying this file, your browser history will not be saved or updated.
Step 1 - Manually clear browsing history in Chrome
1. Open your Google Chrome browser.
Press Ctrl H to open Chrome’s History page.
In the left panel menu, click Clear browsing data.
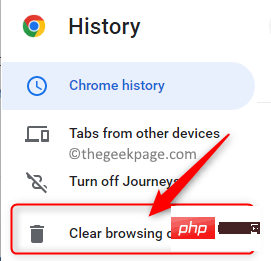
Note: Alternatively, you can press the Ctrl Shift Delete key on your keyboard immediately after launching Chrome to open Clear browsing dataWindow.
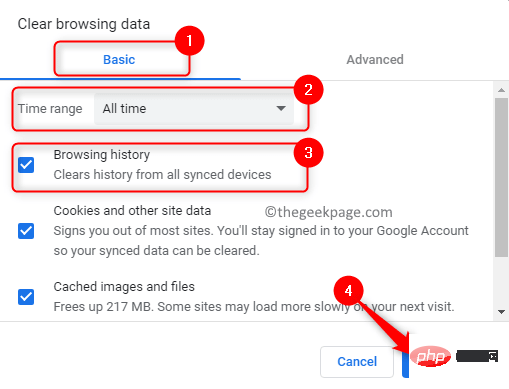
2. In the Clear browsing data window, select the Basic tab.
Then, select the All Time option from the drop-down menu next to Time Range.
In the list of items that need to be cleared, make sure the box next to Browsing History is checked.
Finally, click the Clear Data button at the bottom of the window to clear your browsing history.
#3. Now, the Chrome browsing history is cleared. You can now take the next step to stop Chrome from storing history.
Step 2 - Restrict access to Chrome history files
Before proceeding with this step, make sure you have completely exited Chrome to avoid any conflicts.
Use the three-dot menu in Chrome in the upper right corner and click Exit to stop Chrome from running in the background.

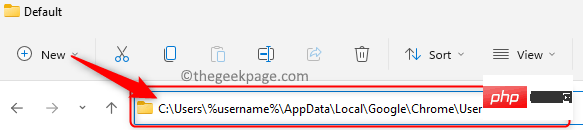
1. To find Chrome’s history files on a Windows PC, open File Explorer (Windows E) .
In the navigation bar, type or copy-paste the location given below to find the history files related to Google Chrome.
C:\Users\%username%\AppData\Local\Google\Chrome\User Data\Default
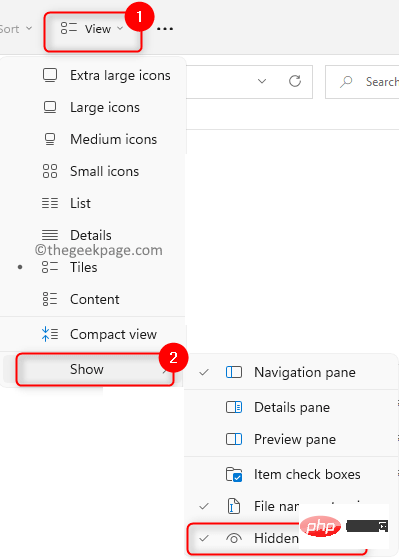
NOTE: If you cannot see the AppData folder, make sure you have the Hide Items option enabled .
Click in the File Explorer command ribbon to view the menu.
Go to Show in the menu and check the Hide Items option.
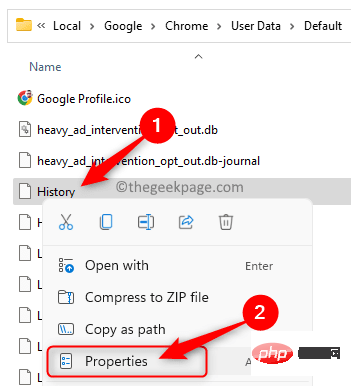
2. Once in the above location, look for a file named History without any file extension. This is the file that needs to be locked.
Right-click on this history file and select Properties in the context menu.
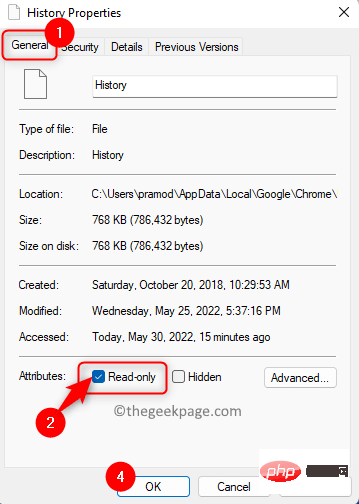
In the "Properties" window, check the "Properties" section Read-only" box next to it.
Then, click Apply and then OK to save the changes.
3. The history file is now locked.
RestartChrome to start browsing.
If you press Ctrl H, you will see that the history list is blank even after browsing. It displays a message saying history entry not found.
If you want to start recording your browsing history at any time, just repeat the above steps and uncheck the box next to Read-onlyChromeHistory file That’s it.
That’s it!
thanks for reading.
Incognito mode in Chrome prevents browsing history from being recorded but blocks cookies and extensions. The method mentioned in this article is the most popular as you will benefit from using extensions and cookies without having your browsing history recorded.
The above is the detailed content of How to prevent Google Chrome from storing browsing history on Windows PC. For more information, please follow other related articles on the PHP Chinese website!

Hot AI Tools

Undresser.AI Undress
AI-powered app for creating realistic nude photos

AI Clothes Remover
Online AI tool for removing clothes from photos.

Undress AI Tool
Undress images for free

Clothoff.io
AI clothes remover

Video Face Swap
Swap faces in any video effortlessly with our completely free AI face swap tool!

Hot Article
Hot Tools

Notepad++7.3.1
Easy-to-use and free code editor

SublimeText3 Chinese version
Chinese version, very easy to use

Zend Studio 13.0.1
Powerful PHP integrated development environment

Dreamweaver CS6
Visual web development tools

SublimeText3 Mac version
God-level code editing software (SublimeText3)
Hot Topics
 1386
1386
 52
52

 How to install Doubao browser plug-in version - Doubao browser plug-in installation method
May 07, 2024 pm 07:16 PM
How to install Doubao browser plug-in version - Doubao browser plug-in installation method
May 07, 2024 pm 07:16 PM
Doubao is a comprehensive and powerful AI. With its support, we can write, draw, check information and other tasks more quickly, thus greatly improving work efficiency. Doubao has a PC client and a browser plug-in. The following editor will introduce the installation method of the Doubao browser plug-in. For those who are not sure, let’s take a look! 1. Take Google Chrome as an example. First, we go to the official website of Doubao Download the beanbao plug-in directly. 2. After downloading the Doubao browser plug-in version, we open the extension page in Google Chrome and turn on the [Developer Mode] in the upper right corner. 3. Next, we drag the downloaded Beanbao plug-in into the Google Chrome page. 4. If a window like this pops up, just click [Add Extension]. 5. After the installation is completed,
 Recommended Android emulator that is smoother (choose the Android emulator you want to use)
Apr 21, 2024 pm 06:01 PM
Recommended Android emulator that is smoother (choose the Android emulator you want to use)
Apr 21, 2024 pm 06:01 PM
It can provide users with a better gaming experience and usage experience. An Android emulator is a software that can simulate the running of the Android system on a computer. There are many kinds of Android emulators on the market, and their quality varies, however. To help readers choose the emulator that suits them best, this article will focus on some smooth and easy-to-use Android emulators. 1. BlueStacks: Fast running speed. With excellent running speed and smooth user experience, BlueStacks is a popular Android emulator. Allowing users to play a variety of mobile games and applications, it can simulate Android systems on computers with extremely high performance. 2. NoxPlayer: Supports multiple openings, making it more enjoyable to play games. You can run different games in multiple emulators at the same time. It supports
 What should I do if Google Chrome prompts for unsafe content? Google Chrome shows unsafe solution
Apr 17, 2024 pm 08:00 PM
What should I do if Google Chrome prompts for unsafe content? Google Chrome shows unsafe solution
Apr 17, 2024 pm 08:00 PM
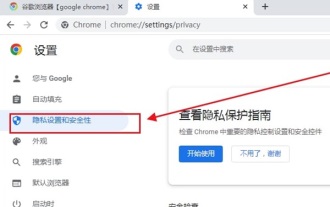
What should I do if Google Chrome prompts for unsafe content? Everyone wants to know how to add a trusted site in this case so that the website can be accessed normally. If you can confirm that the website is indeed OK and it is just a false alarm from the Chrome browser, then the software tutorial will introduce to friends the Google Chrome display. Unsafe solution, hope it helps. Solution to Google Chrome display as unsafe 1. Open Google Chrome, click the three dots in the upper right corner, and select [Settings]. 2. Select Privacy Settings and Security on the left. 3. Click Website Settings at the bottom of the page on the right side. 4. Click on the unsafe content at the bottom of the page. 5. Click the Add button to the right of the Allow option. 6. Enter the website address.
 What is the middle mouse button? What is the use of pressing the middle mouse button?
May 09, 2024 pm 12:40 PM
What is the middle mouse button? What is the use of pressing the middle mouse button?
May 09, 2024 pm 12:40 PM
What is the middle mouse button? In fact, it is the mouse wheel. You can slide the wheel up and down to view the page easily. But if you click the wheel, then this is the so-called middle button. In different software, the middle mouse button may have different functions. It depends on the software settings. How is it defined. The middle mouse button is actually a click on the mouse wheel. The middle mouse button has different functions in different software programs, but it may also have no effect at all. 1. Change to continuous scrolling mode. Clicking the middle mouse button while browsing the web will change to continuous scrolling mode. At this time, the user only needs to move the mouse up and down to slide the page. 2. Open a new tab. For example, in Google Chrome, if the user uses the middle mouse button to click on a web page hyperlink, then
 How to add trusted sites in Google Chrome
Jul 19, 2024 pm 04:14 PM
How to add trusted sites in Google Chrome
Jul 19, 2024 pm 04:14 PM
How to add trusted sites in Google Chrome? Some users cannot browse the web normally because the page prompts that it is not secure when surfing the Internet. At this time, they can add the website as a trusted site, and we can access it normally and surf the Internet smoothly. The editor below will bring you the steps to add a trusted site in Google Chrome. The steps are simple and easy to operate, and even beginners can easily get started. Friends who need it can learn about it together. How to add a trusted site in Google Chrome: 1. Open Google Chrome and click the three dots in the upper right corner. Click [Settings]. Choose privacy settings and security. (As shown in the picture) 2. Click Website Settings at the bottom of the page. (As shown in the picture) 3. Click on the unsafe content at the bottom of the page. (As shown in the picture) 4. Click the Add button to the right of the Allow option. (As shown in the picture) 5. Lose
 Why can't I download Google Chrome in Windows 7?
Apr 13, 2024 pm 11:00 PM
Why can't I download Google Chrome in Windows 7?
Apr 13, 2024 pm 11:00 PM
Reasons why you can't download Google Chrome on Windows 7: The operating system version is too old; security protocols are out of date; necessary components are missing; blocked by firewall or security software; network connection issues. Solution: Upgrade operating system, enable TLS 1.2, install necessary components, check firewall, check network connection.
 How to screenshot the entire content of a web page in Chrome? How to screenshot the entire web page in Google Chrome
May 08, 2024 am 08:50 AM
How to screenshot the entire content of a web page in Chrome? How to screenshot the entire web page in Google Chrome
May 08, 2024 am 08:50 AM
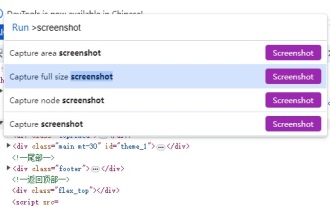
How to screenshot the entire content of a web page in Chrome? The Google Chrome you have downloaded does not have its own screenshot function. Users want to know how to screenshot the entire web page. Here I will share with my friends how to screenshot the entire web page in Google Chrome. The main purpose is to see if there is any way to screenshot the entire web page without installing a plug-in. method can be achieved. Taking a screenshot of the entire webpage in Chrome It is more complicated to take a screenshot of the entire webpage in Chrome, because the built-in function is hidden in the developer options. Don't worry! You'll do it by following the steps below. 1. Click the F12 key on the Chrome interface to quickly enter the developer tools directory. 2. Then press the key combination Ctrl+Shift+P and enter [scre
 Why can't I access gate.io?
Apr 24, 2024 pm 02:25 PM
Why can't I access gate.io?
Apr 24, 2024 pm 02:25 PM
Reasons for gate.io being inaccessible include regional restrictions, maintenance or upgrades, network issues, browser compatibility, anti-fraud measures, and DNS resolution issues. Solution: Confirm that there are no regional restrictions, wait for maintenance to be completed, check the network connection, update the browser, contact customer service to unblock, and adjust DNS settings.