

How to disable 'Let's finish setting up the device' on Windows

Windows 11 comes with many features out of the box, as long as you attach a Microsoft account to them. When you clean install Windows 11, it asks you to set up Microsoft Office, OneDrive, Windows Hello, Phone Links (formerly Your Phone), and more.
If you don't set up these Microsoft services, you will receive a message to remind you to complete the setup every few days. You can click Continue or Remind me within 3 days. Both options are annoying, and there's no option to say no.
Instead, you need to try a workaround. Here's what you need to do to disable the "Let's finish setting up your device" message on Windows.
Disable Let's finish setting up your device message on Windows
However, you may not have set these features during installation. Maybe you don't want to use them, or maybe you've found a better alternative. Windows 11 doesn’t like incomplete setup anyway, and every few days or so, you’ll get a message like the one below that says “Let’s finish setting up the device.” Essentially, it wants you to connect your PC to more Microsoft services.
The screen is just a reminder, you can turn it off - click the "Remind me in 3 days" link to initially get to the desktop.
To disable this message on Windows 11:
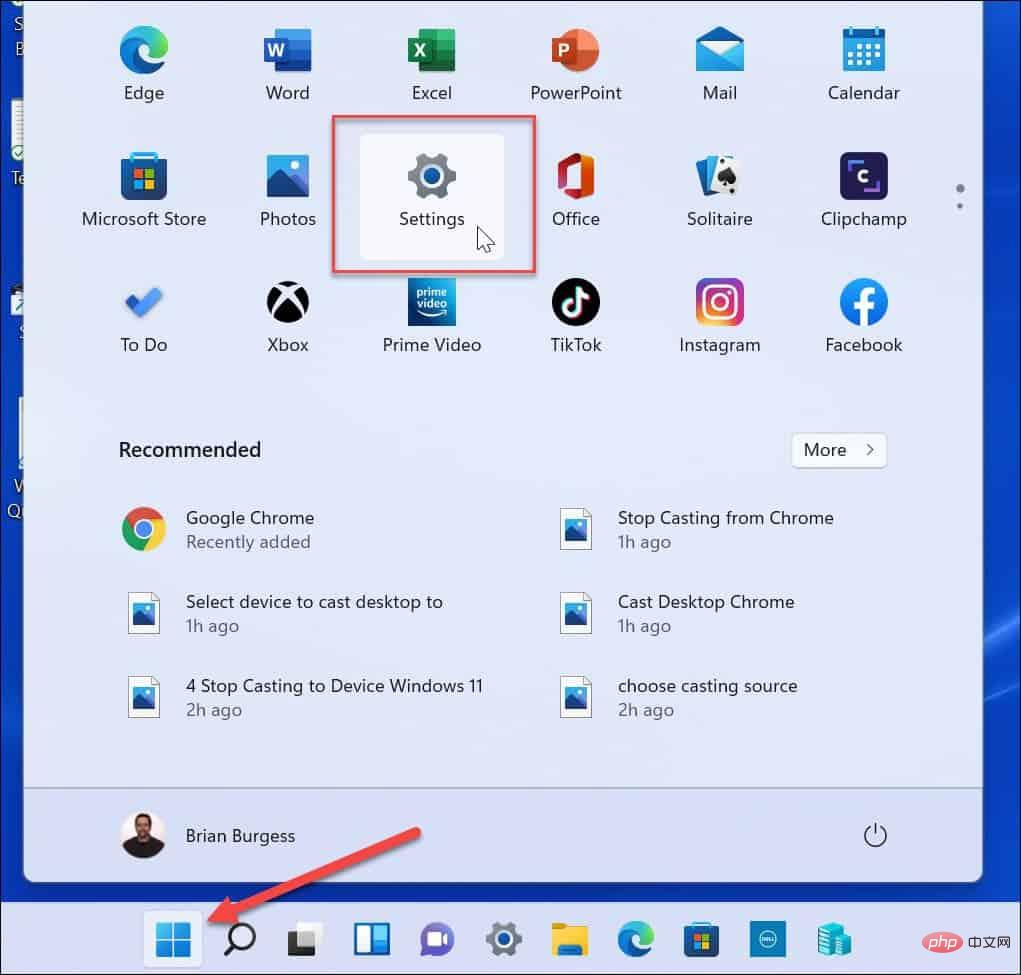
- Open the Start menu and click Settings. Alternatively, you can use the Windows key I to open Settings directly.

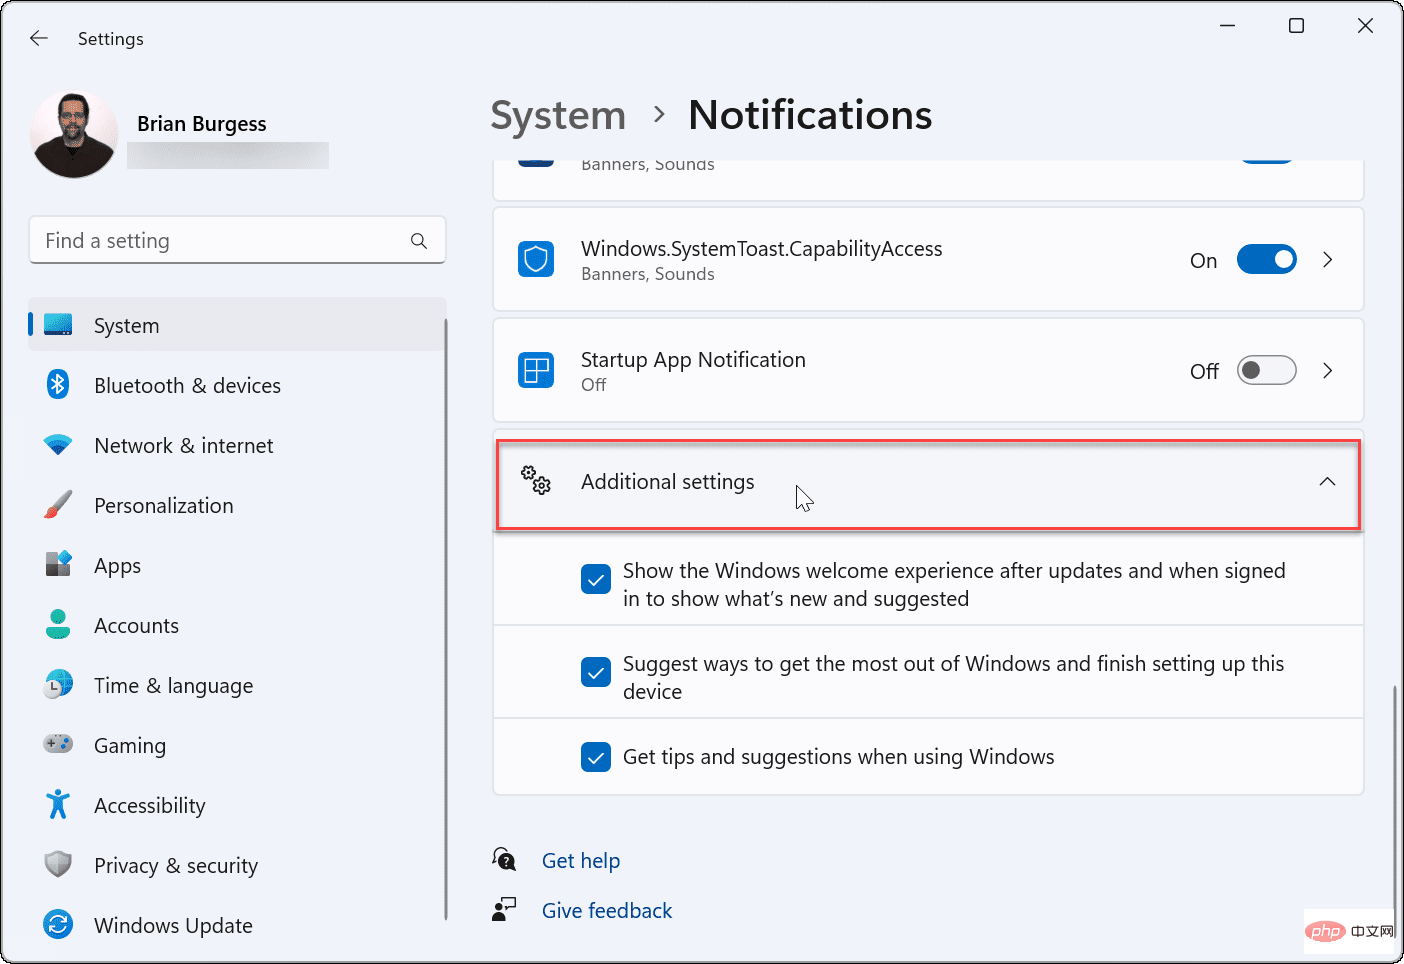
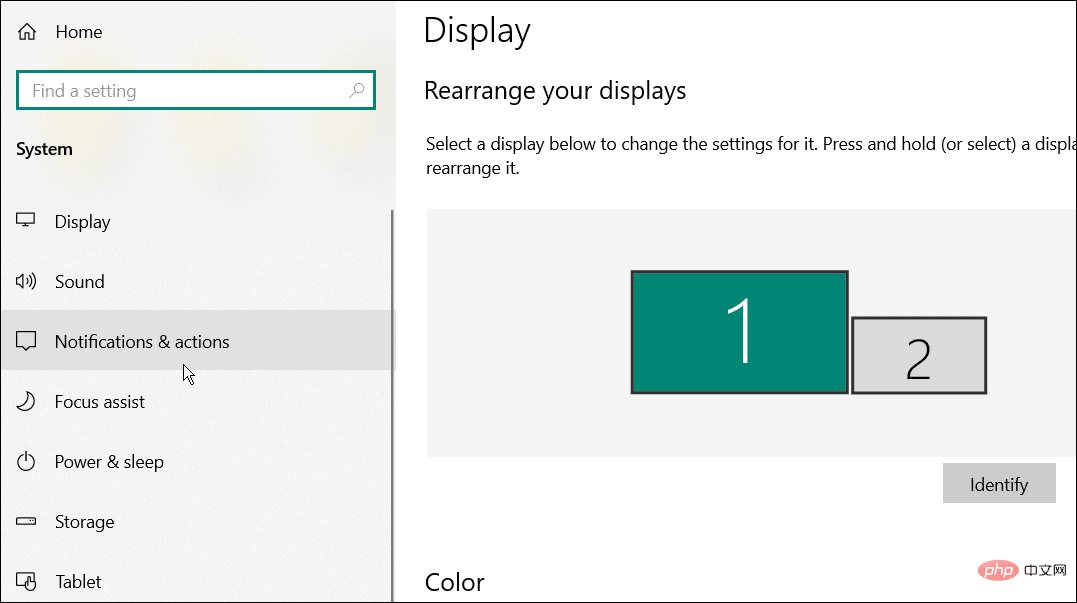
- When Settings opens, click System on the left, then click Notifications on the right.
- Scroll down the Notifications screen and expand the Additional settings section.
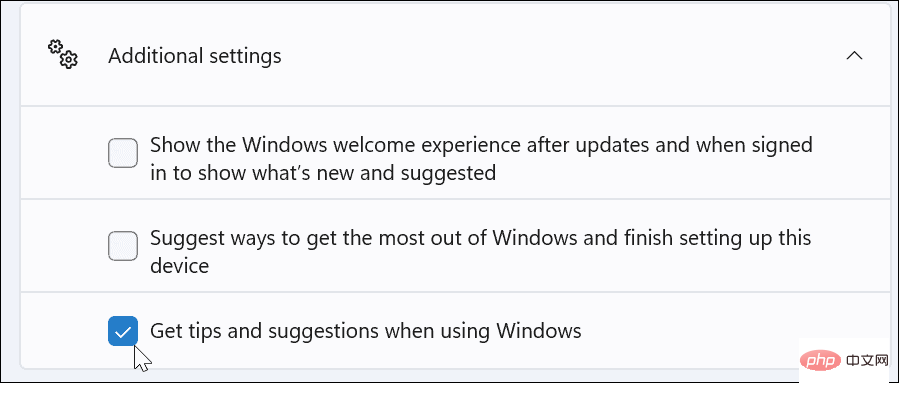
- Uncheck each Additional Settings option.
- Going forward, you should no longer see the annoying "Let's finish setting up the device" window. If you want to mute other notifications, uncheck Show the Windows Welcome experience after updates and at sign-in to show new features and suggestions and Recommendations for getting the most out of Windows and completing setting up your device options .
Disable Notifications via Registry
If you still receive the "Let us finish setting up your device" message or want to permanently disable it on Windows 11, you can use Registration surface.
Note: The registry is the lifeline of Windows. Entering or deleting incorrect values can cause system instability or inoperability. Before continuing, back up the registry, create a restore point, or back up your computer first.To disable notifications using the registry:
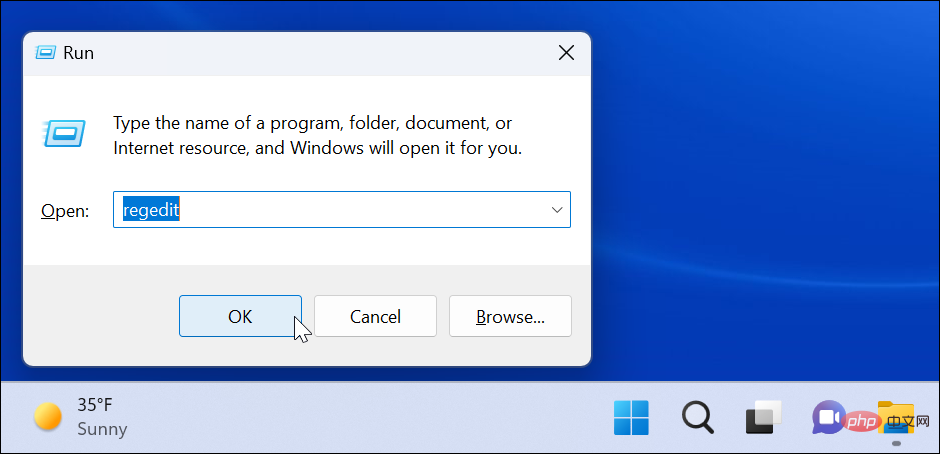
- Use the keyboard shortcut Windows key ROpen the Run dialog box.
- In Run, type regedit and click OK.
- When Registry Editor opens, navigate to the following path:
HKEY_CURRENT_USER\Software\Microsoft\Windows\CurrentVersion\ContentDeliveryManager
Copy after login - In the ContentDeliveryManager key in the right pane, find SubscribedContent-310093Enabled and verify that its value is set to 1 .
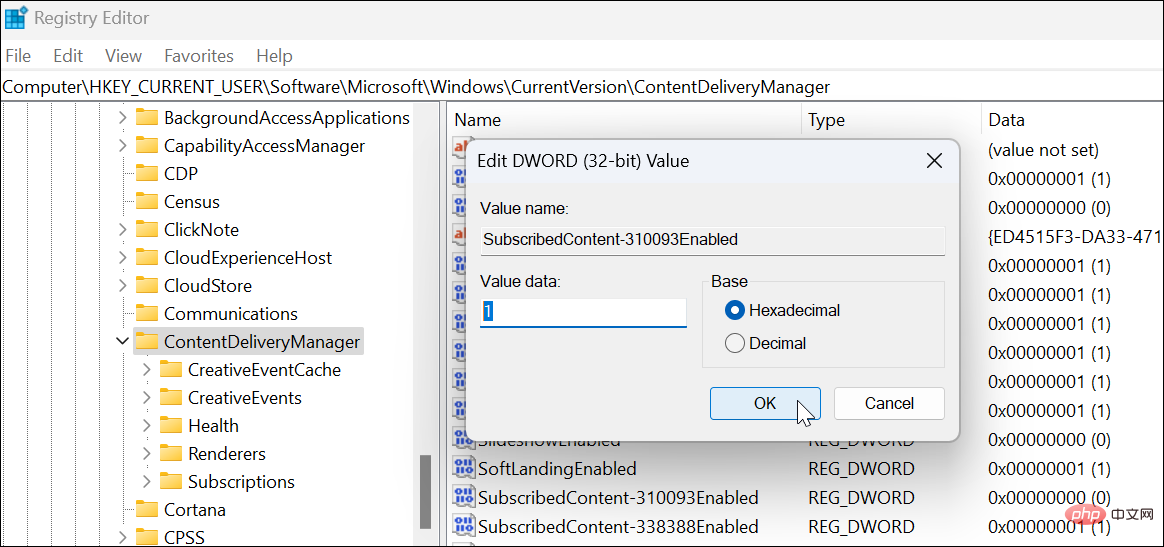
If you want to enable the screen again for any reason, delete the SubscribedContent-310093Enabled value and the screen will return.
Disable Let’s finish setting up your device message on Windows 10
Unfortunately, this message pops up periodically on Windows 10 as well.
To disable notifications on Windows 10, do the following:
- Open the Start menu and launch Settings.
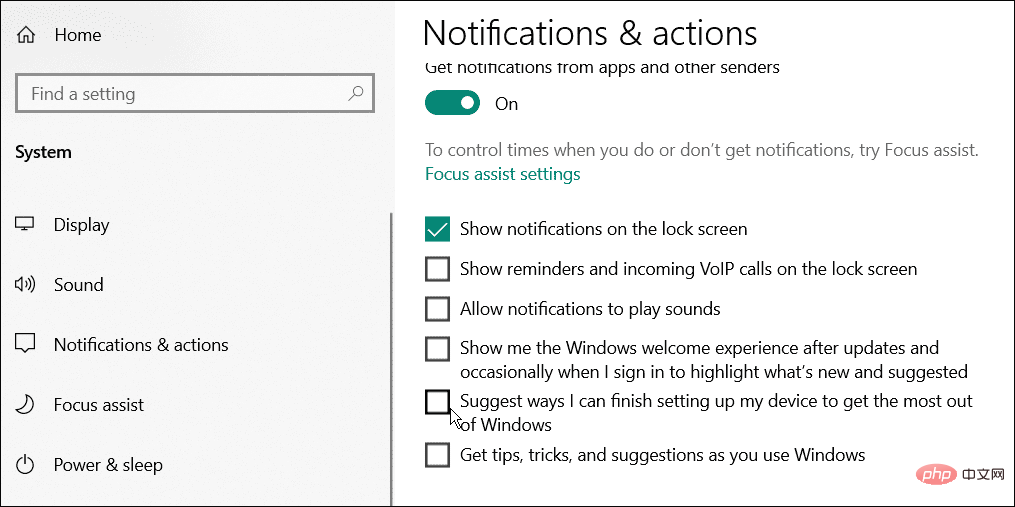
- In Settings, press System > Notifications and Actions.
- Uncheck the near the top that suggests ways I can complete setting up the device to take full advantage of Windows options.
Customize Windows Notifications
While Windows typically displays the "Let's finish setting up the device" message after a fresh installation, it may also appear after a cumulative or feature update (or reappear). If you see the message again, just repeat the steps above, go back to notification settings, and turn it off again. You can also use the registry for a more permanent solution.
Tired of notification spam? You can try using Focus Assist on Windows 11 for distraction-free computing. If you're not already using Windows 11, learn about Focus Assist on Windows 10 instead.
The above is the detailed content of How to disable 'Let's finish setting up the device' on Windows. For more information, please follow other related articles on the PHP Chinese website!

Hot AI Tools

Undresser.AI Undress
AI-powered app for creating realistic nude photos

AI Clothes Remover
Online AI tool for removing clothes from photos.

Undress AI Tool
Undress images for free

Clothoff.io
AI clothes remover

AI Hentai Generator
Generate AI Hentai for free.

Hot Article
Hot Tools

Notepad++7.3.1
Easy-to-use and free code editor

SublimeText3 Chinese version
Chinese version, very easy to use

Zend Studio 13.0.1
Powerful PHP integrated development environment

Dreamweaver CS6
Visual web development tools

SublimeText3 Mac version
God-level code editing software (SublimeText3)
Hot Topics
 1378
1378
 52
52

 What does Discord Do Not Disturb mean and how to use it?
Jun 03, 2023 pm 01:02 PM
What does Discord Do Not Disturb mean and how to use it?
Jun 03, 2023 pm 01:02 PM
If you have Discord Do Not Disturb enabled, you will not see any notifications on your app. This includes servers, group chats, and direct messages. Discord is a chat application that allows users to communicate through text, pictures, and video calls in games. It is designed to be a communication channel for gamers to chat and coordinate with each other in real time. DND settings allow you to disable all incoming messages you don't want to see. This is useful if you don't want to be disturbed by any messages while you are working. Additionally, you can also try the best Discord bots that can help you manage your guild while you are away. If you're wondering what Discord Do Not Disturb means and how to use it, this tutorial should help. D
 How to disable driver signature enforcement in Windows 11
May 20, 2023 pm 02:17 PM
How to disable driver signature enforcement in Windows 11
May 20, 2023 pm 02:17 PM
Microsoft has built several security features into Windows to ensure your PC remains secure. One of them is driver signature enforcement in Windows 11. When this feature is enabled, it ensures that only drivers digitally signed by Microsoft can be installed on the system. This helps most of the users to a great extent as it protects them. But there is a downside to enabling driver signature enforcement. Suppose you find a driver that works for your device, but it is not signed by Microsoft, although it is completely safe. But you won't be able to install it. Therefore, you must know how to disable driver signing in Windows 11
 How to disable display scaling for high DPI settings in Windows 11 or 10
May 22, 2023 pm 10:11 PM
How to disable display scaling for high DPI settings in Windows 11 or 10
May 22, 2023 pm 10:11 PM
The default display scaling feature on Windows 10 or later is a core component of the Windows operating system. But sometimes, this feature of certain apps can cause compatibility issues, unreadable text, blurry logos, and ultimately, app crashes. This can be a huge headache if you're dealing with 2160p or higher resolutions. There are many ways to disable the default display scaling feature on high DPI settings. We've selected the best ones and detailed step-by-step instructions for each process. How to Disable Display Scaling on High DPI Settings There is a way, all you have to do is disable high DPI scaling for a single application, and there is a way to do it for the entire Window
 Fix: WD My Cloud doesn't show up on the network in Windows 11
Oct 02, 2023 pm 11:21 PM
Fix: WD My Cloud doesn't show up on the network in Windows 11
Oct 02, 2023 pm 11:21 PM
If WDMyCloud is not showing up on the network in Windows 11, this can be a big problem, especially if you store backups or other important files in it. This can be a big problem for users who frequently need to access network storage, so in today's guide, we'll show you how to fix this problem permanently. Why doesn't WDMyCloud show up on Windows 11 network? Your MyCloud device, network adapter, or internet connection is not configured correctly. The SMB function is not installed on the computer. A temporary glitch in Winsock can sometimes cause this problem. What should I do if my cloud doesn't show up on the network? Before we start fixing the problem, you can perform some preliminary checks:
 Tiny10 makes Windows 10 durable on (very old) PCs
May 22, 2023 pm 04:02 PM
Tiny10 makes Windows 10 durable on (very old) PCs
May 22, 2023 pm 04:02 PM
Tiny10 is one developer's attempt to make Microsoft's Windows 10 operating system usable on both older PC systems and modern systems. When Microsoft released Windows 10 in 2015, it ensured that the operating system had the same system requirements as previous versions of Windows. That changes with the release of Windows 11 in 2021. Still, Windows 10 felt noticeably heavier than previous Windows versions, and users began looking for ways to improve the usability of the operating system. Faster hard drive, more memory, faster and more powerful CP
![Event ID 157: Disk has been removed unexpectedly [Fixed]](https://img.php.cn/upload/article/000/887/227/168576249277516.jpg?x-oss-process=image/resize,m_fill,h_207,w_330) Event ID 157: Disk has been removed unexpectedly [Fixed]
Jun 03, 2023 am 11:21 AM
Event ID 157: Disk has been removed unexpectedly [Fixed]
Jun 03, 2023 am 11:21 AM
Disk has been accidentally deleted is an error in the system event log on Windows devices. This is an unusual issue on the virtual disk that all XBOX Live PC and Microsoft PC installations rely on. Typically, this problem occurs when something disrupts the system's communication with the disk. Event ID157 in Event Viewer The disk has been accidentally deleted, preventing the user from installing the game using the specified virtual drive. This virtual drive will not be visible in File Explorer like other drives. You may also encounter VMWare issues where the disk has been accidentally deleted. The solution below will fix the problem, but you must make changes directly in VMWare's emulated operating system. Depend on
 How to Fix Error Code 1132 in Zoom on Windows PC
May 30, 2023 am 11:08 AM
How to Fix Error Code 1132 in Zoom on Windows PC
May 30, 2023 am 11:08 AM
Zoom's video conferencing capabilities have made it popular among users while working from home. Many Zoom desktop client users have reported seeing error code 1132 along with an “Unknown error has occurred” message on their Windows PCs. Usually, this error code pops up when users try to log into their account and join any meeting in Zoom. In the error window, the user has the option to open a browser and join the meeting. However, some users reported that they were unable to open the meeting even on the browser. Windows firewall settings, outdated Zoom installation, or Zoom blacklisting your account could be some of the possible reasons for this error. Are you encountering an error code while using the Zoom app
 NVIDIA Setup Unable to Continue? 4 easy ways to fix it
Jun 03, 2023 am 09:52 AM
NVIDIA Setup Unable to Continue? 4 easy ways to fix it
Jun 03, 2023 am 09:52 AM
The NVIDIA installer cannot continue is an error message that prevents you from installing drivers for your graphics card. No matter how many times you try to install it on your computer, you'll almost certainly get the same message over and over again. Additionally, this error occurs with various drivers and Windows iterations, indicating multiple potential causes. That said, it doesn't exclude anyone, and troubleshooting the issue can be a frustrating experience for many users. Fortunately, there's a good chance that one (if not more) of the following methods will work for you, so read on to find out which one works best. Even if the driver installation fails, after you download and install the driver, an NVIDIA folder will be created in the partition where the operating system is installed. This is because it will be