
 Java
javaTutorial
How SpringBoot integrates Mybatis to implement addition, deletion, modification and query
Java
javaTutorial
How SpringBoot integrates Mybatis to implement addition, deletion, modification and query
How SpringBoot integrates Mybatis to implement addition, deletion, modification and query

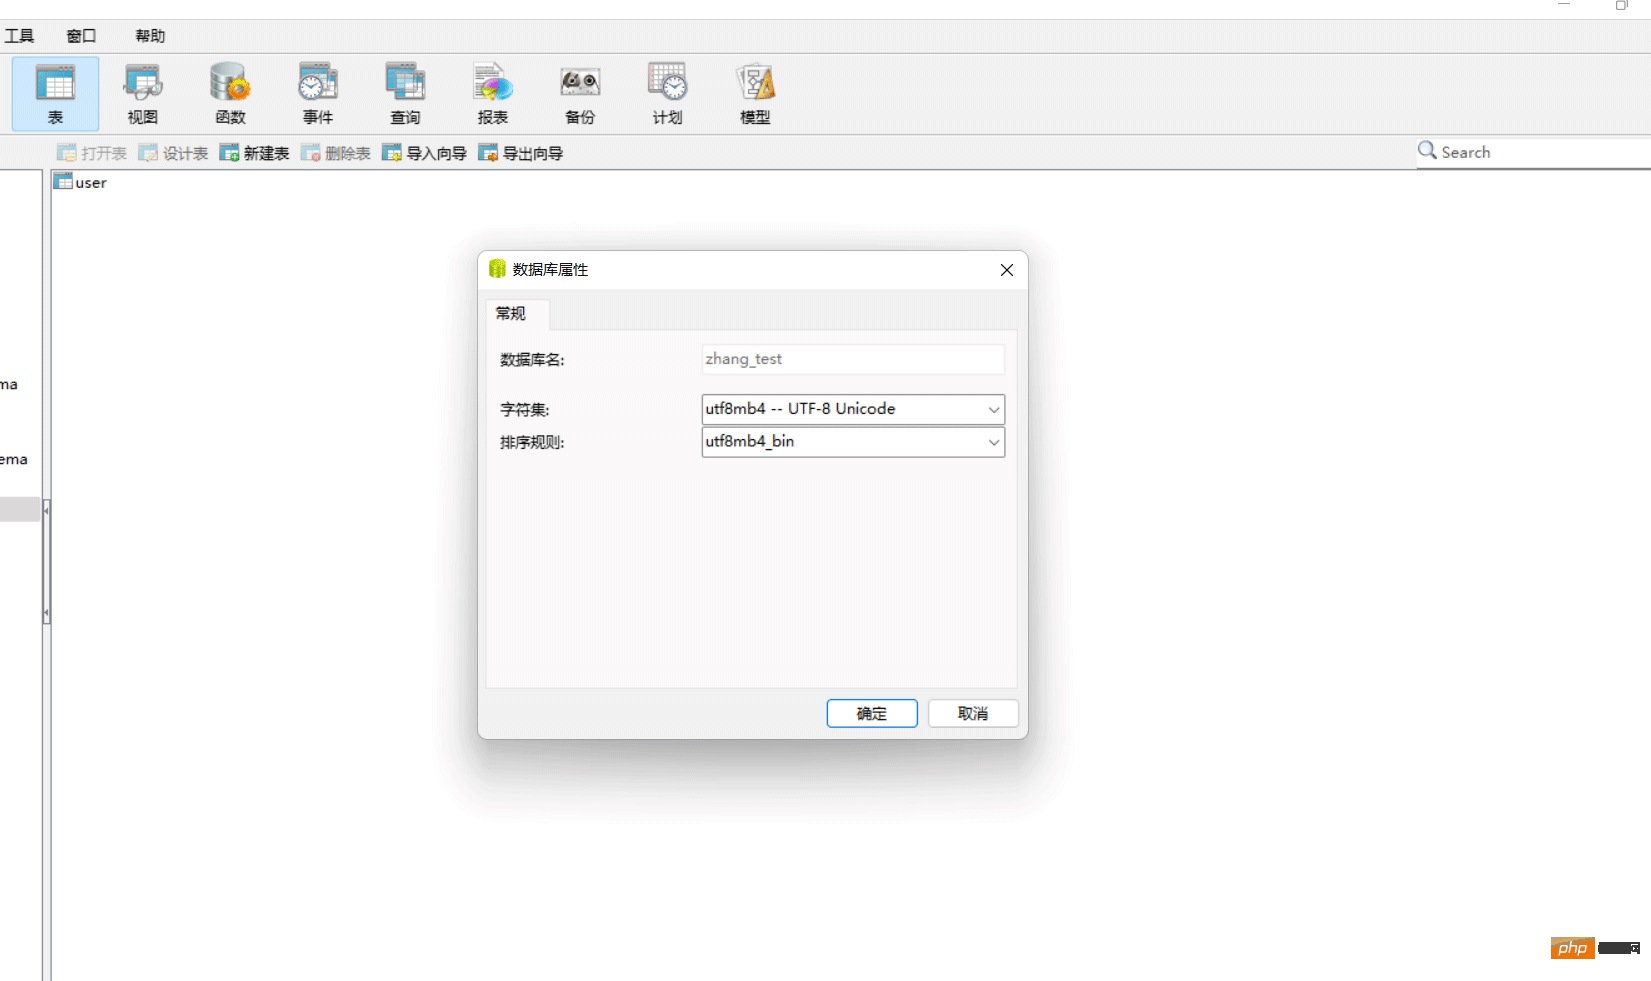
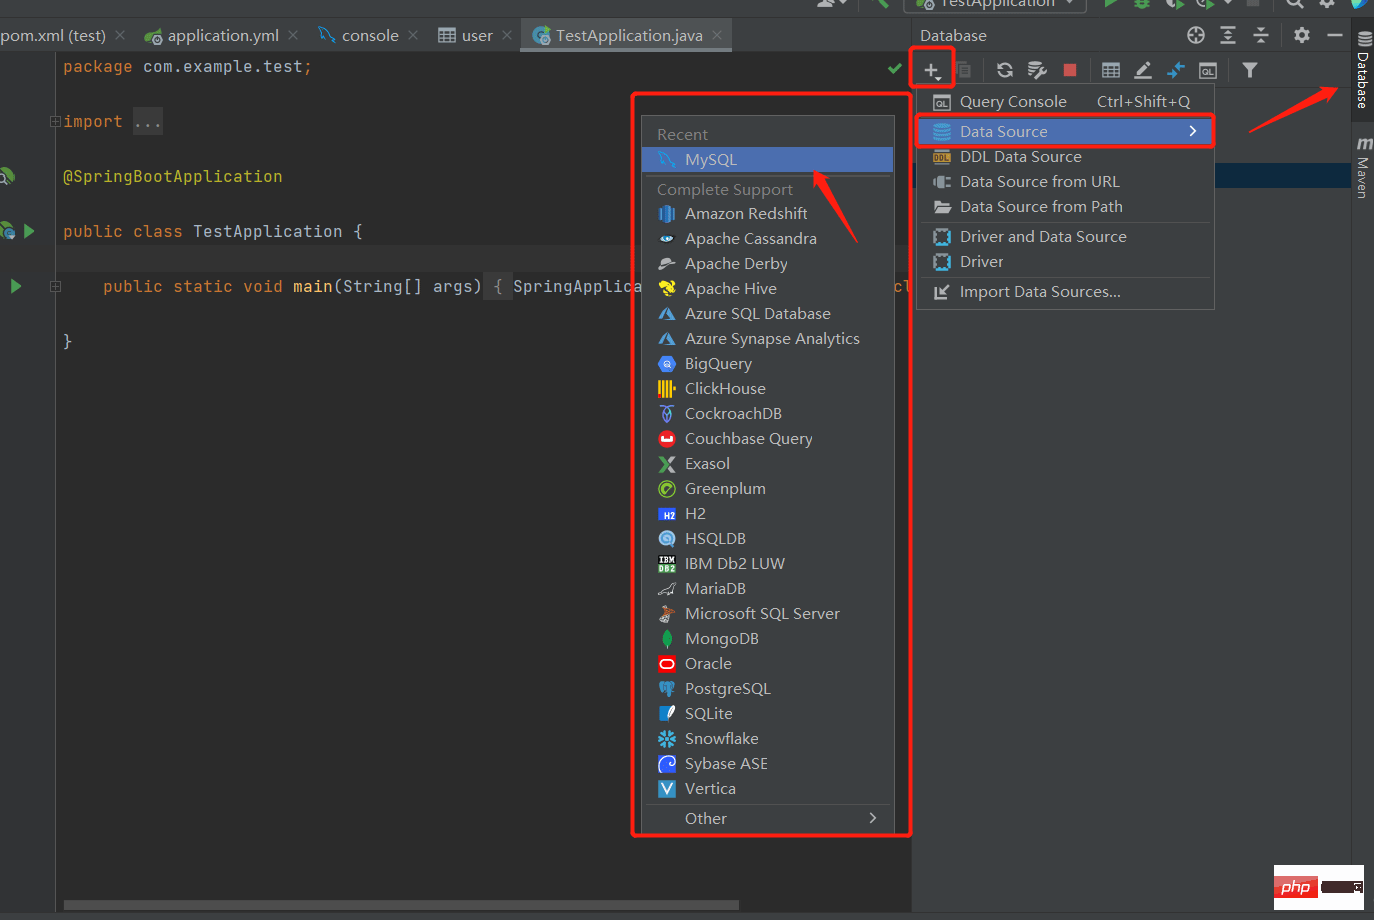
First: Create a MySQL database
First we should create a database to operate our CRUD data (you can use visual tools to create it, or you can use SQL commands to create it), the name of the database You can define it yourself. After creating the database, we have to create a table to store the data. The name of the table is the 'user' table. The fields can be set by ourselves, as long as they correspond to the entities we create later.
1 2 3 4 5 6 |
|
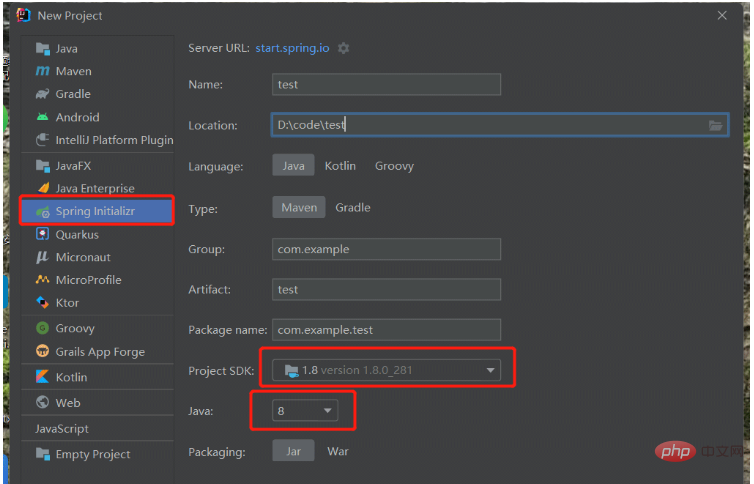
Second: Create a SpringBoot project and introduce the required dependency packages
Create a SpringBoot project using IDEA:
1. Select Spring Initializr to create, and then select JDK 1.8, Java8 version.
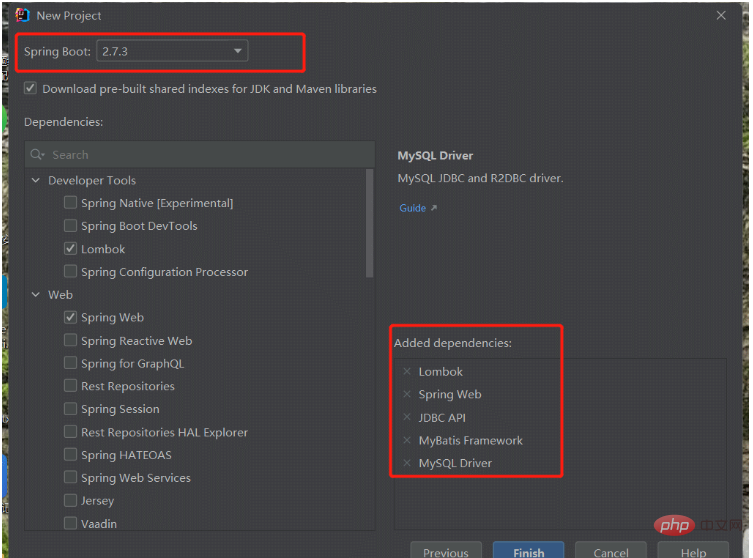
2. Select Spring Web, JDBC API, Mybatis Framework, MySQL Driver, and Lombok for initialization components, which may be used.
3. After selecting, click Finish to create.
4. After creating SpringBoot, check whether your Maven is configured properly. If not, check how to configure Maven. Otherwise, your pom dependencies will not be loaded. Just download Maven, how to change the Alibaba source image address and local warehouse, and then select Maven's xml file and local warehouse address in IDEA.
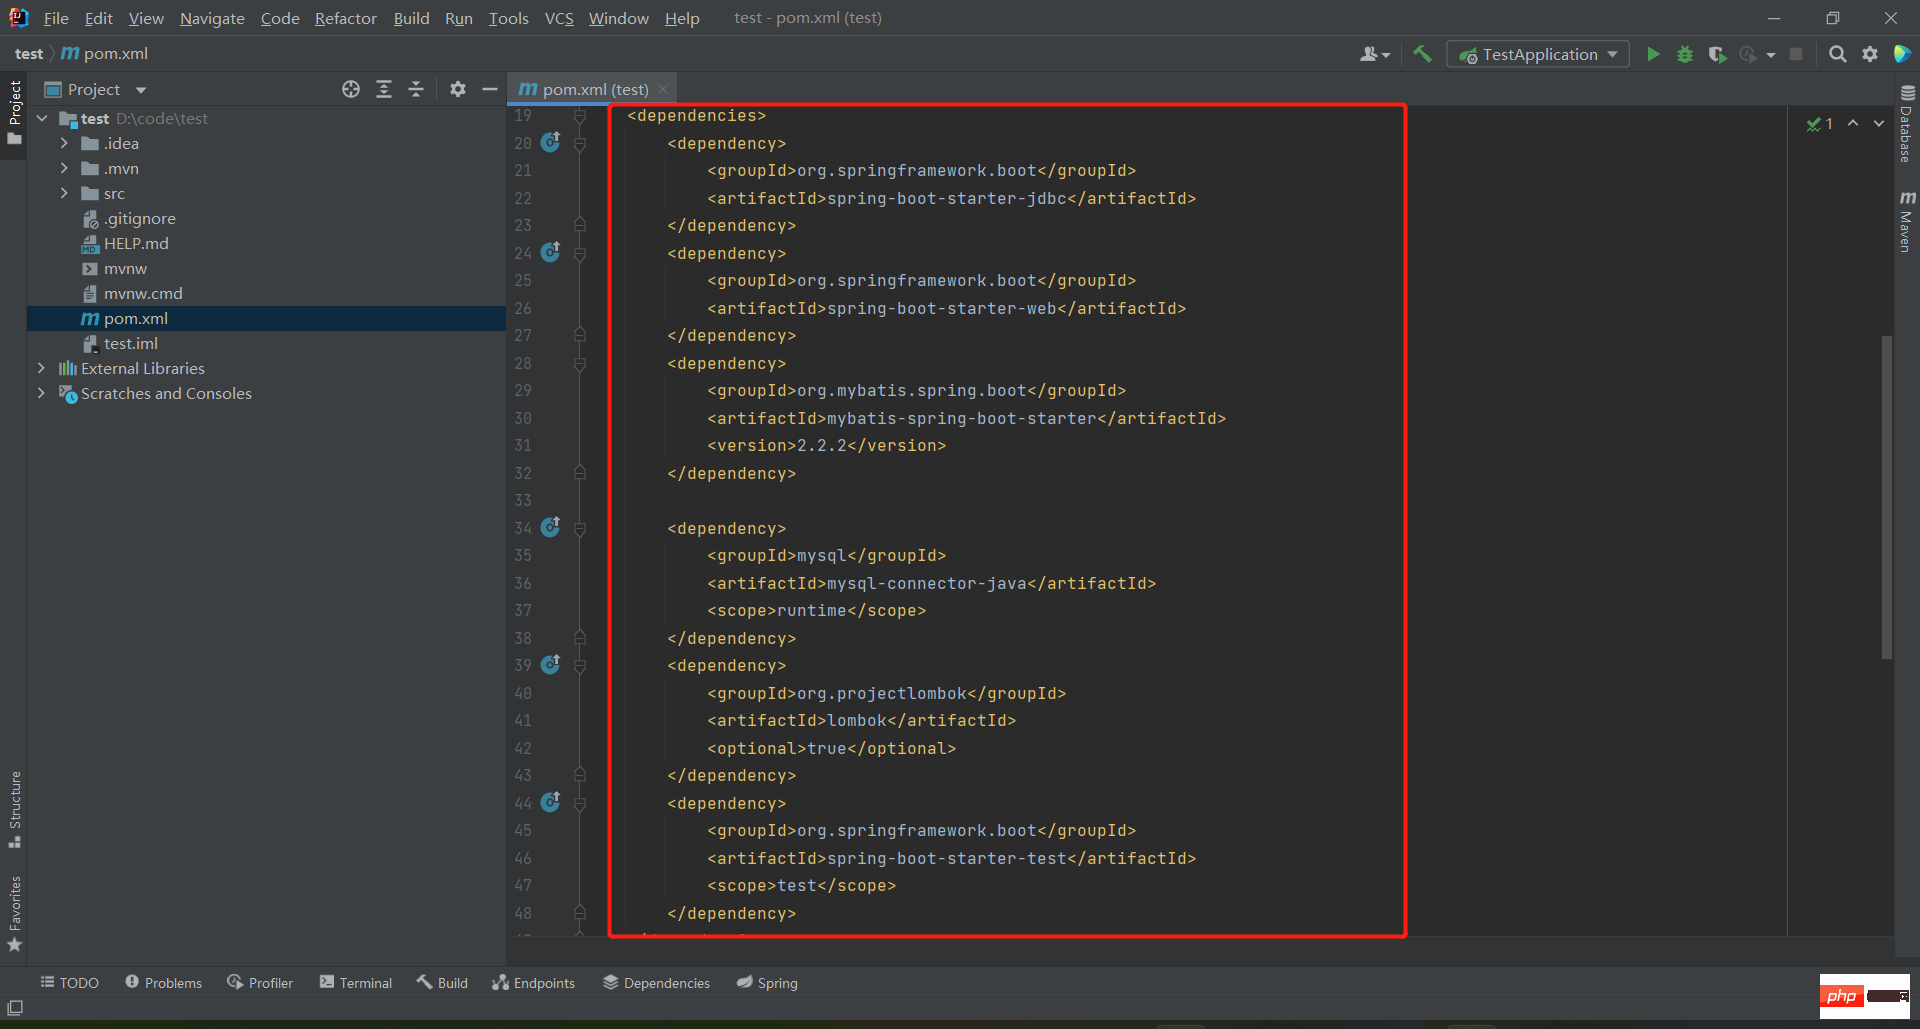
Above are If you forget to introduce the required dependency packages, you can add them directly without re-creating the project.
Third: Create the program directory and configure the core application.xml file
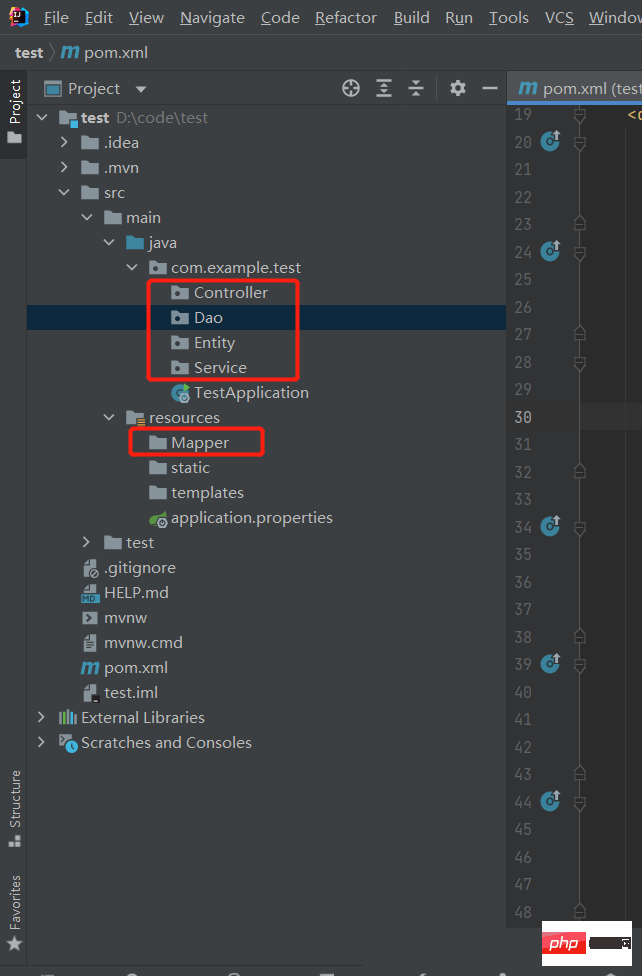
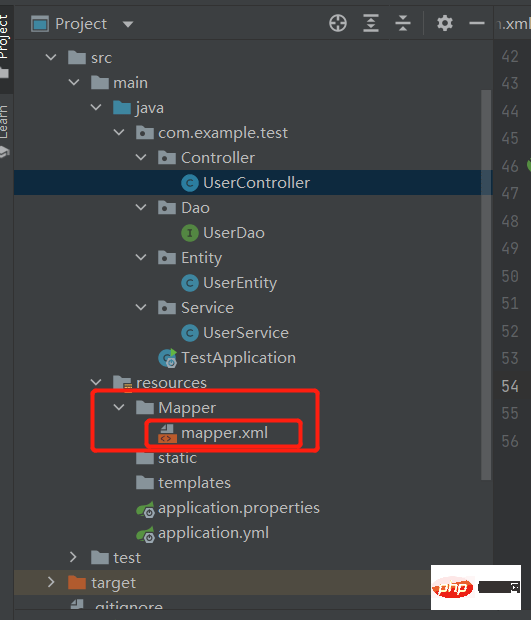
First you need to Create four folders, namely: Entity (user entity), Controller, Service, Dao, and then you need to create a new Mapper directory under the resource directory. This Mapper directory is used to store SQL statements. At this point, I think we need to understand the MVC model. Since our access is called one layer at a time, and then returns to the past after querying the data, our level should be: Controller (the control layer, which is also the layer that receives the parameters passed by the front end) -> Service (business layer, all our business, such as judgments and some loop statements need to be written in this layer) -> Dao (persistence layer, this layer mainly deals with the database, and is mainly responsible for data operations. That is, CRUD operation) -> Database,
is as shown in the figure below:
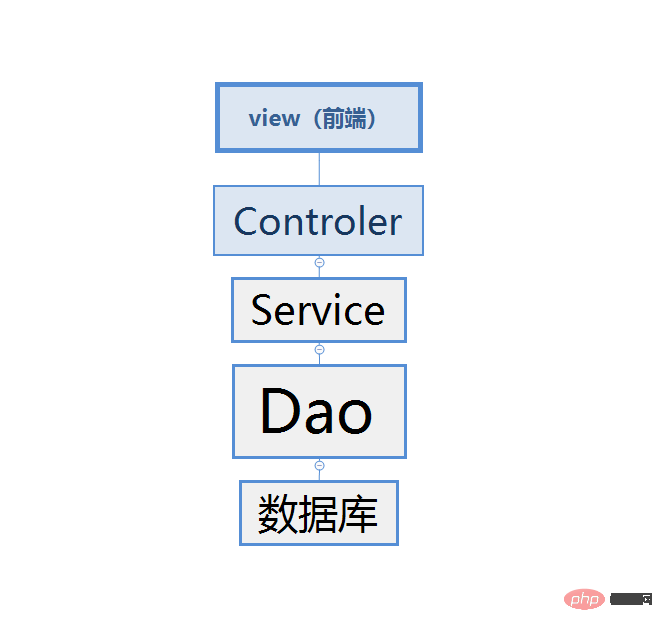
There is no good drawing tool, just I just drew it casually. Anyway, the flow of data is like this. You can take a look at it.
Create a yml file in the resources folder and enter the following content:
1 2 3 4 5 6 7 8 9 10 11 12 13 |
|
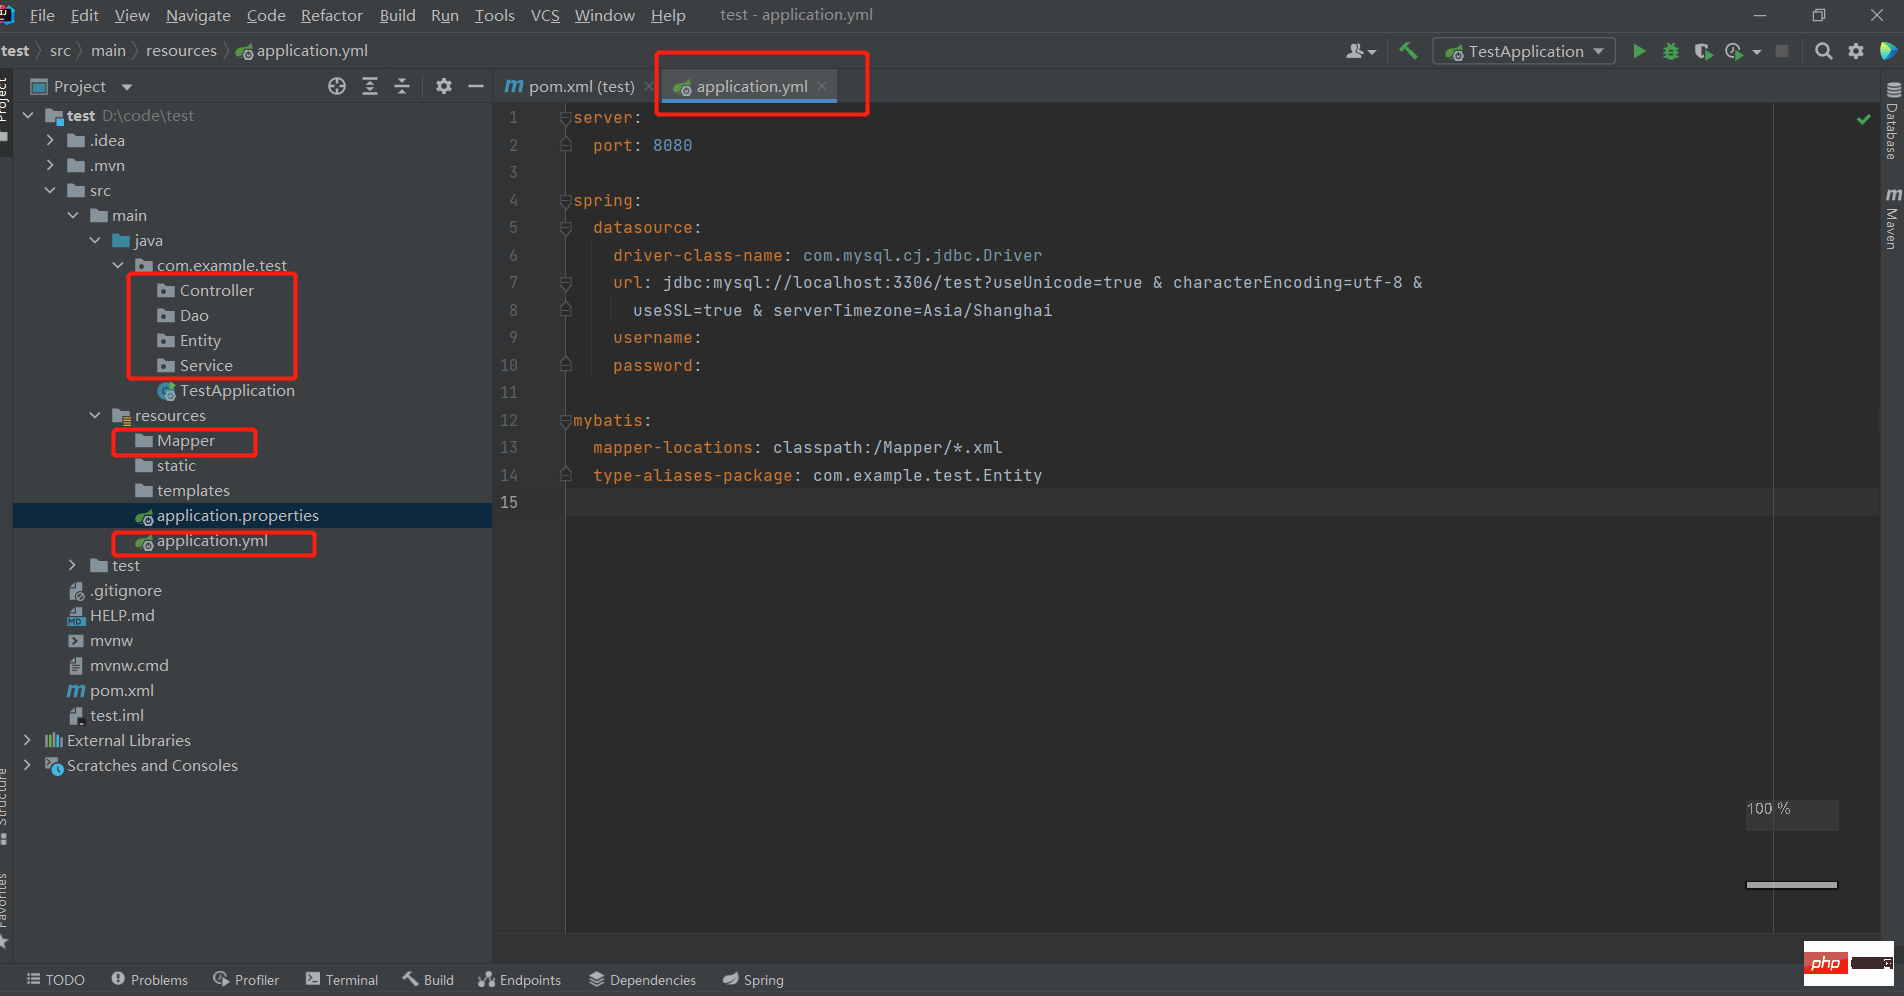
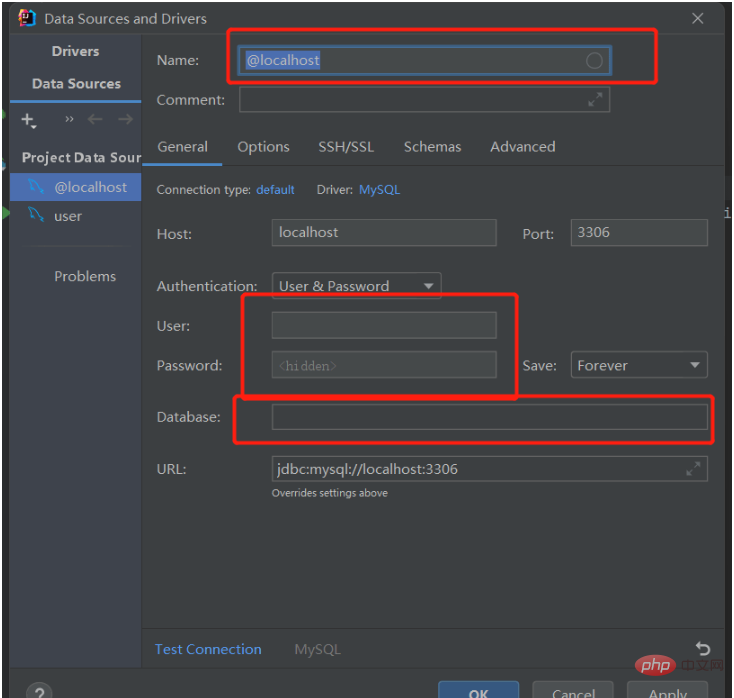
After configuring the yml file, we go to the Databases on the right to see if we can connect to our local MySQL database:
Entity package: create a UserEntity class, the content is as follows:
1 2 3 4 5 6 7 8 9 10 11 12 13 14 15 16 17 18 19 20 21 22 23 24 25 26 27 28 29 |
|
Dao package: create a UserDao interface, the content As follows:
1
2
3
4
5
6
7
8
9
10
11
12
13
14
15
import com.example.test.Entity.UserEntity;
import org.apache.ibatis.annotations.Mapper;
import java.util.List;
@Mapper
publicinterfaceUserDao {
List<UserEntity> queryLimit(Integer currentPage, Integer pageSize);
Integer addUser(UserEntity user);
Integer updateUser(UserEntity user);
Integer deleteUser(UserEntity user);
}Copy after login
Service package: Create a UserService class with the following content:
1
2
3
4
5
6
7
8
9
10
11
12
13
14
15
16
17
18
19
20
21
22
23
24
25
26
27
28
import com.example.test.Dao.UserDao;
import com.example.test.Entity.UserEntity;
import org.springframework.beans.factory.annotation.Autowired;
import org.springframework.stereotype.Service;
import java.util.List;
@Service("UserService")
publicclassUserService {
@Autowired
privateUserDao userDao;
publicList<UserEntity> queryLimit(Integer currentPage,Integer pageSzie){
returnuserDao.queryLimit(currentPage,pageSzie);
}
publicInteger addUser(UserEntity user){
returnuserDao.addUser(user);
}
publicInteger updateUser(UserEntity user){
returnuserDao.updateUser(user);
}
publicInteger deleteUser(UserEntity user){
returnuserDao.deleteUser(user);
}
}Copy after login
Controller package: Create a UserController class with the following content:
1
2
3
4
5
6
7
8
9
10
11
12
13
14
15
16
17
18
19
20
21
22
23
24
25
26
27
28
29
30
31
32
33
34
35
36
37
38
39
40
41
42
43
44
45
46
47
48
49
50
51
52
53
import com.example.test.Entity.UserEntity;
import com.example.test.Service.UserService;
import org.springframework.beans.factory.annotation.Autowired;
import org.springframework.web.bind.annotation.*;
import java.util.List;
@RestController
@RequestMapping("user")
publicclassUserController {
@Autowired
privateUserService userService;
String message ="";
@RequestMapping("/queryLimit")
publicList<UserEntity> queryLimit(@RequestParam("currentPage") Integer currentPage,@RequestParam("pageSize") Integer pageSize){
returnuserService.queryLimit(currentPage,pageSize);
}
@PostMapping("/addUser")
publicString addUer(@RequestBody UserEntity user){
//用Mybatis执行insert语句的时候,插入成功会返回1,不成功则会抛出异常,捕获一下异常就好
try{
userService.addUser(user);
message ="增加用户成功";
}catch(Exception exception){
message ="增加用户异常";
}
returnmessage;
}
@PutMapping("/updateUser")
publicString updateUser(@RequestBody UserEntity user){
//Mybatis的更新操作成功返回1,用户不存在返回0,失败则抛异常
try{
message = userService.updateUser(user) == 1?"更新用户成功":"用户不存在,更新失败";
}catch(Exception exception){
message ="更新异常";
}
returnmessage;
}
@DeleteMapping("/deleteUser")
publicString deleteUser(@RequestBody UserEntity user){
//Mybatis的删除操作和更新返回值一样,成功返回1,用户不存在返回0,失败则抛异常
try{
message = userService.deleteUser(user) == 1?"删除用户成功":"用户不存在,删除失败";
}catch(Exception exception){
message ="删除异常";
}
returnmessage;
}
}Copy after login
After writing the above content, we need to create the mapper.xml file in the Mapper folder, as shown below:
mapper.xml文件内容如下:需要注意的地方是namespace:这个路径是你的UserDao接口的路径,因为你传过来的数据需要和xml进行一个绑定,这样你编写的SQL语句才能接收到你前端传过来的数据(大体意思可以这么理解),而id则是和你UserDao中的接口方法相对应,比如我的UserDao接口中的查找方法命名是queryLimit,那么我在xml文件中的查询语句的id就应该和queryLimit想对应,即:id=“queryLimit”。
resultType是返回数据的类型
parameterType则是传入的数据类型
1 2 3 4 5 6 7 8 9 10 11 12 13 14 15 16 17 18 19 20 21 |
|
最后我们需要在启动类加一点东西(MapperScan扫描的是我们Dao包的地址,填写自己的就好)

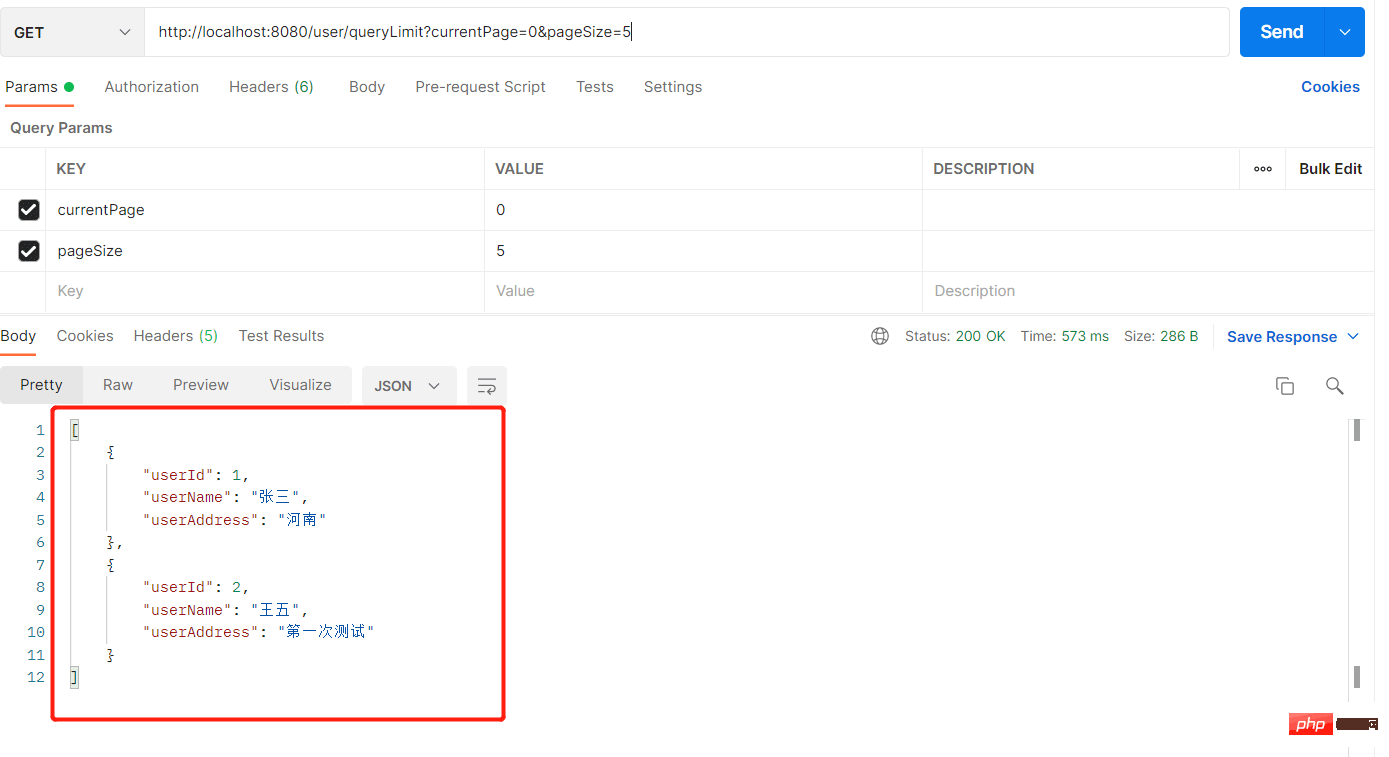
第五:测试结果(这里我用的postman来进行接口测试)
查询用户数据->地址为:http://localhost:8080/user/queryLimit?currentPage=0&pageSize=5
添加用户数据-> 地址为:http://localhost:8080/user/addUser
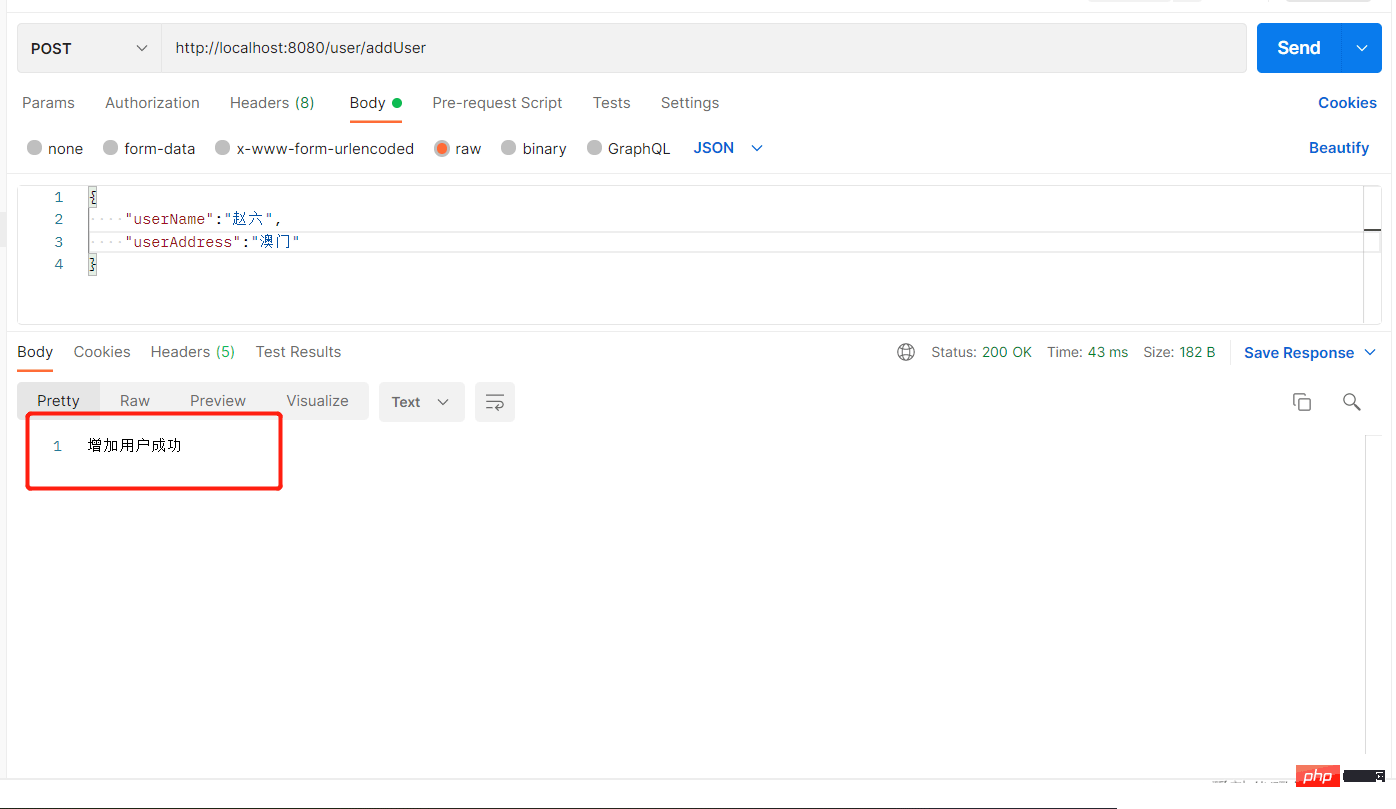
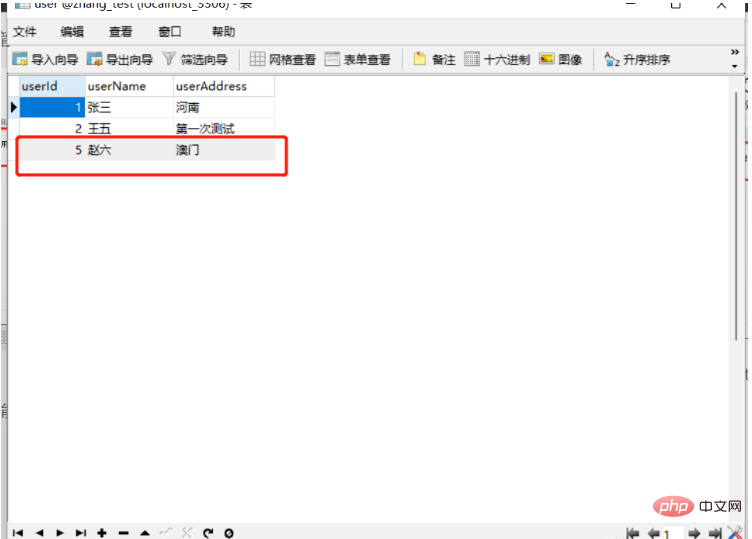
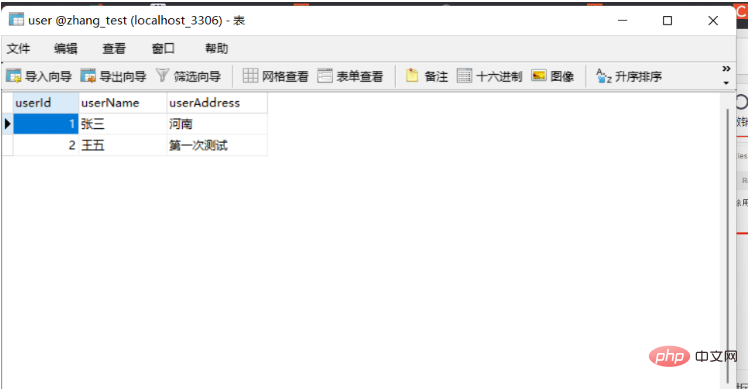
数据库也能看到数据:
更新用户数据-> 地址为:http://localhost:8080/user/updateUser
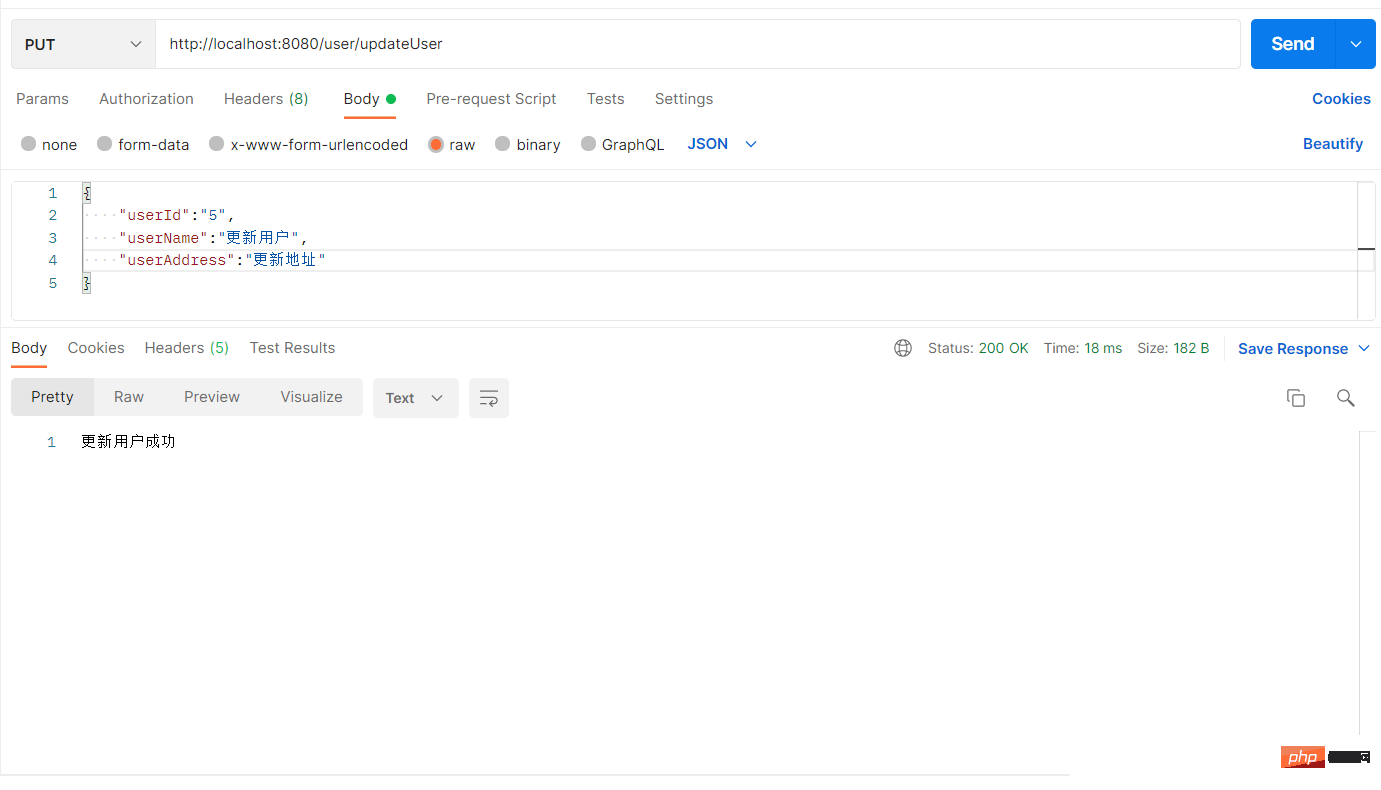
更新之后数据库数据为:

删除用户数据-> 地址为:http://localhost:8080/user/deleteUser
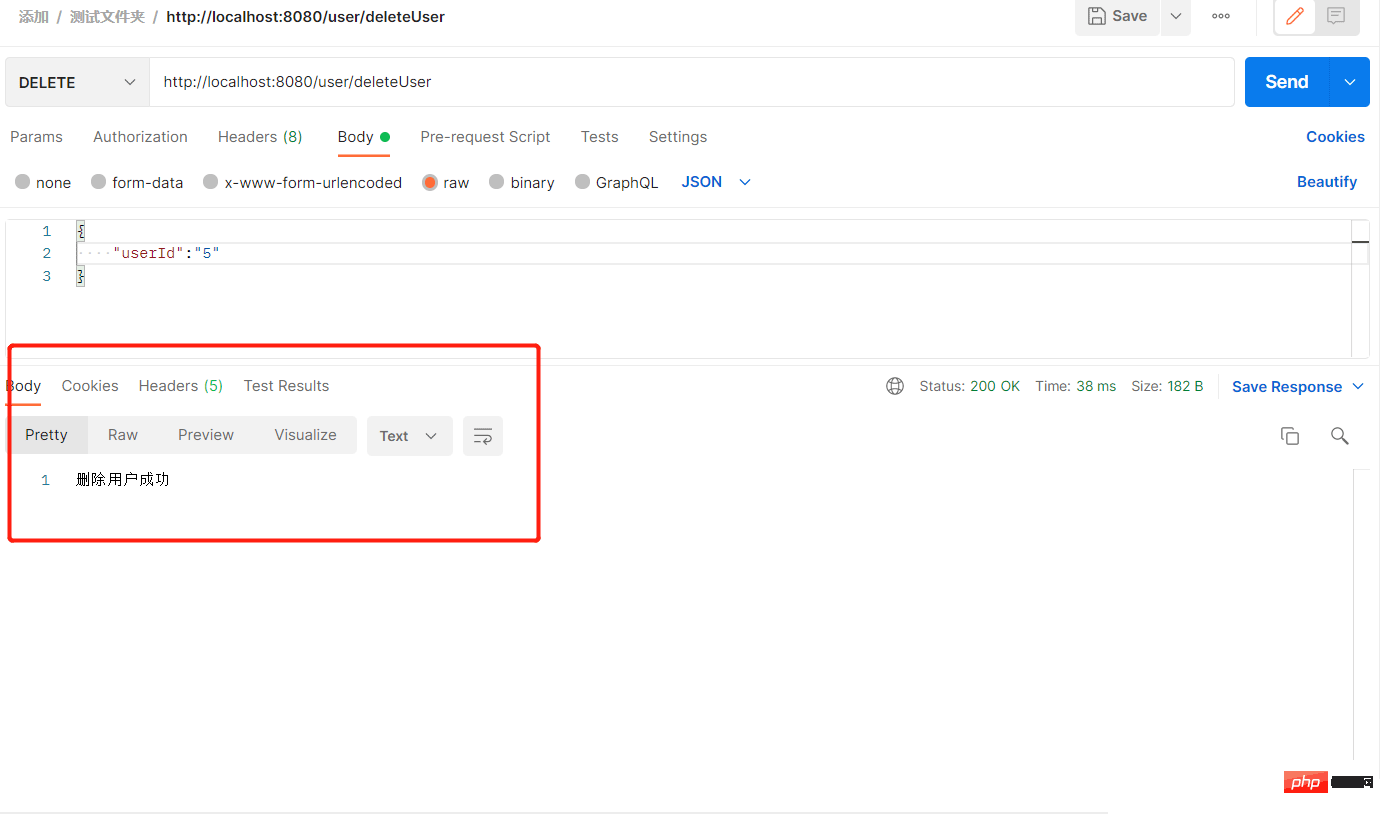
查看数据库数据已经删除:
The above is the detailed content of How SpringBoot integrates Mybatis to implement addition, deletion, modification and query. For more information, please follow other related articles on the PHP Chinese website!

Hot AI Tools

Undresser.AI Undress
AI-powered app for creating realistic nude photos

AI Clothes Remover
Online AI tool for removing clothes from photos.

Undress AI Tool
Undress images for free

Clothoff.io
AI clothes remover

Video Face Swap
Swap faces in any video effortlessly with our completely free AI face swap tool!
Hot Article
Hot Tools

Notepad++7.3.1
Easy-to-use and free code editor

SublimeText3 Chinese version
Chinese version, very easy to use

Zend Studio 13.0.1
Powerful PHP integrated development environment

Dreamweaver CS6
Visual web development tools

SublimeText3 Mac version
God-level code editing software (SublimeText3)
Hot Topics


 iBatis vs. MyBatis: Which one is better for you?
Feb 19, 2024 pm 04:38 PM
iBatis vs. MyBatis: Which one is better for you?
Feb 19, 2024 pm 04:38 PM
iBatis vs. MyBatis: Which should you choose? Introduction: With the rapid development of the Java language, many persistence frameworks have emerged. iBatis and MyBatis are two popular persistence frameworks, both of which provide a simple and efficient data access solution. This article will introduce the features and advantages of iBatis and MyBatis, and give some specific code examples to help you choose the appropriate framework. Introduction to iBatis: iBatis is an open source persistence framework
 Detailed explanation of the Set tag function in MyBatis dynamic SQL tags
Feb 26, 2024 pm 07:48 PM
Detailed explanation of the Set tag function in MyBatis dynamic SQL tags
Feb 26, 2024 pm 07:48 PM
Interpretation of MyBatis dynamic SQL tags: Detailed explanation of Set tag usage MyBatis is an excellent persistence layer framework. It provides a wealth of dynamic SQL tags and can flexibly construct database operation statements. Among them, the Set tag is used to generate the SET clause in the UPDATE statement, which is very commonly used in update operations. This article will explain in detail the usage of the Set tag in MyBatis and demonstrate its functionality through specific code examples. What is Set tag Set tag is used in MyBati
 Comparative analysis of the functions and performance of JPA and MyBatis
Feb 19, 2024 pm 05:43 PM
Comparative analysis of the functions and performance of JPA and MyBatis
Feb 19, 2024 pm 05:43 PM
JPA and MyBatis: Function and Performance Comparative Analysis Introduction: In Java development, the persistence framework plays a very important role. Common persistence frameworks include JPA (JavaPersistenceAPI) and MyBatis. This article will conduct a comparative analysis of the functions and performance of the two frameworks and provide specific code examples. 1. Function comparison: JPA: JPA is part of JavaEE and provides an object-oriented data persistence solution. It is passed annotation or X
 Various ways to implement batch deletion operations in MyBatis
Feb 19, 2024 pm 07:31 PM
Various ways to implement batch deletion operations in MyBatis
Feb 19, 2024 pm 07:31 PM
Several ways to implement batch deletion statements in MyBatis require specific code examples. In recent years, due to the increasing amount of data, batch operations have become an important part of database operations. In actual development, we often need to delete records in the database in batches. This article will focus on several ways to implement batch delete statements in MyBatis and provide corresponding code examples. Use the foreach tag to implement batch deletion. MyBatis provides the foreach tag, which can easily traverse a set.
 Detailed explanation of how to use MyBatis batch delete statements
Feb 20, 2024 am 08:31 AM
Detailed explanation of how to use MyBatis batch delete statements
Feb 20, 2024 am 08:31 AM
Detailed explanation of how to use MyBatis batch delete statements requires specific code examples. Introduction: MyBatis is an excellent persistence layer framework that provides rich SQL operation functions. In actual project development, we often encounter situations where data needs to be deleted in batches. This article will introduce in detail how to use MyBatis batch delete statements, and attach specific code examples. Usage scenario: When deleting a large amount of data in the database, it is inefficient to execute the delete statements one by one. At this point, you can use the batch deletion function of MyBatis
 Detailed explanation of MyBatis cache mechanism: understand the cache storage principle in one article
Feb 23, 2024 pm 04:09 PM
Detailed explanation of MyBatis cache mechanism: understand the cache storage principle in one article
Feb 23, 2024 pm 04:09 PM
Detailed explanation of MyBatis caching mechanism: One article to understand the principle of cache storage Introduction When using MyBatis for database access, caching is a very important mechanism, which can effectively reduce access to the database and improve system performance. This article will introduce the caching mechanism of MyBatis in detail, including cache classification, storage principles and specific code examples. 1. Cache classification MyBatis cache is mainly divided into two types: first-level cache and second-level cache. The first-level cache is a SqlSession-level cache. When
 Detailed explanation of MyBatis first-level cache: How to improve data access efficiency?
Feb 23, 2024 pm 08:13 PM
Detailed explanation of MyBatis first-level cache: How to improve data access efficiency?
Feb 23, 2024 pm 08:13 PM
Detailed explanation of MyBatis first-level cache: How to improve data access efficiency? During the development process, efficient data access has always been one of the focuses of programmers. For persistence layer frameworks like MyBatis, caching is one of the key methods to improve data access efficiency. MyBatis provides two caching mechanisms: first-level cache and second-level cache. The first-level cache is enabled by default. This article will introduce the mechanism of MyBatis first-level cache in detail and provide specific code examples to help readers better understand
 Analyze the caching mechanism of MyBatis: compare the characteristics and usage of first-level cache and second-level cache
Feb 25, 2024 pm 12:30 PM
Analyze the caching mechanism of MyBatis: compare the characteristics and usage of first-level cache and second-level cache
Feb 25, 2024 pm 12:30 PM
Analysis of MyBatis' caching mechanism: The difference and application of first-level cache and second-level cache In the MyBatis framework, caching is a very important feature that can effectively improve the performance of database operations. Among them, first-level cache and second-level cache are two commonly used caching mechanisms in MyBatis. This article will analyze the differences and applications of first-level cache and second-level cache in detail, and provide specific code examples to illustrate. 1. Level 1 Cache Level 1 cache is also called local cache. It is enabled by default and cannot be turned off. The first level cache is SqlSes
