

How to implement nginx multi-domain forwarding

Basic concepts
DNS
DNS is the abbreviation of Domain Name System, which is the domain name system. DNS is a service on the Internet, generally called domain name service or domain name resolution service. It mainly provides services for converting website domain names and IP addresses.
Correspondence between domain names and IP
There is a one-to-one correspondence between domain names and IP addresses, but multiple domain names can correspond to the same IP address. Just like the relationship between a person's name and their ID number, it is obviously much easier to remember a person's name than their ID number. An IP address is a numerical address that identifies a user's site on the Internet. To make it easier to remember, domain names are used instead of IP addresses to represent site addresses. DNS resolves domain names into IP addresses so that they correspond one to one.
How DNS works
On the Internet, a domain name must be provided by two domain name servers to provide "authoritative" domain name resolution. If it is an international domain name, the domain name registration authority is Interinc. If it is a domestic domain name, the domain name registration authority is CNNIC. All domain names must be registered with two registration agencies in order to be used properly.
For example, if you want to visit a website now, such as www.baidu.com, your computer needs to know the IP address of this site before it can access it. So it will automatically send a query to the "master DNS" server in your area, that is, what is the IP of "www.baidu.com"? If there is no record of the domain name on the server, it will go to the upper level DNS to search and repeat until it is found. If it is still not found at the last level. At this time, it will search on the authoritative DNS, and then return the corresponding IP information to your computer. Your computer can communicate with the server corresponding to www.baidu.com. Such level-by-level queries are called "recursive" queries.
hosts file
The hosts file is a local system file without a suffix and requires administrator rights to modify its content. As can be seen from the above DNS resolution process, each DNS resolution may be forwarded by many DNS servers before the real IP address is finally obtained, which is very inefficient. So there is also a DNS resolution file locally on the computer, that is, the hosts file. When you point www.baidu.com in hosts to the correct Baidu server address, the computer will interact with the correct server. If the local hosts do not have a mapping relationship configured, then it will go to the DNS server on the LAN to find the corresponding mapping relationship. If it still doesn't exist, it will look for it in the DNS of the local corresponding node and repeat the steps mentioned above.
nginx reverse proxy
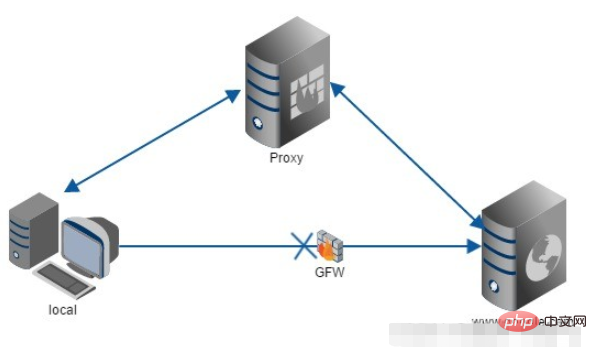
Proxy: In fact, it is an intermediary. A and B could have been directly connected, but C was added between A and B. Forward proxy
is the dns above. It acts as a proxy for the client, sends and receives requests for the client, and is transparent to the server. When I use a browser to access http://www.google.com, it is brutally blocked. So you can set up a proxy server abroad and ask the proxy to help me request google.com. The proxy will return the corresponding structure returned by the request. Give me.
Reverse proxy
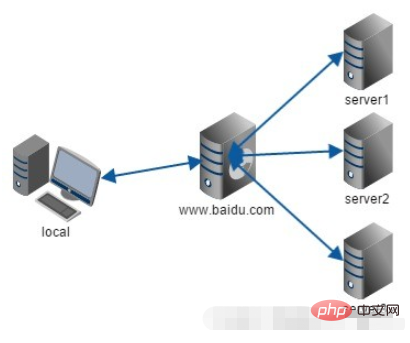
is a function of nginx. It acts as a proxy for the server. It forwards requests for the server and is transparent to the client. When we request www.baidu.com, it's like dialing 10086. There may be thousands of servers serving us behind the scenes, but you don't know which one it is, and you don't need to know. You just need to know. It just matters who the reverse proxy server is. www.baidu.com is our reverse proxy server. The reverse proxy server will help us forward the request to the real server. Nginx is a reverse proxy server with very good performance, used for load balancing.
nginx adds hosts to do multiple domain name mapping
For example, the domain names of your two applications are a.test.com and b .test.com.
Find the hosts file in the C:WindowsSystem32driversetc directory and open it with super administrator privileges. Add
a.test.com 127.0.0.1
b.test.com 127.0.0.1
at the end of the file and modify the nginx.conf file (since nginx.conf has many configurations, here is just the simplest example) and add server inside {} of http. Add the following content:
server {
  listen 80;
  server_name a.test.com;   //填入自己项目对应的域名
  charset utf-8;
  error_log logs/error.log;
  location / {
    proxy_set_header X-Real-IP $remote_addr;
    proxy_set_header X-Forwarded-For $proxy_add_x_forwarded_for;
    proxy_set_header Host $http_host;
    proxy_set_header X-NginX-Proxy true;
    proxy_pass http://127.0.0.1:8888; //填入自己项目的ip加端口号(此处的项目没有工程上下文,只有端口号)
  }
}

server {
  listen 80;
  server_name b.test.com;   //填入自己项目对应的域名
  charset utf-8;
  error_log logs/error.log;
  location / {
    proxy_set_header X-Real-IP $remote_addr;
    proxy_set_header X-Forwarded-For $proxy_add_x_forwarded_for;
    proxy_set_header Host $http_host;
    proxy_set_header X-NginX-Proxy true;
    proxy_pass http://127.0.0.1:8889; //填入自己项目的ip加端口号(此处的项目没有工程上下文,只有端口号)
  }
}After modification, reload the nginx configuration file
nginx.exe -s reload
The above is the detailed content of How to implement nginx multi-domain forwarding. For more information, please follow other related articles on the PHP Chinese website!

Hot AI Tools

Undresser.AI Undress
AI-powered app for creating realistic nude photos

AI Clothes Remover
Online AI tool for removing clothes from photos.

Undress AI Tool
Undress images for free

Clothoff.io
AI clothes remover

Video Face Swap
Swap faces in any video effortlessly with our completely free AI face swap tool!

Hot Article
Hot Tools

Notepad++7.3.1
Easy-to-use and free code editor

SublimeText3 Chinese version
Chinese version, very easy to use

Zend Studio 13.0.1
Powerful PHP integrated development environment

Dreamweaver CS6
Visual web development tools

SublimeText3 Mac version
God-level code editing software (SublimeText3)
Hot Topics
 1387
1387
 52
52

 How to configure cloud server domain name in nginx
Apr 14, 2025 pm 12:18 PM
How to configure cloud server domain name in nginx
Apr 14, 2025 pm 12:18 PM
How to configure an Nginx domain name on a cloud server: Create an A record pointing to the public IP address of the cloud server. Add virtual host blocks in the Nginx configuration file, specifying the listening port, domain name, and website root directory. Restart Nginx to apply the changes. Access the domain name test configuration. Other notes: Install the SSL certificate to enable HTTPS, ensure that the firewall allows port 80 traffic, and wait for DNS resolution to take effect.
 How to check nginx version
Apr 14, 2025 am 11:57 AM
How to check nginx version
Apr 14, 2025 am 11:57 AM
The methods that can query the Nginx version are: use the nginx -v command; view the version directive in the nginx.conf file; open the Nginx error page and view the page title.
 How to start nginx server
Apr 14, 2025 pm 12:27 PM
How to start nginx server
Apr 14, 2025 pm 12:27 PM
Starting an Nginx server requires different steps according to different operating systems: Linux/Unix system: Install the Nginx package (for example, using apt-get or yum). Use systemctl to start an Nginx service (for example, sudo systemctl start nginx). Windows system: Download and install Windows binary files. Start Nginx using the nginx.exe executable (for example, nginx.exe -c conf\nginx.conf). No matter which operating system you use, you can access the server IP
 How to check whether nginx is started
Apr 14, 2025 pm 01:03 PM
How to check whether nginx is started
Apr 14, 2025 pm 01:03 PM
How to confirm whether Nginx is started: 1. Use the command line: systemctl status nginx (Linux/Unix), netstat -ano | findstr 80 (Windows); 2. Check whether port 80 is open; 3. Check the Nginx startup message in the system log; 4. Use third-party tools, such as Nagios, Zabbix, and Icinga.
 How to check the name of the docker container
Apr 15, 2025 pm 12:21 PM
How to check the name of the docker container
Apr 15, 2025 pm 12:21 PM
You can query the Docker container name by following the steps: List all containers (docker ps). Filter the container list (using the grep command). Gets the container name (located in the "NAMES" column).
 How to run nginx apache
Apr 14, 2025 pm 12:33 PM
How to run nginx apache
Apr 14, 2025 pm 12:33 PM
To get Nginx to run Apache, you need to: 1. Install Nginx and Apache; 2. Configure the Nginx agent; 3. Start Nginx and Apache; 4. Test the configuration to ensure that you can see Apache content after accessing the domain name. In addition, you need to pay attention to other matters such as port number matching, virtual host configuration, and SSL/TLS settings.
 How to create a mirror in docker
Apr 15, 2025 am 11:27 AM
How to create a mirror in docker
Apr 15, 2025 am 11:27 AM
Steps to create a Docker image: Write a Dockerfile that contains the build instructions. Build the image in the terminal, using the docker build command. Tag the image and assign names and tags using the docker tag command.
 How to start containers by docker
Apr 15, 2025 pm 12:27 PM
How to start containers by docker
Apr 15, 2025 pm 12:27 PM
Docker container startup steps: Pull the container image: Run "docker pull [mirror name]". Create a container: Use "docker create [options] [mirror name] [commands and parameters]". Start the container: Execute "docker start [Container name or ID]". Check container status: Verify that the container is running with "docker ps".
