 Java
Java
 javaTutorial
 What is the principle of java synchronizer AQS architecture AbstractQueuedSynchronizer
What is the principle of java synchronizer AQS architecture AbstractQueuedSynchronizer
Introduction
AbstractQueuedSynchronizer The Chinese translation is called synchronizer, or AQS for short, which is the basis of various locks, such as ReentrantLock, CountDownLatch, etc. The underlying implementations of these locks that we often use are AQS, so learning AQS well is very important for understanding the implementation of locks later.
The contents of the lock chapter are arranged as follows:
1: There are a lot of AQS source codes. We will divide them into two sections to clarify the underlying principles first;
2: We usually don’t use AQS, we only come into contact with locks such as ReentrantLock and CountDownLatch. Let’s use two locks as examples to explain the source code, because as long as you understand AQS, you only need to know the purpose of all locks. Use AQS to implement it;
3: Summarize the interview questions about locks;
4: Summarize the usage scenarios of locks at work, give a few practical examples, and look at locks What are the precautions when using it;
5: Finally, we will implement a lock ourselves and see what steps and matters we need to pay attention to if we implement the lock ourselves.
ps: The content of this chapter requires a lot of basic knowledge of queues. If you have not read the queue in Chapter 4, it is recommended to read the queue chapter first.
1. Overall architecture
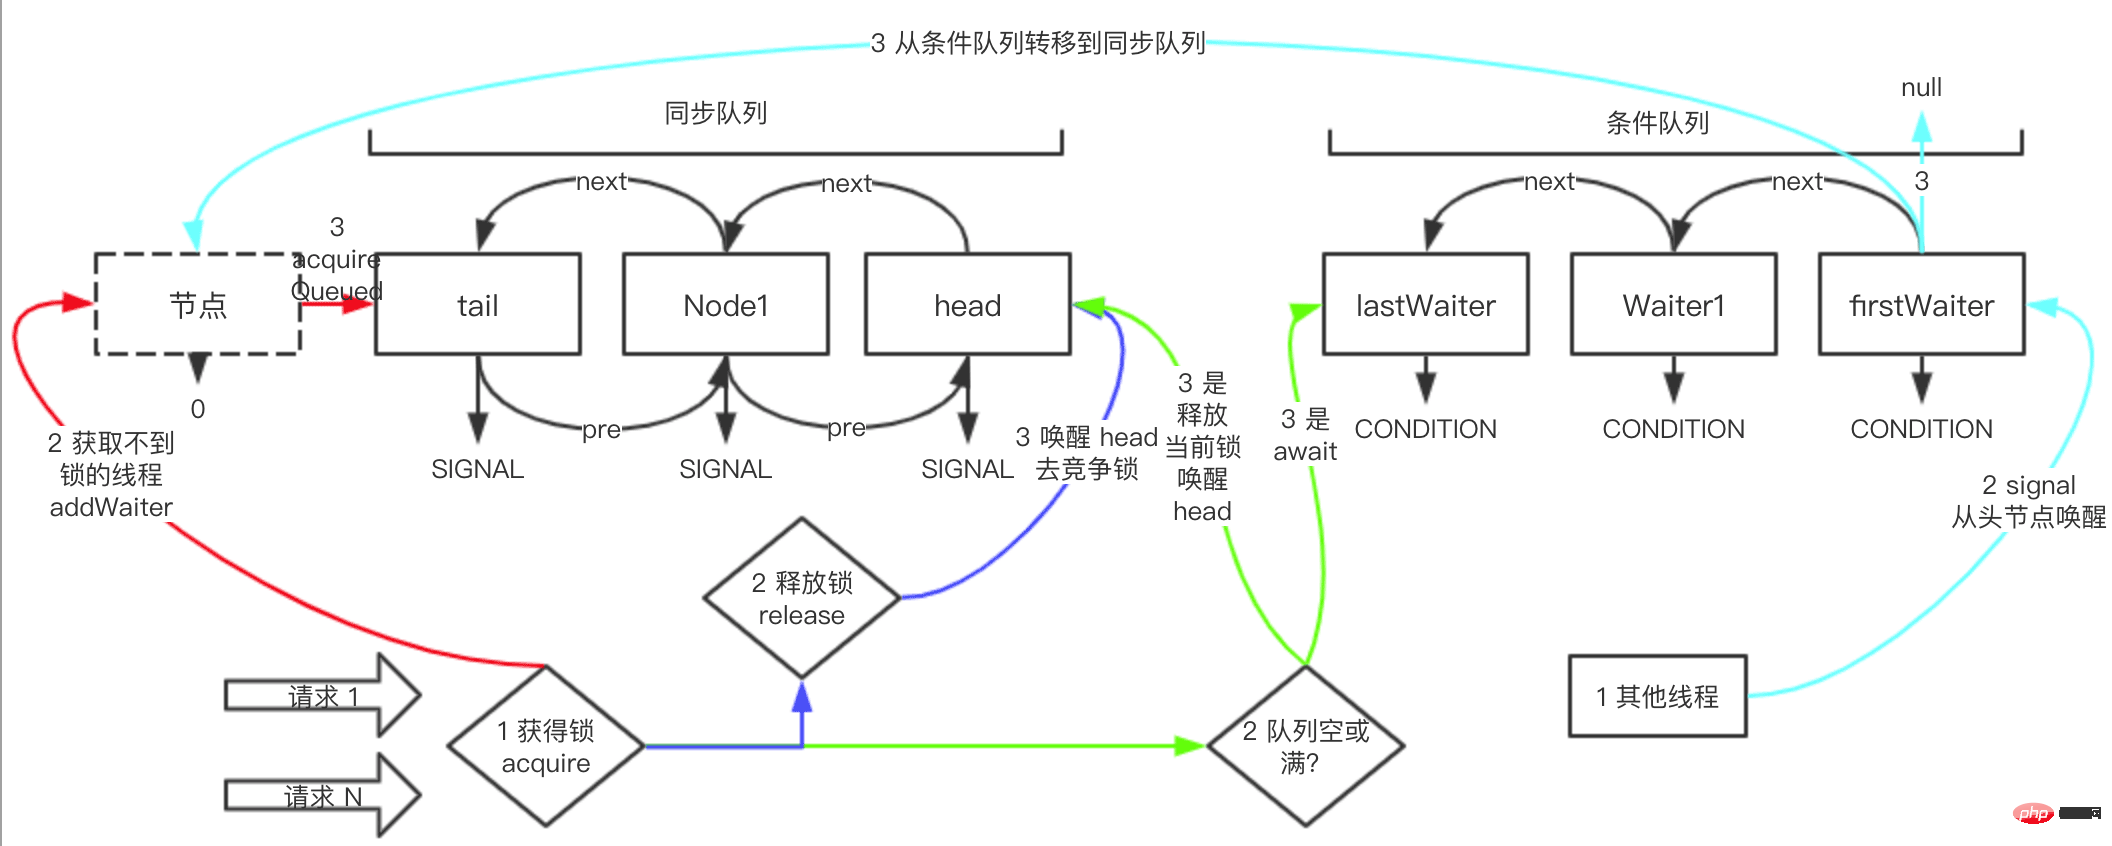
First of all, let’s take a look at the overall architecture diagram of AQS, as follows:

This diagram summarizes the overall architecture of AQS The composition of the architecture and the dynamic flow of some scenes are explained at two points in the picture for your convenience.
There are only two queues in AQS: synchronization queue condition queue, and the underlying data structures are both linked lists;
There are four types in the picture The colored lines represent four different scenes, and the numbers 1, 2, and 3 represent the order of viewing.
AQS itself is a set of lock frameworks. It defines the code structure for acquiring and releasing locks, so if you want to create a new lock, you only need to inherit AQS and implement the corresponding methods.
Next let’s take a look at the details in this picture.
1.1. Class annotation
First of all, let’s take a look at what information we can get from the AQS class annotation:
provides a The framework has customized a first-in-first-out synchronization queue, so that threads that cannot obtain the lock can enter the synchronization queue and queue up;
The synchronizer has a status field, and we can pass the status field To determine whether the lock can be obtained, the key to the design at this time is to rely on a safe atomic value to represent the state (although the comment means this, it actually ensures thread safety by declaring the state as volatile and modifying the state value in the lock. ; If the status value is 0, you can obtain the lock, if the status value is 1, you cannot obtain the lock);
Subclasses can create new non-public internal classes and use the internal classes to inherit AQS to achieve locking Function;
AQS provides two lock modes: exclusive mode and shared mode. In exclusive mode: only one thread can obtain the lock, and the shared mode allows multiple threads to obtain the lock. The subclass ReadWriteLock implements two modes;
The internal class ConditionObject can be used as Condition, we can get the condition queue through new ConditionObject ();
AQS implements frameworks such as locks, queuing, and lock queues. As for how to obtain and release locks, the code is not implemented. , such as tryAcquire, tryRelease, tryAcquireShared, tryReleaseShared, isHeldExclusively, these methods throw UnsupportedOperationException by default in AQS, which require subclasses to implement;
AQS inherits AbstractOwnableSynchronizer to facilitate tracking. The thread of the lock can help monitoring and diagnostic tools identify which threads hold the lock;
AQS synchronization queue and condition queue, nodes that cannot obtain the lock are advanced when joining the queue First out, but when woken up, they may not be executed in the order of first in, first out.
There are many more comments on AQS. The above 9 points are a summary of the slightly more important comments.
1.2. Class definition
The AQS class definition code is as follows:
public abstract class AbstractQueuedSynchronizer
    extends AbstractOwnableSynchronizer
implements java.io.Serializable {We can see two points:
AQS is an abstract class, which is used for various It is used for inheritance by lock subclasses. AQS defines many abstract methods on how to obtain locks and how to release locks. The purpose is for subclasses to implement them;
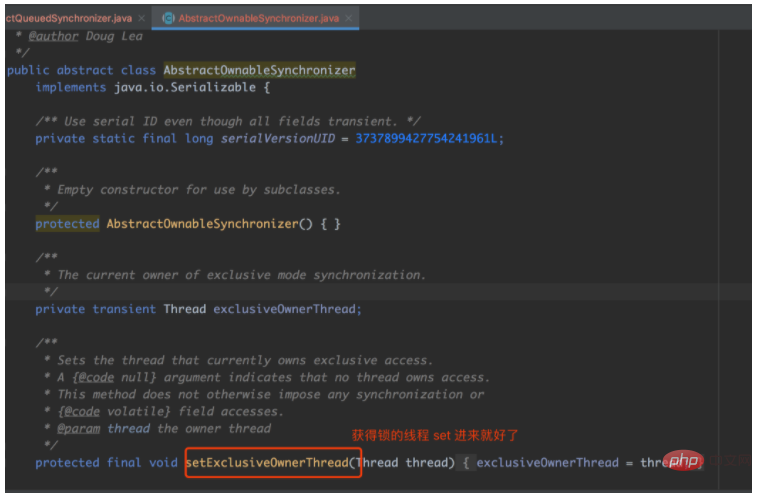
Inherits AbstractOwnableSynchronizer, and the function of AbstractOwnableSynchronizer is to know which one is currently The thread has obtained the lock, which is convenient for monitoring.
The code is as follows:
1.3. Basic attributes The attributes of AQS can be simply divided into There are four categories: synchronizer simple attributes, synchronization queue attributes, conditional queue attributes, and public Node.
1.3.1、简单属性
首先我们来看一下简单属性有哪些:
// 同步器的状态,子类会根据状态字段进行判断是否可以获得锁
// 比如 CAS 成功给 state 赋值 1 算得到锁,赋值失败为得不到锁, CAS 成功给 state 赋值 0 算释放锁,赋值失败为释放失败
// 可重入锁,每次获得锁 +1,每次释放锁 -1
private volatile int state;

// 自旋超时阀值,单位纳秒
// 当设置等待时间时才会用到这个属性
static final long spinForTimeoutThreshold = 1000L;
最重要的就是 state 属性,是 int 属性的,所有继承 AQS 的锁都是通过这个字段来判断能不能获得锁,能不能释放锁。
1.3.2 、同步队列属性
首先我们介绍以下同步队列:当多个线程都来请求锁时,某一时刻有且只有一个线程能够获得锁(排它锁),那么剩余获取不到锁的线程,都会到同步队列中去排队并阻塞自己,当有线程主动释放锁时,就会从同步队列头开始释放一个排队的线程,让线程重新去竞争锁。
所以同步队列的主要作用阻塞获取不到锁的线程,并在适当时机释放这些线程。
同步队列底层数据结构是个双向链表,我们从源码中可以看到链表的头尾,如下:
// 同步队列的头。
private transient volatile Node head;
// 同步队列的尾
private transient volatile Node tail;
源码中的 Node 是同步队列中的元素,但 Node 被同步队列和条件队列公用,所以我们在说完条件队列之后再说 Node。
1.3.3、条件队列的属性
首先我们介绍下条件队列:条件队列和同步队列的功能一样,管理获取不到锁的线程,底层数据结构也是链表队列,但条件队列不直接和锁打交道,但常常和锁配合使用,是一定的场景下,对锁功能的一种补充。
条件队列的属性如下:
// 条件队列,从属性上可以看出是链表结构
public class ConditionObject implements Condition, java.io.Serializable {
    private static final long serialVersionUID = 1173984872572414699L;
    // 条件队列中第一个 node
    private transient Node firstWaiter;
    // 条件队列中最后一个 node
    private transient Node lastWaiter;
}ConditionObject 我们就称为条件队列,我们需要使用时,直接 new ConditionObject () 即可。
ConditionObject 是实现 Condition 接口的,Condition 接口相当于 Object 的各种监控方法,比如 Object#wait ()、Object#notify、Object#notifyAll 这些方法,我们可以先这么理解,后面会细说。
1.3.4、Node
Node 非常重要,即是同步队列的节点,又是条件队列的节点,在入队的时候,我们用 Node 把线程包装一下,然后把 Node 放入两个队列中,我们看下 Node 的数据结构,如下:
static final class Node {
    /**
     * 同步队列单独的属性
     */
    //node 是共享模式
    static final Node SHARED = new Node();
    //node 是排它模式
    static final Node EXCLUSIVE = null;
    // 当前节点的前节点
    // 节点 acquire 成功后就会变成head
    // head 节点不能被 cancelled
    volatile Node prev;
    // 当前节点的下一个节点
    volatile Node next;
    /**
     * 两个队列共享的属性
     */
    // 表示当前节点的状态,通过节点的状态来控制节点的行为
    // 普通同步节点,就是 0 ,条件节点是 CONDITION -2
    volatile int waitStatus;
    // waitStatus 的状态有以下几种
    // 被取消
    static final int CANCELLED =  1;
    // SIGNAL 状态的意义:同步队列中的节点在自旋获取锁的时候,如果前一个节点的状态是 SIGNAL,那么自己就可以阻塞休息了,否则自己一直自旋尝试获得锁
    static final int SIGNAL    = -1;
    // 表示当前 node 正在条件队列中,当有节点从同步队列转移到条件队列时,状态就会被更改成 CONDITION
    static final int CONDITION = -2;
    // 无条件传播,共享模式下,该状态的进程处于可运行状态
    static final int PROPAGATE = -3;
    // 当前节点的线程
    volatile Thread thread;
    // 在同步队列中,nextWaiter 并不真的是指向其下一个节点,我们用 next 表示同步队列的下一个节点,nextWaiter 只是表示当前 Node 是排它模式还是共享模式
    // 但在条件队列中,nextWaiter 就是表示下一个节点元素
    Node nextWaiter;
}从 Node 的结构中,我们需要重点关注 waitStatus 字段,Node 的很多操作都是围绕着 waitStatus 字段进行的。
Node 的 pre、next 属性是同步队列中的链表前后指向字段,nextWaiter 是条件队列中下一个节点的指向字段,但在同步队列中,nextWaiter 只是一个标识符,表示当前节点是共享还是排它模式。
1.3.5、共享锁和排它锁的区别
排它锁的意思是同一时刻,只能有一个线程可以获得锁,也只能有一个线程可以释放锁。
共享锁可以允许多个线程获得同一个锁,并且可以设置获取锁的线程数量。
1.4、Condition
刚才我们看条件队列 ConditionObject 时,发现其是实现 Condition 接口的,现在我们一起来看下 Condition 接口,其类注释上是这么写的:
当 lock 代替 synchronized 来加锁时,Condition 就可以用来代替 Object 中相应的监控方法了,比如 Object#wait ()、Object#notify、Object#notifyAll 这些方法;
提供了一种线程协作方式:一个线程被暂停执行,直到被其它线程唤醒;
Condition 实例是绑定在锁上的,通过 Lock#newCondition 方法可以产生该实例;
除了特殊说明外,任意空值作为方法的入参,都会抛出空指针;
Condition 提供了明确的语义和行为,这点和 Object 监控方法不同。
类注释上甚至还给我们举了一个例子:
假设我们有一个有界边界的队列,支持 put 和 take 方法,需要满足:
1:如果试图往空队列上执行 take,线程将会阻塞,直到队列中有可用的元素为止;
2:如果试图往满的队列上执行 put,线程将会阻塞,直到队列中有空闲的位置为止。
1、2 中线程阻塞都会到条件队列中去阻塞。
take 和 put 两种操作如果依靠一个条件队列,那么每次只能执行一种操作,所以我们可以新建两个条件队列,这样就可以分别执行操作了,看了这个需求,是不是觉得很像我们第三章学习的队列?实际上注释上给的 demo 就是我们学习过的队列,篇幅有限,感兴趣的可以看看 ConditionDemo 这个测试类。
除了类注释,Condition 还定义出一些方法,这些方法奠定了条件队列的基础,方法主要有:
void await() throws InterruptedException;
这个方法的主要作用是:使当前线程一直等待,直到被 signalled 或被打断。
当以下四种情况发生时,条件队列中的线程将被唤醒
有线程使用了 signal 方法,正好唤醒了条件队列中的当前线程;
有线程使用了 signalAll 方法;
其它线程打断了当前线程,并且当前线程支持被打断;
被虚假唤醒 (即使没有满足以上 3 个条件,wait 也是可能被偶尔唤醒,虚假唤醒定义可以参考: https://en.wikipedia.org/wiki/Spurious_wakeup)。
被唤醒时,有一点需要注意的是:线程从条件队列中苏醒时,必须重新获得锁,才能真正被唤醒,这个我们在说源码的时候,也会强调这个。
await 方法还有带等待超时时间的,如下:
// 返回的 long 值表示剩余的给定等待时间,如果返回的时间小于等于 0 ,说明等待时间过了
// 选择纳秒是为了避免计算剩余等待时间时的截断误差
long awaitNanos(long nanosTimeout) throws InterruptedException;
// 虽然入参可以是任意单位的时间,但底层仍然转化成纳秒
boolean await(long time, TimeUnit unit) throws InterruptedException;
除了等待方法,还是唤醒线程的两个方法,如下:
// 唤醒条件队列中的一个线程,在被唤醒前必须先获得锁
void signal();
// 唤醒条件队列中的所有线程
void signalAll();
至此,AQS 基本的属性就已经介绍完了,接着让我们来看一看 AQS 的重要方法。
2、同步器的状态
在同步器中,我们有两个状态,一个叫做 state,一个叫做 waitStatus,两者是完全不同的概念:
state 是锁的状态,是 int 类型,子类继承 AQS 时,都是要根据 state 字段来判断有无得到锁,比如当前同步器状态是 0,表示可以获得锁,当前同步器状态是 1,表示锁已经被其他线程持有,当前线程无法获得锁;
waitStatus 是节点(Node)的状态,种类很多,一共有初始化 (0)、CANCELLED (1)、SIGNAL (-1)、CONDITION (-2)、PROPAGATE (-3),各个状态的含义可以见上文。
这两个状态我们需要牢记,不要混淆了。
3、获取锁
获取锁最直观的感受就是使用 Lock.lock () 方法来获得锁,最终目的是想让线程获得对资源的访问权。
Lock 一般是 AQS 的子类,lock 方法根据情况一般会选择调用 AQS 的 acquire 或 tryAcquire 方法。
acquire 方法 AQS 已经实现了,tryAcquire 方法是等待子类去实现,acquire 方法制定了获取锁的框架,先尝试使用 tryAcquire 方法获取锁,获取不到时,再入同步队列中等待锁。tryAcquire 方法 AQS 中直接抛出一个异常,表明需要子类去实现,子类可以根据同步器的 state 状态来决定是否能够获得锁,接下来我们详细看下 acquire 的源码解析。
acquire 也分两种,一种是排它锁,一种是共享锁,我们一一来看下:
3.1、acquire 排它锁
// 排它模式下,尝试获得锁
public final void acquire(int arg) {
    // tryAcquire 方法是需要实现类去实现的,实现思路一般都是 cas 给 state 赋值来决定是否能获得锁
    if (!tryAcquire(arg) &&
        // addWaiter 入参代表是排他模式
        acquireQueued(addWaiter(Node.EXCLUSIVE), arg))
        selfInterrupt();
}以上代码的主要步骤是(流程见整体架构图中红色场景):
尝试执行一次 tryAcquire,如果成功直接返回,失败走 2;线程尝试进入同步队列,首先调用 addWaiter 方法,把当前线程放到同步队列的队尾;接着调用 acquireQueued 方法,两个作用,1:阻塞当前节点,2:节点被唤醒时,使其能够获得锁;如果 2、3 失败了,打断线程。
3.1.1、addWaiter
代码很少,每个方法都是关键,接下来我们先来看下 addWaiter 的源码实现:
// 方法主要目的:node 追加到同步队列的队尾
// 入参 mode 表示 Node 的模式(排它模式还是共享模式)
// 出参是新增的 node
// 主要思路:
// 新 node.pre = 队尾
// 队尾.next = 新 node
private Node addWaiter(Node mode) {
    // 初始化 Node
    Node node = new Node(Thread.currentThread(), mode);
    // 这里的逻辑和 enq 一致,enq 的逻辑仅仅多了队尾是空,初始化的逻辑
    // 这个思路在 java 源码中很常见,先简单的尝试放一下,成功立马返回,如果不行,再 while 循环
    // 很多时候,这种算法可以帮忙解决大部分的问题,大部分的入队可能一次都能成功,无需自旋
    Node pred = tail;
    if (pred != null) {
        node.prev = pred;
        if (compareAndSetTail(pred, node)) {
            pred.next = node;
            return node;
        }
    }
    //自旋保证node加入到队尾
    enq(node);
    return node;
}
// 线程加入同步队列中方法,追加到队尾
// 这里需要重点注意的是,返回值是添加 node 的前一个节点
private Node enq(final Node node) {
    for (;;) {
        // 得到队尾节点
        Node t = tail;
        // 如果队尾为空,说明当前同步队列都没有初始化,进行初始化
        // tail = head = new Node();
        if (t == null) {
            if (compareAndSetHead(new Node()))
                tail = head;
        // 队尾不为空,将当前节点追加到队尾
        } else {
            node.prev = t;
            // node 追加到队尾
            if (compareAndSetTail(t, node)) {
                t.next = node;
                return t;
            }
        }
    }
}如果之前学习过队列的同学,对这个方法应该感觉毫不吃力,就是把新的节点追加到同步队列的队尾。
其中有一点值得我们学习的地方,是在 addWaiter 方法中,并没有进入方法后立马就自旋,而是先尝试一次追加到队尾,如果失败才自旋,因为大部分操作可能一次就会成功,这种思路在我们写自旋的时候可以借鉴。
3.1.2、acquireQueued
下一步就是要阻塞当前线程了,是 acquireQueued 方法来实现的,我们来看下源码实现:
// 主要做两件事情:
// 1:通过不断的自旋尝试使自己前一个节点的状态变成 signal,然后阻塞自己。
// 2:获得锁的线程执行完成之后,释放锁时,会把阻塞的 node 唤醒,node 唤醒之后再次自旋,尝试获得锁
// 返回 false 表示获得锁成功,返回 true 表示失败
final boolean acquireQueued(final Node node, int arg) {
    boolean failed = true;
    try {
        boolean interrupted = false;
        // 自旋
        for (;;) {
            // 选上一个节点
            final Node p = node.predecessor();
            // 有两种情况会走到 p == head:
            // 1:node 之前没有获得锁,进入 acquireQueued 方法时,才发现他的前置节点就是头节点,于是尝试获得一次锁;
            // 2:node 之前一直在阻塞沉睡,然后被唤醒,此时唤醒 node 的节点正是其前一个节点,也能走到 if
            // 如果自己 tryAcquire 成功,就立马把自己设置成 head,把上一个节点移除
            // 如果 tryAcquire 失败,尝试进入同步队列
            if (p == head && tryAcquire(arg)) {
                // 获得锁,设置成 head 节点
                setHead(node);
                //p被回收
                p.next = null; // help GC
                failed = false;
                return interrupted;
            }
            // shouldParkAfterFailedAcquire 把 node 的前一个节点状态置为 SIGNAL
            // 只要前一个节点状态是 SIGNAL了,那么自己就可以阻塞(park)了
            // parkAndCheckInterrupt 阻塞当前线程
            if (shouldParkAfterFailedAcquire(p, node) &&
                // 线程是在这个方法里面阻塞的,醒来的时候仍然在无限 for 循环里面,就能再次自旋尝试获得锁
                parkAndCheckInterrupt())
                interrupted = true;
        }
    } finally {
        // 如果获得node的锁失败,将 node 从队列中移除
        if (failed)
            cancelAcquire(node);
    }
}此方法的注释还是很清楚的,我们接着看下此方法的核心:shouldParkAfterFailedAcquire,这个方法的主要目的就是把前一个节点的状态置为 SIGNAL,只要前一个节点的状态是 SIGNAL,当前节点就可以阻塞了(parkAndCheckInterrupt 就是使节点阻塞的方法),
源码如下:
// 当前线程可以安心阻塞的标准,就是前一个节点线程状态是 SIGNAL 了。
// 入参 pred 是前一个节点,node 是当前节点。
// 关键操作:
// 1:确认前一个节点是否有效,无效的话,一直往前找到状态不是取消的节点。
// 2: 把前一个节点状态置为 SIGNAL。
// 1、2 两步操作,有可能一次就成功,有可能需要外部循环多次才能成功(外面是个无限的 for 循环),但最后一定是可以成功的
private static boolean shouldParkAfterFailedAcquire(Node pred, Node node) {
    int ws = pred.waitStatus;
    // 如果前一个节点 waitStatus 状态已经是 SIGNAL 了,直接返回,不需要在自旋了
    if (ws == Node.SIGNAL)
        /*
         * This node has already set status asking a release
         * to signal it, so it can safely park.
         */
        return true;
    // 如果当前节点状态已经被取消了。
    if (ws > 0) {
        /*
         * Predecessor was cancelled. Skip over predecessors and
         * indicate retry.
         */
        // 找到前一个状态不是取消的节点,因为把当前 node 挂在有效节点身上
        // 因为节点状态是取消的话,是无效的,是不能作为 node 的前置节点的,所以必须找到 node 的有效节点才行
        do {
            node.prev = pred = pred.prev;
        } while (pred.waitStatus > 0);
        pred.next = node;
    // 否则直接把节点状态置 为SIGNAL
    } else {
        /*
         * waitStatus must be 0 or PROPAGATE.  Indicate that we
         * need a signal, but don't park yet.  Caller will need to
         * retry to make sure it cannot acquire before parking.
         */
        compareAndSetWaitStatus(pred, ws, Node.SIGNAL);
    }
    return false;
}acquire 整个过程非常长,代码也非常多,但注释很清楚,可以一行一行仔细看看代码。
总结一下,acquire 方法大致分为三步:
使用 tryAcquire 方法尝试获得锁,获得锁直接返回,获取不到锁的走 2;
把当前线程组装成节点(Node),追加到同步队列的尾部(addWaiter);
自旋,使同步队列中当前节点的前置节点状态为 signal 后,然后阻塞自己。
整体的代码结构比较清晰,一些需要注意的点,都用注释表明了,强烈建议阅读下源码。
3.2、acquireShared 获取共享锁
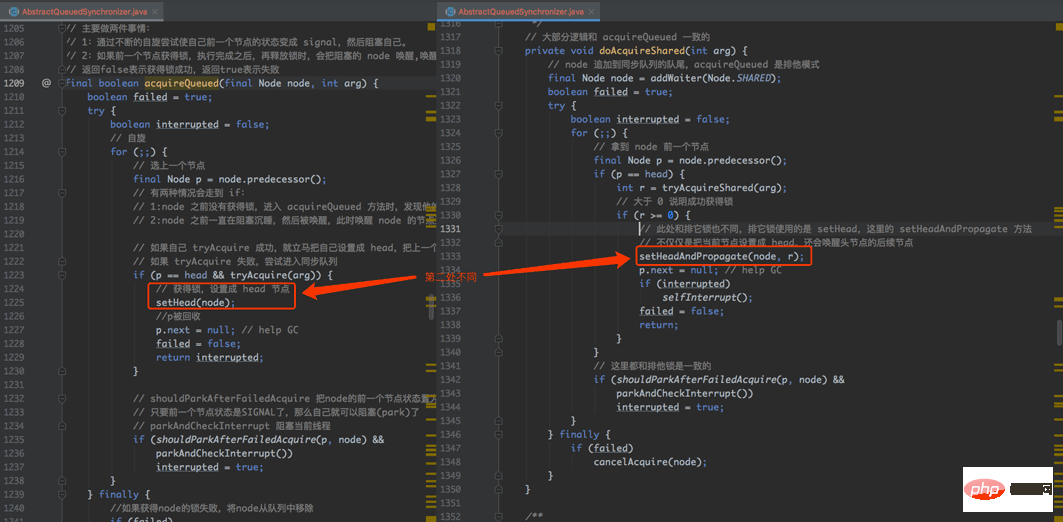
acquireShared 整体流程和 acquire 相同,代码也很相似,重复的源码就不贴了,我们就贴出来不一样的代码来,也方便大家进行比较:
第一步尝试获得锁的地方,有所不同,排它锁使用的是 tryAcquire 方法,共享锁使用的是 tryAcquireShared 方法,如下图:

第二步不同,在于节点获得排它锁时,仅仅把自己设置为同步队列的头节点即可(setHead 方法),但如果是共享锁的话,还会去唤醒自己的后续节点,一起来获得该锁(setHeadAndPropagate 方法),不同之处如下(左边排它锁,右边共享锁):

接下来我们一起来看下 setHeadAndPropagate 方法的源码:
// 主要做两件事情
// 1:把当前节点设置成头节点
// 2:看看后续节点有无正在等待,并且也是共享模式的,有的话唤醒这些节点
private void setHeadAndPropagate(Node node, int propagate) {
    Node h = head; // Record old head for check below
    // 当前节点设置成头节点
    setHead(node);
    /*
     * Try to signal next queued node if:
     *   Propagation was indicated(表示指示) by caller,
     *     or was recorded (as h.waitStatus either before
     *     or after setHead) by a previous operation
     *     (note: this uses sign-check of waitStatus because
     *      PROPAGATE status may transition to SIGNAL.)
     * and
     *   The next node is waiting in shared mode,
     *     or we don't know, because it appears null
     *
     * The conservatism(保守) in both of these checks may cause
     * unnecessary wake-ups, but only when there are multiple
     * racing acquires/releases, so most need signals now or soon
     * anyway.
     */
    // propagate > 0 表示已经有节点获得共享锁了
    if (propagate > 0 || h == null || h.waitStatus < 0 ||
        (h = head) == null || h.waitStatus < 0) {
        Node s = node.next;
        //共享模式,还唤醒头节点的后置节点
        if (s == null || s.isShared())
            doReleaseShared();
    }
}
// 释放后置共享节点
private void doReleaseShared() {
    /*
     * Ensure that a release propagates, even if there are other
     * in-progress acquires/releases.  This proceeds in the usual
     * way of trying to unparkSuccessor of head if it needs
     * signal. But if it does not, status is set to PROPAGATE to
     * ensure that upon release, propagation continues.
     * Additionally, we must loop in case a new node is added
     * while we are doing this. Also, unlike other uses of
     * unparkSuccessor, we need to know if CAS to reset status
     * fails, if so rechecking.
     */
    for (;;) {
        Node h = head;
        // 还没有到队尾,此时队列中至少有两个节点
        if (h != null && h != tail) {
            int ws = h.waitStatus;
            // 如果队列状态是 SIGNAL ,说明后续节点都需要唤醒
            if (ws == Node.SIGNAL) {
                // CAS 保证只有一个节点可以运行唤醒的操作
                if (!compareAndSetWaitStatus(h, Node.SIGNAL, 0))
                    continue;            // loop to recheck cases
                // 进行唤醒操作
                unparkSuccessor(h);
            }
            else if (ws == 0 &&
                     !compareAndSetWaitStatus(h, 0, Node.PROPAGATE))
                continue;                // loop on failed CAS
        }
        // 第一种情况,头节点没有发生移动,结束。
        // 第二种情况,因为此方法可以被两处调用,一次是获得锁的地方,一处是释放锁的地方,
        // 加上共享锁的特性就是可以多个线程获得锁,也可以释放锁,这就导致头节点可能会发生变化,
        // 如果头节点发生了变化,就继续循环,一直循环到头节点不变化时,结束循环。
        if (h == head)                   // loop if head changed
            break;
    }
}这个就是共享锁独特的地方,当一个线程获得锁后,它就会去唤醒排在它后面的其它节点,让其它节点也能够获得锁。
The above is the detailed content of What is the principle of java synchronizer AQS architecture AbstractQueuedSynchronizer. For more information, please follow other related articles on the PHP Chinese website!

Hot AI Tools

Undresser.AI Undress
AI-powered app for creating realistic nude photos

AI Clothes Remover
Online AI tool for removing clothes from photos.

Undress AI Tool
Undress images for free

Clothoff.io
AI clothes remover

AI Hentai Generator
Generate AI Hentai for free.

Hot Article

Hot Tools

Notepad++7.3.1
Easy-to-use and free code editor

SublimeText3 Chinese version
Chinese version, very easy to use

Zend Studio 13.0.1
Powerful PHP integrated development environment

Dreamweaver CS6
Visual web development tools

SublimeText3 Mac version
God-level code editing software (SublimeText3)

Hot Topics
 1386
1386
 52
52
 Perfect Number in Java
Aug 30, 2024 pm 04:28 PM
Guide to Perfect Number in Java. Here we discuss the Definition, How to check Perfect number in Java?, examples with code implementation.
 Weka in Java
Aug 30, 2024 pm 04:28 PM
Guide to Weka in Java. Here we discuss the Introduction, how to use weka java, the type of platform, and advantages with examples.
 Smith Number in Java
Aug 30, 2024 pm 04:28 PM
Guide to Smith Number in Java. Here we discuss the Definition, How to check smith number in Java? example with code implementation.
 Java Spring Interview Questions
Aug 30, 2024 pm 04:29 PM
In this article, we have kept the most asked Java Spring Interview Questions with their detailed answers. So that you can crack the interview.
 Break or return from Java 8 stream forEach?
Feb 07, 2025 pm 12:09 PM
Java 8 introduces the Stream API, providing a powerful and expressive way to process data collections. However, a common question when using Stream is: How to break or return from a forEach operation? Traditional loops allow for early interruption or return, but Stream's forEach method does not directly support this method. This article will explain the reasons and explore alternative methods for implementing premature termination in Stream processing systems. Further reading: Java Stream API improvements Understand Stream forEach The forEach method is a terminal operation that performs one operation on each element in the Stream. Its design intention is
 TimeStamp to Date in Java
Aug 30, 2024 pm 04:28 PM
Guide to TimeStamp to Date in Java. Here we also discuss the introduction and how to convert timestamp to date in java along with examples.
 Java Program to Find the Volume of Capsule
Feb 07, 2025 am 11:37 AM
Capsules are three-dimensional geometric figures, composed of a cylinder and a hemisphere at both ends. The volume of the capsule can be calculated by adding the volume of the cylinder and the volume of the hemisphere at both ends. This tutorial will discuss how to calculate the volume of a given capsule in Java using different methods. Capsule volume formula The formula for capsule volume is as follows: Capsule volume = Cylindrical volume Volume Two hemisphere volume in, r: The radius of the hemisphere. h: The height of the cylinder (excluding the hemisphere). Example 1 enter Radius = 5 units Height = 10 units Output Volume = 1570.8 cubic units explain Calculate volume using formula: Volume = π × r2 × h (4
 Create the Future: Java Programming for Absolute Beginners
Oct 13, 2024 pm 01:32 PM
Java is a popular programming language that can be learned by both beginners and experienced developers. This tutorial starts with basic concepts and progresses through advanced topics. After installing the Java Development Kit, you can practice programming by creating a simple "Hello, World!" program. After you understand the code, use the command prompt to compile and run the program, and "Hello, World!" will be output on the console. Learning Java starts your programming journey, and as your mastery deepens, you can create more complex applications.


