

Nginx service optimization methods

Nginx service optimization can be optimized from several aspects: hiding version numbers, changing users and groups, configuring web page cache time, log cutting, and setting connection timeouts.
1. Hidden version number
The Nginx version number needs to be hidden in the production environment to avoid leaking the Nginx version and preventing users from targeting a specific version. To check the Nginx version, use the command curl -I http://172.16.10.10/ in CentOS.
[[email protected] ~]# curl -I http://172.16.10.10/ HTTP/1.1 200 OK Server: nginx/1.12.0 #Nginx版本信息 Date: Fri, 29 Jun 2018 08:52:27 GMT Content-Type: text/html Content-Length: 483 Last-Modified: Fri, 29 Jun 2018 06:56:20 GMT Connection: keep-alive ETag: "5b35d814-1e3" Accept-Ranges: bytes<br>
There are two ways to hide the version number. One is to modify the Nginx source code file to specify not to display the version number. The second is to modify the Nginx main configuration file.
The method to modify the main configuration file is as follows:
Set the server_tokens option value in the Nginx configuration file to off. If there is no such configuration item, just add it.
[[email protected] ~]# vim /usr/local/nginx/conf/nginx.conf ........... #省略内容 http { include mime.types; default_type application/octet-stream; server_tokens off; #关闭版本号 ............ #省略内容<br>Visit the website again, only Nginx is displayed, and the version number has been hidden.
[[email protected] ~]# nginx -t #测试配置文件 nginx: the configuration file /usr/local/nginx/conf/nginx.conf syntax is ok nginx: configuration file /usr/local/nginx/conf/nginx.conf test is successful<br>
The source code file of Nginx contains version information, which can be set at will. Then recompile and install, and the version information will be hidden.
[[email protected] ~]# service nginx restart #重新启动nginx服务 [[email protected] ~]# curl -I http://172.16.10.10/ HTTP/1.1 200 OK Server: nginx #nginx隐藏了版本号 Date: Fri, 29 Jun 2018 09:09:36 GMT Content-Type: text/html Content-Length: 483 Last-Modified: Fri, 29 Jun 2018 06:56:20 GMT Connection: keep-alive ETag: "5b35d814-1e3" Accept-Ranges: bytes<br>
Recompile and install
[[email protected] ~]# vim /opt/nginx-1.12.0/src/core/nginx.h #编辑源码文件 #define NGINX_VERSION "1.1.1" #修改版本号 #define NGINX_VER "IIS" NGINX_VERSION #修改服务器类型<br>
When you visit the URL again, only the modified version information will be displayed.
[[email protected] ~]# cd /opt/nginx-1.12.0/ [[email protected] nginx-1.12.0]#./configure --prefix=/usr/local/nginx --user=nginx --group=nginx --with-http_stub_status_module && make && make install<br>
2. Modify users and groups
The Nginx runtime process requires user and group support to implement access control when reading website files. The main process is created by root, and the child processes are created by specified users and groups. Nginx uses the nobody user account and group account by default, which generally need to be modified.
(1) Specify the user and group when compiling Nginx, that is, when configuring nginx, specify the user and group parameters after ./configure.
[[email protected] nginx-1.12.0]# service nginx restart #重启nginx服务 [[email protected] nginx-1.12.0]# curl -I http://172.16.10.10/HTTP/1.1 200 OK Server: IIS1.1.1 #nginx的版本信息 Date: Fri, 29 Jun 2018 09:30:09 GMT Content-Type: text/html Content-Length: 483 Last-Modified: Fri, 29 Jun 2018 06:56:20 GMT Connection: keep-alive ETag: "5b35d814-1e3" Accept-Ranges: bytes<br>
(2) Modify the Nginx configuration file nginx.conf to specify the user and group.
[[email protected] ~]# cd /opt/nginx-1.12.0/ [[email protected] nginx-1.12.0]#./configure --prefix=/usr/local/nginx --user=nginx #指定用户名是nginx --group=nginx #指定组名是nginx --with- && make && make install<br>
Restart nginx to check the running status of the process. The main process is created by the root account, and the sub-process is created by nginx.
[[email protected] ~]# vim /usr/local/nginx/conf/nginx.conf user nginx nginx; #修改用户为nginx,组为nginx<br>
3. Configure web page cache time
After Nginx returns the web page data to the client, the cache time can be set so that future requests for the same content can be returned directly to avoid repeated requests and speed up access. Generally, this is only set for static resources, and there is no need to set the cache time for dynamic web pages. The operation steps are as follows:
(1) Use images as cache objects and place game.jpg in the Nginx website directory.
[[email protected] ~]# ps aux | grep nginx root 14923 0.0 0.0 20540 624 ? Ss 17:30 0:00 nginx: master process /usr/local/nginx/sbin/nginx #主进程由root创建 nginx 14925 0.0 0.1 22984 1412 ? S 17:30 0:00 nginx: worker process #子进程由nginx创建 root 19344 0.0 0.0 112720 984 pts/0 R+ 17:47 0:00 grep --color=auto nginx<br>
(2) Visit http://172.16.10.10/game.jpg, then use the Fidder tool to capture the packet and check the response message. There is no cached image information.
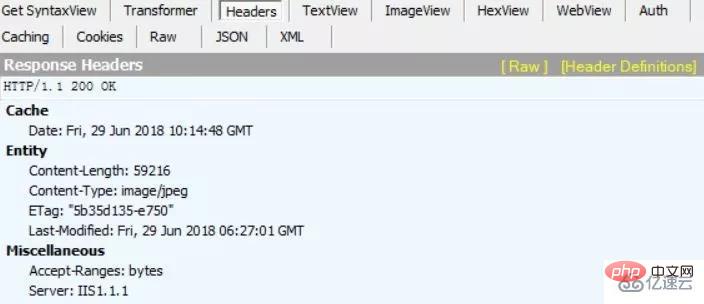
(3) Modify the configuration file, add the expire parameter to the new location section, and specify the cache time, 1d means one day.
[[email protected] ~]# cd /usr/local/nginx/html/ #Nginx的网站目录 [[email protected] html]# ls 50x.html error.png game.jpg index.html test.html<br>
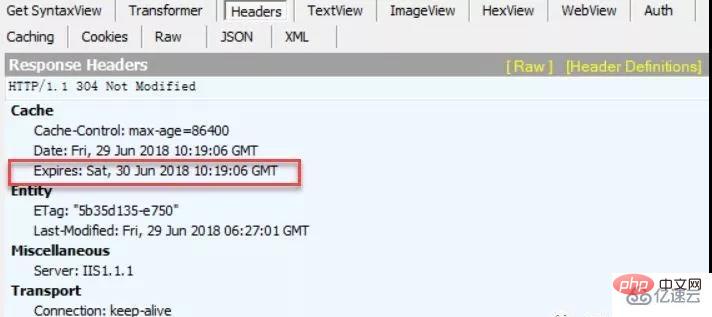
(4) Restart the nginx service, access the URL to capture packets, and the response message contains the Expire parameter, which indicates the cache time.
[[email protected] ~]# vim /usr/local/nginx/conf/nginx.conf location ~\.(gif|jpg|jepg|png|bmp|ico)$ { #加入新的location root html; expires 1d; #指定缓存时间 }<br>[
The above is the detailed content of Nginx service optimization methods. For more information, please follow other related articles on the PHP Chinese website!

Hot AI Tools

Undresser.AI Undress
AI-powered app for creating realistic nude photos

AI Clothes Remover
Online AI tool for removing clothes from photos.

Undress AI Tool
Undress images for free

Clothoff.io
AI clothes remover

Video Face Swap
Swap faces in any video effortlessly with our completely free AI face swap tool!

Hot Article
Hot Tools

Notepad++7.3.1
Easy-to-use and free code editor

SublimeText3 Chinese version
Chinese version, very easy to use

Zend Studio 13.0.1
Powerful PHP integrated development environment

Dreamweaver CS6
Visual web development tools

SublimeText3 Mac version
God-level code editing software (SublimeText3)
Hot Topics
 1386
1386
 52
52

 How to configure cloud server domain name in nginx
Apr 14, 2025 pm 12:18 PM
How to configure cloud server domain name in nginx
Apr 14, 2025 pm 12:18 PM
How to configure an Nginx domain name on a cloud server: Create an A record pointing to the public IP address of the cloud server. Add virtual host blocks in the Nginx configuration file, specifying the listening port, domain name, and website root directory. Restart Nginx to apply the changes. Access the domain name test configuration. Other notes: Install the SSL certificate to enable HTTPS, ensure that the firewall allows port 80 traffic, and wait for DNS resolution to take effect.
 How to check whether nginx is started
Apr 14, 2025 pm 01:03 PM
How to check whether nginx is started
Apr 14, 2025 pm 01:03 PM
How to confirm whether Nginx is started: 1. Use the command line: systemctl status nginx (Linux/Unix), netstat -ano | findstr 80 (Windows); 2. Check whether port 80 is open; 3. Check the Nginx startup message in the system log; 4. Use third-party tools, such as Nagios, Zabbix, and Icinga.
 How to check nginx version
Apr 14, 2025 am 11:57 AM
How to check nginx version
Apr 14, 2025 am 11:57 AM
The methods that can query the Nginx version are: use the nginx -v command; view the version directive in the nginx.conf file; open the Nginx error page and view the page title.
 How to create a mirror in docker
Apr 15, 2025 am 11:27 AM
How to create a mirror in docker
Apr 15, 2025 am 11:27 AM
Steps to create a Docker image: Write a Dockerfile that contains the build instructions. Build the image in the terminal, using the docker build command. Tag the image and assign names and tags using the docker tag command.
 How to check the name of the docker container
Apr 15, 2025 pm 12:21 PM
How to check the name of the docker container
Apr 15, 2025 pm 12:21 PM
You can query the Docker container name by following the steps: List all containers (docker ps). Filter the container list (using the grep command). Gets the container name (located in the "NAMES" column).
 How to start nginx server
Apr 14, 2025 pm 12:27 PM
How to start nginx server
Apr 14, 2025 pm 12:27 PM
Starting an Nginx server requires different steps according to different operating systems: Linux/Unix system: Install the Nginx package (for example, using apt-get or yum). Use systemctl to start an Nginx service (for example, sudo systemctl start nginx). Windows system: Download and install Windows binary files. Start Nginx using the nginx.exe executable (for example, nginx.exe -c conf\nginx.conf). No matter which operating system you use, you can access the server IP
 How to run nginx apache
Apr 14, 2025 pm 12:33 PM
How to run nginx apache
Apr 14, 2025 pm 12:33 PM
To get Nginx to run Apache, you need to: 1. Install Nginx and Apache; 2. Configure the Nginx agent; 3. Start Nginx and Apache; 4. Test the configuration to ensure that you can see Apache content after accessing the domain name. In addition, you need to pay attention to other matters such as port number matching, virtual host configuration, and SSL/TLS settings.
 How to check whether nginx is started?
Apr 14, 2025 pm 12:48 PM
How to check whether nginx is started?
Apr 14, 2025 pm 12:48 PM
In Linux, use the following command to check whether Nginx is started: systemctl status nginx judges based on the command output: If "Active: active (running)" is displayed, Nginx is started. If "Active: inactive (dead)" is displayed, Nginx is stopped.
