How to add borders to Snipping Tool captures in Windows 11

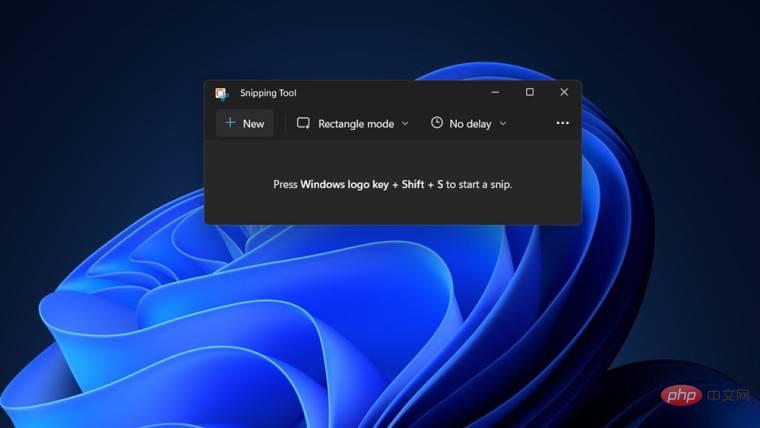
If you want to capture all or part of your computer screen, the Snipping Tool in Windows 11 lets you capture it easily. Additionally, you can even add a colored border to the captured area, but you first need to enable the settings related to this feature. Let's see how it's done!
Add colored borders to Snipping Tool captures in Windows 11
There’s more than one way to capture screenshots in Windows 11. However, all of these images will not display a border around them unless they are configured to do so. Here's how to change settings in the Windows 11 Snipping Tool to add custom colors and change image border thickness.
- Click Start, and then in the search box, type Snipping Tool and select it from the list of options that appears.

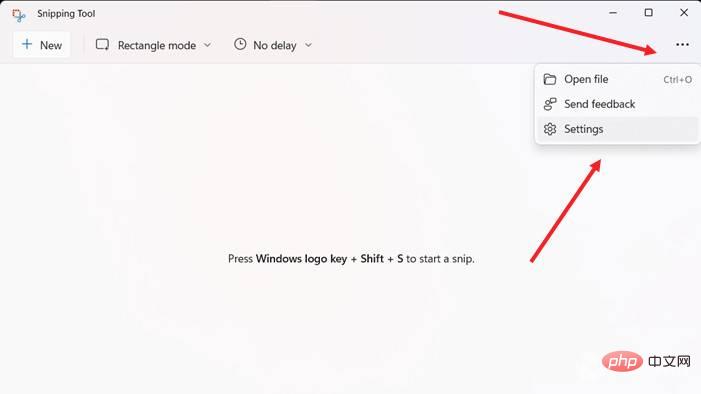
- Click the "View More" menu that appears as three horizontal dots in the upper right corner of the "Snipping Tool" window. Select Set options.

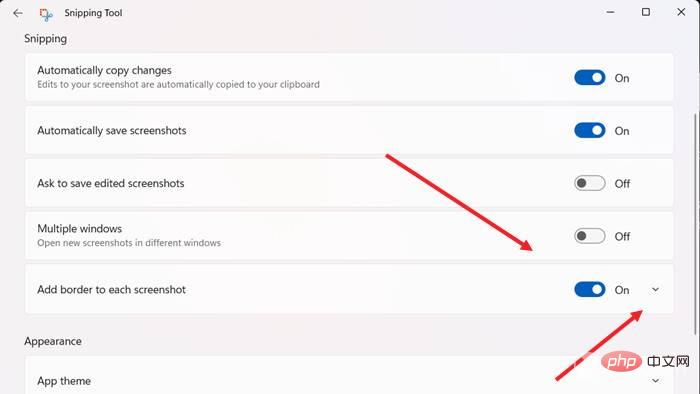
- Scroll down to the Add a border to each screenshot option under the Screenshots section. To enable borders for screenshots, toggle the switch to the "On" position.

- If you would like to add a custom color and adjust the thickness of the border around the image, click the drop-down button next to the Add border to each screenshot option .
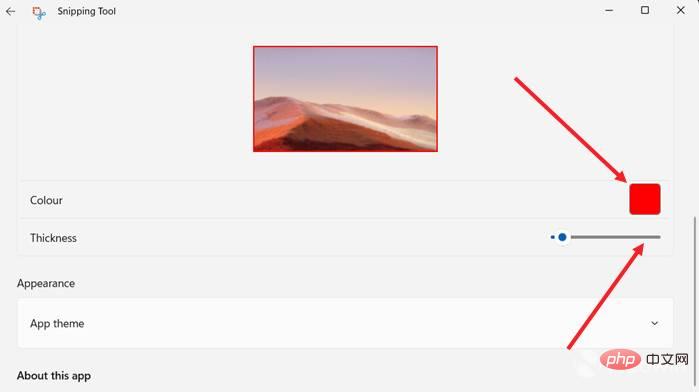
Select Custom Color to change the color of the outline. Just click on the color box and select the desired color. Likewise, move the slider to the right or left to adjust the border thickness of the image.
The above is the detailed content of How to add borders to Snipping Tool captures in Windows 11. For more information, please follow other related articles on the PHP Chinese website!

Hot AI Tools

Undresser.AI Undress
AI-powered app for creating realistic nude photos

AI Clothes Remover
Online AI tool for removing clothes from photos.

Undress AI Tool
Undress images for free

Clothoff.io
AI clothes remover

AI Hentai Generator
Generate AI Hentai for free.

Hot Article

Hot Tools

Notepad++7.3.1
Easy-to-use and free code editor

SublimeText3 Chinese version
Chinese version, very easy to use

Zend Studio 13.0.1
Powerful PHP integrated development environment

Dreamweaver CS6
Visual web development tools

SublimeText3 Mac version
God-level code editing software (SublimeText3)

Hot Topics
 How to take a scrolling screenshot on iPhone
Apr 15, 2023 pm 06:55 PM
How to take a scrolling screenshot on iPhone Using this native iOS option, scrolling screenshots or "full page" screenshots give you a PDF of everything in a document, web page, note, or email in an Apple app. Take a screenshot (press the side or top button and the volume up button at the same time) before it disappears Click on the preview in the lower left corner Select the full page option in the upper right corner The full page option will only appear if you have more content on the screen than the page is worth You can preview all pages before saving, use markup, and more. You can also click the crop icon (the square icon next to "Done") to edit the portion of the full page you want to save. Click Done in the upper left corner to save or click the Share button in the upper right corner for Scroll screenshots on iPhone
 How to Share Last Screenshot on iPhone via AirDrop
Feb 23, 2024 am 08:16 AM
To simplify repetitive tasks, Apple has launched Shortcuts apps that can help you automate common daily operations, such as automatically turning off the Internet connection when you leave your phone, or automatically playing your favorite music list when you get in the car. One task you might want to make easier is sharing the last screenshot you just took without opening the Photos app. This article will introduce how to use the Airdrop function to quickly send iPhone’s latest screenshots to others or other Apple devices. How to quickly share your last screenshot on iPhone Before sharing content, make sure the target device (such as another iPhone, iPad, or Mac) has AirDrop enabled for this to happen
 How to add borders to Snipping Tool captures in Windows 11
May 13, 2023 pm 08:46 PM
If you want to grab all or part of your computer screen, the Snipping Tool in Windows 11 lets you capture it easily. Additionally, you can even add a colored border to the captured area, but you first need to enable the settings related to this feature. Let's see how it's done! Add Colored Borders to Snipping Tool Captures in Windows 11 There’s more than one way to capture screenshots in Windows 11. However, all of these images will not display a border around them unless they are configured to do so. Here's how to change settings in the Windows 11 Snipping Tool to add custom colors and change image border thickness. Click Start, then in the search box, type Snipping tool and select
 How to solve the problem of grayed out Wi-Fi icon in Windows 11 and 10?
Apr 23, 2023 am 08:34 AM
Many Windows users have reported that the wi-fi icon on their system is suddenly disabled or grayed out, resulting in users being unable to change wi-fi settings or wi-fi options from the available list. This can be very frustrating for users who rely solely on Wi-Fi and don't have any other internet options (e.g. USB tethering, LAN connection (Ethernet)). This issue can have many factors, some of which we have mentioned below: Outdated Wi-Fi driver manually disabled Wi-Fi adapter by mistake In-system network issues Windows is not updated. So, keeping all the above points in mind, we have compiled some fixes mentioned below in this article,
 Screenshots and screenshot location on Windows 11/10
May 16, 2023 pm 04:01 PM
Where are clippings and screenshots in Windows 11? This is a question we get from some of our readers who may have just installed a new operating system or used a snipping tool for the first time. This tool is designed to capture any or all parts of your computer screen. To put things in context, the PrintScreen key will take a complete snapshot of your screen, but the SnippingTool can be adjusted to grab just the area you like. Where are screenshots and screenshots on Windows 10/11? By default, clippings and screenshots are saved to your computer's clipboard. This means that to retrieve them you simply paste them into your desired application such as Microsoft Paint, Photo
 How to take a screenshot on Windows 11 and 10?
Apr 16, 2023 am 09:37 AM
As we enter the Windows 11 era, one thing hasn't changed: screenshots remain an essential feature of any operating system. That said, whether you're still using Windows 10 or are currently exploring the awesomeness of Windows 11, here are some easy ways to take screenshots like a boss. Snipping Tool If you remember the Snipping Tool in Windows Vista, then you may be one of its loyal users. It's still available in Windows 10, but users were warned back in 2018 that the app would be abandoned and replaced by Snip & Sketch. Windows, however, was unexpected. they didn't
 Microsoft has confirmed that some users are experiencing crashes when using the Snipping Tool in Windows 10
May 10, 2023 am 08:07 AM
It looks like Windows 10’s native snipping tool called “Snip & Sketch” is running into a very annoying issue where when some users try to take a screenshot, the app won’t load at all. As long as you don't rely on Snip & Sketch tools, this bug doesn't seem to completely affect your operating system's ability to capture screenshots. The fact that Microsoft's own apps can't run on its own operating system doesn't look good, but it's not the first time. Last year, a bug broke the same app, and the company later scrambled to fix the issues. As you may know, Snip&Sketch tool allows users to capture screenshots on Windows and it has multiple
 How to video capture your screen in macOS Monterey
Apr 20, 2023 pm 05:01 PM
Whether it's for YouTube videos or just showing clickable buttons to family members, macOS Monterey includes a way to record your Mac's screen. If the job is just to capture your screen in a way that's useful to other people, you can share your screen with them via Messages. But if one family member wants to know, you can bet others want to know too. And you don’t have to do it to help others, you can screen record to help yourself. Specifically, to help your future self. If you only do a specific job on your Mac a few times a year, you can screen record the first one and get the most comprehensive tutorial on how to do the second one. Since macOS Mojave, a new


