

Nginx reverse proxy cross-domain basic configuration method

nginx interface service reverse proxy basic configuration
server {
  listen 8443; # 监听的端口号
  server_name a.test.com; # 服务器名称
  client_max_body_size 100m;  # 定义读取客户端请求头的超时时间
  ssl on;
  ssl_certificate test.pem;
  ssl_certificate_key test.key;
  ssl_session_timeout 5m;
  ssl_protocols sslv3 tlsv1.2;
  ssl_ciphers ecdhe-rsa-aes256-sha384:aes256-sha256:rc4:high:!md5:!anull:!enull:!null:!dh:!edh:!aesgcm;
  ssl_prefer_server_ciphers on;
  location / {
    root /test-static-app; # 静态资源目录
    index index.html index.htm;
    try_files $uri $uri/ /index.html; # 动态解析目录,配合vue的history模式
  }
}The basic configuration implements the basic functions of the page and static server, and can implement routing when using vue’s history mode parse. Furthermore, in order to achieve unified forwarding to the interface server, we need to specify the prefix of the interface name with the back-end developer. For example, the relative paths of all interfaces start with api. At this time, we can add the following configuration (equal to the previous location ),
...
location /api {
  proxy_pass https://b.test.com; # 设置代理服务器的协议和地址
  proxy_cookie_domain b.test.com a.test.com; # 修改cookie,针对request和response互相写入cookie
}
...which mainly relies on proxy_pass to forward the /api/x interface under a.test.com to b.test.com. The process is roughly as follows
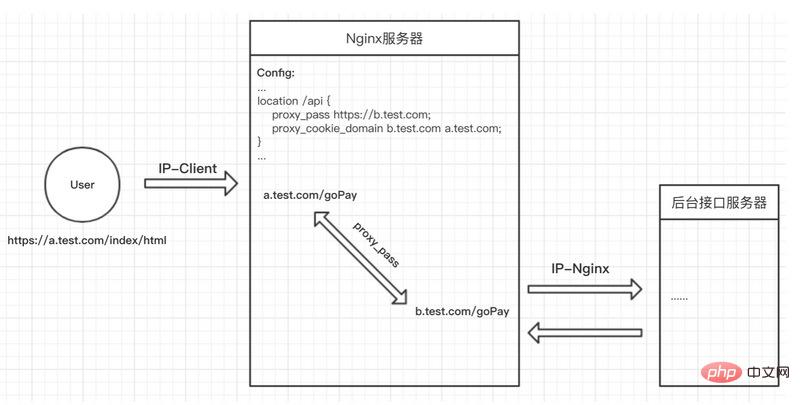
The cookie interaction is mainly proxy_cookie_domain, plus the following paragraph
proxy_cookie_domain b.test.com a.test.com;
This realizes the transfer and write-back of cookies between the a.test.com and b.test.com domain names.
If you use node to simulate it, it is roughly as follows
module.exports = (router) => {
 router.get('/api/index/getcmsinfo', async function (ctx, next) {
  // 接口转发
  let result = await superagent.post('https://b.test.com/api/card/home').set(browsermsg)
  // 获取返回的set-cookie,并设置header
  let setcookie = result.headers['set-cookie']
  if (setcookie) {
    ctx.response.header['set-cookie'] = setcookie
  }
  // 返回
  ctx.response.body={
    success: true,
    result: result.body
  }
 })
}To sum up, the essence of nginx reverse proxy is actually the forwarding of interface services and header processing. It is easy to understand if you think about it carefully. .
Common misunderstandings
1. Useless aca-header?
Many nginx cross-domain settings on the Internet have added content related to cross-domain header settings, such as
add_header 'access-control-allow-origin' '*';
add_header 'access-control-allow-credentials' "true";
add_header access-control-allow-headers x-requested-with;
Think about the above principles, do you think this is still useful? ? The header of the aca (access-control-allow-) series is configured for cross-domain negotiation in CORS. It is simply unnecessary to take off your pants and fart here.
2. Does the proxy_pass domain name contain ‘slash/’?
Similarly, I saw on the Internet that some netizens will add a slash after configuring proxy_pass, as shown below, and then say that an error is reported and the interface cannot be found~How to fix it~
...
location /api {
  #proxy_pass https://b.test.com;
  proxy_pass https://b.test.com/;
}
... Let’s think about it after seeing this. The function of proxy_pass is to catch the request. Adding a slash means that all /api requests will be forwarded to the root directory, which means /api will be / Instead, the interface path has changed at this time, and one layer/api is missing. What about without adding a slash? This means that when forwarded to the domain name of b.test.com, the /api path will not be lost.
In this case, if the backend interface has a prescribed prefix, such as /api, then you do not need to configure the slash here. In another case, the back-end interface shit is the same, without a unified prefix. Here we need to distinguish, then add a unified prefix to all front-end interfaces, such as /api, and then replace it by adding a slash~
The above is the detailed content of Nginx reverse proxy cross-domain basic configuration method. For more information, please follow other related articles on the PHP Chinese website!

Hot AI Tools

Undresser.AI Undress
AI-powered app for creating realistic nude photos

AI Clothes Remover
Online AI tool for removing clothes from photos.

Undress AI Tool
Undress images for free

Clothoff.io
AI clothes remover

Video Face Swap
Swap faces in any video effortlessly with our completely free AI face swap tool!

Hot Article
Hot Tools

Notepad++7.3.1
Easy-to-use and free code editor

SublimeText3 Chinese version
Chinese version, very easy to use

Zend Studio 13.0.1
Powerful PHP integrated development environment

Dreamweaver CS6
Visual web development tools

SublimeText3 Mac version
God-level code editing software (SublimeText3)
Hot Topics
 1393
1393
 52
1206
24
52
1206
24

 How to check nginx version
Apr 14, 2025 am 11:57 AM
How to check nginx version
Apr 14, 2025 am 11:57 AM
The methods that can query the Nginx version are: use the nginx -v command; view the version directive in the nginx.conf file; open the Nginx error page and view the page title.
 How to configure cloud server domain name in nginx
Apr 14, 2025 pm 12:18 PM
How to configure cloud server domain name in nginx
Apr 14, 2025 pm 12:18 PM
How to configure an Nginx domain name on a cloud server: Create an A record pointing to the public IP address of the cloud server. Add virtual host blocks in the Nginx configuration file, specifying the listening port, domain name, and website root directory. Restart Nginx to apply the changes. Access the domain name test configuration. Other notes: Install the SSL certificate to enable HTTPS, ensure that the firewall allows port 80 traffic, and wait for DNS resolution to take effect.
 How to check whether nginx is started
Apr 14, 2025 pm 01:03 PM
How to check whether nginx is started
Apr 14, 2025 pm 01:03 PM
How to confirm whether Nginx is started: 1. Use the command line: systemctl status nginx (Linux/Unix), netstat -ano | findstr 80 (Windows); 2. Check whether port 80 is open; 3. Check the Nginx startup message in the system log; 4. Use third-party tools, such as Nagios, Zabbix, and Icinga.
 How to check the name of the docker container
Apr 15, 2025 pm 12:21 PM
How to check the name of the docker container
Apr 15, 2025 pm 12:21 PM
You can query the Docker container name by following the steps: List all containers (docker ps). Filter the container list (using the grep command). Gets the container name (located in the "NAMES" column).
 How to configure nginx in Windows
Apr 14, 2025 pm 12:57 PM
How to configure nginx in Windows
Apr 14, 2025 pm 12:57 PM
How to configure Nginx in Windows? Install Nginx and create a virtual host configuration. Modify the main configuration file and include the virtual host configuration. Start or reload Nginx. Test the configuration and view the website. Selectively enable SSL and configure SSL certificates. Selectively set the firewall to allow port 80 and 443 traffic.
 How to start nginx server
Apr 14, 2025 pm 12:27 PM
How to start nginx server
Apr 14, 2025 pm 12:27 PM
Starting an Nginx server requires different steps according to different operating systems: Linux/Unix system: Install the Nginx package (for example, using apt-get or yum). Use systemctl to start an Nginx service (for example, sudo systemctl start nginx). Windows system: Download and install Windows binary files. Start Nginx using the nginx.exe executable (for example, nginx.exe -c conf\nginx.conf). No matter which operating system you use, you can access the server IP
 How to create containers for docker
Apr 15, 2025 pm 12:18 PM
How to create containers for docker
Apr 15, 2025 pm 12:18 PM
Create a container in Docker: 1. Pull the image: docker pull [mirror name] 2. Create a container: docker run [Options] [mirror name] [Command] 3. Start the container: docker start [Container name]
 How to start containers by docker
Apr 15, 2025 pm 12:27 PM
How to start containers by docker
Apr 15, 2025 pm 12:27 PM
Docker container startup steps: Pull the container image: Run "docker pull [mirror name]". Create a container: Use "docker create [options] [mirror name] [commands and parameters]". Start the container: Execute "docker start [Container name or ID]". Check container status: Verify that the container is running with "docker ps".
