

nginx JavaScript capabilities nginScript example analysis

nginx can mainly do the following:
1. Working on the seventh layer of tcp, it can analyze and process all contents of the http protocol.
2. Support lua, perl, javascript dynamic language
3. Support third-party plug-ins
Let’s talk about nginscript
1. nginscript is javascript/ecmascript subset. It implements most of the capabilities of the JavaScript language, does not fully comply with the ECMAScript standard, and abandons the more difficult parts of JavaScript.
2. nginscript is not implemented through the v8 engine. Instead, it is implemented through a small virtual machine (vm) that is smaller, has lower energy consumption, and is more suitable for nginx application scenarios. It can be understood that nginx implements its own set of lexical analysis.
3. nginscript runs in the nginx configuration file. For example: in the nginx.conf file. Therefore, nginscript can complete everything that traditional configuration files can handle, and at the same time, it can make configuration management dynamic. This is also the most important reason for the emergence of nginscript.
4. nginscript exists as an nginx plug-in. The plug-in name is: njs. Like other nginx plug-ins, we need to recompile nginx to complete the installation.
5. nginscript is currently in early development status. You can communicate with the nginx team and put forward your demands through email.
How to install nginscript
Just follow the official steps here:
// 1. Download The latest nginx package, the address can be seen: wget //2. Unzip tar -xzvf nginx-1.9.4.tar.gz //3. Get the nginscript module through mercurial. If mercurial is not installed here, you need to run yum install mercurial hg clone
//4. Compile nginx. Only the njs module is specified here. Remember to install other required modules together. If you have not compiled nginx, some dependent modules require yum installation, please search for them yourself. cd nginx-1.9.4 ./configure --add-module=../njs/nginx --prefix=/usr/local make make install ok. Now the installation is complete and we can start playing.
Specific how to use nginscript
The use of nginscript mainly adds 2 instructions to the nginx configuration system. The specific instructions are:
js_set, set the variable value in the configuration
js_run, directly execute the configuration rules
1. First look at js_set in nginx.conf How does it work?
http {
 js_set $msg"
   var str = 'hello,imweb';
   // javascript str;
 ";
 server {
  ...
  location /{
   return 200 $msg;
  }
 }
}Result:
In the above example, it can be seen that we can set variable values to nginx through js at will. These variables can be used in various places in nginx configuration. For example: proxy_pass, limit_req_zone, and sub_filter. Compared with the previous configuration, the flexibility here has been greatly improved.
2. The running rules and scenarios of js_run
js_run is run in the location instruction, and the corresponding javascript will be executed if it matches the path of the specified location
js_run Yes Directly generate the content returned by http through javascript
Here is a specific example:
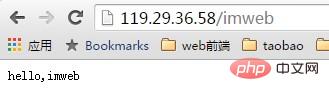
location /imwebteam {
 js_run "
  var res;
  res = $r.response;
  res.status = 200;
  res.send('hello,imweb!');
  res.finish();
 ";
}This result is the same as the first result. I won’t go into details here.
3. In addition to processing the two instructions, there is also an important variable $r
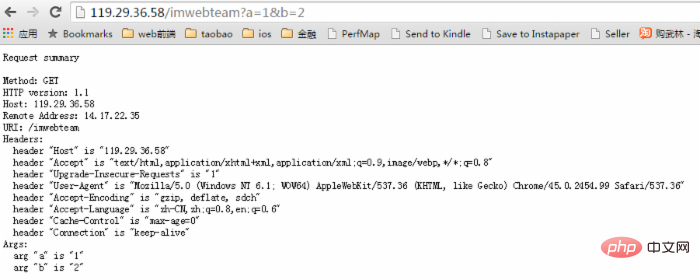
Through js_set and js_run, you can have complete control over the http request request. Control The way is to use the variable $r. What's in $r can be seen with the following simple example.
http {
 js_set $summary "
 var a, s, h;
 s = 'js summary\n\n';
 s += 'method: ' + $r.method + '\n';
 s += 'http version: ' + $r.httpversion + '\n';
 s += 'host: ' + $r.headers.host + '\n';
 s += 'remote address: ' + $r.remoteaddress + '\n';
 s += 'uri: ' + $r.uri + '\n';
 s += 'headers:\n';
 for (h in $r.headers) {
  s += ' header \"' + h + '\" is \"' + $r.headers[h] + '\"\n';
 }
 s += 'args:\n';
 for (a in $r.args) {
  s += ' arg \"' + a + '\" is \"' + $r.args[a] + '\"\n';
 }
 s;
 ";
 server {
 listen 8000;
 location /imwebteam{
  return 200 $summary;
 }
}The result is as shown in the figure:
nginscript’s current problems
After the above introduction, I believe Everyone already has a basic understanding of nginscript. So let's take a look at what problems this newborn has.
First of all, the debugging method is weak. At present, it is still relatively primitive and is displayed through logs, and the detail of the error log is very unsatisfactory.
Secondly, the control is weak. At present, nginscript's processing power is limited to the processing of http requests and returning responses. It is not yet able to dynamically process some content other than nginx requests, such as dynamic user data or dynamic updates of forwarding configuration tables.
Finally, the overall implementation is weak. The overall structure is relatively simple. The running environments of js_run and js_set are inconsistent. The code segment where js_set executes ok will cause some exceptions on js_run.
In summary, nginscript is still a newborn with great wishes and prospects. It takes some time to polish and optimize. I also hope that everyone will provide more opinions and feedback, and even submit your own plug-ins. This allows it to grow better.
For our practical scenario
These are two main scenarios that I discussed with Li Xiaotengjun and Donald before, the reallog system and the nohost2.0 system. nginscript is undoubtedly great news for both scenarios here. In terms of rule response, it can have a very flexible processing method under the existing system. However, in terms of dynamic loading of user configuration, we still need to implement it in other ways. For this part, we will first raise an issue to the nginx development team and take a look at the specific situation before further discussing and synchronizing it with everyone.
The above is the detailed content of nginx JavaScript capabilities nginScript example analysis. For more information, please follow other related articles on the PHP Chinese website!

Hot AI Tools

Undresser.AI Undress
AI-powered app for creating realistic nude photos

AI Clothes Remover
Online AI tool for removing clothes from photos.

Undress AI Tool
Undress images for free

Clothoff.io
AI clothes remover

Video Face Swap
Swap faces in any video effortlessly with our completely free AI face swap tool!

Hot Article
Hot Tools

Notepad++7.3.1
Easy-to-use and free code editor

SublimeText3 Chinese version
Chinese version, very easy to use

Zend Studio 13.0.1
Powerful PHP integrated development environment

Dreamweaver CS6
Visual web development tools

SublimeText3 Mac version
God-level code editing software (SublimeText3)
Hot Topics
 1387
1387
 52
52

 How to configure cloud server domain name in nginx
Apr 14, 2025 pm 12:18 PM
How to configure cloud server domain name in nginx
Apr 14, 2025 pm 12:18 PM
How to configure an Nginx domain name on a cloud server: Create an A record pointing to the public IP address of the cloud server. Add virtual host blocks in the Nginx configuration file, specifying the listening port, domain name, and website root directory. Restart Nginx to apply the changes. Access the domain name test configuration. Other notes: Install the SSL certificate to enable HTTPS, ensure that the firewall allows port 80 traffic, and wait for DNS resolution to take effect.
 How to start nginx server
Apr 14, 2025 pm 12:27 PM
How to start nginx server
Apr 14, 2025 pm 12:27 PM
Starting an Nginx server requires different steps according to different operating systems: Linux/Unix system: Install the Nginx package (for example, using apt-get or yum). Use systemctl to start an Nginx service (for example, sudo systemctl start nginx). Windows system: Download and install Windows binary files. Start Nginx using the nginx.exe executable (for example, nginx.exe -c conf\nginx.conf). No matter which operating system you use, you can access the server IP
 How to check nginx version
Apr 14, 2025 am 11:57 AM
How to check nginx version
Apr 14, 2025 am 11:57 AM
The methods that can query the Nginx version are: use the nginx -v command; view the version directive in the nginx.conf file; open the Nginx error page and view the page title.
 How to check the name of the docker container
Apr 15, 2025 pm 12:21 PM
How to check the name of the docker container
Apr 15, 2025 pm 12:21 PM
You can query the Docker container name by following the steps: List all containers (docker ps). Filter the container list (using the grep command). Gets the container name (located in the "NAMES" column).
 How to run nginx apache
Apr 14, 2025 pm 12:33 PM
How to run nginx apache
Apr 14, 2025 pm 12:33 PM
To get Nginx to run Apache, you need to: 1. Install Nginx and Apache; 2. Configure the Nginx agent; 3. Start Nginx and Apache; 4. Test the configuration to ensure that you can see Apache content after accessing the domain name. In addition, you need to pay attention to other matters such as port number matching, virtual host configuration, and SSL/TLS settings.
 How to check whether nginx is started
Apr 14, 2025 pm 01:03 PM
How to check whether nginx is started
Apr 14, 2025 pm 01:03 PM
How to confirm whether Nginx is started: 1. Use the command line: systemctl status nginx (Linux/Unix), netstat -ano | findstr 80 (Windows); 2. Check whether port 80 is open; 3. Check the Nginx startup message in the system log; 4. Use third-party tools, such as Nagios, Zabbix, and Icinga.
 How to create a mirror in docker
Apr 15, 2025 am 11:27 AM
How to create a mirror in docker
Apr 15, 2025 am 11:27 AM
Steps to create a Docker image: Write a Dockerfile that contains the build instructions. Build the image in the terminal, using the docker build command. Tag the image and assign names and tags using the docker tag command.
 How to start containers by docker
Apr 15, 2025 pm 12:27 PM
How to start containers by docker
Apr 15, 2025 pm 12:27 PM
Docker container startup steps: Pull the container image: Run "docker pull [mirror name]". Create a container: Use "docker create [options] [mirror name] [commands and parameters]". Start the container: Execute "docker start [Container name or ID]". Check container status: Verify that the container is running with "docker ps".
