

How Springboot integrates RabbitMQ message queue

Producer project
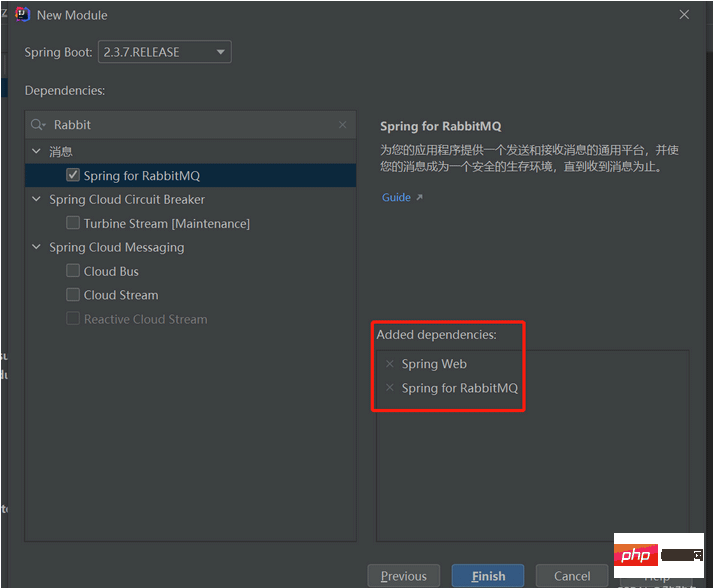
POM dependency
You can choose to add dependencies directly when creating the project.

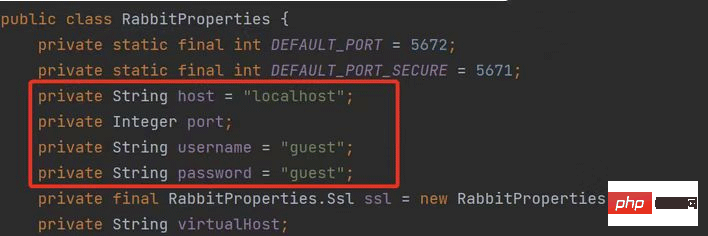
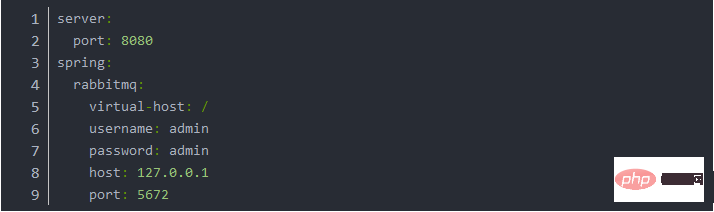
RabbitMQ configuration file:
When using related switches and queues, we need The implementation declares switches and queues. If there is no corresponding information, the startup project will fail. Therefore, when using springboot to integrate rabbitmq, we can use the configuration file to declare the switch and queue and bind the relationship between the two. Since Fanout mode is currently being demonstrated, FanoutExchange is used to declare the switch, and other modes use the corresponding TopicExchange and DirectExchange to declare.@Configuration
public class RabbitMQConfiguration {
//声明fanout模式的交换机
@Bean
public FanoutExchange fanoutExchange() {
return new FanoutExchange("fanout_order_exchange", true, false);
}
//声明队列
@Bean
public Queue smsQueue() {
return new Queue("sms.fanout.queue", true);
}
@Bean
public Queue emailQueue() {
return new Queue("email.fanout.queue", true);
}
@Bean
public Queue duanxinQueue() {
return new Queue("duanxin.fanout.queue", true);
}
//绑定
@Bean
public Binding smsBinding() {
return BindingBuilder.bind(smsQueue()).to(fanoutExchange());
}
@Bean
public Binding emailBinding() {
return BindingBuilder.bind(emailQueue()).to(fanoutExchange());
}
@Bean
public Binding duanxinBinding() {
return BindingBuilder.bind(duanxinQueue()).to(fanoutExchange());
}
}@Autowired
private RabbitTemplate rabbitTemplate;
public void makeOrder() {
// 保存订单
String orderId = UUID.randomUUID().toString();
System.out.println("下单成功:" + orderId);
// 通过MQ完成消息的分发
// 参数1:交换机 ;参数2:路由key/队列名;参数3:消息内容
String exchangeName = "fanout_order_exchange";
rabbitTemplate.convertAndSend(exchangeName, "", orderId);
}
}Consumer:
Consumer engineering is similar to producer engineering. We first need to introduce dependencies, and then make related changes in the application file configuration to start writing code. In the consumer project, we can also write rabbitmq configuration files to declare switches and queues. It is recommended to write the configuration file on the consumer side, because the consumer side is the first project to start. If the switch and queue are not created, the project startup will fail. Message listeningWe listen to the message queue through the RabbitListener annotation. It should be noted that we need to hand over the monitoring to spring management through Component annotation, otherwise we cannot receive messages from the server normally. Only one email message monitoring is given here. The duanxin and SMS queues declared by the producer above can be created by themselves. You only need to modify the queue name. @Service public class OrderService {@RabbitListener(queues = {"email.fanout.queue"})
@Component
public class FanoutEmailService {
@RabbitHandler
public void receive(String message) {
System.out.println("email fanout -----》接收到" + message);
}
}@SpringBootTest class SpringbootOrderRabbitmqProducerApplicationTests {
@Autowired
private OrderService orderService;
@Test
void contextLoads() {
orderService.makeOrder();
}
}
@Configuration
public class DirectRabbitMQConfiguration {

//声明direct模式的交换机
@Bean
public DirectExchange directExchange() {
    return new DirectExchange("direct_order_exchange", true, false);
}

//声明队列
@Bean
public Queue smsDirectQueue() {
    return new Queue("sms.direct.queue", true);
}

@Bean
public Queue emailDirectQueue() {
    return new Queue("email.direct.queue", true);
}

@Bean
public Queue duanxinDirectQueue() {
    return new Queue("duanxin.direct.queue", true);
}
//绑定

@Bean
public Binding smsDirectBinding() {
    return BindingBuilder.bind(smsDirectQueue()).to(directExchange()).with("sms");
}

@Bean
public Binding emailDirectBinding() {
    return BindingBuilder.bind(emailDirectQueue()).to(directExchange()).with("email");
}

@Bean
public Binding duanxinDirectBinding() {
    return BindingBuilder.bind(duanxinDirectQueue()).to(directExchange()).with("duanxin");
}
}@Service
public class OrderService {
@Autowired
private RabbitTemplate rabbitTemplate;
public void makeOrderDirect() {
// 保存订单
String orderId = UUID.randomUUID().toString();
System.out.println("下单成功:" + orderId);
String exchangeName = "direct_order_exchange";
rabbitTemplate.convertAndSend(exchangeName, "sms", orderId);
rabbitTemplate.convertAndSend(exchangeName, "email", orderId);
}
}Copy after login
ConsumerMessage monitoring is the same as above, just pay attention to the queue name. @Service
public class OrderService {
@Autowired
private RabbitTemplate rabbitTemplate;
public void makeOrderDirect() {
// 保存订单
String orderId = UUID.randomUUID().toString();
System.out.println("下单成功:" + orderId);
String exchangeName = "direct_order_exchange";
rabbitTemplate.convertAndSend(exchangeName, "sms", orderId);
rabbitTemplate.convertAndSend(exchangeName, "email", orderId);
}
}@RabbitListener(queues = {"email.direct.queue"})
@Component
public class DirectEmailService {
@RabbitHandler
public void receive(String message) {
System.out.println("email direct -----》接收到" + message);
}
}@Service
public class OrderService {
@Autowired
private RabbitTemplate rabbitTemplate;
public void makeOrderTopic() {
// 保存订单
String orderId = UUID.randomUUID().toString();
System.out.println("下单成功:" + orderId);
String exchangeName = "topic_order_exchange";
String routingKey = "com.email";
rabbitTemplate.convertAndSend(exchangeName, routingKey, orderId);
}
}@RabbitListener(bindings = @QueueBinding(
value = @Queue(value = "email.topic.queue",durable = "true",autoDelete = "false"),
exchange = @Exchange(value = "topic_order_exchange",type = ExchangeTypes.TOPIC),
key = "*.email.#"
))
@Component
public class TopicEmailService {
@RabbitHandler
public void receive(String message) {
System.out.println("email topic -----》接收到" + message);
}
}The above is the detailed content of How Springboot integrates RabbitMQ message queue. For more information, please follow other related articles on the PHP Chinese website!

Hot AI Tools

Undresser.AI Undress
AI-powered app for creating realistic nude photos

AI Clothes Remover
Online AI tool for removing clothes from photos.

Undress AI Tool
Undress images for free

Clothoff.io
AI clothes remover

AI Hentai Generator
Generate AI Hentai for free.

Hot Article
Hot Tools

Notepad++7.3.1
Easy-to-use and free code editor

SublimeText3 Chinese version
Chinese version, very easy to use

Zend Studio 13.0.1
Powerful PHP integrated development environment

Dreamweaver CS6
Visual web development tools

SublimeText3 Mac version
God-level code editing software (SublimeText3)
Hot Topics
 1386
1386
 52
52

 How to build a reliable messaging app with React and RabbitMQ
Sep 28, 2023 pm 08:24 PM
How to build a reliable messaging app with React and RabbitMQ
Sep 28, 2023 pm 08:24 PM
How to build a reliable messaging application with React and RabbitMQ Introduction: Modern applications need to support reliable messaging to achieve features such as real-time updates and data synchronization. React is a popular JavaScript library for building user interfaces, while RabbitMQ is a reliable messaging middleware. This article will introduce how to combine React and RabbitMQ to build a reliable messaging application, and provide specific code examples. RabbitMQ overview:
 How to use RabbitMQ to implement distributed message processing in PHP
Jul 18, 2023 am 11:00 AM
How to use RabbitMQ to implement distributed message processing in PHP
Jul 18, 2023 am 11:00 AM
How to use RabbitMQ to implement distributed message processing in PHP Introduction: In large-scale application development, distributed systems have become a common requirement. Distributed message processing is a pattern that improves the efficiency and reliability of the system by distributing tasks to multiple processing nodes. RabbitMQ is an open source, reliable message queuing system that uses the AMQP protocol to implement message delivery and processing. In this article we will cover how to use RabbitMQ in PHP for distribution
 Comparison and difference analysis between SpringBoot and SpringMVC
Dec 29, 2023 am 11:02 AM
Comparison and difference analysis between SpringBoot and SpringMVC
Dec 29, 2023 am 11:02 AM
SpringBoot and SpringMVC are both commonly used frameworks in Java development, but there are some obvious differences between them. This article will explore the features and uses of these two frameworks and compare their differences. First, let's learn about SpringBoot. SpringBoot was developed by the Pivotal team to simplify the creation and deployment of applications based on the Spring framework. It provides a fast, lightweight way to build stand-alone, executable
 Using RabbitMQ in Go: A Complete Guide
Jun 19, 2023 am 08:10 AM
Using RabbitMQ in Go: A Complete Guide
Jun 19, 2023 am 08:10 AM
As modern applications increase in complexity, messaging has become a powerful tool. In this area, RabbitMQ has become a very popular message broker that can be used to deliver messages between different applications. In this article, we will explore how to use RabbitMQ in Go language. This guide will cover the following: Introduction to RabbitMQ RabbitMQ Installation RabbitMQ Basic Concepts Getting Started with RabbitMQ in Go RabbitMQ and Go
 SpringBoot+Dubbo+Nacos development practical tutorial
Aug 15, 2023 pm 04:49 PM
SpringBoot+Dubbo+Nacos development practical tutorial
Aug 15, 2023 pm 04:49 PM
This article will write a detailed example to talk about the actual development of dubbo+nacos+Spring Boot. This article will not cover too much theoretical knowledge, but will write the simplest example to illustrate how dubbo can be integrated with nacos to quickly build a development environment.
 Solution for real-time data synchronization between Golang and RabbitMQ
Sep 27, 2023 pm 10:41 PM
Solution for real-time data synchronization between Golang and RabbitMQ
Sep 27, 2023 pm 10:41 PM
Introduction to the solution for real-time data synchronization between Golang and RabbitMQ: In today's era, with the popularity of the Internet and the explosive growth of data volume, real-time data synchronization has become more and more important. In order to solve the problems of asynchronous data transmission and data synchronization, many companies have begun to use message queues to achieve real-time synchronization of data. This article will introduce a real-time data synchronization solution based on Golang and RabbitMQ, and provide specific code examples. 1. What is RabbitMQ? Rabbi
 Application practice of go-zero and RabbitMQ
Jun 23, 2023 pm 12:54 PM
Application practice of go-zero and RabbitMQ
Jun 23, 2023 pm 12:54 PM
Now more and more companies are beginning to adopt the microservice architecture model, and in this architecture, message queues have become an important communication method, among which RabbitMQ is widely used. In the Go language, go-zero is a framework that has emerged in recent years. It provides many practical tools and methods to allow developers to use message queues more easily. Below we will introduce go-zero based on practical applications. And the usage and application practice of RabbitMQ. 1.RabbitMQ OverviewRabbit
 Golang RabbitMQ: Architectural design and implementation of a highly available message queue system
Sep 28, 2023 am 08:18 AM
Golang RabbitMQ: Architectural design and implementation of a highly available message queue system
Sep 28, 2023 am 08:18 AM
GolangRabbitMQ: The architectural design and implementation of a highly available message queue system requires specific code examples. Introduction: With the continuous development of Internet technology and its wide application, message queues have become an indispensable part of modern software systems. As a tool to implement decoupling, asynchronous communication, fault-tolerant processing and other functions, message queue provides high availability and scalability support for distributed systems. As an efficient and concise programming language, Golang is widely used to build high-concurrency and high-performance systems.
