

How to configure load balancing for TCP in Nginx server

1. Install nginx
1. Download nginx
# wget http://nginx.org/download/nginx-1.2.4.tar.gz
2. Download tcp module patch
# wget https://github.com/yaoweibin/nginx_tcp_proxy_module/tarball/master
Source code homepage: https ://github.com/yaoweibin/nginx_tcp_proxy_module
3. Install nginx
# tar xvf nginx-1.2.4.tar.gz
# tar xvf yaoweibin-nginx_tcp_proxy_module-v0.4-45-ga40c99a.tar.gz
# cd nginx-1.2.4
# patch -p1 < ../yaoweibin-nginx_tcp_proxy_module-a40c99a/tcp.patch
#./configure --prefix=/usr/local/nginx --with-pcre=../pcre-8.30 --add-module=../yaoweibin-nginx_tcp_proxy_module-ae321fd/
# make
# make install
2. Modify the configuration file
Modify the nginx.conf configuration file
# cd /usr/local/nginx/conf
# vim nginx.conf
worker_processes 1;
events {
worker_connections 1024;
}

tcp {
upstream mssql {
server 10.0.1.201:1433;
server 10.0.1.202:1433;
check interval=3000 rise=2 fall=5 timeout=1000;
}
server {
listen 1433;
server_name 10.0.1.212;
proxy_pass mssql;
}
}3. Start nginx
# cd /usr/local/nginx/sbin/
# ./nginx
View 1433 port:
#lsof :1433
4. Test
# telnet 10.0.1.201 1433
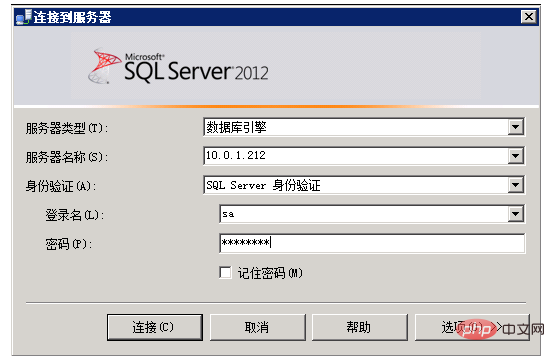
5. Use sql server client tool to test
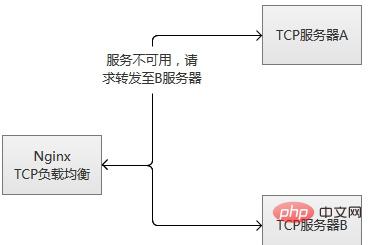
##6. The execution principle of tcp load balancing
When nginx receives a new client link from the listening port, it immediately executes the routing scheduling algorithm, obtains the specified service IP that needs to be connected, and then creates a new upstream connection. to the specified server.


ps: Service robustness monitoring
tcp load balancing module supports built-in robustness detection. If an upstream server refuses a tcp connection for more than the proxy_connect_timeout configured time, it will is considered to have expired. In this case, nginx immediately tries to connect to another normal server in the upstream group. Connection failure information will be recorded in the nginx error log. (2) Prepare "commonly used" data in advance, actively "preheat" the service, and then open access to the server after the preheating is completed.
The tcp load balancing module supports built-in robustness detection. If an upstream server refuses a tcp connection for more than the proxy_connect_timeout configured time, it will be considered to have failed. In this case, nginx immediately tries to connect to another normal server in the upstream group. Connection failure information will be recorded in the nginx error log.
If a server fails repeatedly (exceeding the parameters configured by max_fails or fail_timeout), nginx will also kick the server. 60 seconds after the server is kicked off, nginx will occasionally try to reconnect to it to check whether it is back to normal. If the server returns to normal, nginx will add it back to the upstream group and slowly increase the proportion of connection requests.
The reason for "slowly increasing" is because usually a service has "hot data", that is to say, more than 80% or even more of the requests will actually be blocked in the "hot data cache" , only a small part of the requests are actually processed. When the machine is just started, the "hot data cache" has not actually been established. At this time, a large number of requests are forwarded explosively, which is likely to cause the machine to be unable to "bear" and hang up again. Taking mysql as an example, more than 95% of our mysql queries usually fall into the memory cache, and not many queries are actually executed.
In fact, whether it is a single machine or a cluster, restarting or switching in a high concurrent request scenario will have this risk. There are two main ways to solve it:
(1) The requests gradually increase, from less to more, gradually accumulating hotspot data, and finally reaching normal service status.
(2) Prepare "commonly used" data in advance, actively "preheat" the service, and then open access to the server after the preheating is completed.
The principle of tcp load balancing is the same as that of lvs. It works at a lower level and its performance will be much higher than the original http load balancing. However, it will not be better than lvs. lvs is placed in the kernel module, while nginx works in user mode, and nginx is relatively heavy. Another point, which is very regrettable, is that this module is a paid function.
The above is the detailed content of How to configure load balancing for TCP in Nginx server. For more information, please follow other related articles on the PHP Chinese website!

Hot AI Tools

Undresser.AI Undress
AI-powered app for creating realistic nude photos

AI Clothes Remover
Online AI tool for removing clothes from photos.

Undress AI Tool
Undress images for free

Clothoff.io
AI clothes remover

AI Hentai Generator
Generate AI Hentai for free.

Hot Article
Hot Tools

Notepad++7.3.1
Easy-to-use and free code editor

SublimeText3 Chinese version
Chinese version, very easy to use

Zend Studio 13.0.1
Powerful PHP integrated development environment

Dreamweaver CS6
Visual web development tools

SublimeText3 Mac version
God-level code editing software (SublimeText3)
Hot Topics
 1386
1386
 52
52

 How to configure cloud server domain name in nginx
Apr 14, 2025 pm 12:18 PM
How to configure cloud server domain name in nginx
Apr 14, 2025 pm 12:18 PM
How to configure an Nginx domain name on a cloud server: Create an A record pointing to the public IP address of the cloud server. Add virtual host blocks in the Nginx configuration file, specifying the listening port, domain name, and website root directory. Restart Nginx to apply the changes. Access the domain name test configuration. Other notes: Install the SSL certificate to enable HTTPS, ensure that the firewall allows port 80 traffic, and wait for DNS resolution to take effect.
 How to check whether nginx is started
Apr 14, 2025 pm 01:03 PM
How to check whether nginx is started
Apr 14, 2025 pm 01:03 PM
How to confirm whether Nginx is started: 1. Use the command line: systemctl status nginx (Linux/Unix), netstat -ano | findstr 80 (Windows); 2. Check whether port 80 is open; 3. Check the Nginx startup message in the system log; 4. Use third-party tools, such as Nagios, Zabbix, and Icinga.
 How to create a mirror in docker
Apr 15, 2025 am 11:27 AM
How to create a mirror in docker
Apr 15, 2025 am 11:27 AM
Steps to create a Docker image: Write a Dockerfile that contains the build instructions. Build the image in the terminal, using the docker build command. Tag the image and assign names and tags using the docker tag command.
 How to check nginx version
Apr 14, 2025 am 11:57 AM
How to check nginx version
Apr 14, 2025 am 11:57 AM
The methods that can query the Nginx version are: use the nginx -v command; view the version directive in the nginx.conf file; open the Nginx error page and view the page title.
 How to start nginx server
Apr 14, 2025 pm 12:27 PM
How to start nginx server
Apr 14, 2025 pm 12:27 PM
Starting an Nginx server requires different steps according to different operating systems: Linux/Unix system: Install the Nginx package (for example, using apt-get or yum). Use systemctl to start an Nginx service (for example, sudo systemctl start nginx). Windows system: Download and install Windows binary files. Start Nginx using the nginx.exe executable (for example, nginx.exe -c conf\nginx.conf). No matter which operating system you use, you can access the server IP
 How to check whether nginx is started?
Apr 14, 2025 pm 12:48 PM
How to check whether nginx is started?
Apr 14, 2025 pm 12:48 PM
In Linux, use the following command to check whether Nginx is started: systemctl status nginx judges based on the command output: If "Active: active (running)" is displayed, Nginx is started. If "Active: inactive (dead)" is displayed, Nginx is stopped.
 How to start nginx in Linux
Apr 14, 2025 pm 12:51 PM
How to start nginx in Linux
Apr 14, 2025 pm 12:51 PM
Steps to start Nginx in Linux: Check whether Nginx is installed. Use systemctl start nginx to start the Nginx service. Use systemctl enable nginx to enable automatic startup of Nginx at system startup. Use systemctl status nginx to verify that the startup is successful. Visit http://localhost in a web browser to view the default welcome page.
 How to configure nginx in Windows
Apr 14, 2025 pm 12:57 PM
How to configure nginx in Windows
Apr 14, 2025 pm 12:57 PM
How to configure Nginx in Windows? Install Nginx and create a virtual host configuration. Modify the main configuration file and include the virtual host configuration. Start or reload Nginx. Test the configuration and view the website. Selectively enable SSL and configure SSL certificates. Selectively set the firewall to allow port 80 and 443 traffic.
