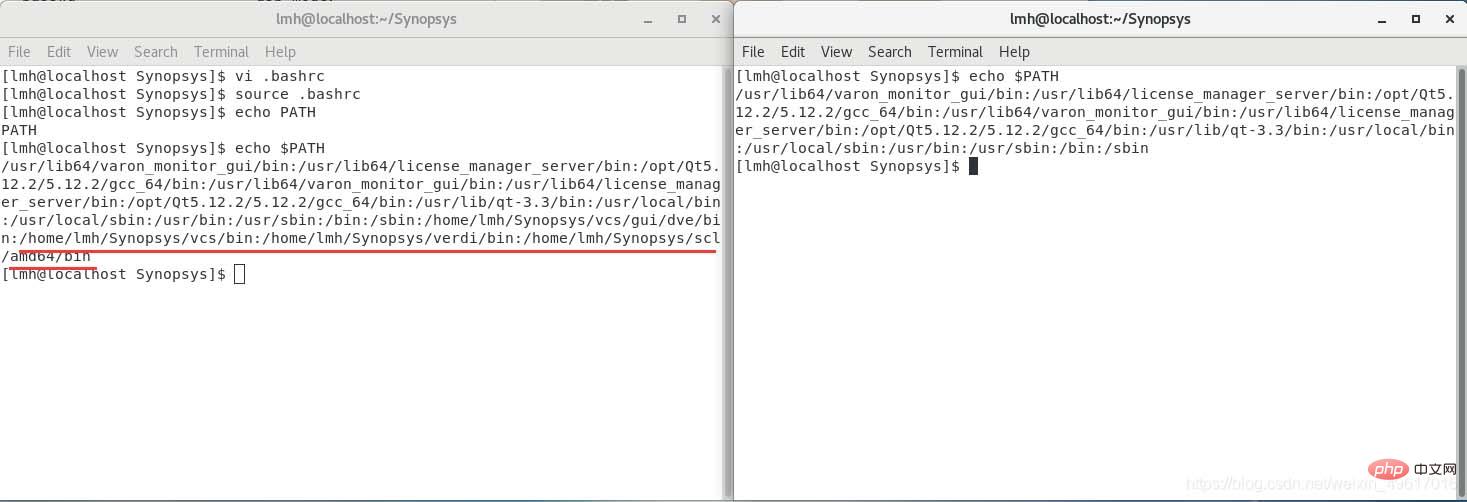
During the installation of VCS, original or reprinted blogs on CSDN will automatically say to modify .bashrc to set environment variables. Some Lazy bloggers even directly said that we need to set the environment variable balabala here. I didn’t know it at the time. I modified the .bashrc file directly in the directory where the installation package is located. The installation was successful. After the terminal source in that directory, It is also possible to open VCS packages such as verdi, but calling VCS from external software will never succeed. In the end it comes down to the issue of environment variables.
So here we need to explain the environment variables first. In other words, you want to call a file under a certain path in any path, but you can’t enter a lot of path names every time. At this time You need to use environment variables. Set the PATH under the relevant files (detailed below), that is, after setting the environment variables, you can directly call them by name no matter where or in which external application (generally compliant names do not conflict) Yes, of course there may be conflicts when different versions of the same software are installed, but the default one will generally be opened).
Here we mainly talk about the setting of the most common environment variables, PATH, and LD_LIBERARY_PATH, but after you understand what he means, they are all the same.
This PATH is the same thing as the PATH on Windows. If you want to open verdi directly without entering the path, just add the verdi path in PATH.
export SynopsysList=/home/lmh/Synopsys
export VERDI_HOME=$SynopsysList/verdi
export PATH=$PATH:$VERDI_HOME/bin
$ is a bit like a pointer. In addition to some proprietary names, you can define some common path names such as VCS_HOME and VERDI_HOME. They are mainly convenient for direct calls in other paths. Adding $ means calling The path, directly = is to redefine the path, so when defining PATH, the original path $PATH must be added, and the paths are connected with colons.
So it will be clearer if you look at this again. Alias is similar to define. On CentOS, it doesn’t matter if I add or not quote single quotes or double quotes. Finally, lmg_vcs can activate the license.
export SynopsysList=/home/lmh/Synopsys
export DVE_HOME=$SynopsysList/vcs/gui/dve
export VCS_HOME=$SynopsysList/vcs
export VERDI_HOME=$SynopsysList/verdi
#dve
export PATH=$PATH:$VCS_HOME/gui/dve/bin
alias dve="dve -full64"
#VCS
export PATH=$PATH:$VCS_HOME/bin
alias vcs="vcs -full64"
#VERDI
export PATH=$PATH:$VERDI_HOME/bin
alias verdi="verdi -full64"
#scl
export PATH=$PATH:$SynopsysList/scl/amd64/bin
export VCS_ARCH_OVERRIDE=linux
#LICENCE
export LM_LICENSE_FILE=27000@localhost.localdomain
alias lmg_vcs="lmgrd -c $SynopsysList/vcs/license/Synopsys.dat"
By the way, generally the license that needs to be activated manually needs to be hung. Of course, there are also lazy ways to directly modify the /etc/rc.d/rc.local file and add it to it. I don’t understand the LD_LIBERARY_PATH method. It’s better to activate it manually.
bash is the bash of the shell. There are many on CSDN. You can learn it casually. rc is the run command, literally.
There is also a .bashrc file. I don’t quite understand the difference between it and this .bashrc. I tried changing the PATH in the .bashrc and source it, but the PATH did not change. There is no difference between the two on this website. .

As shown in the picture above, after opening the shell under this path, there is no vcs, etc. path, but source .bashrc will show the path to vcs when you check $PATH later. At this time, you can directly enter the VCS command you need to enter, but it is only limited to the terminal window on the left, not the right.
The .bashrc file in the subdirectory will not be preloaded or shared. It is only for the current terminal window of the current user. Each call is equivalent to having to source the .bashrc file in this path yourself. . Somewhat similar to temporary environment variables.
So if you are generally required to set environment variables, you still need to change ~/.bashrc or /etc/profile
The following explains the difference between the two:
~/ is to enter the current user’s home directory. That is, the path of /home/
.bashrc is to enter the .bashrc folder, which is the directory whose name is .bashrc in the user directory.
To understand the difference between bashrc and profile, we must first understand what are interactive shells and non-interactive shells, and what is login shell and non-login shell.
Interactive mode means that the shell waits for your input and executes the commands you submit. This mode is called interactive because the shell interacts with the user.
This mode is also very familiar to most users: Log in, execute some commands, and log out. When you sign out, the shell terminates.
The shell can also run in another mode: Non-interactive mode. In this mode, the shell does not interact with you, but reads commands stored in files and executes them. When it reaches the end of the file, the shell terminates.
Both bashrc and profile are used to save the user's environment information, bashrc is used for interactive non-login shell, and profile is used for interactive login shell.
There are many bashrc and profile files in the system. The following mainly distinguishes two types (generally, only these two types of environment variable settings are used):
/etc/profile This file sets environment information for each user of the system. When the first user logs in, this file is executed. And collect shell settings from the /etc/profile.d configuration file.
~/.bashrc: This file contains bash information specific to a user's bash shell. This file is read when the user logs in and every time a new shell is opened. Pick.
In addition, the variables (global) set in /etc/profile can be applied to any user, while the variables (local) set in ~/.bashrc, etc. can only be inherited. The variables in /etc/profile have a "father-son" relationship.
The above is the detailed content of How to modify ~/.bashrc or /etc/profile to set environment variables in Linux. For more information, please follow other related articles on the PHP Chinese website!


